8 Fixes on No Restore Points Have Been Created in Windows 10
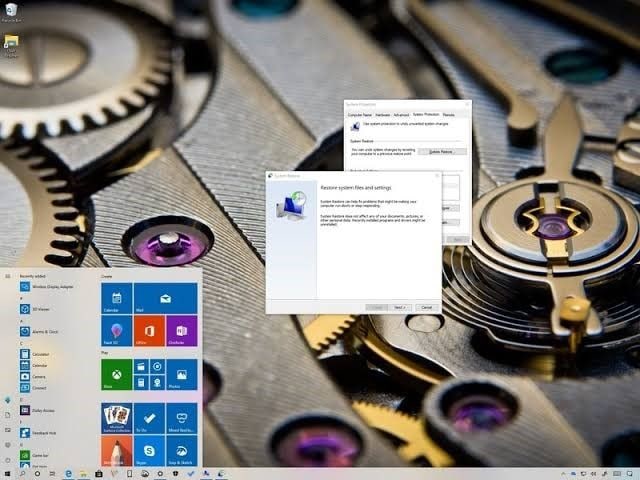
Are you are wondering how you can create a restore point in your Windows 10? Here, you will learn 8 major fixes for the error message "No restore points have been created in Windows 10". Also, you will get a comprehensive knowledge about what system restore points are, why they are useful to you, and why they are missing in your Windows 10. Finally, you will learn how to use the expert Recoverit Data Recovery tool to recover lost data after you have done a system restore on your Windows 10.
What Can System Restore Points Do for You?
What this built-in Windows feature does is to undo changes that you may have made to your PC so that it can go back to its earlier state. You can do a system restore to previous files or versions of system folders, settings, installed applications, and even Windows Registry. This is unlike the "Undo" Ctrl + Z shortcut that you use when working on a file on Windows. System restore reverts previous Windows settings and files even after you may have shut down your system and restarted it.
Note that this feature does not work for your folders such as videos, music, documents, etc.; it only works for Windows files.
Why is System Restore Points Missing in Windows 10?
The error message of "system restore points is missing" in Windows 10 may likely appear when you are attempting to restore your PC to a date that's earlier than the time of restoration. The following are possible causes of the error:
- It can be due to insufficient space on your Local Drive C: which makes the creation of a restore point on Windows 10 impossible. Your system may automatically delete all former restore points once the maximum capacity has been reached.
- You may have manually disabled System Restore Point or it is disabled by default. This is a major reason it's missing in your Windows 10
- If you have recently done a Windows update, it is possible that it can affect the previous settings of your system, thereby causing the system to restore points to get missing
- Another reason for system restore points missing in Windows 10 is an accidental deletion of the restore point feature from your system, especially if you have such utility as Disk Cleanup
- Your Page File may be highly defragmented. A quick way to know that this is the cause is to check if your system restore points get deleted after each restart of your computer.
How to Fix Missing System Restore Points in Windows 10
The following eight solutions will guide you on how to fix no system restore points in your Windows 10. Attempt to use each of the solutions until you find what works for you:
Fix #1: Enable System Restore
This is quite straightforward. Remember that one of the reasons why your system restore points are missing is because it has been disabled right? Use the following steps to check and enable the feature once again:
- From the "Control Panel" window, click on "System". Move your cursor to the left panel and select the "System protection" option
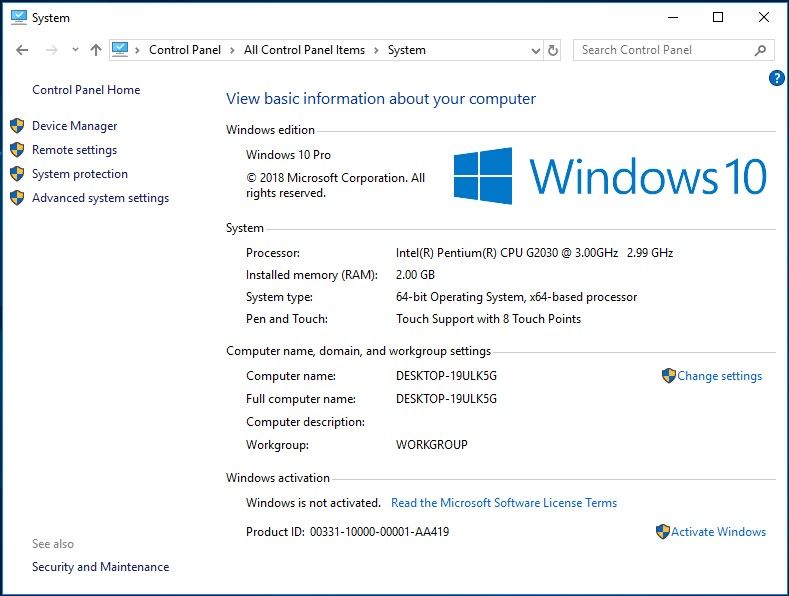
- A new window labeled "System Properties" will appear. Click on the tab for "System Protection", then choose the drive you want to peruse. Here, you need to enable system protection by choosing "Configure"
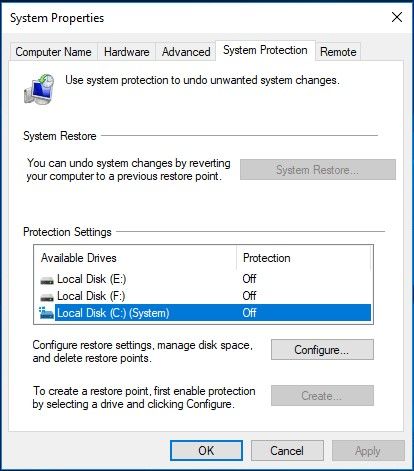
- Of the two options that you see in the new window, tap on "Turn on system protection", then choose "OK" to complete the action
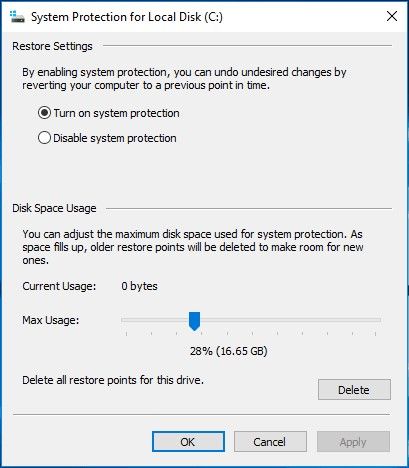
- Now you can create another system restore point.
Fix #2: Check HDD Disk Space
This solution handles the problem of disk space on your system whereby you can learn how to adjust your disk space so that the restore points that have been created will not be deleted just to make a room or enough space for a new one. Now, follow these two steps:
- Visit the "System Protection" tab as shown above. Place your cursor above the line beside "Max Usage" and drag it to the right. This will create more space for the System Restore point
- Now, continue by choosing "OK"
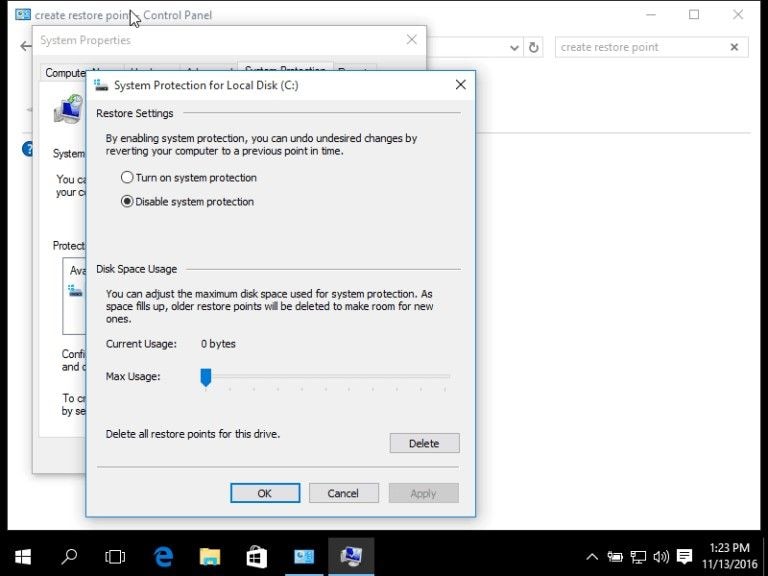
If the cause of your problem is insufficient space, then this solution should work. If it doesn't, don't give up! Try the next solution
Fix #3: Run CHKDSK, SFC
CHKDSKK and SFC are both utilities with which you can check your hard disk's integrity and system files respectively. Once any errors are found, these tools fix them. Windows 10 has both as inbuilt features so you can access them in fixing this error of restore points missing.
You can run CHKDSK from Command Prompt, an installation disk, and "My Computer". In order not to bore you with so much, you will be shown how to run it from Command Prompt
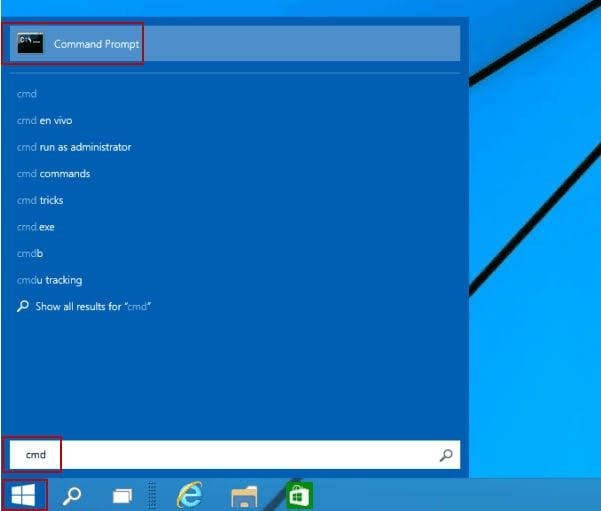
- On your keyboard, hit the key representing Windows and this should open your system's "Start" menu
- Choose the "Search" field and in there, input "cmd". Command Prompt will appear. Right-click it
- Select the option "Run as administrator" and you will log in as such
- In the new interface for Command Prompt, type in the following command and hit the key "Enter": chkdsk C: /f /r /x
- If your C: drive is in use, you can type "Y" instead so that when your PC restarts next, the utility will run a scan
Alternatively, you can use SFC (System File Checker) using the same Command Prompt. So once you have logged into the Command Prompt window as above, do the following:
- Input this command instead:
sfc /scannow
- Press the "Enter" key and wait while this tool scans all through your system to find errors and fix them.
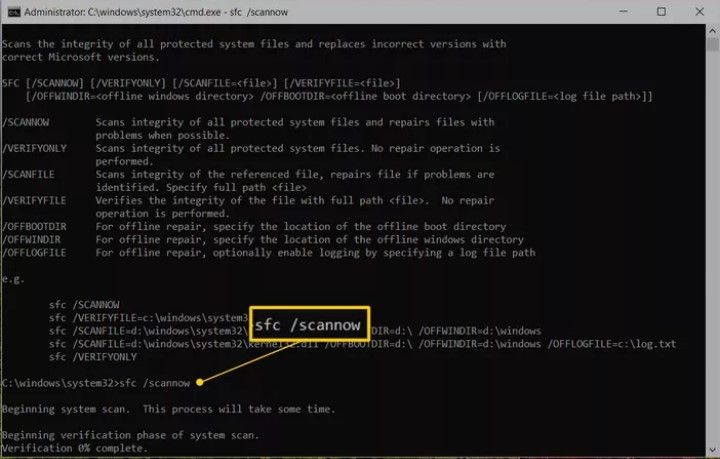
- Restart your system and check to see if the error has gone. You may need to repeat either of the scans you choose several times to get the ultimate desired solution
Fix #4: Check Volume Shadow Copy
With Volume Shadow Copy, you can make back-ups of your files and application data even while still using them. If this feature has been disabled or is not working properly, chances are that it can cause restore points to get missing. Now to deal with this challenge, do the following:
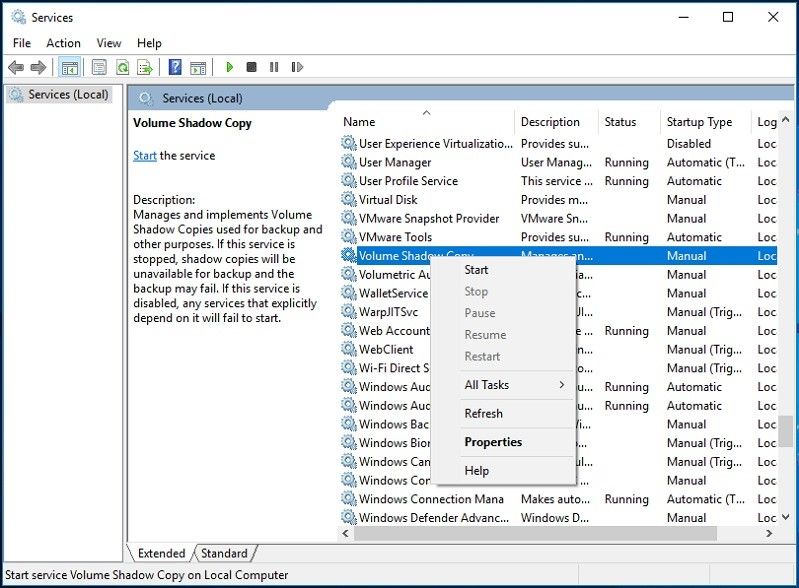
- Go to the "Run" dialog box by hitting the keys "Win" + "R" at the same time on your keyboard. In the box, input the instruction "services.msc" and tap the "OK" button

- From the list you see, check "Volume Shadow Copy" to ascertain if it is running. If this is not the case, then you need to right-click the option, then select "Start". This should fix the error as you can now create a system restore point.
Fix #5: Check Page File for Fragmentation
Check if your page file is fragmented, as well as fix the issue by disabling and recreating page file with the steps below:
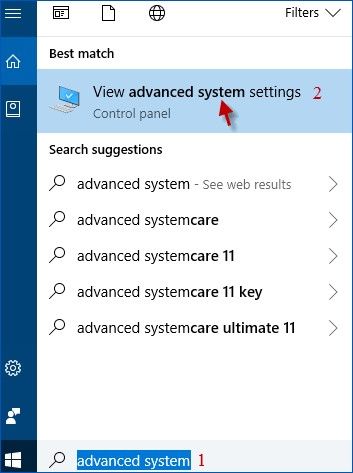
- Search for, and launch "Control Panel". Input "advanced system settings" in the search box
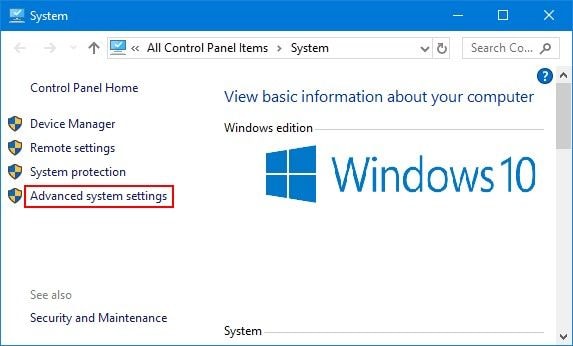
- Click to "View advanced system settings"
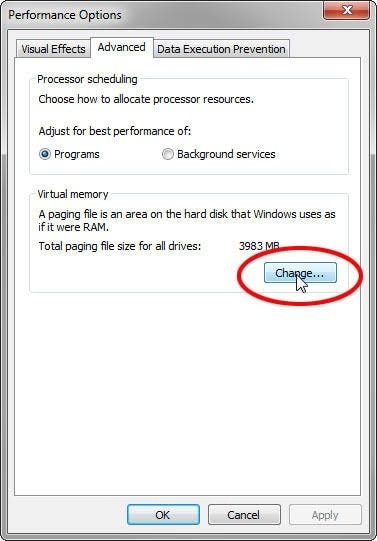
- Go to "Performance" > "Settings"
- Under the "Virtual Memory" tab, choose "Change"
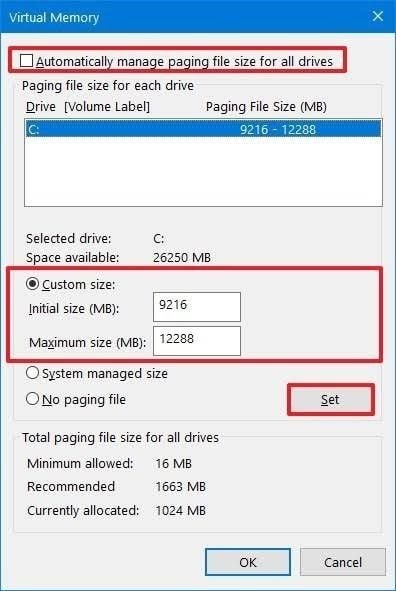
- If your main system drive is "C:" for instance, choose it and select "No paging file"
- Select "Set", then thrice, click on "OK". This will take you out of the menu you are presently in
- Restart your system
- Choose to "Start". To launch Command Prompt, type the short form "cmd"

- In the Command Prompt window, type the instruction (if c: is your drive letter. If it isn't, replace with your drive letter where applicable);
defrag /h c:
- To enable your page file, go back to "Control Panel", use the steps above, and where you selected "No paging file", deselect it. Again, to exit, click the "OK" tab thrice.
- Restart your system before doing anything else
Fix #6: Change Triggers in SR Properties
This fix centers around steps on how to change triggers in SR properties. You can achieve this using the steps below:
- In Windows 10 search box, input this: "Task Scheduler". Enter the program's main interface by opening it
- You will see a folder representing the Task Schedule Library. Uncover it and click on "Microsoft"
- Move to "Windows" and select "System Restore"
- After following the path above, hove over the top pane and choose the "SR" option there to go to its main interface
- Now choose "Triggers" from the lineup of tabs
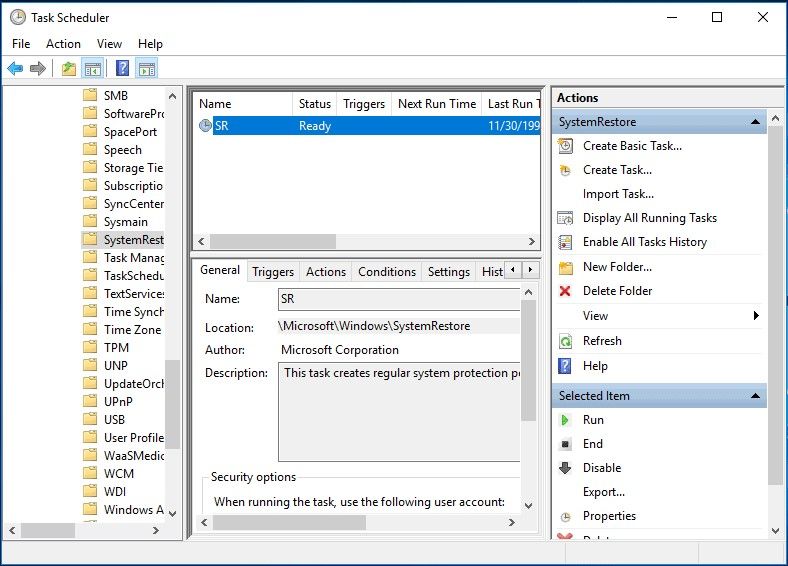
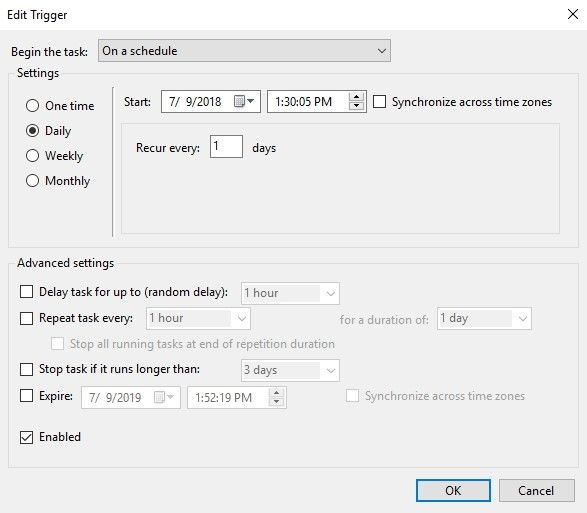
- You can choose to either add trigger using the "New" button or change triggers by choosing the "Edit" option after clicking a trigger that already exists. Now, using the schedule that is already predefined, a system restore point will be automatically created. To continue with this method, choose "OK"
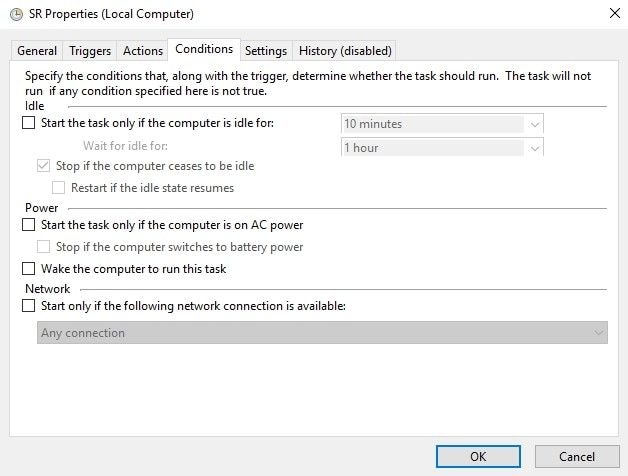
- Click to uncheck the following: "Start the task only if the computer is on AC power" and "Start the task only if the computer is idle for". Specify what conditions you want by selecting "Conditions". Once all of these are in order, choose to continue by clicking "OK".
- Exit this interface and go ahead in creating a new system restore point
Fix #7: Check and Remove Suspicious Viruses, Programs
This solution is meant to deal with any viruses or malware programs you may be suspected to have on your system. If you are suspecting any software of erasing your system restore points, then you need to check for and remove them before they get any chance to revert to the previous computer state again.
You can do this by installing antivirus, if you do not already have one, and using it to scan your system for any culprit to be removed. Once you have successfully removed every malicious program or software from your system, it is time to recreate your system restore point.
Fix #8: Manually Perform System Restore via Safe Mode
If your system restore point is missing on your Windows 10, you can manually perform a system restore using your computer's Safe Mode. This way, you can get back any previous Windows files or settings you want without exposing your computer while doing so: this is the essence of the Safe Mode. Do this using the steps outlined as follows:
- Start or boot your PC
- Before you see the logo representing Windows on your screen, quickly press the key "F8"
- Choose the option "Safe Mode with Command Prompt" from the in the "Advanced Boot Options" window
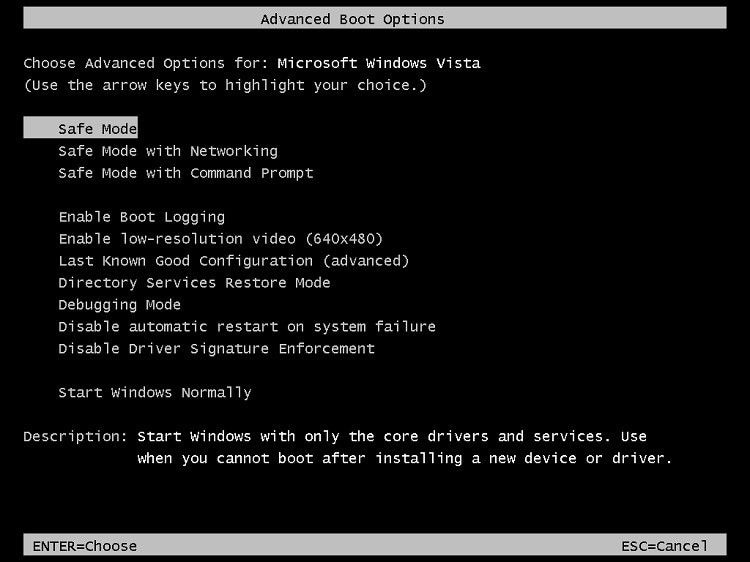
- Hit the key "Enter" on your keyboard
- Type the following command and press "Enter" again:
rstrui.exe
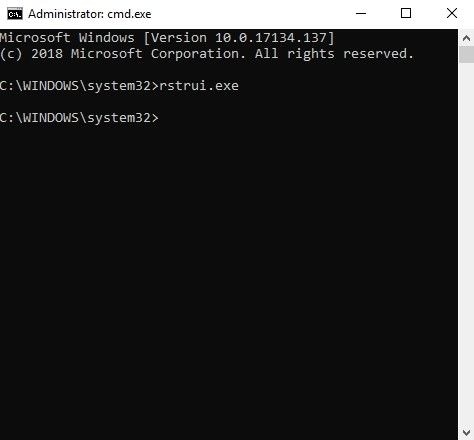
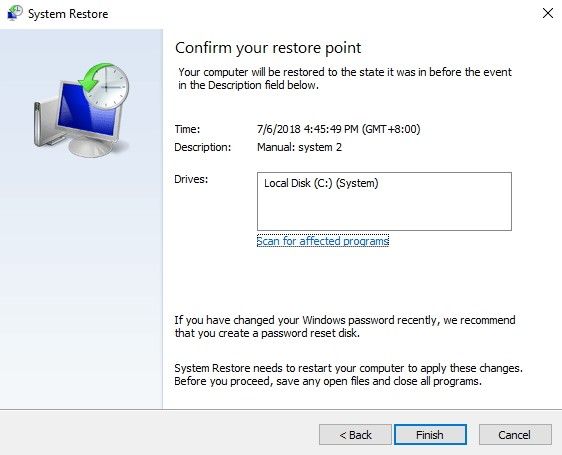
- You will receive instructions for your System Restore once you select a restore point that is available on the list provided for you. Choose "Next"

- Confirm your choices and click "Finish". This will restore your PC
How to Recover Lost Data after System Restore on Windows 10
After you have succeeded in creating and doing a system restore on your Windows 10, you may end up losing some data or files. With the help of an effective tool like Recoverit Data Recovery, you can retrieve all your lost data. This tool is compatible with all the versions of the Windows operating system, as well as Mac OS, therefore you can use it for your Windows 10.
Apart from data loss during system restore, other data lost from crashed systems, card errors, virus infection, formatted drives, etc, can be recovered with this software. All you need to do is download the app, install it, and follow the guidelines below to retrieve back your files:
Step 1: Select a Location
Click on the location where you wish to retrieve your lost data from

Step 2: Scan the Location
Click the "Start" button and let the tool scan for lost files

Step 3: Preview and Save Recovered Files
Use the Preview feature to view all recovered files and click "Recover" to save them

The Bottom Line
With a system restore point, it is easy to get bac previous Windows files. Thus, it is understandable that you may have been worried when you saw the error message saying no restore points have been created on your Windows 10. By now, your worry should be gone right? After all, you have been given eight fixes to this problem; if one doesn't work, another just might.
Computer Troubleshooting
- Win System Crash
- Windows Tips
- Computer Problems
- Blue Screen Errors


 ChatGPT
 Perplexity
 Google AI Mode
 Grok
Grok


David Darlington
staff Editor