
Jun 08, 2026 • Filed to: Windows Computer Solutions • Proven solutions
 TL;DR:
Resolve the VirtualBox "No Bootable Medium Found" error by properly mounting a valid ISO image to an IDE controller, configuring the correct boot priority, or enabling the Live CD/DVD attribute.
● If your VM's storage device controller is configured as SATA, the boot image may fail to load; bypass this by navigating to Settings > Storage, adding an IDE controller, and attaching your virtual optical drive and ISO image directly to it.
● Correct an improper boot sequence by opening Settings > System > Motherboard and using the arrow keys to move the designated boot device to the top of the Boot Order list.
● When attempting to boot via a live disc, verify the virtual drive is not marked as empty in the Storage menu and explicitly check the Live CD/DVD attribute box before selecting your chosen virtual optical disk file.
Ask AI for a summary
 ChatGPT
 Perplexity
 Gemini
 Claude
 Grok
Grok
The Oracle VM VirtualBox revolutionized the use of virtual machines when it was first released. The cross-platform visualization application is now being commonly used in most modern computers as a machine emulator and visualizer. Its diversity to be used on almost all major OS, including Windows, Mac, Linux, and Solaris, serves it great advantages.
However, many users have recently encountered the “VirtualBox: No Bootable Medium Found” error while trying to create a new VM. In the following read, you shall acquire all the necessary information needed to tackle the issue firsthand. Keep reading to learn more on what might possibly cause the issue and how to fix it.
Part 1: What Might Cause the No Bootable Medium Found Issue
If you are facing the no bootable medium found issue with your VirtualBox, it is important to look at plausible explanations for the error to arise before jumping to the fixes. The problem might be a result of various different reasons. Some of them are mentioned below.
📊 Diagnostic Profile: VirtualBox Storage Architecture Failures
Before adjusting your hypervisor properties, use this classification table to diagnose why VirtualBox cannot discover a valid boot configuration:
| Virtualization Root Cause | Storage Subsystem Affected | Error Trigger Mechanism | Target Optimization Resolution |
| 01. Empty Virtual Optical Storage Attachment | Storage Controller (IDE/SATA) | The drive has no digital media (.ISO) mounted to the attachment slot. | Map a valid operating system installer image inside VirtualBox Storage settings. |
| 02. Incorrect Storage Controller Layout | Storage Controller Driver | The .iso file is attached to a storage controller driver missing legacy emulation rules. | Manually provision an independent IDE Controller layout layer. |
| 03. Misconfigured Boot Device Order Priority | Guest Motherboard Firmware | The system searches an empty virtual floppy or disk partition before checking the bootable volume. | Re-order the boot stack priority inside the Motherboard subsystem menu. |
| 04. Corrupted or Incomplete ISO Download | File System Metadata | The installation image has a broken header layout or an invalid MD5 checksum. | Re-download the target Linux distribution or Windows installation media file. |
Part 2: Fixing the VirtualBox: No Bootable Medium Found Issue
Below are some effective methods which you can use to fix your VirtualBox no bootable medium found error.
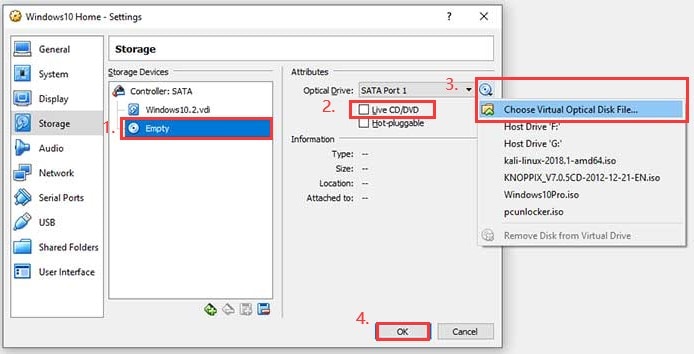
Method 1: Manually Add an IDE Controller
If your virtual machine configuration lacks a default virtual optical hardware stack, or if your `.iso` image fails to boot from a SATA assignment slot, use this structural sequence to build a clean boot path:
- Access Virtual Storage Parameters: Power off the target virtual machine completely. In the primary VirtualBox manager interface dashboard, highlight your virtual machine, navigate to the top toolbar, and click Settings.
- Initialize Storage Architecture Panels: From the left-hand navigation menu column, click the Storage tab. This reveals your active storage tree layout, featuring your main hard disk image and your controller pathways.
- Inject an Independent IDE Controller Stack: Look at the storage devices panel. Click the Add Storage Controller icon (the green plus sign over the disk graphics) and choose Add IDE Controller from the context dropdown menu list.
- Provision a Virtual Device Attachment Point: Highlight the newly generated Controller: IDE root branch directory layer. Click the Add Optical Drive icon located right beside the controller name.
- Mount your Operating System ISO File: In the prompt window overlay, click Add, browse your local host computer storage directories to locate your installer
.isofile, highlight the asset, and click Choose. - Lock Configuration and Initialize Boot Sequences: Verify that your ISO file is listed cleanly beneath the IDE controller structure tree layout. Mark the Live CD/DVD checkbox parameter active if required, click OK to save the state, and hit Start to run your VM boot sequence.
Method 2: Check the Bootable Medium
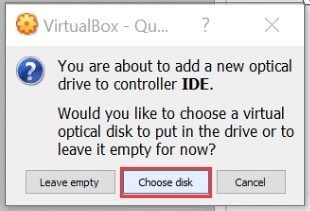
You can check if the bootable medium is properly or if the optical drive is empty. To do so in your VM, follow the steps given below.
- Insert an appropriate bootable media into your virtual CD/DVD drive of the VM. Then, restart it.
- Open your VirtualBox. In the main interface, select your VM and go to "Machine." From there, select "Settings" and open "Storage."
- In the window, check if the bootable optical disk or the ISO image is inserted into the virtual optical drive or CD/DVD disk drive properly.
- In case the optical drive in the VM is empty, select "Choose Virtual Optical Disk" and click on "OK." You can also select the host optical drive that contains the CD/DVD disk drive.
- Once the correct boot disk image is inserted, restart the VM to see if the error has gone away.
Method 3: Fix the Boot Order
If your boot order is incorrect in the VM settings, you will need to change the boot order in order to get rid of the “no bootable medium found” error in your VirtualBox. To do so, follow as mentioned below.
- Open VirtualBox, select your VM, and navigate to "Machine." From there, open "Settings."
- From the window, select the “System” option from the left side and go to the “Motherboard” tab.
- Under the “Boot Order” section, select an entry such as Hard Disk and change the boot order by pressing the up and down arrow keys.
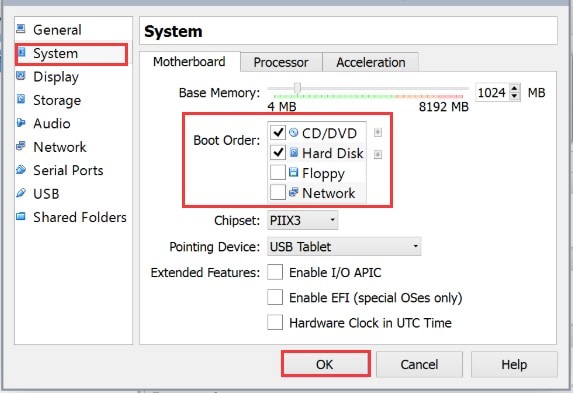
- Finally, click on “OK” to save changes. You can also disable an entry by deselecting the checkbox.
Method 4: Check the Live CD/DVD Box
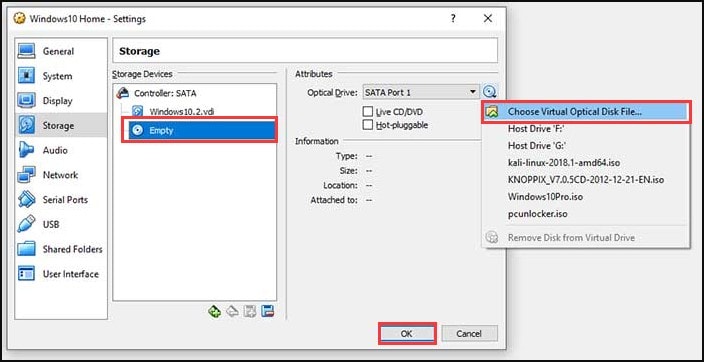
If you are booting your VM via a live CD/DVD disc, it might be that the live CD/DVD option is not selected, and thus the virtual CD/DVD drive of the VM appears to be empty. This can cause the no bootable medium found error. To fix this, proceed as the following steps indicate.
- Open your VM. Navigate to "Machine" and then to "Settings." From the left side, go to the "Storage" option.
- Under the "Storage Devices" section, a CD/DVD icon would be visible with the word "Empty," indicating that the virtual optical drive is empty.
- In the "Attributes" section, a checkbox will be visible reading as "Live CD/DVD." Select the box.
- In the “Optical Drive” option, click on the CD icon that is next to it, and select “Choose virtual optical disk file” from the drop-down menu.
- Finally, click on OK and exit the window. Your error should disappear.
Part 3: Some Useful Tips to Avoid the Issue
The above-mentioned methods will surely help you get rid of the problem in your VirtualBox. However, it is still advisable to take up some common practices which will help you actively avoid the problem. Take a look at the tips mentioned below to avoid any problem in your VirtualBox from arising at all.
🖥️ Performance Tuning: Hypervisor Resource Allocations
To ensure your virtual storage systems load installer images quickly without timed-out boot failures or black-screen crashes, optimize your host ecosystem variables using this resource grid:
| Subsystem Component | Baseline Configuration | Advanced Optimization Target | Direct Virtual Machine Return |
| 01. Host Storage Hardware | Mechanical HDD Drive | Solid-State Drive (SATA / NVMe SSD) | Accelerated disk I/O operations; eliminates boot media timeout errors. |
| 02. System Memory (RAM) | 2 GB Base Assignment | 50% of available Physical Host RAM | Prevents guest operating system memory starvation failures. |
| 03. Processor Allocation | 1 vCPU Core | 2 to 4 Virtual CPU Cores (Green Zone) | Smooths concurrent thread execution workloads within the hypervisor engine. |
| 04. Virtual Extensions | Default Drivers | VirtualBox Guest Additions Iso Package | Enables shared clipboards, display auto-resizing, and mouse pointer integration. |
| 05. Host Power Management | Balanced Profile Plan | High-Performance System Profile | Eliminates hardware throttling loops that bottleneck processing speeds. |
The Bottom Line
The VirtualBox is a great utility that enables its users to run multiple operating systems simultaneously on a single computer. But like any other material thing, it can face issues. The "no medium found" is a rather commonly occurring issue that users have faced with their VirtualBox.
Now, if you encounter this error while trying to make a new virtual machine, you know what to do. First, identify the cause of the problem. Then work your way through the above-mentioned methods to effectively get rid of the issue. And don't forget to make these tips and techniques a common practice to ensure the smooth and trouble-free running of your VirtualBox.
Frequently Asked Questions (FAQs)
- How do you open an ISO image in VirtualBox?
To open an ISO image in VirtualBox, attach your ISO image to the VirtualBox. Then, go to the main menu and navigate to "Settings." From the left side, go to the "Storage" tab, and under "Controller IDE," click on "Empty." Next, select the CD/DVD icon and tap on "Choose virtual CD/DVD disk file." Finally, select the ISO file that you wish to open.
- Can you run a virtual machine on Windows 10 Home?
Yes, Windows 10 Home can run various third-party visualization software, including VB or VMware. However, Windows 10 Home does not allow access to Microsoft Hyper-V feature as it is only available in the Pro edition.
- How can you select a startup disk in VirtualBox?
In order to select a startup disk in VirtualBox, click on the "Start" button in the toolbar. From the window that pops up, click on "Select Startup Disk." Then you can select your ISO image and click on "Start."
Computer Troubleshooting
- Win System Crash
- Crack Bios Password
- Fix Run Dll Errors
- Fix Taskbar Disappeared Error
- Fix BootMGR Image Corrupt
- MBR Errors Fixed
- Windows Tips
- How to Edit DLL Files
- How to Test Hard Drive Speed
- Bootcamp Windows 10 No Sound Issue
- Download iCloud on PC
- Difference between File Systems
- Fix Computer Overheat
- Computer Problems
- Best Bad Sector Repair Tools
- Audio Not Working in Windows 10
- Fix Windows 10/11 Error Code 0xc000014c
- Fix Windows 10 Error Code 0xc0000034
- SMART Status Bad Error
- Fix Grub Loading Error
- Remove Admin Password
- Blue Screen Errors


Theo Lucia
chief Editor