8 Methods to Resolve Windows 10 Error Code 0xc00000e
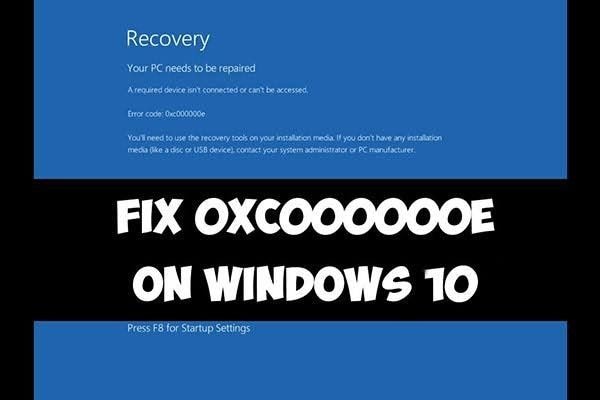
If you are faced with the error code 0xc00000e, then it could be because of such factors as a drive configuration that is incorrect or due to hardware failure. It could also be because your operating system cannot locate its boot location or the winload.exe file is corrupt and therefore, inaccessible.
To be able to deal with all these factors and fix the error code 0xc00000e, you need to follow carefully, the methods outlined in this article.
How to Resolve the Windows 10 Error Code 0xc00000e
With the following methods, you can fix the recovery error code 0xc00000e. Now, the method you opt to use will be determined by the cause of the error in your PC's case.
Video tutorial: Fix Windows 10 Error Code 0xc00000e
Method 1: Check Physical Device Connections
Start by checking if there are any external devices connected to your PC. This method is important because if the BIOS or UEFI are configured in such a way that the external device is higher on the scale of boot order of preference than your computer's hard disk, then it will affect the booting process. Your computer will be trying to boot into the external disk, instead of into your system's hard disk. This could lead your computer to boot into this error code 0xc00000e.
Examples of external devices that could cause such issues including CDs, Pen Drivers, DVDs, other USB Storage Devices, and so on.
Method 2: Rebuild BCD File
The Boot Configuration Data (BCD) file contains the parameters for the boot configuration, such parameters indicate how to boot your Windows operating system. Thus, a corrupt BCD will pose a problem to your PC, leading to this error.
To rebuild your BCD file, you need to create a bootable medium from ISO, insert it into your Windows 10 computer, and follow the steps below:
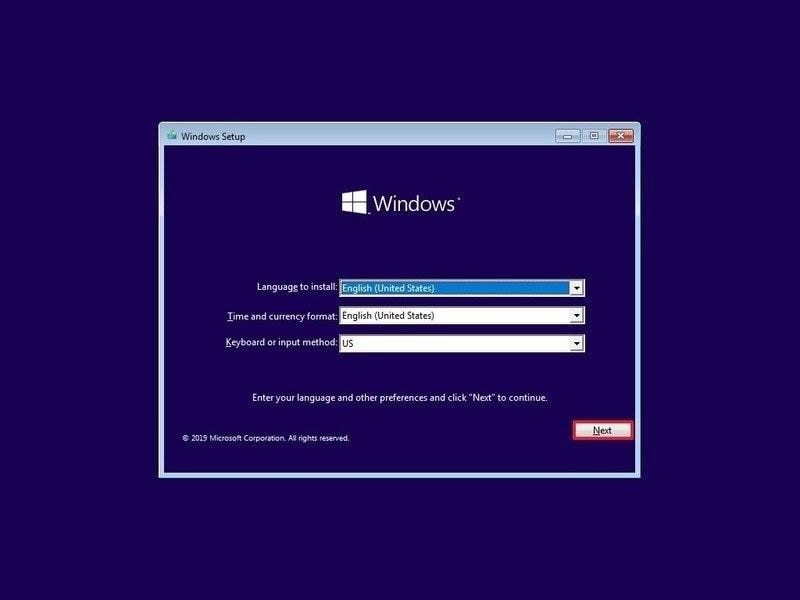
- Once your computer is booting from the bootable medium you have created, choose the "Next" button you see at the bottom right of the screen.
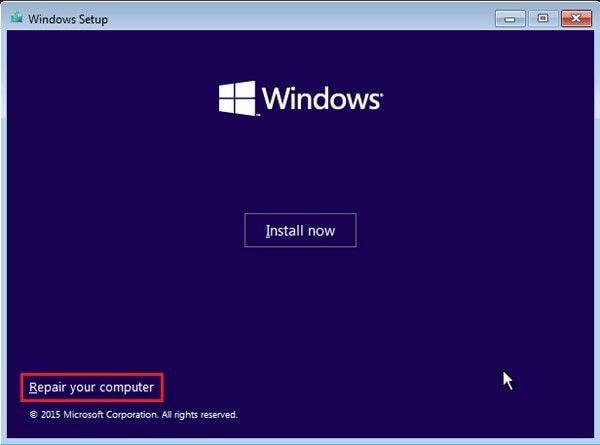
- Click on "Repair your computer", the link which is located at the bottom left of your screen so you have to watch out. Do not be tempted to click the "Install now" button which is obviously at the center of the screen because that will lead you to a fresh installation of your Windows 10 OS.
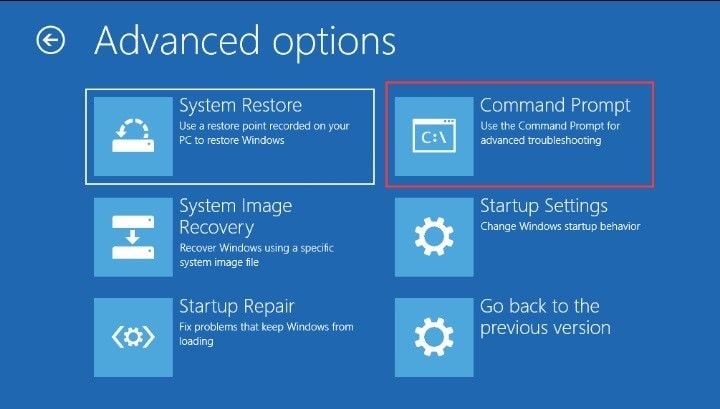
- Select to begin "Troubleshoot"; then choose the "Command Prompt" tab in the list beneath the "Advanced options" window.
- To continue, choose the account you are currently using.
- Type in your computer's password if you have one.

- Input this command: bootrec /rebuildbcd. Now, hit the "Enter" key.
- When the installation is found for Windows, go to your keyboard and press the letter "Y". This will enable it to boot from the list and consequently rebuild your system's BCD.
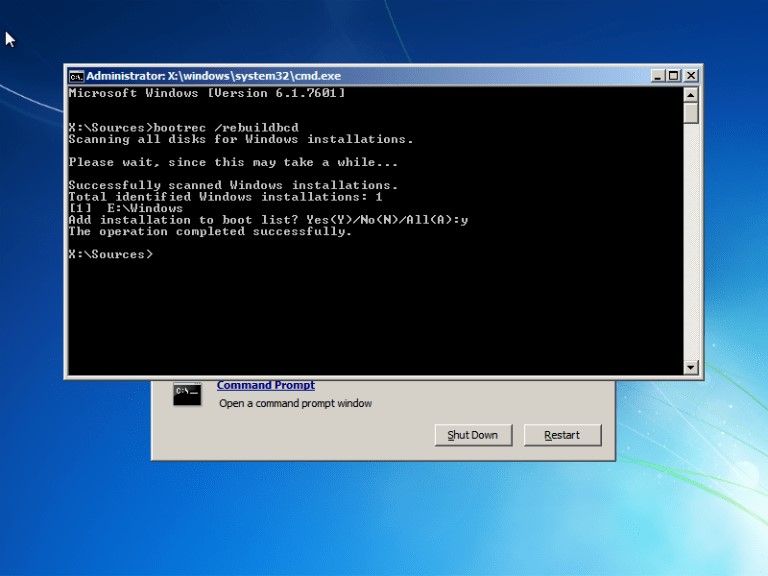
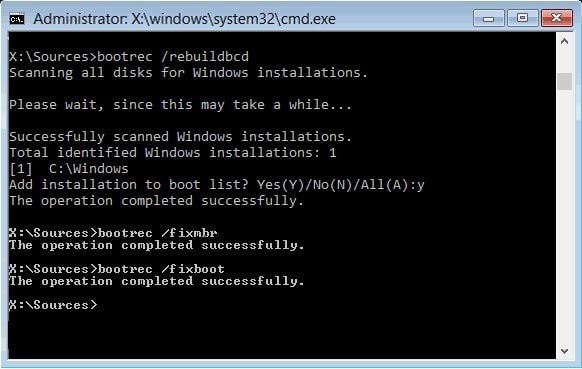
- After its finished, type the following instructions, pressing "Enter" after each line":
bootrec /fixmbr
bootrec /fixboot
Method 3: Rebuild BCR Registry Hive
This method will repair your boot sector files and establish them once again. Create a bootable media using a tool for media creation, then do the following:
- The bootable media can be either a USB drive or DVD/CD so you can plug in if it's a drive or inserts if it's a CD/DVD. Restart your computer.
- Go to the "BIOS" settings window or "Boot meu" and reset the boot order to place a priority on the bootable media as the primary device to boot from. To boot the computer, press any key of your choice.
- Hold on as the system files completely load.
- Choose what you prefer and click "Next".
- Select the option "Repair your computer".
- Select the next option "Troubleshoot".
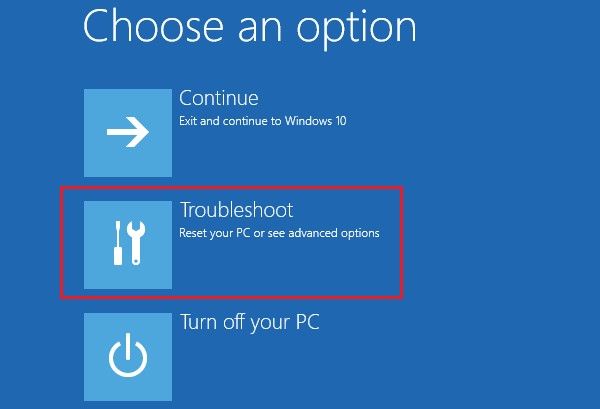
- Click on "Advanced Options".
- Launch "Command Prompt" from the list of options and if you are required to, select your user account and type in the password you have set for the account。
- Now in the Command Prompt field, type these outlined commands below and after each, press "Enter".
bootrec /FixMbr
bootrec /FixBoot
bootrec /ScanOs
bootrec /RebuildBcd
- Exit this window, remove the drive, and restart the computer the way you normally would.
Method 4: Use Automatic Repair Utility
Windows has a built-in Automatic Repair tool that can be used to fix Windows errors. You can access the utility from an install disc and fix the error with the steps below:
- Boot your computer from the install disc of Windows.
- Choose the correct time, language, and keyboard input, then click "Next".
- Select the "Troubleshoot" option after clicking "Repair your computer".
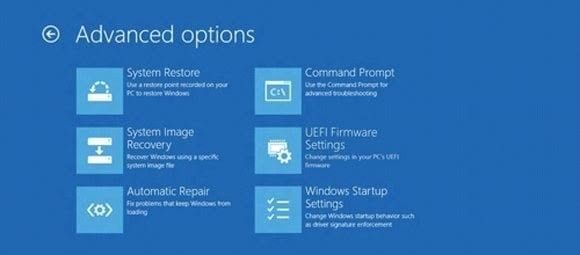
- Choose the "Advanced options".
- Click the button "Automatic repair", then choose your OS.
Method 5: Reset the BIOS/UEFI Configuration
The error code 0xc00000e can be resolved through a reset of the BIOS/UEFI configuration.
- Boot your computer normally and press the key that is required to take you to the BIOS settings window. Different computers have different hotkeys for this function but the most popular are F2, F12, Esc, Del, etc.
- Navigate the screen with your keyboard's arrow keys to find the default option of the BIOS setup. Click on this option once you find it and press the "Enter" key to begin the BIOS reset or configuration.
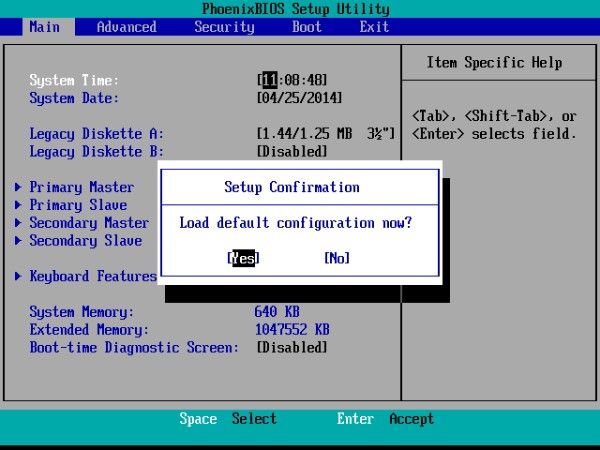
- Using F10 as a shortcut key, save the changes and exit the BIOS settings window. Your PC will automatically restart
Method 6: Mark Boot Disk as Online
You need to mark your computer's boot disk as online so that it won't fail to boot. Insert a bootable USB medium into your Windows 10 computer, then do the following:
- Boot your computer from the bootable drive you inserted. Now, enter WinRE by choosing "Next" and "Repair your computer" in the first two screens that appear.
- Click on "Troubleshoot". From here, choose to go to "Advanced options", then tap the button "Command Prompt".
- Choose the account you are using and type in your account password.
- In the Command Prompt window, input: diskpart. This will launch the Diskpart utility once you press "Enter" inside the present window.
- To see all the list of partitions and disks on your PC, type the command "list disk" or "list volume" and hit the "Enter" key to execute.
- You will need to choose the disk or partition containing your OS. To do this, type either "select disk*" or "select volume*" and press the "Enter" key.
- To mark the disk or partition you have chosen as "Online", type the instruction "online disk" or "online volume". Again, press "Enter" to execute.
- To leave diskpart, input "exit" and "Enter".
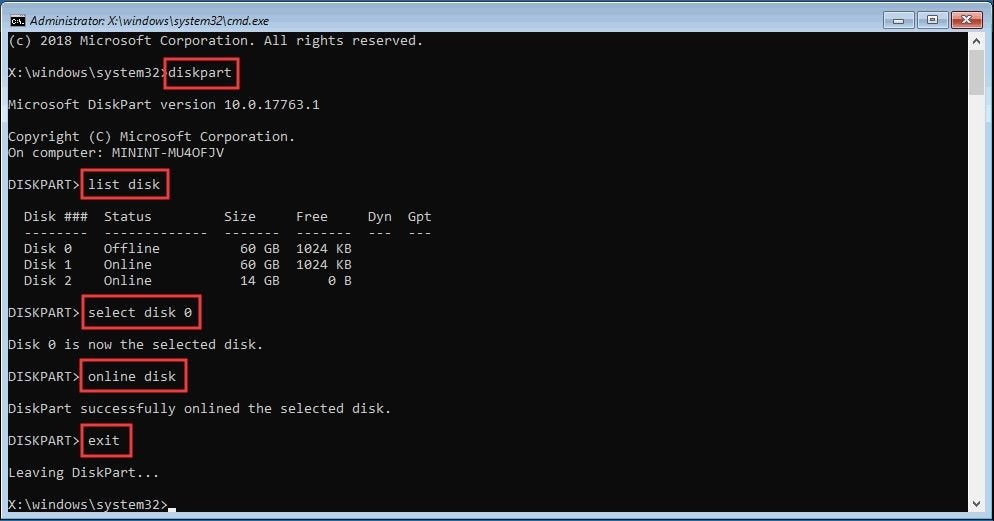
- Close the window altogether.
Method 7: Check Windows 8.1/10 WHQL Support Setting in BIOS
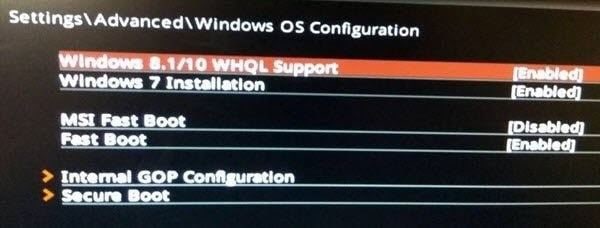
The WHQL support setting in Windows 8.1/10 BIOS has two main purposes: to allow you in enabling UEFI support and to check for drivers that have been signed during the process of booting. If this WHQL support setting is not enabled in your system, you need to enable it. This will ensure your computer boots smoothly since a disabled WHQL support setting could be a reason why your computer boots into the error code 0xc00000e. Go to BIOS settings as shown in method 5 above and check it.
Method 8: Rescue Your Data and Reinstall Windows
If all else fails, you may have to reinstall Windows OS. Note that reinstalling your Windows will wipe off everything. This calls for the need to rescue your important data before doing the Windows reinstallation. Rescuing data is best done with third-party software and one that is highly recommended for you is Recoverit Data Recovery. The steps on how to use this software will be explained in the next section. Reinstall Windows using a created bootable USB drive and the following steps:
- Boot your computer from the bootable drive and click "Next" on the first page that appears.
- Select "Install Now".

- Click to indicate you do not have a product key since you are doing a reinstallation and not a fresh activation.
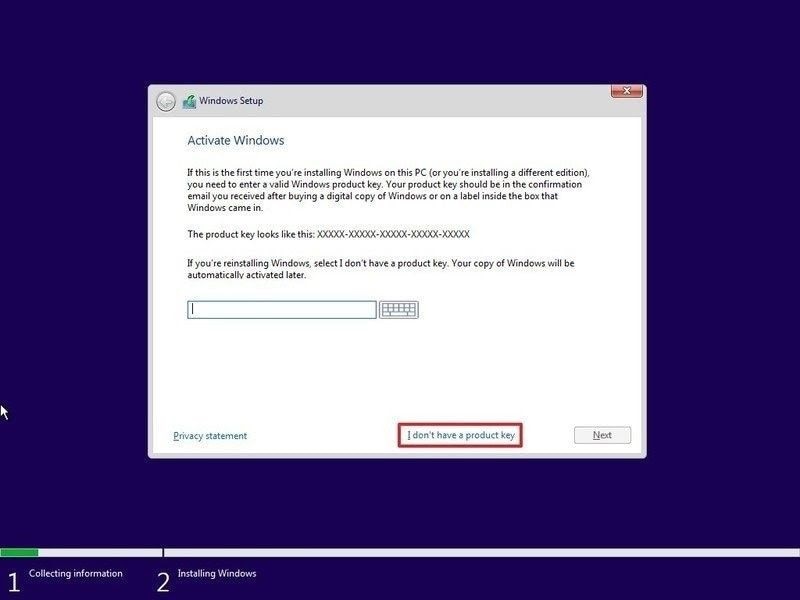
- Choose your OS and select "Next" to move on.
- Accept the license terms and again, tap "Next".
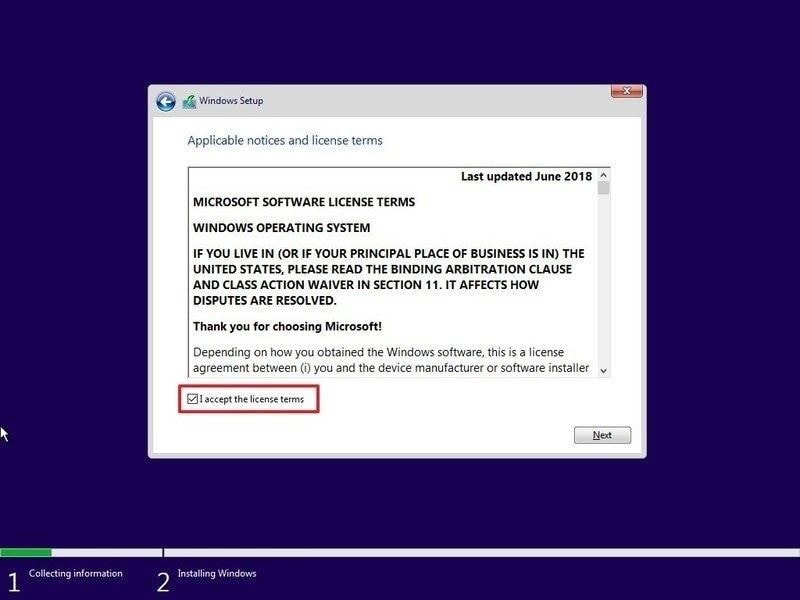
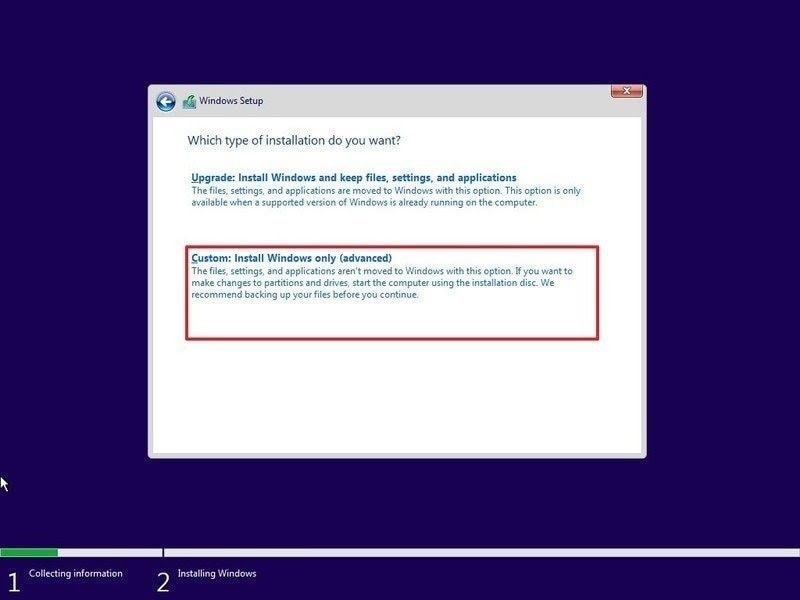
- Select "Custom: Install Windows only (advanced)" and continue.
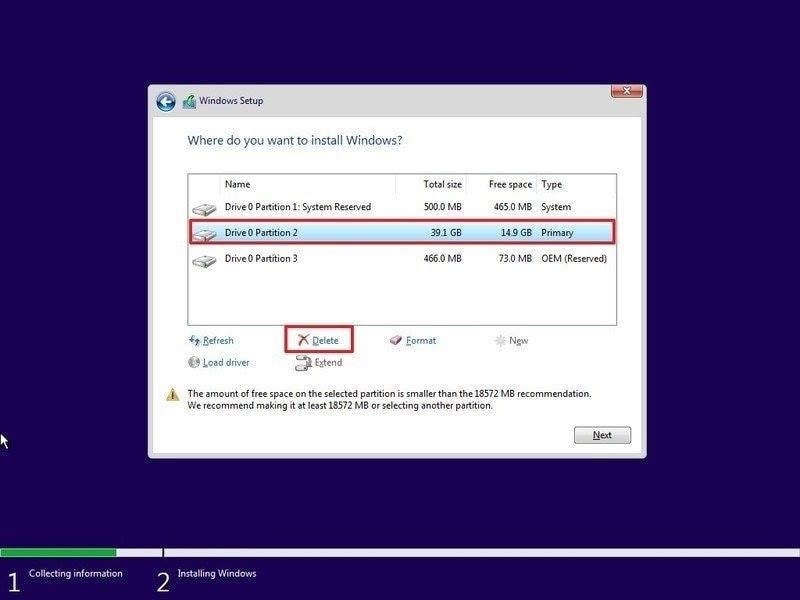
- Choose the drive that is required for the Windows 10 installation; the drive is normally "Drive 0". Click on this drive and select "Delete" to be able to remove the partition from the drive.
- Hit "OK".
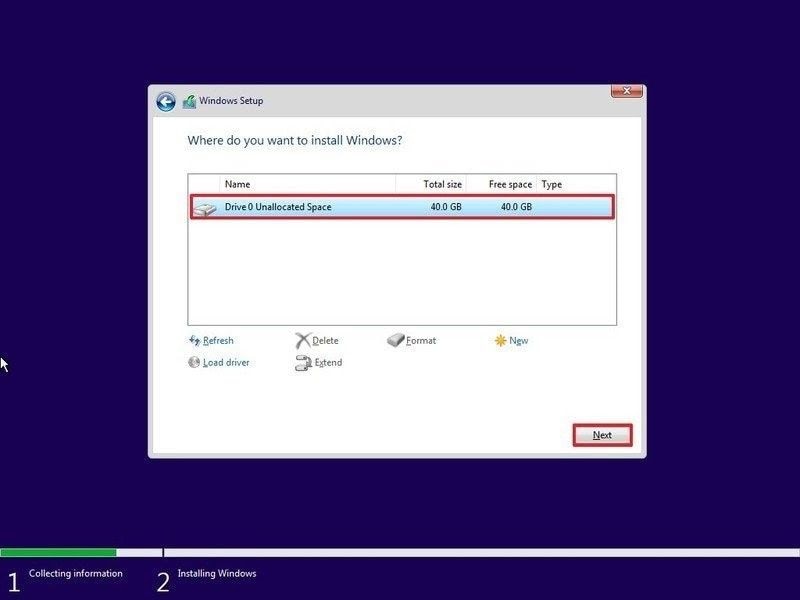
- Select the empty partition and choose "Next".
- Once the Windows reinstallation is finished, you can create a new user account and do a setup that suits your requirements.
How to Recover Unsaved or Lost Data Due to Error Code 0x00000e
Recoverit Data Recovery is third-party software that can be used to recover data that have been lost or unsaved from a wide range of data loss scenarios. If you have lost some data or you have unsaved data that you cannot access due to the error code 0xc00000e, Recoverit is the ideal tool for you to use. It can also retrieve data from the system's "Recycle Bin", "Trash", formatted drives, external storage device, corrupted SD cards, internal hard drives, crashed systems, among others. Recoverit works perfectly fine with Windows OS, and Mac OS as well. It can also be used to recover different types of data such as images, audios, videos, zipped files, etc.
With the three-step process below, you can use Recoverit to recover unsaved or lost data due to error code 0xc00000e:
Step 1: Select a Location
Choose the location where you wish to recover the files from and select "Start".

Step 2: Scan the Location
The location will be scanned by the tool once you have pressed "Start". All the lost and unsaved data will be recovered.

Step 3: Preview and Save
Click on the "Recover" button to save all the retrieved data once you have reviewed them.

The Bottom Line
Several factors may be responsible for the error code 0xc00000e but it takes commitment to the process to fix this error. If your Windows 10 has been plagued with this error, you have come to the right article to help with fixing it. For lost or unsaved data, you can access their location and recover them with Recoverit Data Recovery.
Computer Troubleshooting
- Win System Crash
- Windows Tips
- Computer Problems
- Blue Screen Errors


 ChatGPT
 Perplexity
 Google AI Mode
 Grok
Grok


David Darlington
staff Editor