
Oct 23, 2026 • Filed to: Windows Computer Solutions • Proven solutions

The Stop Code Clock Watchdog Timeout error can occur in Windows when there is a miscommunication between the threads in a processor with multiple cores. If you have experienced this Blue Screen error, you need solutions that work.
This article examines the causes of the error in Windows. It goes further to show you nine fixes to the error. Finally, if you lose any data because of this error, you will learn how to recover them back with the Recoverit Data Recovery tool.
What Causes Clock Watchdog Timeout?
As stated earlier, the Clock Watchdog Timeout error is usually caused by an issue with a specified processor on your computer. Other factors can cause this error; they include errors in your hardware drivers, BIOS, RAM (Random Access Memory), or a third-party app. Also, an overclocking of your computer is a major cause of the error. Finally, if you just installed software on your computer but you didn't do it correctly, this error might be the result.
| System State | Likely Trigger | Primary Solution |
| Occurs during high-load Gaming/Rendering | CPU Overclock or Voltage Droop | Solution 8: Reset BIOS Defaults |
| Occurs while Idle or Browsing | C-State Power Saving Conflict | Solution 6: Disable C1E/SpeedStep |
| Happens after Hardware Upgrade | RAM Compatibility/XMP Profile | Solution 7: Manual RAM Timing |
| Random BSOD with different apps | Corrupt System Files | Solution 5: Run SFC Scan |
How to Fix Windows Stop Code Clock Watchdog Timeout
If you are confronted with the Clock Watchdog Timeout error message, you will be required to restart your computer. If you still see the error after restarting it, try any of the following solutions:
Solution 1: Rollback a Recently Updated Device Driver
Consider rolling back any driver you may have recently updated on your device. This solution is more viable if you discovered that the error occurred after you did a driver update.
- Open the "Start" menu of Windows and from there, click on the "Device Manager" tab

- To view the property details of the device in question, right-click it and select "Properties" from the list you see

- Click on "Driver", one of the tabs on the new pop-up window. If this tab is in gray, then it implies that your Windows has no previous driver to go back to. Now, choose the "Roll Back Driver" option

- Confirm that you want to roll back to the previous driver by clicking "Yes". Restart your computer after the previously installed app has been restored. This will save your changes

Solution 2: Run Windows Memory Diagnostics Tool
The error can be caused by issues in your system's memory. The sure way you can do a check to know for sure the problem (if any) is by running the Windows Memory Diagnostic tool.
- Start by using the "Run" dialog box. In this box, input the command: mdshed.exe. Press "Enter" and launch the Windows Memory Diagnostic tool.

- Another way to access the tool is by launching "Windows Memory Diagnostic" as an administrator. To do this, conduct a search for this tool in your Windows' search field on your desktop

- From the two options in the pop-up window, choose the first option. This will permit the software to restart your computer in checking for any errors.

- Any problem found after the restart will be automatically fixed. If this doesn't happen, you can replace the memory with a new one.

- If there are no errors found, then the problem is from another factor hence you need to move on to other solutions.
Solution 3: Disconnect New Hardware Devices
Disconnect any hardware devices you may have externally attached or connected to your computer. If a newly downloaded app is improperly installed on Windows, it can cause this error. So in the meantime that you do not know which of your connected devices is causing the error, you should detach all devices that have been externally connected, except for your keyboard and mouse. Now, restart your PC.
Solution 4: Remove Third-Party Software
Third-party software can be a source of the Clock Watchdog Timeout error. Therefore, you need to uninstall such software from your computer, then restart it.
- Bring up the "Run" box of dialog by pressing together these keys "Windows" + "R". In the box, type this: appwiz.cpl. Launch by pressing the "Enter" key

- All the installed programs on your PC will be displayed on a list you can view.

- Choose the third-party software you wish to uninstall, right-click it and tap on the "Uninstall" button

- Follow the prompts on your screen to complete the process
Solution 5: Run System File Checker
If the related system files are damaged, then this error could occur. With the System File Checker (SFC), you can scan your computer for errors and fix them. To use the SFC utility, follow the steps below:
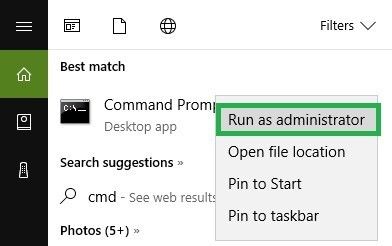
- In the Cortana search box of your Windows 10, input this instruction and hit the "Enter" key: cmd. The best match to select is "Command Prompt". You must select to "Run as administrator"
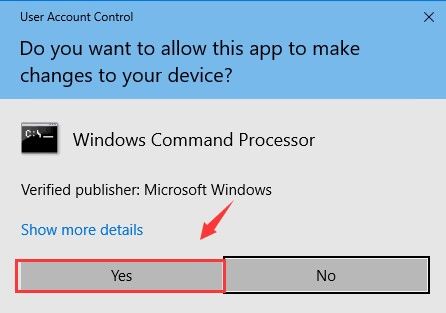
- Agree to let the program make changes to your computer by tapping "Yes"
- Type this: sfc /scannow. This SFC command is to be executed in the Command Prompt page. To complete this, press the key "Enter"
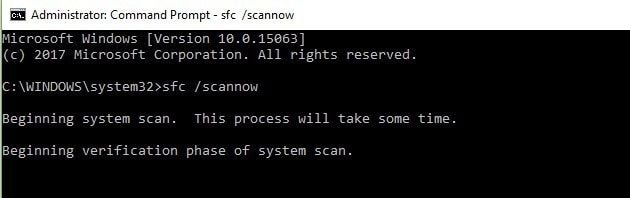
Close the window after the scanning and repair are done. Do this by typing "exit", then press "Enter" and that concludes it
Solution 6: Disable C1E and Intel SpeedStep in BIOS
Sometimes, computer motherboards come with already-enable power savings modes such as C1E and Intel SpeedStep. This lowers the voltage with which BIOS operates, as well as the clock speed. Although the features are useful for saving battery power, you need to disable them to enhance maximum performance. Launch the BIOS settings window and click to disable them, if they are enabled.


Solution 7: Manually Set the Speed of Your RAM and Turn Off Asus Turbo Feature in BIOS
In some instances, this error occurs when you do not manually set your RAM speed in BIOS. This is because RAM will always run at low speed unless you set it yourself. You can do this by enabling its Extreme Memory Profile (X.M.P) or manually tuning its timings.
- Open BIOS settings when you boot your computer by pressing the necessary hotkey: "Del", "Esc", "F2", etc.

- Select "X.M.P" and activate it. You may be presented with two profiles to choose from. Select the one that enables you to get faster speed.

- Consult your computer's motherboard manual for instructions on how to turn off your Asus Turbo feature as this is unique for each type of motherboard.
| RAM Technology | Watchdog Risk Factor | Stabilization Tip |
| DDR5 (High Speed) | High (Signal Integrity) | Update BIOS to improve "Memory Training" algorithms. |
| DDR4 (XMP) | Medium (Voltage) | Increase SoC Voltage slightly (consult manual). |
| Mixed Brands | Very High | Ensure all sticks match timing (CL) and frequency. |
Solution 8: Set the BIOS Settings to the Default Stage
Reset your BIOS to its default settings using the following steps:
- Launch the BIOS settings page by pressing the right key as suggested by your computer; every motherboard type has its specific key or key combination to enter its BIOS settings. Consult your motherboard's manufacturer to find out yours
- Click on the option that has "default" in it for instance "Setup Defaults", also depending on your motherboard type

- You may get a prompt to confirm your decision, press the letter "Y"

- After the reset is complete, save the changes you have made and leave the page
- Restart your PC
Pro Tip: Perform a "Complete" Power Cycle
Windows "Fast Startup" often saves the state of hardware drivers to the disk to speed up boot times. However, if a driver is causing the Watchdog Timeout, "Fast Startup" will simply reload the error. To truly reset your hardware handshake:
- Go to Control Panel > Power Options.
- Click "Choose what the power buttons do."
- Uncheck "Turn on fast startup."
- Shut down your PC entirely, unplug the power cord for 30 seconds, and then reboot. This forces the CPU to re-initialize every core thread from scratch.
Solution 9: Remove the Problematic Updates
If a problematic update is the cause of the Clock Watchdog Timeout error in your Windows, you should follow the steps outlined below to remove the update that is causing you this issue:
- Go to the section for "Update & Security" by clicking on and launching the "Settings" app

- Choose to "View installed update history"

- Since the last several updates you did are most likely the culprits, in this case, you should memorize them or note them down from the list of update history that appears
- Select the "Uninstall updates" button

- Double-click on the update you have chosen to remove. After making your choice, follow the on-screen instructions to complete the process

How to Recover Unsaved Data after Clock Watchdog Timeout Happens
So imagine you are working some important data and you haven't saved them, then suddenly, your work gets interrupted by the Clock Watchdog Timeout error. The sense of loss you will feel is understandable. But not to worry, this section is all about helping you get back those data that you may think are lost to you forever.
Recoverit Data Recovery is a third-party tool you can download online for the retrieval of your unsaved files and missing data. It supports data recovery from all sorts of data loss events like formatted systems, virus infection, crashed systems, damaged SD cards, internal hard drives with issues, and of course, errors as this Stop Code.
If your data is in formats like audio, video, documents, images, among other file types, Recoverit can assist you in getting them back in both Mac and Windows OS computers.
Step 1: Select a Location
Choose a location from which Recoverit can scan for your lost files. The location should be where you had your unsaved data
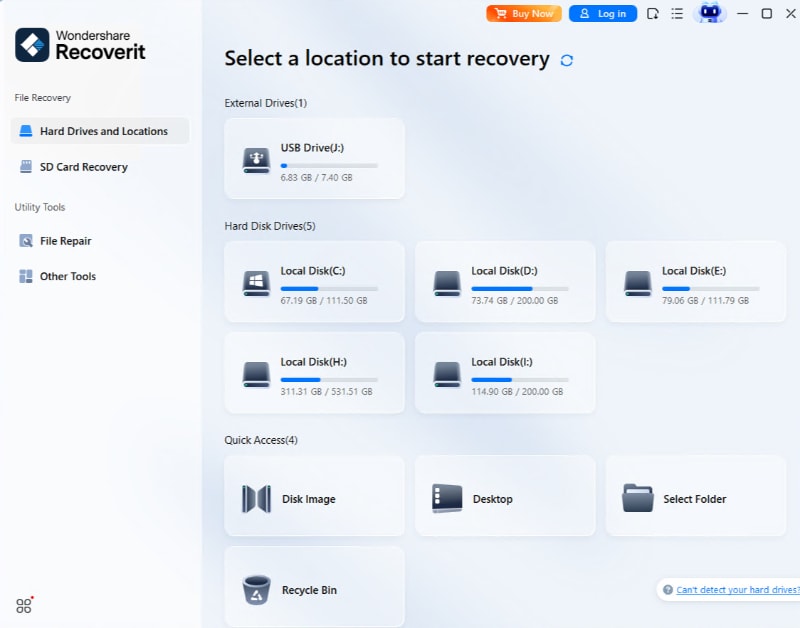
Step 2: Scan the Location
Sit back and let Recoverit do its thing in scanning your chosen location
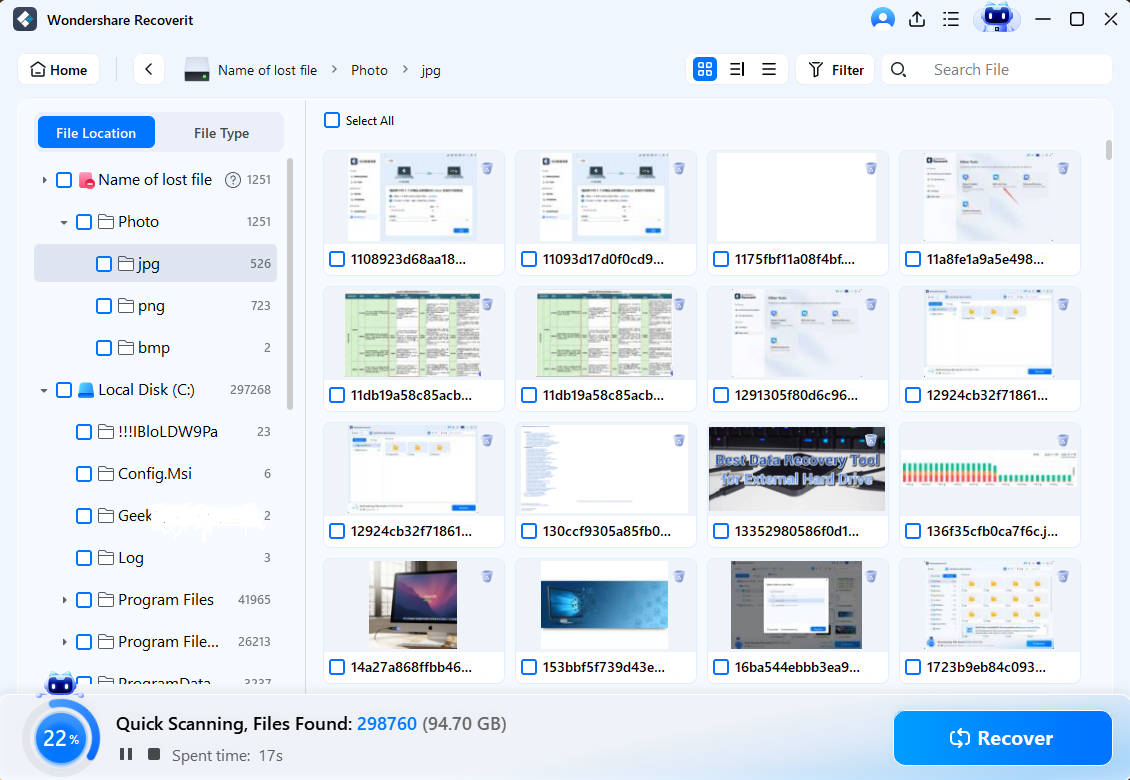
Step 3: Preview and Save
View all the files that have been retrieved, then choose the "Recover" button to save them.

The Bottom Line
This article has succeeded in showing you the top nine solutions to fix Windows Stop Code Clock Watchdog Timeout error. Try each solution until you find what works for you. For your unsaved files that have been lost due to the error, Recoverit Data Recovery can help you get them back.
Clock Watchdog Timeout BSOD FAQ
-
Is 'Clock Watchdog Timeout' a hardware failure?
Usually, this is a timing/sync issue rather than permanent physical damage. However, if the error persists even after a BIOS reset to default settings, it may indicate a failing CPU voltage regulator (VRM) or an unstable processor. -
Can an Antivirus cause this blue screen?
Yes. Certain third-party antivirus programs use low-level "kernel hooks" that can inadvertently delay CPU threads, triggering the timeout. If you suspect your security software, follow Solution 4 to temporarily disable or uninstall it for testing. -
Why does my PC freeze before the blue screen?
The "Watchdog" is essentially a system timer. If one processor core stops responding, the entire system freezes while waiting for that core to "check in." If it fails to respond within the allotted time limit, Windows triggers the BSOD to prevent data corruption.
Computer Troubleshooting
- Win System Crash
- Crack Bios Password
- Fix Run Dll Errors
- Fix Taskbar Disappeared Error
- Fix BootMGR Image Corrupt
- MBR Errors Fixed
- Windows Tips
- How to Edit DLL Files
- How to Test Hard Drive Speed
- Bootcamp Windows 10 No Sound Issue
- Download iCloud on PC
- Difference between File Systems
- Fix Computer Overheat
- Computer Problems
- Best Bad Sector Repair Tools
- Audio Not Working in Windows 10
- Fix Windows 10/11 Error Code 0xc000014c
- Fix Windows 10 Error Code 0xc0000034
- SMART Status Bad Error
- Fix Grub Loading Error
- Remove Admin Password
- Blue Screen Errors
 > Resources > Windows Computer Solutions > 9 Solutions to Fix Windows Stop Code Clock Watchdog Timeout


Recoverit Editorial Team
chief Editor