
 TL;DR:
For QNAP NAS cross-platform file sharing, deploy Apple Filing Protocol (AFP) for macOS environments, Samba for Windows clients, or Network File System (NFS) for Unix-based systems.
● AFP achieves the highest transfer speeds at 649 MB per second for reading and 306 MB per second for writing but demands significant computing power and restricts security keys to a single use.
● NFS configurations support versions v2, v3, and v4 but experience performance drops under increased traffic loads and require deployment behind a firewall due to inherent RPC-based security risks.
● Accessing FTP settings requires installing the QuFTP service directly from the QNAP App Center, while restoring lost NAS data via external recovery software requires establishing a wireless connection and selecting an alternate destination path.
Ask AI for a summary
 ChatGPT
 Perplexity
 Gemini
 Claude
 Grok
Grok

If you want to make your business successful, make sure you maintain effective knowledge management and smooth information sharing within your company. It increases overall efficiency and productivity.
To achieve this goal, you must have a reliable solution to provide you with seamless cross-platform file sharing. This guide presents the top four protocols, like QNAP NFS and three others, you can use to perform high-performance file sharing across multiple platforms.
Part 1. What File Sharing Protocols Can I Use to Access QNAP NAS?
When it comes to using efficient cross-platform file-sharing solutions, the top protocols you can use to get over the line are listed below.
- Samba or Server Message Block (SMB)
- Apple Filing Protocol (AFP)
- Network File System (NFS)
- Web Distributed Authority and Versioning (WebDAV)
This article specifically focuses on the first three protocols. Let’s delve deeper into the details.
1. Samba
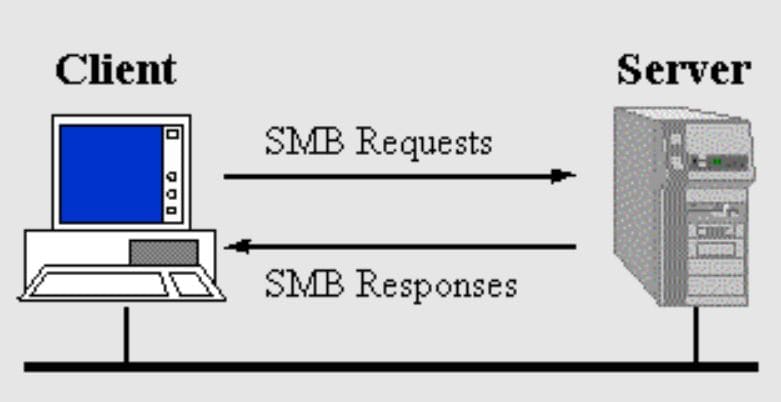
It is an open-source deployment system for SMB protocol. Samba offers SMB support for Unix, Linux, and other similar operating systems. You can use Samba to benefit from the SMB protocol to assist Linux computers in hosting and sharing files over a local network.
In case you don’t know, SMB is a trusted file-sharing protocol, which is also called the Common Internet File System (CIFS). In practice, CIFS is very different and is an implementation of the SMB protocol.
| First Release | 1992 |
| Developed By | IBM |
| Supported OS | Windows and Unix |
| Function | It is used on a network for sharing access to resources. |
| Security | Advanced encryption standards and end-to-end encryption |
| Version | v1 |
| Read Speed | 161 MB per second |
| Write Speed | 169 MB per second |
Pros
You can easily set it up on Windows and Linux computers.
Allows printer and multiple access sharing based on user verification.
You don’t need to use an additional file because it offers profound support for Apple extended files.
Mounting SMB protocol for network sharing does not need any additional tool.
Features transfer between networks and ACL file sharing.
Cons
SMB is not considered a perfect solution for the implementation of Microsoft because Samba is an open-source tool.
This does not provide you with a cost-effective cross-platform file-sharing solution.
Renaming any file (whether it is closed or opened) is not possible.
2. Apple Filing Protocol (AFP)
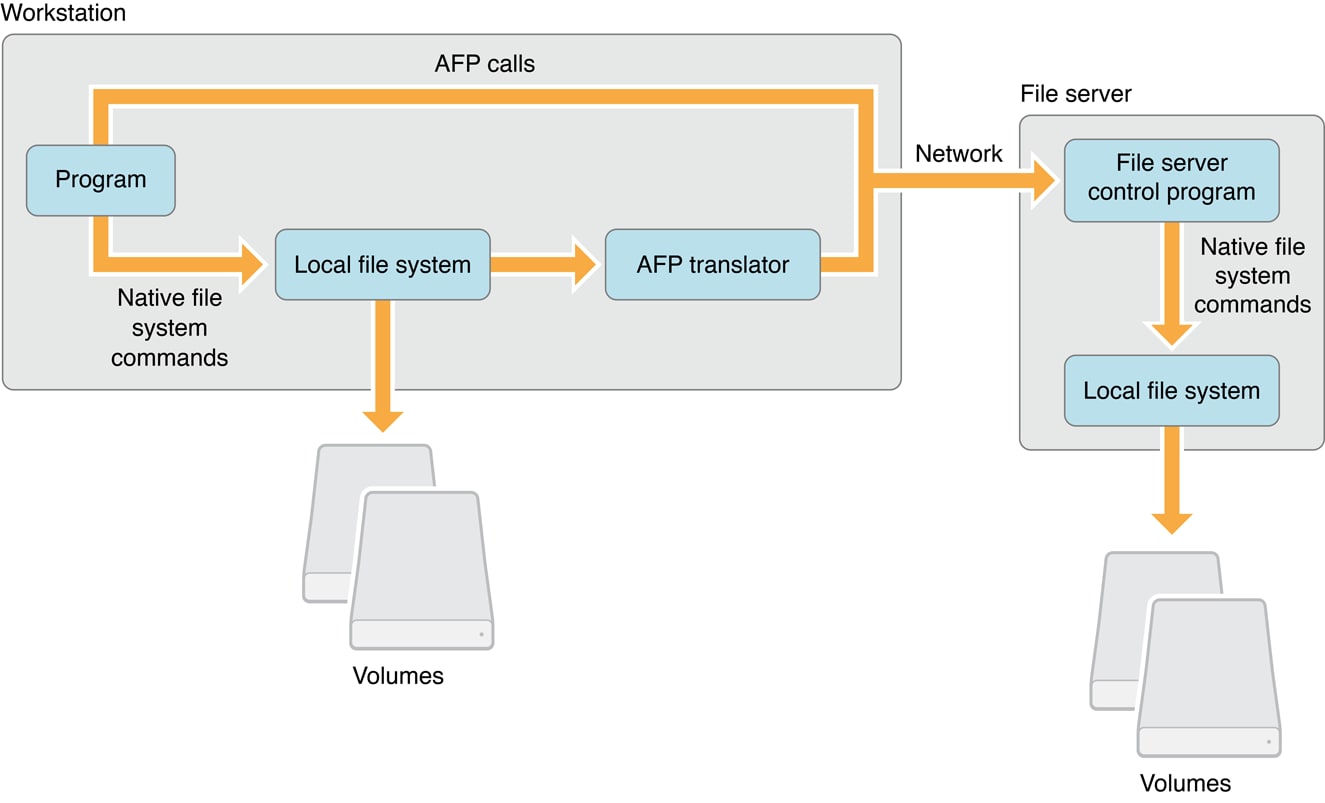
It is a file-sharing protocol for Mac-based platforms specifically designed to help you access files from outside systems. As far as AFP’s location is concerned, it is found in the AppleTalk protocol stack’s presentation and application layers. With strict security functionalities, the AFP protocol has the ability to restrict you from accessing certain files.
If you intend to share large files with your Mac device across different platforms, selecting the AFS protocol will surely be a wise decision. It not only helps you transfer your data safely but also performs an efficient and robust file transfer.
| First Release | 1988 |
| Developed By | Apple, Inc. |
| Supported OS | Mac OS 9, Mac OS X, Mac Computers |
| Function | It is used on Mac platforms for network file control purposes. |
| Security | It encrypts the random number with the National Institute of Standards and Technology Data Encryption Standard (NIST DES). |
| Version | N/A |
| Read Speed | 649 MB per second |
| Write Speed | 306 MB per second |
Pros
It is very easy to set up.
It makes cross-platform file sharing super simple.
Protects your devices and data very well when sharing between different devices.
Supports huge file transfers.
You don’t need a password to use AFP smoothly.
If you are a non-admin user, you can still share files on the network.
Cons
A large amount of computing power is required to use the AFP protocol.
You can use each security key once.
Does not support all devices, like certain tablets and mobile phones.
3. Network File System (NFS)
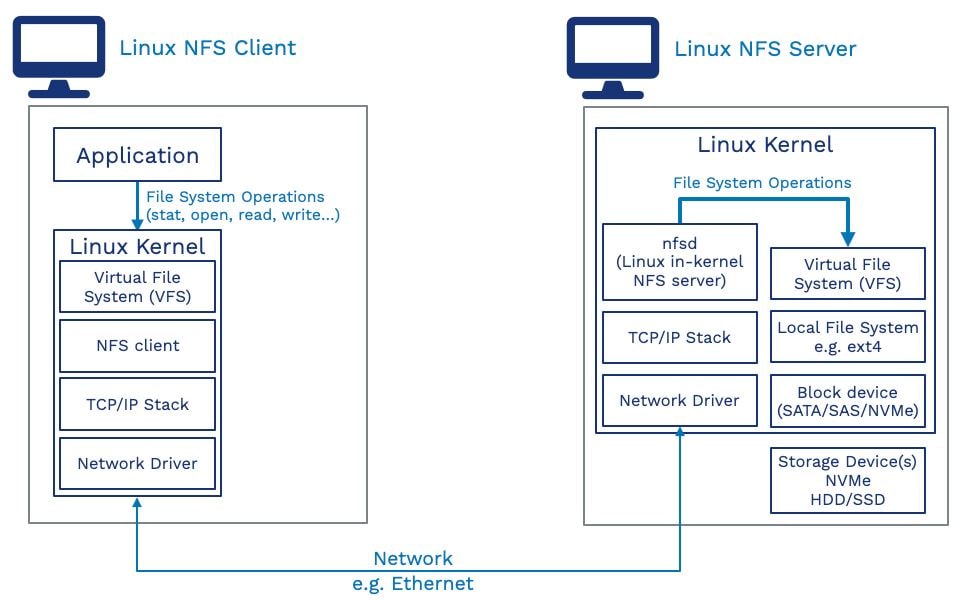
The major reason behind the popularity of this file-sharing protocol is that it enables you to access the file in the same manner as you do from local storage. Since it is an open-source protocol, every user can easily implement it at any time.
NFS allows multiple clients on the network to access the same data remotely. Since everyone has access to the same content, it is a great way to keep all files updated. This protocol performs efficient data centralization and reduces the system admin overhead.
| First Release | 1984 |
| Developed By | Sun Microsystems |
| Supported OS | Windows, Linux OSes, and Unix |
| Function | It is used for transparent file sharing between laptops, desktops, servers, and other similar devices. |
| Security | It is not too secure, so make sure you use it behind a firewall on a trusted and reliable network. |
| Version | v3 or v4 |
| Read Speed | 551 MB per second |
| Write Speed | 121 MB per second |
Below is the representation of Linux client communication with the Linux server using the NFS protocol.
Pros
It is a relatively budget-friendly solution when it comes to sharing files across multiple networks.
You can centrally manage all the shared files.
You can set up NFS easily using the existing IP infrastructure.
It improves security by reducing the need for removable storage media, e.g., DVDs or USB flash drives.
Accessing files is pretty simple and is quite similar to accessing local files.
Cons
As soon as the traffic load increases, file sharing slows down in NFS.
NFS is not very secure because it is an RPC-based solution.
Samba vs. AFP vs. NFS: A Quick Comparison
Let’s quickly go through the basics of all three protocols to establish a stance on which one of them is better and why.
- Samba is the best cross-platform file-sharing solution for Windows users.
- AFP offers support for Mac solutions only.
- NFS is perfect for Unix-based file sharing and does not support Windows clients.
- Samba is not very stable compared to NFS and AFP.
- In comparison to NFS and Samba, the read and write speeds of AFP are much better.
- Your Mac works fast and reliably with AFP protocol.
- AFP is necessary for the large systems being used today because it offers great support for the “fast find line.”
Our Verdict
If you go through the above discussion, you will clearly see that the performance of all three protocols is different under different circumstances. So, it all depends on whether you have Windows, macOS, or Linux-based computers. But yes, if you are a regular user of Mac devices and are looking for a trustworthy cross-platform file-sharing protocol, there is nothing better than choosing Apple Filing Protocol (AFP).
Part 2. How to Configure NFS Service Settings in QNAP NAS?
This section of today’s discussion presents a step-by-step guide on how you can configure NFS service settings on your QNAP NAS. Let’s look at the steps required.
Step 1: Open “Control Panel” and click on “Network & File Services.”
Step 2: Select “Win/Mac/NFS/WebDAV” and then tap on “NFS Service.”
Step 3: Now, you can enable NFS service. For this, follow the below points.
- Choose “Enable NFS v2/v3 Service.”
- Tap on “Enable NFS v4 Service.”
Remember, they both are optional.
Step 4: Now, select “Enable manage-gids.”
Step 5: It is time to hit the “Apply” button.
Part 3. How to Configure Samba Settings in QNAP NAS?
A quick step-by-step guide on how you can configure Samba settings in your QNAP NAS is presented below. Let’s take a look at the steps you need to follow.
Step 1: Open “Control Panel” and click on “Network & File Services.”
Step 2: Now, choose “Win/Mac/NFS/WebDAV” and tap on “Microsoft Networking.”
Step 3: It is time to select “Enable file service for Microsoft networking.”
Step 4: Perform Microsoft’s setting configuration by specifying the server description and workgroup. Providing the server description is optional. It is perfectly fine if you don’t write it down.
Step 5: Now, choose an authentication method from the list presented below.
- Standalone server
- AD domain member
- LDAP domain authentication
Step 6: It is time for the advanced settings configuration. For this, tap on “Advanced Options” and start conjuring accordingly. You will find a couple of options, like “Enable WINS server, Use the specified WINS server, local master browser, etc.” Once you select the suitable option, click on “Apply.” Doing this will close the Advanced Options window.
Step 7: Now, hit the “Apply” button, and you are done.
Part 4. How to Access FTP Settings in QNAP NAS?
Do you want to access FTP settings in your QNAP NAS? Don’t know how to proceed and what steps to follow? There is nothing to be concerned about. All you need is to follow the three easy steps given below.
Step 1: Open the “Control Panel” on your system.
Step 2: Click on “Network & File Services.”
Step 3: Now, tap on “QuFTP Service.” It will help you open this service application.
Important Note: If you don’t have QuFTP service, don’t forget to install it from the App Center. If you want to get into the detailed specifics, visiting the official website of QNAP will be a better approach for sure.
Part 5. How to Recover Lost Data Due to a Security Vulnerability?
Are you worried about experiencing a situation when your data is at risk? Or lost it already? Concerned about whether or not you can recover your data from NAS accurately? Well, hundreds of easily accessible recovery tools have jumped into the market in the last few years. But trusting a random software could not be a risk-free activity. Without much ado, download and install Wondershare Recoverit on your system and give it a try.
For Windows Vista/7/8/10/11
For macOS X 10.10 or later
Why Recoverit?
You must be thinking about why you should trust Recoverit when recovering your important data files from NAS. Right?
Well, it is a superb tool that helps you get your lost and deleted data back with its powerful data recovery approach. It is not only limited to NAS recovery but also supports more than 2000 storage devices. Moreover, this software has 35+ patents and supports 500+ data recovery scenarios and 1000+ file formats.
The most appealing factor associated with Recoverit is its highest data recovery rate - 95% - in today’s market. This is why more than 50 million people are happy with its performance and repeatedly use this tool. Don’t worry about investing in this software, as your purchases are backed by a 7-day satisfaction guarantee. Furthermore, the customer support staff is friendly, extremely professional, and very cooperative.
Video Tutorial on How to Recover Files from NAS Server?
For Windows Vista/7/8/10/11
For macOS X 10.10 or later
Steps to Recover Your Lost Data
It asks you to follow 8 super simple steps, as listed below.
Step 1: You already have Recoverit on your system. Right? If not, download it from the official site and install it carefully.
Step 2: Once done, tap on “NAS and Linux.”
Step 3: Now, you will find a blue-colored button at the bottom, namely “NAS Recovery.” Click on this button to proceed.

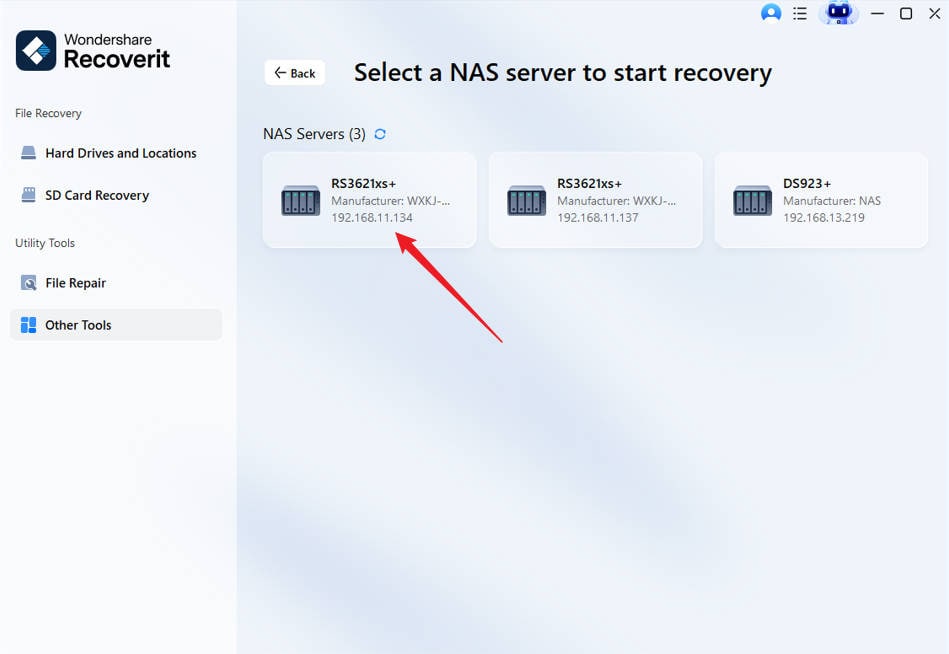
Step 4: Now, the program will show you a couple of detectable NAS devices on your computer’s screen. Select the one that has your lost or deleted data files.
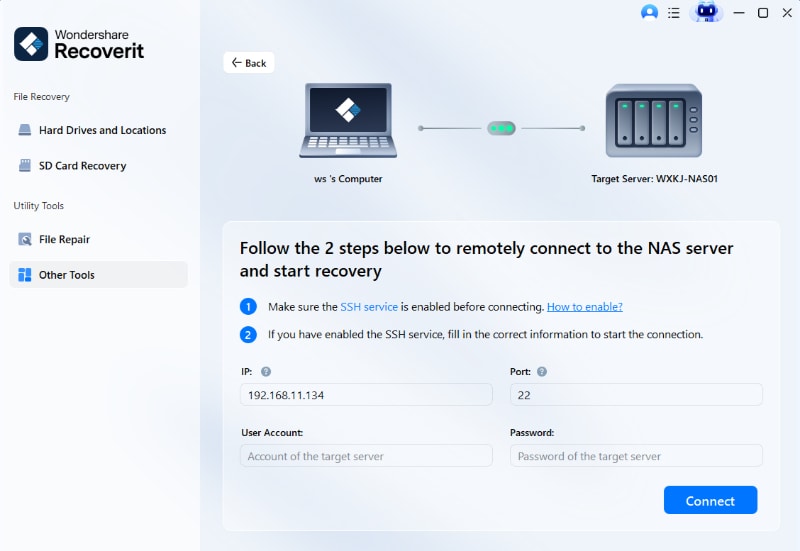
Step 5: Upon selecting the NAS device, a new window will appear on your screen. Enter the desired details, as asked on the screen. As soon as you provide them all, don’t forget to hit the “Connect” button. It will help you establish a wireless connection.
Step 6: Now, Recoverit will start searching for the data you lost earlier. For this, it uses an auto-scan technique. You can estimate the expected recovery time or search time by looking at the scanning progress displayed at the bottom of the window.

Step 7: It is time to preview (tap on the Preview button) the files before you proceed to recover them.

Step 8: Once you are sure that the file you have previewed is the one you are actually looking for, hit the “Recover” button. Now, the program will ask for the selection of a specific location on your system where you can store the recovered data. Ensure you provide a different path this time (compared to the earlier location where your data was accidentally lost).

For Windows Vista/7/8/10/11
For macOS X 10.10 or later
Takeaway
Cross-platform file sharing refers to the scenario when you share the same data across various platforms where multiple clients can access it. QNAP NFS, QNAP Samba, QNAP AFP, and QNAP exFAT are the top-grade file-sharing protocols in NAS. You can trust them all. However, when it comes to read and write speeds and security standards, AFP wins the battle against all others. But it is only available for Mac devices.
Accidental deletion of the data from NAS is indeed a bad scenario, and no one wants to get exposed to it. Do you? But there are many cases worldwide when people lose their NAS data and struggle to find a credible recovery tool. Thanks to Wondershare Recoverit for making life easier in this regard. It helps you recover your lost or deleted NAS data with an over 95% data recovery rate.
For Windows Vista/7/8/10/11
For macOS X 10.10 or later


