
 TL;DR:
To enable SSH access on your Synology NAS, log into DiskStation Manager (DSM), navigate to Control Panel > Terminal & SNMP > Terminal, check the Enable SSH service box, and apply the changes.
● If an active firewall is running on your Synology device, you must manually create an Allow rule for the assigned SSH port (default is 22) under Security > Firewall to permit incoming connections.
● Connect to the NAS remotely by executing the command ssh username@SYNOLOGY_NAS_IP in your local terminal or by using a dedicated SSH client like PuTTY with your NAS IP address and login credentials.
● Disable the SSH service from the Terminal settings immediately after use, as leaving the port continuously open creates a network vulnerability for malicious remote access.
Ask AI for a summary
 ChatGPT
 Perplexity
 Gemini
 Claude
 Grok
Grok
Do you need to access the terminal of your Synology NAS device and run some commands there? You can’t do that unless you enable SSH. Now, you need a guide for that, too. We’re here to help.
Let’s go through the process of adding a secure socket shell to your Synology NAS device step by step. From logging in to your Synology device and turning on the SSH service to finding the right SSH tool and using it to access NAS.
Ready? Here’s how it goes.
Step 1. Locating the Synology NAS IP Address
If you’ve never used a Synology NAS device before, you’ll probably need help accessing it. Every Synology NAS device is powered by an intuitive operating system called DiskStation Manager (DSM). So, before you can do anything else, you need to log into your DSM.
There are three different ways to do this:
- Install Synology QuickConnect;
- Set up a Synology desktop app;
- Connect with your NAS IP address.
For the purpose of this article, you will choose the shortest route – logging into your Synology NAS via its IP address. So, you will need to access your device from a web browser.
Here’s what you need to do:
- Visit https://finds.synology.com/.
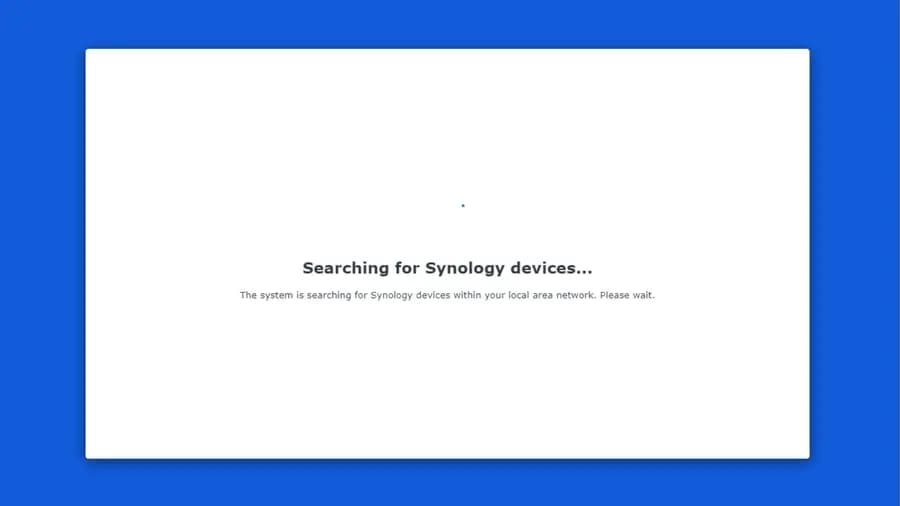
- Now, you only need to sit and wait. The Synology web page will search for the NAS device on your network and display an overview of its basic specifications, including its IP.

- Simply click Connect, and you’ll be able to access your NAS dashboard.
Step 2. Turning on Synology SSH Service
Now, you need to enable SSH service on your Synology NAS device.
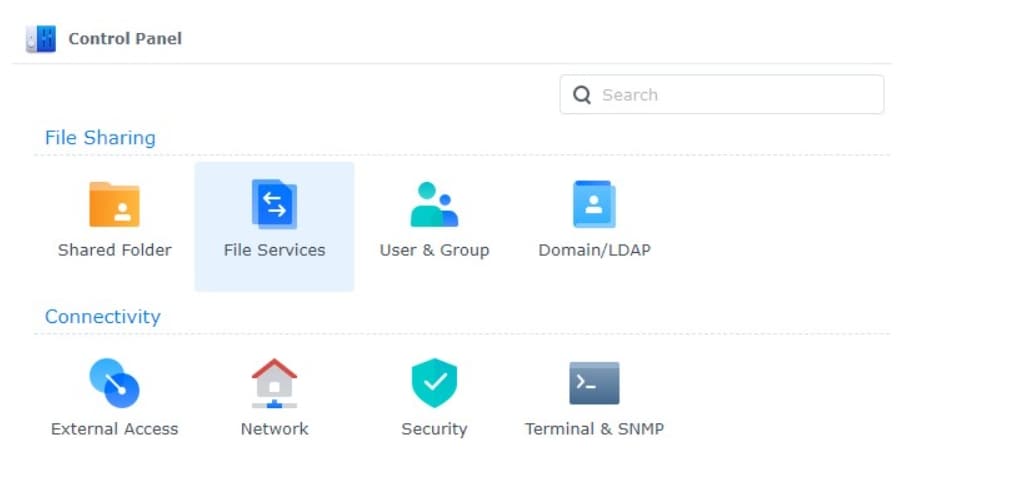
- To enable a secure shell, you need to run your Synology DSM. Once you’re in, open the Control Panel and select Terminal & SNMP. Then, go to the Terminal.
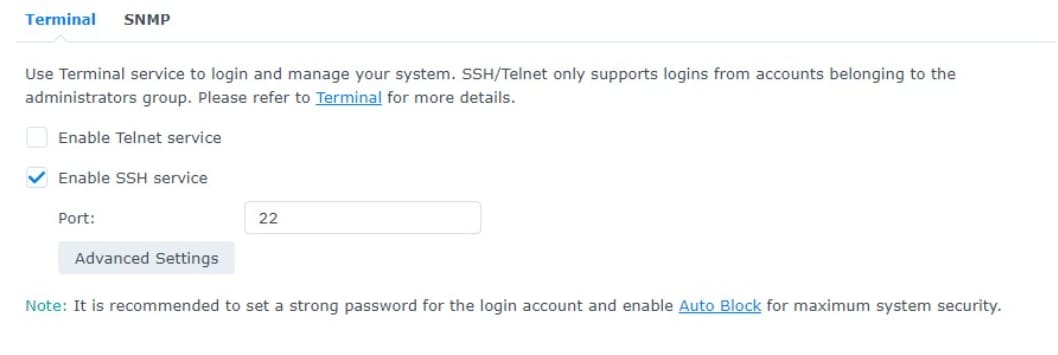
- The Terminal card will give you a few options you can enable. Among others, there will be an option to Enable SSH service. Tick the box to turn it on. Now, you need to add a port. The default setting for Synology NAS SSH port is 22, but you can change it if you want to. After you’re done with that, click Apply so that DSM can save the changes you’ve made.
- There’s one thing left to do. If you’ve already installed a firewall on your Synology device, SSH won’t work unless you create an Allow rule for the new encryption port. To do this, navigate to Security and click on Firewall. Then, open the card that says Edit Rules. You’ll see a list of built-in applications. Find your SSH encrypted terminal and select it. Then, hit OK to save the changes.

And voila - you’ve successfully finished the second step.
Step 3. Find an SSH Tool

Sadly, enabling Synology SSH won’t suffice. You’ll need to 1) use an SSH client or 2) do a bit of coding.
At this step, we’ll explain how to add SSH encryption to your Synology NAS device using an SSH tool. Never heard of it? Here’s what you need to know:
An SSH client is a tool that allows you to connect to a remote computer or system using a secure socket shell protocol. Using this tool, you can access your NAS device remotely. Most importantly, it will execute at the command line.
There are many different SSH clients to choose from. If you need it for this end only, we suggest getting a free, user-friendly tool such as PuTTy.
Here’s how to enable your Synology SSH with PuTTy:
- Go to the official website of PuTTY to download PuTTy for free.
- When it’s all set up, open the program and log in via your NAS device’s IP address using your credentials.
And that’s it!
PuTTY will do its thing, and you’ll be able to use SSH.
Step 4. Synology NAS SSH Command
If you’re okay with running commands on your Synology NAS terminal, that’s great news! You’ll be done in a sec without downloading any more tools.
The only thing you need to do is run the terminal and execute this command:
ssh username@SYNOLOGY_NAS_IP
Inexperienced users should be cautious at this step. Making a mistake in the terminal may cause significant damage to the entire system, especially if you're executing commands as the root user. It’s best to run an SSH client if you’ve never done this before.
Security Considerations
Enabling a Synology NAS SSH is a potential security risk.
Sure, a secure socket shell is an encryption protocol. But it also allows remote access to your device, thus turning it into a network vulnerability. Every NAS device with enabled SSH is an entry point that malicious actors can use to access and compromise your network.
You should NEVER leave your SSH port open when you’re not using it.
When you no longer need it, return to Settings > Terminal and disable SSH service.
Synology NAS SSH is a great power that comes with great responsibility. While enabled, SSH protocol allows access to the entire system, where the slightest mistake can do enormous damage. It’s a good idea to be equipped for Synology NAS data recovery, just in case.

Wondershare Recoverit - Your Safe and Reliable NAS Recovery Software
5,481,435 people have downloaded it.
Recovers lost or deleted documents, photos, videos, music, emails, and other 1000+ file types effectively, safely, and completely.
Compatible with all popular NAS vendors, including Synology, QNAP, ASUSTOR, Western Digital, Buffalo, LaCie, etc.
Facilitates 500+ NAS data loss scenarios, such as deleting, formatting, OS crash, RAID failure, defective controller, power failure, virus attack.
Supports all RAID types, including RAID 0, 1, 5, 6, and 10.
Recovers NAS data through the remote connection without disk pull-out.
Conclusion
As you can see, enabling an SSH service on a Synology NAS device only seems complicated. It really isn’t. However, just because anyone can access a terminal and execute a few commands, it doesn’t mean they should. One inexperienced move and you can break the system, or worse – you can turn it into an easy target for criminals.
Follow this guide one step at a time and with utmost care. If you get confused about what to do next or run into a problem, you better stop and contact us for help. Good luck!


