
The path to a successful migration from on-premises email systems can be difficult, but there are plenty of ways to get your job done quickly and without incurring too much cost. A critical consideration in planning to migrate to office365 is optimizing data movement? And what about velocity: does it make sense given time/cost constraints put forth by budgets tight enough that some organizations don't even think Microsoft Exchange Server to office 365 migration is possible anymore.
We'll provide you with instructions you need to know about the process, from preparing for migration to understanding how it works. Let's begin by understanding the two.
What Is Microsoft Exchange Server and Exchange Online (Office 365)?
Microsoft Exchange is the most popular mail server and calendaring application in use today. It can run on any computer running Windows Server operating systems, which means you don't need specialized hardware or software for it.
Microsoft's cloud-based Exchange Online service offers a hosted email solution with business-class capabilities. Users can access their emails, shared calendars, and contacts even when they're on the move. It’s part of the Office 365 Premium suite. Check the detailed information about Microsoft Exchange Online>>.
Why Should You Migrate to Office365?
There are different reasons why companies consider hosting their Exchange services on-premise. One of the most important is that you can control all hardware and data, giving complete access for troubleshooting purposes if necessary; however, this also means higher maintenance costs and providing 100% availability (which may not always be possible).
When you migrate to Office365, you receive several significant advantages as compared on-premise. Some of them include:
- Office 365 is your one-stop-shop for all of the tools you need to get work done. Not only does it offer scalability without any additional spend, but with purchase comes hosting and Email accounts—saving time on installation costs.
- The cost of operating an on-premise server is high, with constant maintenance needed. You can’t say the same for Microsoft Office 365—you only pay once, and then it's easy as pie.
- Microsoft ensures the security of your data with its disaster recovery plans. You could rest assured that you would still have access and control over what happened in Settings if something were to happen.
- With an automatic update service, you can rest easy knowing that your server is up-to-date and protected. There are no more worries about downtime or other such situations
You may also interested in: Microsoft Exchange 2016 to 2019 Migration
How To Migrate Exchange to Office 365 - 5 Types of Migration
Microsoft Exchange to Office 365 Migration is a process of moving your Exchange organization Email, calendar, and contacts data to the cloud-based service Office 365. Microsoft provides 5 different migration types based on the existing Exchange Server of your organization, how many mailboxes required to be migrated, and whether you want to manage a part of mailboxes in the on-premises organization or migrate them all online. Check details for each migration type and choose the best option for your organization.

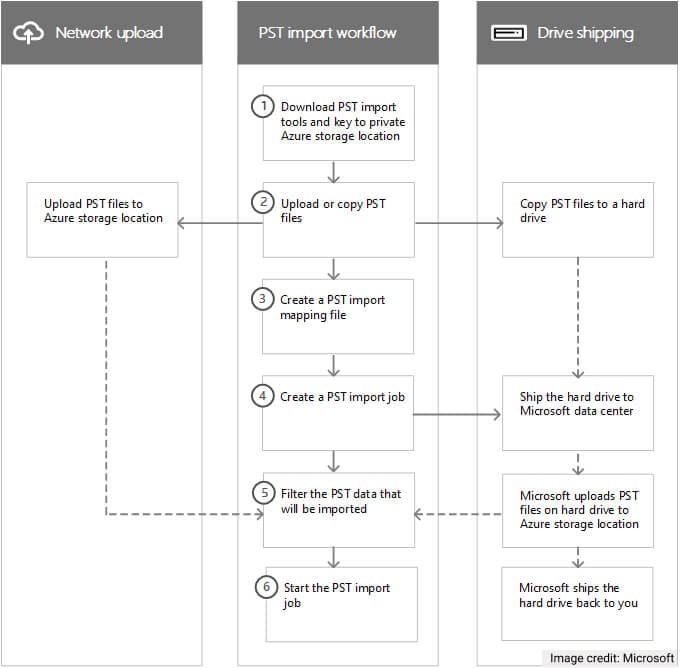
Type 1: Import Service for PST Files Migration
If you're looking to migrate your Email data from an old system, the Microsoft 365 Import Service can help. This service enables users with large PST files and Office 365 accounts to quickly import PST file into Office 365.
The Import Service can be used to upload your old PST files or send them via a network drive. Below is the Step-by-Step Guide:
Further reading:
Type 2: Migrate Mailboxes From Microsoft Exchange Server
In this type, there are 3 methods to migrate mailboxes from Exchange Server to Office 365:
A. Cutover Migration: Migrate all mailboxes at once to Office 365
The cutover migration is a great way to upgrade your Exchange Server if you're running Exchange 2003/2007/2010/2013, and have less than 2000 users. This 'migrate to office365' method can be used for small businesses with an e-mail system that uses Exchange admin center (EAC). The process goes quickly and simultaneously, making these Exchange migrations often called "cutovers." That said, they may work out perfectly on occasion when dealing with large mailboxes like those found amongst significant corporations or government agencies who need everything done fast before deadlines approach.
Check the Step-by-Step Guide for Cutover Migration below:
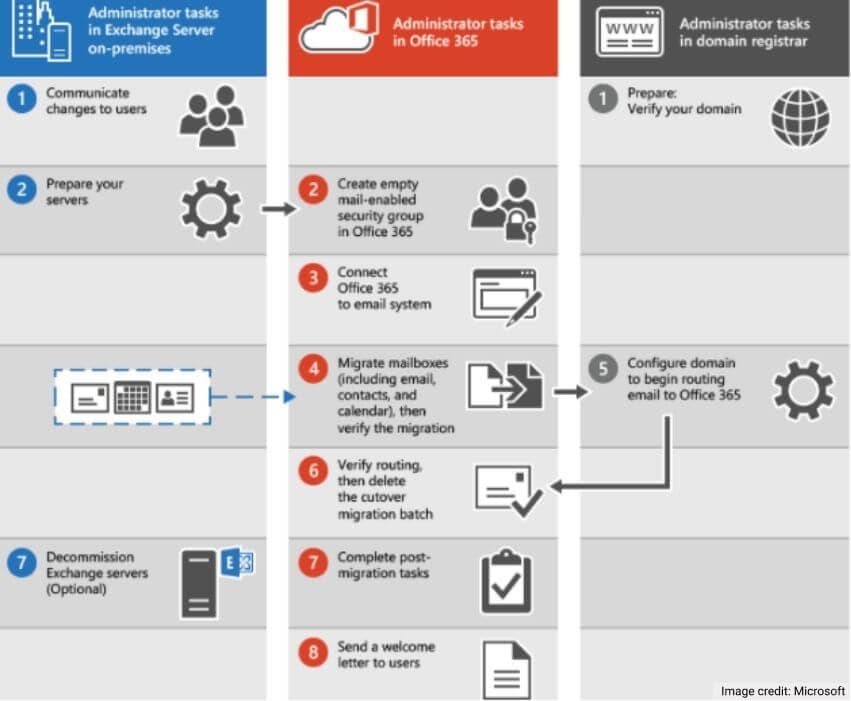
- Add your domain to Office 365.
- Prepare your on-premises environment.
- To your Email system, connect Office 365.
- Then create a cutover migration batch and migrate mailboxes.
- Next, Convert on-premises mailboxes to mail-enabled users.
- It’s time to configure DNS to reduce Email delivery delays.
- Next, route your Email directly to Office 365.
- Assign Office 365 licenses to your users.
- The administrator deleted the cutover migration batch.
- Create an Autodiscover record.
- Now decommission your Exchange servers.
- Provide help to users install the updated version of Office on their computers.
- Lastly, provide users with the information they need to start using Office 365
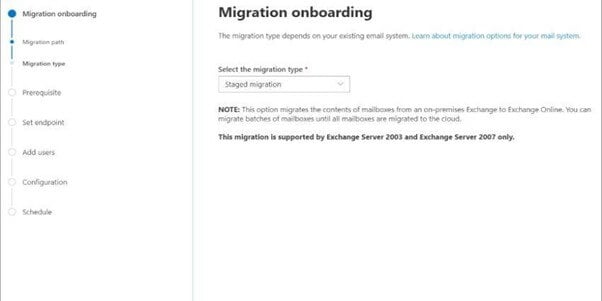
B. Staged Migration: Migrate mailboxes in batches to Office 365
When you're planning Exchange to Office 365 migration, it's essential to think about how and when users will migrate their mailboxes from one platform (i.e., source) for them not to experience downtime during this process. Microsoft 365 or Office 365 offers a staged migration which means that instead of transferring all data at once, which could take hours if done correctly. The company feeds off subscribers' Emails as they come through on both systems until everything has been successfully copied over.
If you're running Exchange 2003/2007 and have more than 2000 mailboxes, then use Staged Migration. Check the Step-by-Step Guide for Staged Migration below:
- Visit Exchange Admin Center. Navigate Recipients>Migration
- Tap on the New+ icon. Select Migrate to Exchange Online option
- Select pop-up Migration Type screen. Select the ‘Staged Migration’ option.
- Tap ‘Next’
- Select the desired CSV file for your migration batch
- CSV validation takes place for Office 365 verification process. A screen appears with CSV File listed users will appear. Click ‘Next’
- Authenticate ‘migration endpoint information.’ Click ‘Next.’
- On the Confirm the Migration Endpoint screen, enter your authentication details. Click ‘Next.’
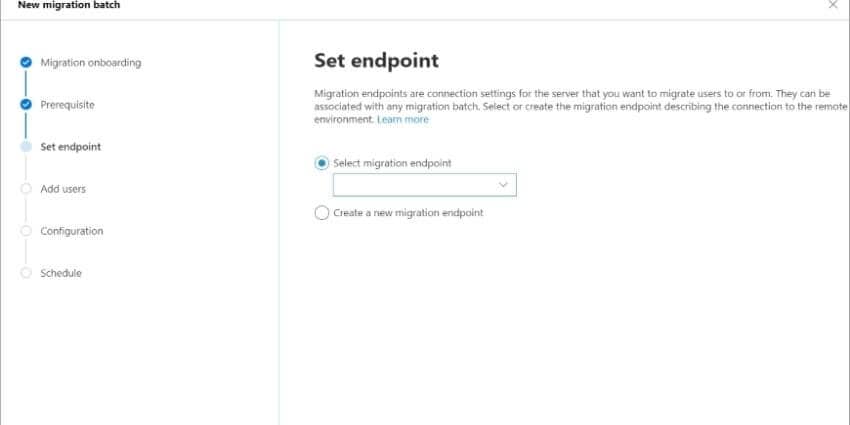
- Authenticate the migration endpoint information to make sure it's correct.
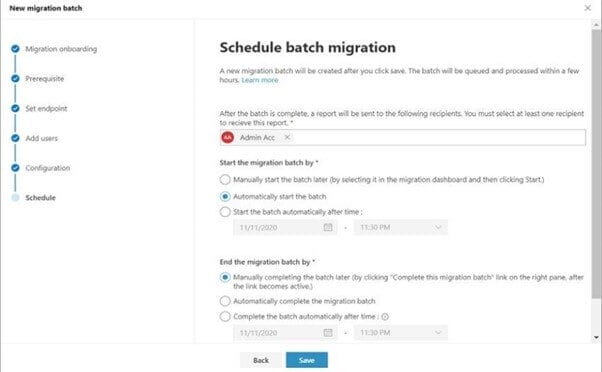
- The options on this screen will help you start your batch process. Choose between Auto Start and Manual, then press “Start” when ready.
- Click ‘New’ to create ‘migration batch.’
- Go to ‘Exchange Admin Center.’ Select Recipients’. From there, you can choose between different migration options for your Email accounts.
- From ‘Migration dashboard.’ Select a batch and click ‘Start.’
- If successful, a syncing status will appear on the dashboard.
C. Hybrid Migration: Migrate using an integrated Exchange Server and Office 365 environment
Use this type of migration if you're running Exchange 2010 or above, and there are more than 150-2,000 mailboxes. Hybrid migration creates a relationship between the Exchange Server and Office 365 of your organization to gradually migrate mailboxes to Office 365.
Type 3: IMAP Migration
Use this type of migration to migrate users and email from Gmail, Exchange, Outlook, and other email systems that support Internet Message Access Protocol (IMAP) migration. The first step to using an IMAP migration for your users—they must have been added as a contact of yours in Microsoft 365 or Office 365 organization. Check the Step-by-Step Guide for Staged Migration below:
- Sign in to ‘About the Microsoft 365 admin center’.
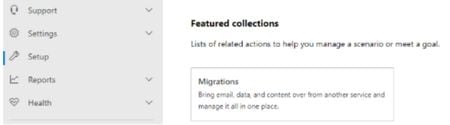
- Go to Setup. Select Migrations (it lies under Featured Collections).
- Select ‘Email’ on the Migrations page. Click ‘Get Started’
- Select ‘Import my Email messages’ in the Email sources pane
- Select your data service dashboard opens.
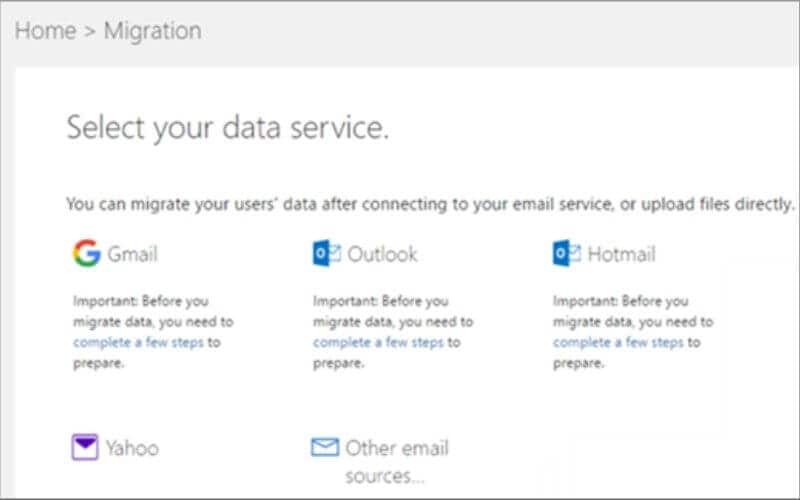
- You have two options. If the provider is listed, choose ‘Email provider’ and select users to begin ‘start migrating Email messages page.’
- Next, route your Email directly to Office 365. If the provider isn't listed: Select ‘other Email sources’. On the ‘Select your data service’ page, test the connection by filling in the ‘IMAP connection data.’ Click ‘Save.’
- Check the box next to each user whose Email address you want in our database, and then fill out a new password.
- Select ‘Start Migration.’ When the status is 'Synced,' this IMAP migration will periodically synchronize with your source Email account until you select ‘Stop Migration.’
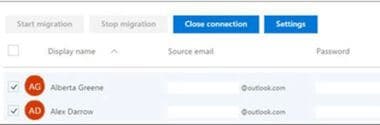
- It would help if you the batch run for at least 72 hours before stopping it. When you’re done, select Close Connection and then click on Start new migration if desired so.
Type 4: Let Users Import Their Email
Users can quickly transfer their Emails, contacts, and other mailbox information from one account to another with the help of an intuitive interface.
Type 5: Using Third-party Migration Tools
If none of the types of migration provided by Microsoft works for your organization, there are also many third-party tools that help you migrate your hosted exchange to exchange online. Third-party tools can be used to migrate your Email account from one service provider's platform to another. They have distinct protocols and approaches, so you must choose the right one. Stellar Converter for EDB is a professional tool that is highly recommended by MVPs and IT admins for a quick and easy migration from Exchange server to office 365.
How to Migrate to Office 365 with Stellar Converter for EDB? Here are steps to follow:
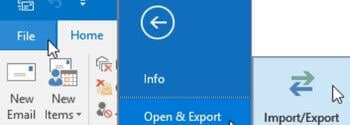
- Download Stellar Converter for EDB. Install and launch.
- From the main screen, choose ‘Offline EDB.’

- To select EDB file, click ‘Browse’ (in case you know the correct location). Or if not known, click ‘Find’ to locate all the EDB files on the system.
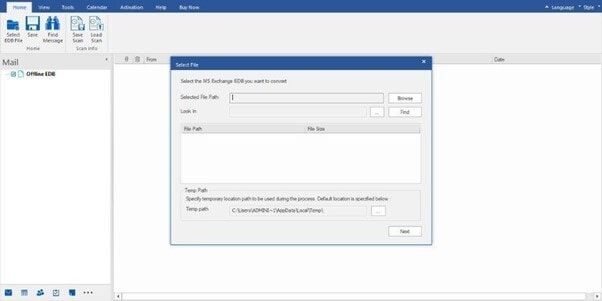
- Click on ‘Next’
- The extracted mailboxes and items are populated in a tree-view list on the left side panel of your screen. You can click any item to preview it right there.
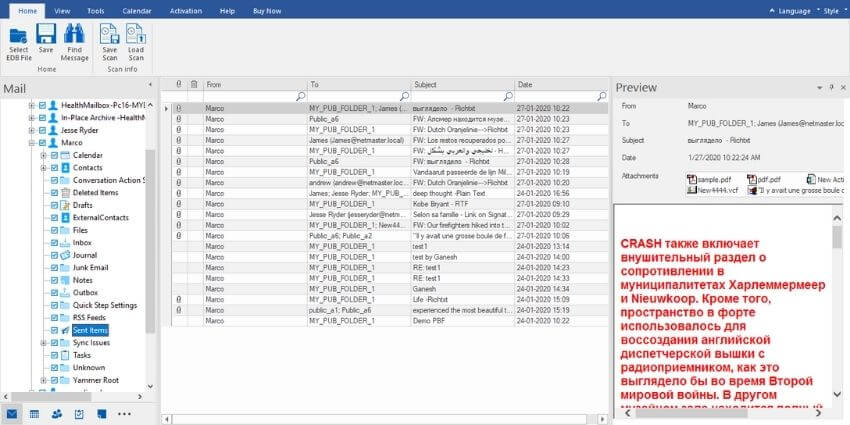
- Select the file or folder from the tree-view list and click ‘Save.’
- When you export mailboxes to Office 365, the format must be set correctly. When exporting in PST mode, use this option and make sure all your contacts are imported into a new contact database before running these commands.
- A dialog box will pop up. Enter Office 365 profile credentials. Provide information and click on ‘OK’.
FAQs about Exchange to Office 365 Migration
Can you migrate Exchange 2010 to Exchange Online?
Yes. If you're running Microsoft Exchange 2010, you can migrate to office 365 by using the Hybrid Configuration Wizard. The Hybrid Configuration Wizard is a tool that you can use to configure your on-premises Exchange organization for coexistence with Microsoft Office 365. The wizard will create a secure connection between your on-premises Exchange organization and your Office 365 organization and configure Exchange 2010 to route mail through Office 365.
How much duration does it take to migrate to Office365?
The estimated completion times for each Exchange online migration batch vary depending on how many mailboxes you want to move at once. However, you can complete the migration in 10 minutes if the batch is small.
Does Office 365 replace Exchange server?
While it is true that people mistake these two to be different products, they are not. Exchange Online is a small part of the many products included in Office 365, which provides you with tools to help keep your business running smoothly.
How to transfer my Exchange account to an Office 365 account?
The best way to migrate mailbox from Exchange to Office is by using the EAC. To do so, go into Office 365 > Recipients>Migration and select Migration from there. Select the Select Users page, select which users you want to move, and click Next. Click on the Exchange Online users you wish to proceed, click Add, and select OK.
Wondershare Recoverit - Recover your deleted and lost email files from any disaster
5,481,435 people have downloaded it.
Recover accidentally deleted emails that were purged by mistake or lost due to unplanned system formatting.
Recover all mailbox components within the files such as emails, attachments, contacts, calendar items, journals, notes, etc.
Support all common email file types: MSG, PST, OST, EML, EMLX, MBOX, BKL, BKS, EDB, etc.
Restore data from all kinds of storage drives like USB Drive, SD card, SSDs, HDDs, Floppy Disks, Pen Drive, etc.
Save your accidentally deleted videos, and also repair the broken videos.
Preview files before you recover them.
 ChatGPT
 Perplexity
 Google AI Mode
 Grok
Grok


