
 TL;DR:
The Exchange Admin Center is a web-based dashboard replacing the Exchange Management Console and Exchange Control Panel to manage on-premises, online, and hybrid deployments across Windows, Mac, and Linux browsers.
● Access the portal directly at https://admin.exchange.microsoft.com/, which redirects based on the Internet Information Services virtual directory on the Mailbox server, or navigate through the Microsoft 365 Admin Centers menu.
● The interface includes a List View with a visible limit of approximately 20,000 objects and supports exporting recipient data to a CSV file.
● The built-in notification viewer tracks certificate expiration dates, Mailbox Replication Service tasks for migrations, and the creation of .pst files from mailbox content.
Ask AI for a summary
 ChatGPT
 Perplexity
 Gemini
 Claude
 Grok
Grok
Were you feeling a little behind in technology after the launch of Exchange Admin Center? You don’t have to worry anymore. This article will take you through all the details you need to know and also how you can access the Exchange Admin Center login portal. To start off, let’s learn about the technicalities linked to the Exchange Admin Center.
Insights About Exchange Admin Center (EAC)
EAC is a web-based management dashboard for on-premises, online, and hybrid Exchange deployments. It helps you replace the Exchange Management Console (EMC) and Exchange Control Panel (ECP), which were the two management interfaces for Exchange Server 2010. Furthermore, the web-based administration console in Microsoft Exchange Server 2013 is optimized for on-premises, online, or hybrid Exchange deployments and enables simplicity of use.
- Insights About EAC For Exchange Online
With the entire world shifting towards a digital era, Microsoft 365 launched its New Exchange Admin Center online to explore diversified realms. Now you get the liberty of a cloud-based system, and you can access your files from anywhere in the world with just a working connection.
- What is EAC in Exchange Server?
EAC in Exchange Server lays down a path for you, leading to out-of-the-box exchange features. You get a personalized dashboard wherein you can monitor your priorities, reports, insights, a mail management system, your go-to cloud shell support, and much more. In this article we will show you how to log in the EAC for Exchange Server and it’s user interface.
Discover more solutions to Microsoft Exchange:
Exchange Admin Center Login — Your Step By Step Guide
There are two broad ways to access EAC for Exchange Server.
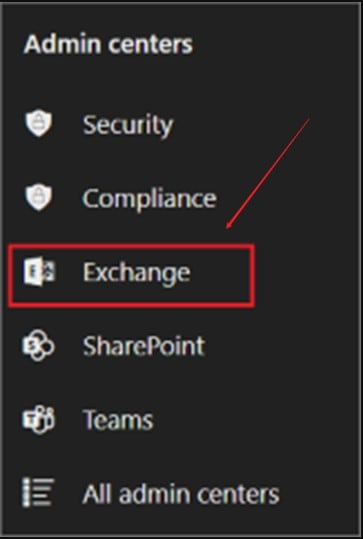
Way 1: Sign in to your Microsoft 365 or Office 365 account > Admin Centers > Exchange.
Way 2: Directly visit the link https://admin.exchange.microsoft.com/. The URL will be redirected based on the Internet Information Services (IIS) virtual directory in the Client Access services on the Mailbox server. You can follow either an internal URL or an external URL. The internal link would consist of a domain name by fully qualified default, while the external link would not be configured. So, you need to adhere to some steps. Microsoft provides detailed guide on how to configure external URLs in Configure mail flow and client access on Exchange servers.
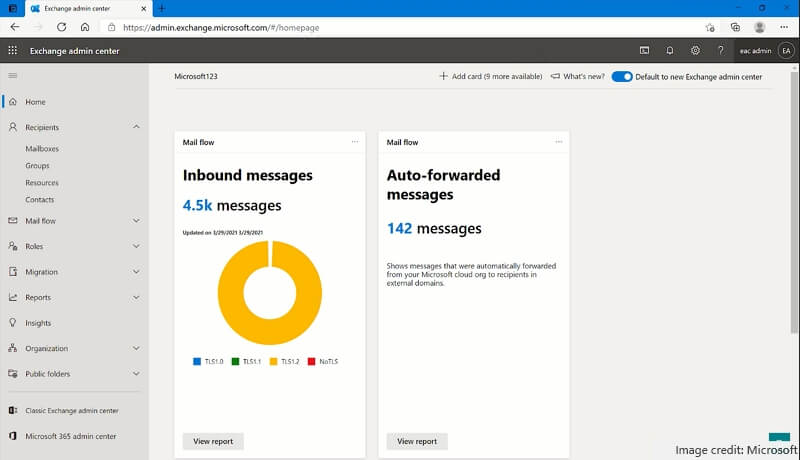
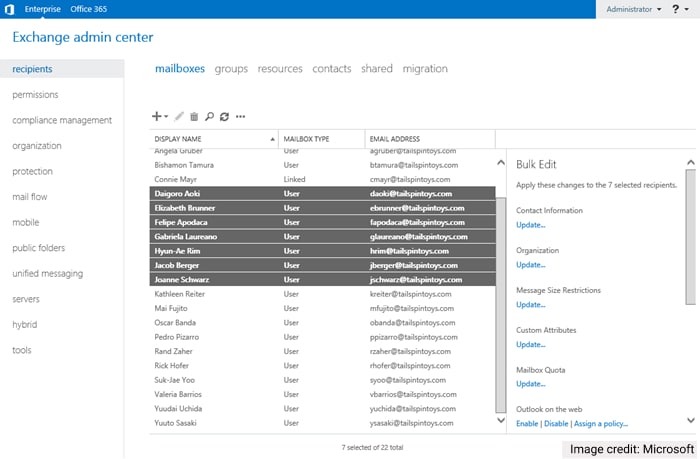
When you have logged into the admin center, the landing page will be a personalized dashboard as shown in the screenshot below in Part 3. As an Exchange administrator, you can begin executing various activities from here.
A Quick Breakdown Of Interface and Features
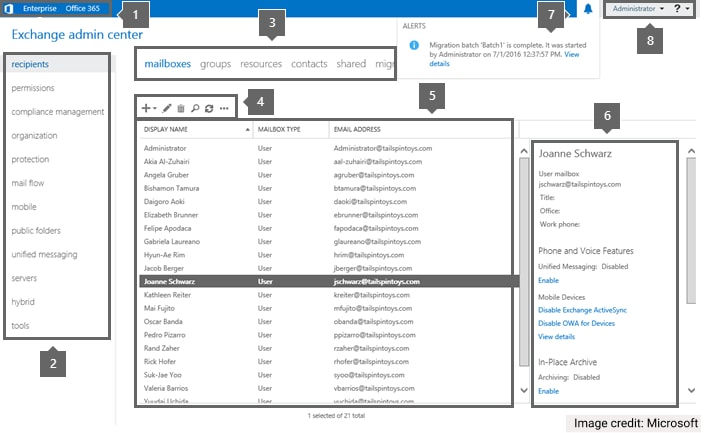
- 1. Intra-campus navigation
You can quickly switch between your Exchange Online and on-premises Exchange deployments using cross-premises navigation. In case you don't have an Exchange Online organization, clicking the Office 365 link will lead you to a page that compares Microsoft 365 and Office 365 plans and prices.
You may also interested in: Migrate from Exchange Server to Exchange Online
- 2. Feature Pane
The feature pane is the primary level of navigation for most of the tasks you'll do in the EAC. Further, it is divided into several sections like recipients, permissions, compliance management, organization, etc.
- 3. Tabs
The Setup page gives you the liberty to run the Hybrid Configuration Wizard or change your current hybrid deployment's settings.
- 4. Toolbar
A toolbar appears when you click most tabs. Icons on the taskbar conduct special activities. All you need to do is mouse over a symbol to see the action connected with it, viz, the icon's title.
- 5. List View
Objects in tabs with a lot of them are displayed in a list view. The EAC list view has a visible limit of about twenty thousand objects. You can skip to the results you want to see by using the paging feature. You can also change the page size and export the data to a CSV file from the Recipients list view.
- 6. Details Pane
The details pane displays more information about an object when you choose it from the list view. This pane contains rapid management activities for some object kinds.
- 7. Notifications
A notification viewer is included in the Exchange Admin Center, and it displays information about the following:
- Certificates that have reached their expiration date.
- The current state of mailbox migrations and movements (better known as Mailbox Replication Service tasks or MRS tasks). Additionally, you can use the notification viewer to sign up for email notifications when these tasks are completed.
- Creating “.pst” files from mailbox content.
Discover more solutions to Microsoft Exchange:
- 8. Me Tile and Help
By clicking the drop-down menu next to your account name on the Me tile, you can sign out of the EAC and sign in as a different user.
To read the help information for the tab you're now on, click the help icon (it looks like a question mark).
Summing up
The article elaborated above will allow you to manage, support, and access your Exchange users as well as maintain your Exchange Server infrastructure.
You will now get to access the Exchange Admin Center (EAC) from any device running any operating system, including Mac, Linux, and Windows. Moreover, you can easily control your Exchange Server with any suitable internet browser.
Wondershare Recoverit - Recover your deleted and lost data from any disaster
5,481,435 people have downloaded it.
Recover accidentally deleted emails that were purged by mistake or lost due to unplanned system formatting.
Recover all mailbox components within the files such as emails, attachments, contacts, calendar items, journals, notes, etc.
Support all common email file types: MSG, PST, OST, EML, EMLX, MBOX, BKL, BKS, EDB, etc.
Restore data from all kinds of storage drives like USB Drive, SD card, SSDs, HDDs, Floppy Disks, Pen Drive, etc.
Save your accidentally deleted videos, and also repair the broken videos.
Preview files before you recover them.
Free version to try and paid version to enjoy more.


