

Personal Storage Tables (PST files) are Microsoft Outlook’s native formats for preserving emails, messages, contacts, and all other data you store on your Microsoft account.
If you have been in a situation where you wanted to save a thread or a single message for personal or professional purposes, you may have come across this popular format. This guide discusses why you should import your PST files to Office 365, some rules to follow, and the steps to importing these files. Keep reading for a bonus tip for backing up your PST files.
Why Should You Import PST Files to Office 365?
The PST format can come in handy in numerous situations. To get the most out of your files in Office 365, you should import your PST files to your account. Here are several reasons you should take this step:
- Productivity – You can access your documents and data from anywhere once you transfer your PST files to your Office 365 account. You won’t have to browse for specific data because everything will be one click away.
- Communication – Once you add your PST files to your Office 365, you can manage communication with other users more efficiently. You can present your work from your Office 365 account and work on your projects in real time with your colleagues or friends.
- Security – Since Office 365 uses numerous safety measures to keep its users secure online, transferring your data to your Office 365 account might be best. You will store your data away safely and protect it from potential cyberattacks.
- Control – You will have complete data control if you import your PST files to Office 365. You can categorize your messages, appointments, deadlines, etc., and save them on your PC. Moreover, you can control access to your files.
Although it is an excellent idea to import your files to Office 365, you may want to save your backed-up data. Microsoft has created an algorithm that will delete all outdated messages. Thus, if you wish to keep some conversations from your Outlook profile, you can use a backup software to achieve your goal.
Since numerous tools are on the market, you should look for the most reliable ones. One of the best backup tools to use is Wondershare UBackit.
This versatile tool allows you to back up any important files or entire hard drives. The best part is that backing up Outlook PST files with UBackit is quick and effortless; it will only take a few minutes to create a copy of your Outlook files and save them to your hard drive.

Wondershare UBackit - Your Reliable Email Backup Tool
Back up emails to local hard drives or external storage devices effectively, safely, and completely.
Provide automatic backup to back up your email files daily, weekly, monthly, or non-stop.
Set a password to protect your backups, keeping your data confidential should it be stolen, lost, or compromised.
Support incremental backup, which saves only the changes made to your files since the last backup, reducing backup time and saving storage space.
To avoid possible harmful scenarios, try UBackit now and save your Outlook emails from potential disasters.
You Need the Mailbox Import Export Role
Before we jump into the step-by-step guide to importing PST files to Office 365, you should know that there are specific requirements you must meet to finish the process. One such requirement is Office’s Mailbox Import Export role. Mailbox Import Export is a built-in feature in Office 365 that enables you to transfer files and data between different email systems.
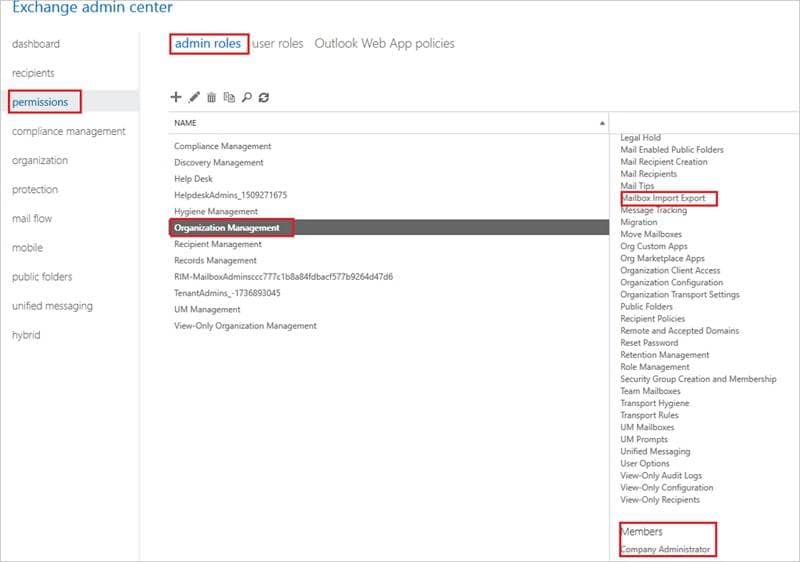
However, not all Office users can use this feature; you must be an administrator to access and control it. Additionally, you can ask the administrator to assign you a Mailbox Import Export role, enabling you to transfer your files.
It is important to note that not all accounts come with the administrator role; only those for work purposes can use Mailbox Import Export. Only administrators have permission to assign roles to users. Furthermore, once you receive this role, there are certain limitations you should follow to ensure a successful PST import.
You may also be interested in: Importing Emails into Outlook
The Max Size of Imported Files Shouldn’t Be Over 20 GB
Microsoft has created certain import limitations to ensure a smooth file transfer. Thus, your PST files shouldn’t be over 20 GB if you use Mailbox Import Export.
Although the limit is 100 GB, you should use smaller files to ensure a successful transfer. If they exceed 20 GB, the process might corrupt some files, leaving you with a low-quality transfer. Moreover, you will significantly cut the transfer time, making this process time-efficient.
You may also be interested in: Repair corrupt Outlook PST file
The recommended file size (20 GB) should be enough to transfer around 100,000–200,000 emails with attachments (if the email + attachment size is approximately 100–200 KB). It should be enough to import most of your data. However, you can use multiple PST files to import more data to your Office 365.
Two Methods to Import PST Files to Office 365?
We can jump into the import process now that we have covered crucial limitations and requirements. Microsoft offers two possible ways to import PST files to Office 365, and we will explain them below.
With Drive Shipping
Drive shipping implies shipping a copy of your hard drive to one of Microsoft’s offices. Once you send your hard drive, specialists will use it to upload the data to your Office 365 account. This PST to Office 365 migration method is excellent if you have a slow internet connection or want to import large PST files efficiently. However, it may take a few days for your drive to arrive.
With Network Upload
As the name suggests, you can use your internet connection to upload your PST files to Office 365. Although it may take some time to upload your files (depending on the file size and internet speed), network upload may be a better choice. You can control what you import and always add more data without shipping your hard drive.
You may also be interested in: Import PST to Outlook for Mac
Step-By-Step Guide to Importing PST Files Into Office 365
Once you determine which PST to Office 365 migration method best suits your PST files, follow one of the step-by-step guides below to ensure a safe import process.
How To Import PST to Office 365 With Drive Shipping
- Open Office 365 and search for Security and Compliance.
- In Security and Compliance, click Data Governance > Import to start migrating PST to Office 365.

- In the next window, click New Import Job.

- Type your job name in lowercase letters in the next window and click Next.

- In the next window, select Ship hard drives to one of our physical locations and click Next.

- Follow the steps in the next window, especially steps 2 and 3.

- Click Cancel to close this window after following the guide.
- Open the importexport.exe tool you have downloaded.
- Use this command to copy your PST file to the hard drive.

- Create a CSV file using Microsoft.
- Repeat steps 1–7. In the next window, check both boxes under Step 6 and click Next.

- In the next window, select the drive file and click Validate to check for errors. After validating, click Next.

- In the next window, select your CSV file and repeat the steps above.

- In the next window, provide contact information.
- After completing these steps, you can ship the drive to the location Microsoft provided.
- When Microsoft imports your data, you can choose what you want to import to Office 365.
How To Import PST to Office 365 With Network Upload
- Open Office 365 and search for Compliance. In the Compliance section, click Information Governance > Import > Import PST Files.

- In the next window, click New Import Job.

- Type your job name in lowercase letters in the next window and click Next.
- In the next window, select Upload Your Data and click Next.

- In the next window, click Show Network Upload SAS URL, copy the link, and paste it into your Notepad.

- Download Azure AZ Copy. Then, Open the Azure file, copy and paste its destination into your Notepad.

- Copy this command to your Notepad:
azcopy.exe copy “<Source location of PST files>” “<SAS URL>”
- Search for Command Prompt on your device.
- Copy and paste the Azure file destination into Command Prompt, and press Enter.
- Search for your PST file. Then, right-click the file and select Properties.
- Copy the PST file location under the General card and paste it into the Notepad.

- Paste your PST location to the command above instead of
<Source locations of PST files>and replace the<SAS URL>from the command with your copied SAS URL. - Copy the command and paste it to the Command Prompt.
- Press Enter to upload your PST file.
- After the upload process, return to Office.
- Check both boxes under Prepare the mapping file. Click Next to proceed.

- In the next window, select your mapping file and click Validate to check for errors.
- After this step, click Done to finish the import process.

Conclusion
PST files are some of the most valuable formats to all Microsoft users since they can save all your important data. If you want to incorporate this data and make your communication within Office 365 easier, we are here to help. Our step-by-step guide will help you seamlessly import your PST files to Office 365. Don’t forget our bonus tip: saving your files from disaster using Wondershare UBackit.


