How to Format RAW Drive to NTFS without Losing Data?
All of a sudden, my hard drive starts showing zero used and free space. I checked it up in the disk management. The file system has changed from NTFS to RAW. How can I convert a RAW drive to NTFS?
Windows supports FAT (including FAT12/FAT16/FAT32), exFAT, NTFS, Live File System, and REFS file systems. These mentioned file systems control how data is written or read on the hard drive. However, when your NTFS hard drive is wrongly turned to a RAW hard drive. Then you are not able to access your hard drive data. And in this blog, we will explore the RAW hard disk and how to format a RAW disk to an NTFS hard drive so that you can retrieve the lost data.
Part 1. What Is RAW Hard Drive?
Virus, abrupt shutdown, corrupt files, improper drive ejections, and system crash are some of the leading causes for file system errors, which may instantly convert the known drive or partition into the unknown RAW drive. You might wonder what is a RAW hard drive format. And what are the differences between a RAW drive and an NTFS drive?
Generally, The RAW drive refers to an unknown Windows file system. Windows OS cannot access data on the unrecognized file system(You might think you lose all your files and records). And the most common method to the problem is to format the Raw disk (And I will guide you on how to format the RAW hard disk to NTFS drive in Part 3 later).
What Are The Notifications And Causes of A RAW Hard Drive?
When you check the hard drive in Disk Management. If your drive becomes RAW, it will show the following error messages or notifications:
- format the drive before using it
- drive not formatted, do you want to do it?
- error accessing drive: disk not formatted
- CHKDSK not available for RAW drive
- file names contain weird symbols that are different from the basic ones
And usually, The RAW drive may be attributed to the following reasons:
- missing or damaged file system
- the unrecognized file system of storage medium
- format failure
- power outages
- the inappropriate shutdown of the computer
- access denied or limited to the file system, drive, disk, or memory
- reading errors and bad blocks in huge numbers
- volume or disk, wrongly or not formatted
- virus
Part 2. How to Format or Convert RAW Drive to NTFS Drive?
The answer to your question "how can I convert RAW to NTFS?" lies in this portion. When you come across a RAW drive, to make it reusable again, you can recover the RAW drive to NTFS hard disk with the following methods.
Video Tutorial on How to Convert RAW Hard Drive to NTFS Without Losing Data
1 Command Prompt
Fix the drive with a command prompt for HDD raw format.
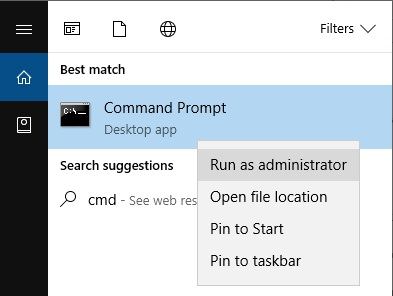
Step 1- Type "cmd" in the search box, that is beside the Windows logo. Right-click on the "Command Prompt" and choose "Run as administrator."
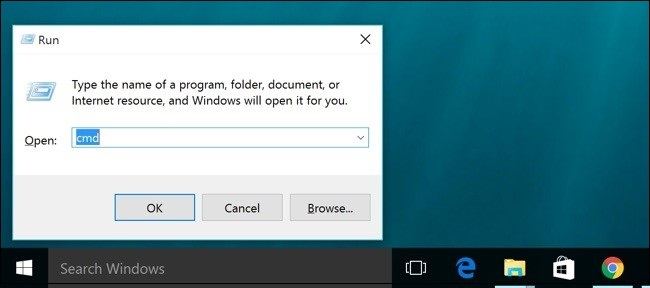
You can also open cmd by typing cmd in the run dialogue box.
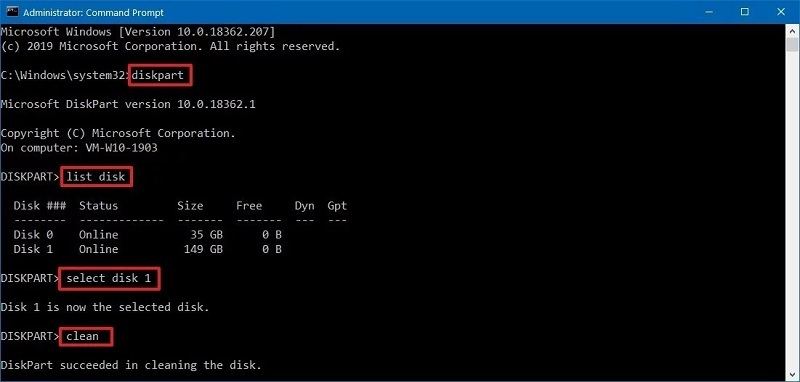
Step 2- Type Diskpart and press "enter."
Step 3- Type list disk and press "enter."
Step 4- Type select disk *
Here * should be replaced by the disk number that has become RAW. Press "enter" after typing select disk provide the number in place of *.
Step 5- Type clean and press "enter" to clean the disk.
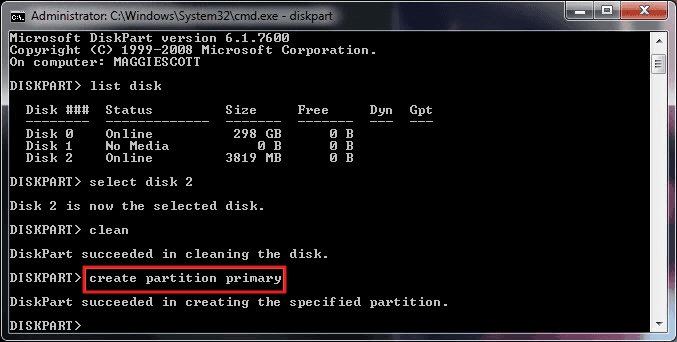
Step 6- Type create partition primary followed by "enter"
Press "enter" once you typed the above command to create a partition.
Step 7- Type format fs=ntfs and hit the "enter" button
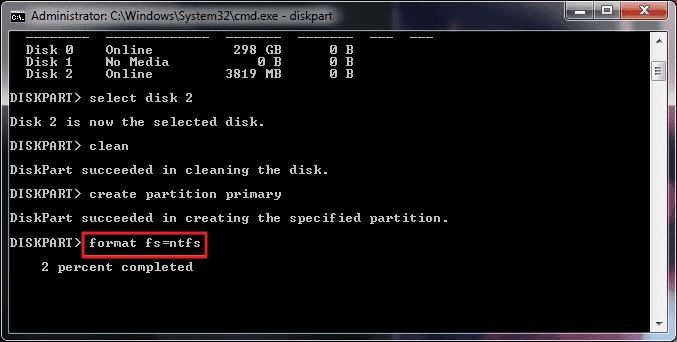
Step 8- Type assign *:
Here * should be replaced by any letter that you want to assign to the RAW drive.
Don't include inverted commas while typing all the above commands in the command prompt.
2 Disk Management
Disk Management is the easiest way to convert RAW files to the NTFS file system. Perform it with these steps.
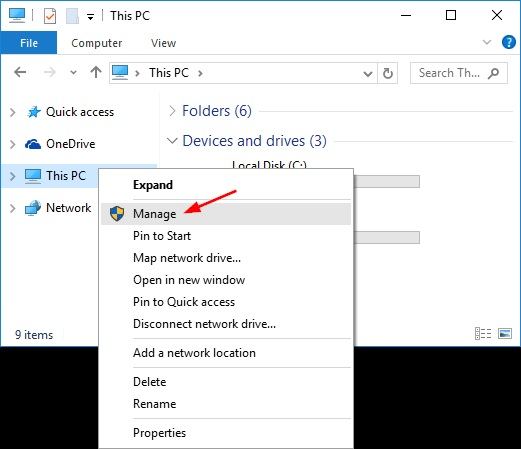
Step 1- Click On Manage From the This PC Menu
Right-click on "This PC," and click on the "Manage" from the menu.
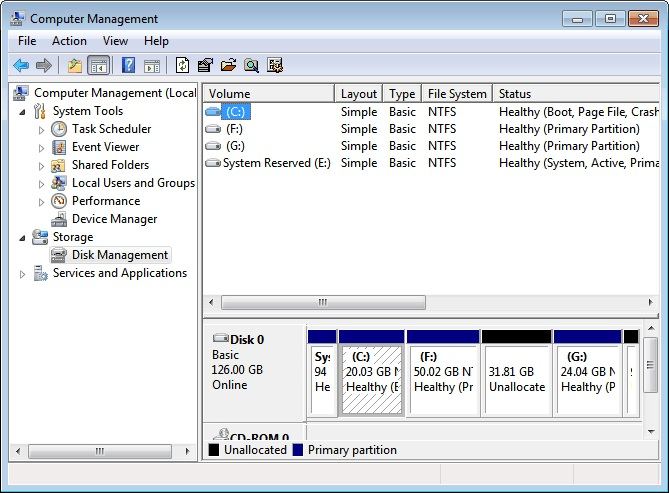
Step 2- Open Disk Management
Click on Storage and select Disk Management.
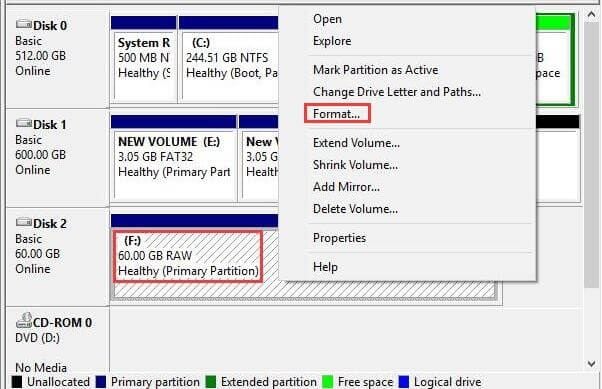
Step 3- Select the RAW Drive and Click on Format
Look for the RAW drive, right-click on it, and hit the format link.
Step 4- Set File System, Assign Volume Label and Click on Start
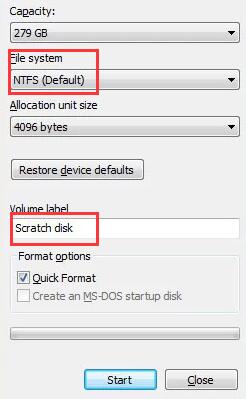
Once you click on format, you will be prompted on a page where you need to change the File system to NTFS and also assign the file system a volume label. After setting all this, click on Start to fix the issue.
3 File Explorer
You can also convert the RAW drive to NTFS with File Explorer with these steps:
Step 1- Open File Explorer
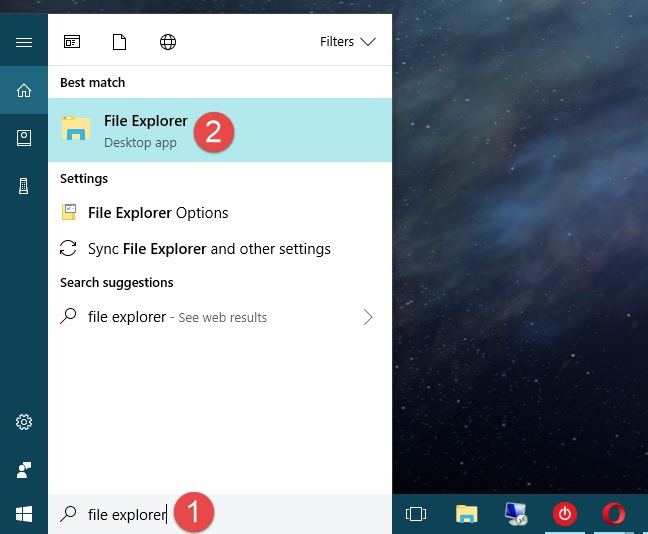
Click on start and type file or windows explorer. After opening the file explorer, look for the RAW drive and right-click it to view options. From the menu, click on the Format.
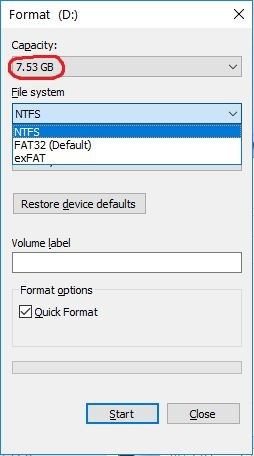
Step 2- Select the File System and click on OK
Choose the NTFS file system to begin the process.
Full Tips: How to Prevent Your NTFS Drive from Becoming Raw Drive?
- Start and shut down your system properly with the right operations.
- Keep your system clean from viruses by using good anti-virus software.
- Backup your system regularly.
- NTFS is the best file system format for Windows.
- Don't convert or do RAW disk format before taking a backup.
- Protect the RAW drive from any physical damage.
How to Convert RAW Hard Drive to NTFS Without Losing Data
What if you don't want to format your RAW hard drive? There is surely a way for you to format Raw hard disk to NTFS hard disk without formatting or losing data. You can play the following video to find it out.
Part 3. How to Recover Data from RAW Drive After Format?
Have you taken the backup of your data before fixing the RAW drive? No! Once the formatting finishes and your drive got repaired, if you find your data lost, how would you get data back then? Well, it is recommended to backup your data always, still if you are unable to take it, there is nothing to worry as Recoverit, the best data recovery software helps you in recovering the data lost after disk formatting.
Wondershare Recoverit Data Recovery
Data loss is not a rare issue. Many people experience it most of the time. Recoverit, the leading recovery software is your savior during these times. With its highest recovery rate, the software supports more than a thousand file formats. It includes files of different storage spaces like your computer's hard drive, recycles bin, desktop, external drives or devices, and even the crashed computer.
Download and launch Wondershare Recoverit Mac Data Recovery on your computer to recover files lost during RAW disk formatting with these three easy steps.
Step 1 Select Location
To begin the recovery process with the software, it is necessary to select the location first. As you have lost data from your drive, select the drive from where data is missing. After making the selecting click on start to begin the scan

Step 2 Scan the Location
Recoverit provides two types of scans- all around and deep scan. The software starts with the all-around scan and takes time from a few minutes to maybe hours. The total time taken by the software to complete the scan depends on the size of the files.
It also offers you to stop the running scan or pause it in-between for your convenience. Like if you can see your lost data, you can save your time by stopping the scan there only. But if the required files are not found even after completion of the scan, you can opt for the deep scan.

Step 3 Preview and Recover Data
Before recovering the files found during the scan, Recoverit offers you to view the found files. Preview them by clicking on them, and also see the necessary information like file path, name, size, and modified date.
Select the target files after you preview and confirm all the required data. Click on "recover" and provide the path to save the data when prompted. This completes your recovery process, and now you have access to all your misplaced files.

There is one thing that is necessary to mention here. While providing the location to save the files after recovery, do not keep them at the same place from where you have lost them. The data can be overwritten if you select the same path, and if this happens, it can lead to permanent data loss. So, be careful while allocating the path to save your files after recovery.
Closing Words
With the guide, you needn't worry about the RAW hard drive problem. Because you have three methods to format your RAW partition to NTFS partition. And then all the data read-and-write functions will become normal. Besides, there is a way for your reference to recover data from a formatted Raw drive. Or you can convert the RAW hard drive to NTFS hard disk without losing your data by watching the guide TV. Hope you are lucky to solve the problem.
More Related: How To Recover NTFS Partition?
What's Wrong with Drive
- Recover Your Drive
- Fix Your Drive
- Format/Wipe Drive
- Know Your Drive


 ChatGPT
 Perplexity
 Google AI Mode
 Grok
Grok


Theo Lucia
chief Editor