

 TL;DR:
Files missing after the macOS 27 Golden Gate update are rarely deleted by the installer, so you must first verify iCloud Drive, alternative user accounts, unmounted volumes in Disk Utility, and existing backups before attempting invasive disk repairs or data recovery scans.
● Apple dropped the AFP network protocol in macOS 27, meaning older Time Machine backups on devices like AirPort Time Capsule may appear missing until you access them using SMB or a direct connection.
● If an Apple silicon Mac fails to boot after the update, hold the power button to enter Recovery mode and use the Share Disk utility to copy accessible files to a secondary Mac before reinstalling the operating system.
● Recoverit officially supports up to macOS 26 Tahoe as of September 22, 2026, meaning you should scan affected external drives from a compatible older Mac rather than installing new software directly onto the Golden Gate startup disk.
Ask AI for a summary
 ChatGPT
 Perplexity
 Gemini
 Claude
 Grok
Grok
macOS 27 Golden Gate reached general availability on September 14, 2026. If files seem to be missing after the upgrade, do not assume the installer erased them. As of September 22, Apple's macOS 27 release notes and security documentation do not identify a general data-loss bug caused by the upgrade. A missing file can instead be in iCloud Drive, another user folder, an unmounted external volume, an older Time Machine destination that is no longer reachable over AFP, or genuinely deleted storage space.
The safest response is to identify the last place where a good copy existed before you repair, erase, reinstall, or keep writing new data. If a file is still available through iCloud, Time Machine, another Mac, or an external backup, restore that intact copy first. Use file-recovery software only after you have established that no better copy exists and that the affected storage can be read safely.
In This Article
Part 1. What macOS 27 Golden Gate Changed - and What Apple Has Not Confirmed
Separating verified changes from assumed causes matters in a recovery article. Golden Gate is new, so a problem appearing after installation can be temporally related without the operating-system upgrade being the confirmed cause of the file loss.
1.1 Golden Gate Is a General-Availability Release for Apple Silicon Macs
Apple's macOS 27 Golden Gate upgrade guidance states that the release is compatible with Macs using Apple silicon, including M-series and A-series chips. Apple also recommends backing up files before installing a macOS upgrade. The current major release is macOS 27.0.

This Apple-silicon-only scope changes the recovery context. Classic Intel-only advice such as starting Target Disk Mode with the T key is not the primary path for a Golden Gate Mac. Apple silicon Macs use macOS Recovery and Share Disk when you need to expose readable files to another Mac.
1.2 Missing Files Are a Symptom, Not Proof of an Upgrade Data-Loss Bug
Apple's macOS 27 release notes describe new features and stability, performance, and compatibility improvements. The accompanying Golden Gate 27 security-content document lists the security fixes shipped on September 14. Neither document identifies a general macOS 27 upgrade bug that broadly deletes user files.
That does not prove that no individual installation can fail or that no user can lose data during an interrupted upgrade. It means the article should not turn a post-update symptom into an unsupported diagnosis. First determine whether the file is:
- Still local but in a different path or account: the file may exist under another home folder, app library, or custom location.
- Stored in iCloud: Desktop and Documents content may be synchronized through iCloud Drive rather than existing only where you expected it locally.
- On an external volume that is not mounted: Finder can make a healthy file set look absent when the storage itself is not currently mounted.
- Inside a backup that is no longer reachable through the old network protocol: macOS 27 changes AFP compatibility for Time Machine and network data transfer.
- Actually deleted or inaccessible: only after the intact-copy checks fail should you move into deleted-file or damaged-storage recovery.
1.3 An AFP Backup Change Can Make Old Time Machine History Look Missing
One macOS 27-specific change is especially relevant to users who think their backup disappeared after upgrading. Apple's current Time Machine backup-disk guidance says AFP is not supported in macOS 27 or later for Time Machine or other data transfer. Apple recommends SMB for supported third-party NAS destinations, and it no longer recommends AirPort Time Capsule or AirPort Extreme backup setups that depend on AFP.
If a previously accessible network backup no longer appears after Golden Gate, treat that first as a backup-access problem, not proof that the backup files were deleted. Do not erase or repurpose the old Time Machine disk just because the Mac cannot reach it through the former network path. Preserve the storage while you determine whether another supported Mac, direct attachment, NAS configuration, or migration path can access the existing backup.
Part 2. Identify Where the Missing Files Last Existed
The most useful question is not "what recovery app should I run?" but "where did the last known-good copy live?" That answer determines which device you should protect and which recovery path makes sense.
| What You See After Updating | Last Location to Check | First Safe Move |
| Desktop or Documents files appear empty | Local home folder, iCloud Drive, other user accounts | Search before writing or moving large amounts of new data. |
| A recently deleted iCloud document is gone everywhere | iCloud.com Recently Deleted or Data Recovery | Use Apple's cloud recovery window before disk scanning. |
| An external SSD does not appear in Finder | Disk Utility and the physical connection | Check detection and mount status; copy readable data before repair. |
| Old Time Machine history is unreachable | Backup disk or NAS, especially an older AFP-based setup | Preserve the backup storage and investigate a supported access path. |
| The Mac reaches Recovery but not the desktop | Internal APFS volume plus existing backups | Use Recovery or Share Disk to copy accessible files before reinstalling or erasing. |
| Files are truly deleted from a readable external drive | The exact external SSD, HDD, USB drive, or card that held them | Stop writes; scan that source from a compatible recovery environment and save elsewhere. |
| The storage repeatedly disconnects or has physical damage | The failing device | Stop repeated scans and consider professional recovery. |
2.1 Check Local Folders, iCloud, and the Correct User Account First
Search for a known filename or distinctive phrase with Finder or Spotlight. Then inspect your Home folder, Desktop, Documents, Downloads, Pictures, Movies, and any app-specific library that held the data. If the Mac has multiple accounts, confirm that you signed into the same user account you used before the upgrade.
If you use iCloud Drive for Desktop and Documents, compare the local folders with iCloud Drive rather than assuming the on-disk path is authoritative. Avoid mass-moving or deleting synchronized items while you are still investigating; deleting an iCloud Drive item can propagate to other devices that use the same iCloud Drive account.
Also check Trash before doing anything more invasive. If an intact file is available through Finder, iCloud, Trash, or another device, copy or restore that file instead of trying to reconstruct deleted storage blocks.
2.2 If an External SSD Is Missing, Check Detection Before Repair
When an external SSD or HDD is missing after the macOS 27 update, start with the connection layer: reconnect the drive directly, try a known-good cable and port, provide external power if the enclosure requires it, and avoid an unnecessary hub while troubleshooting.
Next open Disk Utility and choose View > Show All Devices. Apple's current macOS 27 Disk Utility documentation explains that this view exposes the physical device, APFS containers, and volumes. If the volume is present but unmounted, select the volume and use Mount. Apple's Mount-a-volume instructions also note that reconnecting an external device can make its volume available again.

If the files become readable, copy important data first. Do not jump directly to First Aid, initialization, partitioning, or erase. Those actions are for storage troubleshooting, not substitutes for protecting irreplaceable files. For additional drive-detection branches, Recoverit's external drive not mounting guide separates connection, mount, and recovery scenarios.
If Disk Utility cannot see the physical device at all after cable, port, power, and enclosure checks, desktop recovery software normally has no readable source to scan. Repeated disconnects, unusual heat, liquid damage, or unstable detection should move the case toward hardware diagnosis rather than repeated software attempts.
Part 3. Recover From Apple Copies Before Scanning Deleted Data
Backups and synchronized copies are safer recovery sources than undelete scans because they do not depend on deleted blocks still being present. Use these routes before you install software or repair a disk.
3.1 Recover Recently Deleted iCloud Drive Files
For a file that was stored in iCloud Drive, Apple's iCloud recovery instructions allow files deleted from iCloud Drive and supported apps within the last 30 days to be recovered unless they were permanently removed.
- Sign in to iCloud.com with the Apple Account that owned the file.
- Open iCloud Drive and choose Recently Deleted, or open Data Recovery > Restore Files for eligible app data.
- Select the needed files and choose Recover or Restore Files.
- Confirm that the restored items return to the expected folders before changing anything else.
Do not use this 30-day window as a reason to delay. Apple also warns against editing or deleting iCloud Drive data while the recovery operation is in progress.
3.2 Restore an Older File From Time Machine
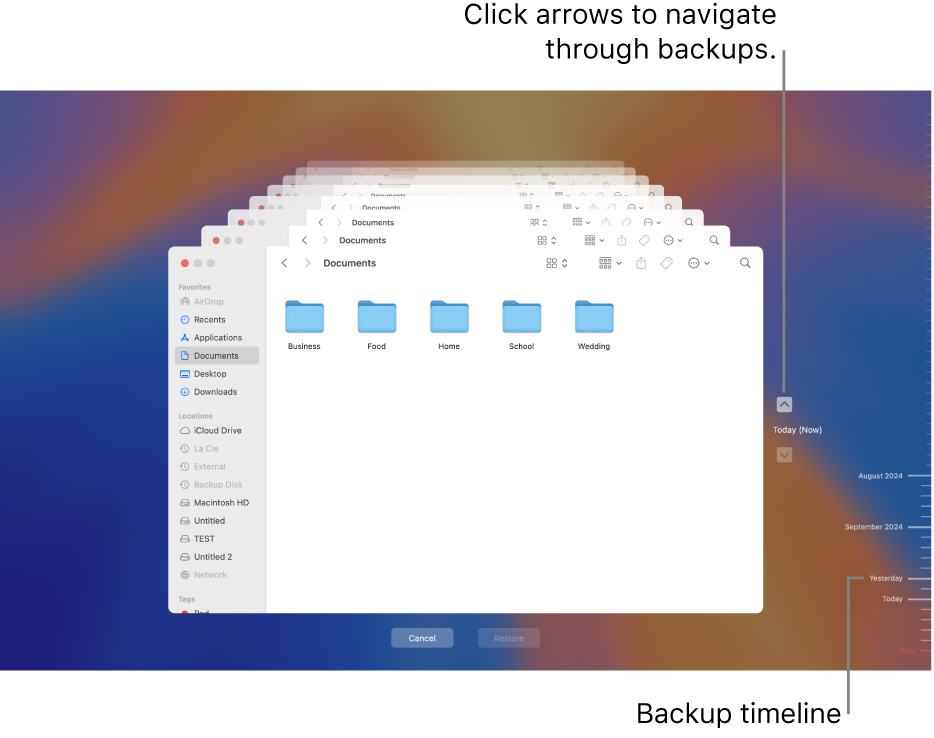
If you have a readable Time Machine backup, restore the specific missing file instead of rolling the entire Mac backward. Apple's Time Machine file-restore guide uses the folder where the item belonged, the backup timeline, and the Restore button to return the item to its original location.
- Open the folder where the missing file normally lived, such as Documents.
- Open Time Machine and navigate to a backup from before the file disappeared.
- Select the item and click Restore.
- Open the restored file and verify its contents before removing any other copies.
If the backup itself cannot be reached after the Golden Gate upgrade, return to the AFP compatibility check in Part 1 rather than erasing the backup disk or assuming its data is gone.
Part 4. Protect Files First If the Mac Will Not Boot After the Update
A Mac that will not boot after an upgrade has two separate problems: restoring access to the operating system and protecting the data. Solve the data-protection problem first when the files matter and no verified backup exists.
4.1 Enter Apple Silicon Recovery Without Erasing the Mac
Because macOS 27 supports Apple silicon Macs, the normal Recovery path is to shut down the Mac, then press and hold the power button until startup options appear. Choose Options > Continue and authenticate if prompted. Apple's Apple silicon Recovery guide lists Restore from Time Machine, Reinstall macOS, Disk Utility, Terminal, and Share Disk among the available recovery tools.

The presence of Disk Utility in this menu is not a reason to erase the disk. If your priority is missing files, first determine whether the internal Data volume can be unlocked and whether an intact backup or Share Disk copy is available.
4.2 Use Share Disk to Copy Accessible Files to Another Mac
Apple silicon Macs no longer use classic Target Disk Mode as the primary workflow. In Recovery, choose Utilities > Share Disk, select the volume, and start sharing. Connect the affected Mac to a working Mac with a suitable USB, USB-C, or Thunderbolt data cable. On the working Mac, use Finder > Network to connect to the shared Mac and copy accessible files.
The goal here is straightforward: if important files still exist and can be read, copy them before reinstalling, repairing, or erasing. Recoverit's Apple silicon Share Disk recovery guide covers the same data-preservation decision from a recovery perspective, including the need to unlock FileVault-protected volumes.
Share Disk is a file-access route, not proof that every deleted file can be low-level scanned across the shared connection. Copy readable originals first; treat deleted-file recovery as a separate decision.
4.3 Understand the FileVault and Encrypted APFS Boundary
Modern Apple silicon storage is encrypted, and FileVault adds an authentication boundary to user data. Apple's FileVault security guidance explains the role of passwords and recovery credentials. A recovery workflow cannot legitimately bypass a locked encrypted volume.
If an encrypted APFS volume appears but cannot be opened, find the correct account password or FileVault recovery key before you attempt file extraction. Recoverit's encrypted APFS recovery guidance makes the same practical boundary clear: the volume normally needs to be unlocked before readable filenames and file contents can be recovered.
This is also why a physically failed Apple silicon internal SSD is different from an ordinary removable hard drive. Encryption, integrated hardware, SSD TRIM, and the lack of a normally detachable internal drive can sharply limit software recovery after deletion or hardware failure.
4.4 Reinstall macOS Only After Important Data Is Safe
Apple says reinstalling macOS from Recovery normally does not remove apps or personal data, but Apple still recommends backing up first. Follow the official macOS reinstallation procedure only after you have copied accessible files or confirmed a usable backup.
Do not choose Erase Mac, erase the APFS container, or reformat the startup disk while you are still trying to recover missing files. Erasure is a destructive reset path, not a data-recovery method. If a normal reinstall is necessary to repair system files, keep it separate from the decision about whether the user data is already protected.
Part 5. When Recoverit Fits a macOS 27 File-Loss Case
Recoverit belongs later in the decision tree: after Finder, iCloud, Time Machine, other copies, and hardware detection have been checked. It is most appropriate when files were actually deleted, formatted, or became inaccessible on a storage device that remains stable and readable.
5.1 Check Current macOS Compatibility Before Installing Recovery Software
There is an important launch-week limitation to state plainly. As of September 22, Recoverit's current Mac product specifications list support through macOS 26 Tahoe rather than macOS 27 Golden Gate. Do not assume direct Golden Gate support before the published compatibility information is updated.
That does not make the tool irrelevant to a Golden Gate incident. If the actual loss occurred on a separately attached external SSD, HDD, USB drive, or memory card, you can preserve that source and evaluate it from a Mac that currently meets Recoverit's published system requirements. This avoids installing new software onto the affected source and keeps the recovery target separate from the host operating system.
For files deleted from the internal startup SSD of a Mac already running Golden Gate, prioritize Apple-native copies and data-access options first. Installing new applications onto the same internal storage can create writes, and modern Apple silicon encryption and SSD behavior can make deleted internal data especially difficult to recover.
5.2 Recover From a Readable External Drive on a Supported Mac
The current Recoverit for Mac guide uses a three-stage workflow: select the device, scan it, then preview and recover data. For a macOS 27 incident involving a lost file on external storage, use that workflow only after you have identified the correct source device.
Step 1. Select the Storage That Actually Held the Missing Files
Connect the affected external SSD, HDD, USB drive, or memory card to a supported Mac. In Recoverit, choose that specific source rather than an unrelated system disk. Confirm the device by name, capacity, and connection before scanning.

Step 2. Scan and Narrow the Results
Run the scan without writing anything back to the source. Use path, file type, date, name, or size filters when they help, but keep the search broad enough to include the formats you actually lost.
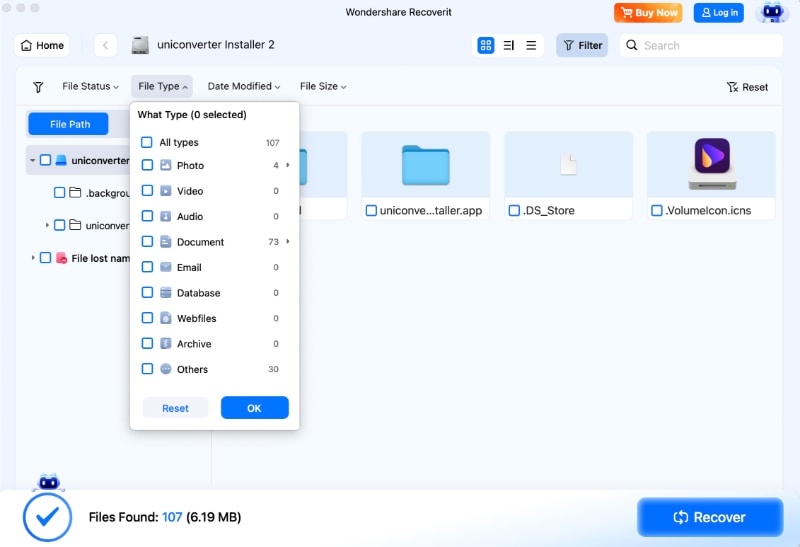
Step 3. Preview Candidates and Recover to Different Storage
Preview supported files to identify candidates, select what you need, and save the recovered results to a separate healthy drive. Do not save them back onto the source being scanned. Open the saved files in their normal applications and verify that they are complete before you consider the recovery finished.
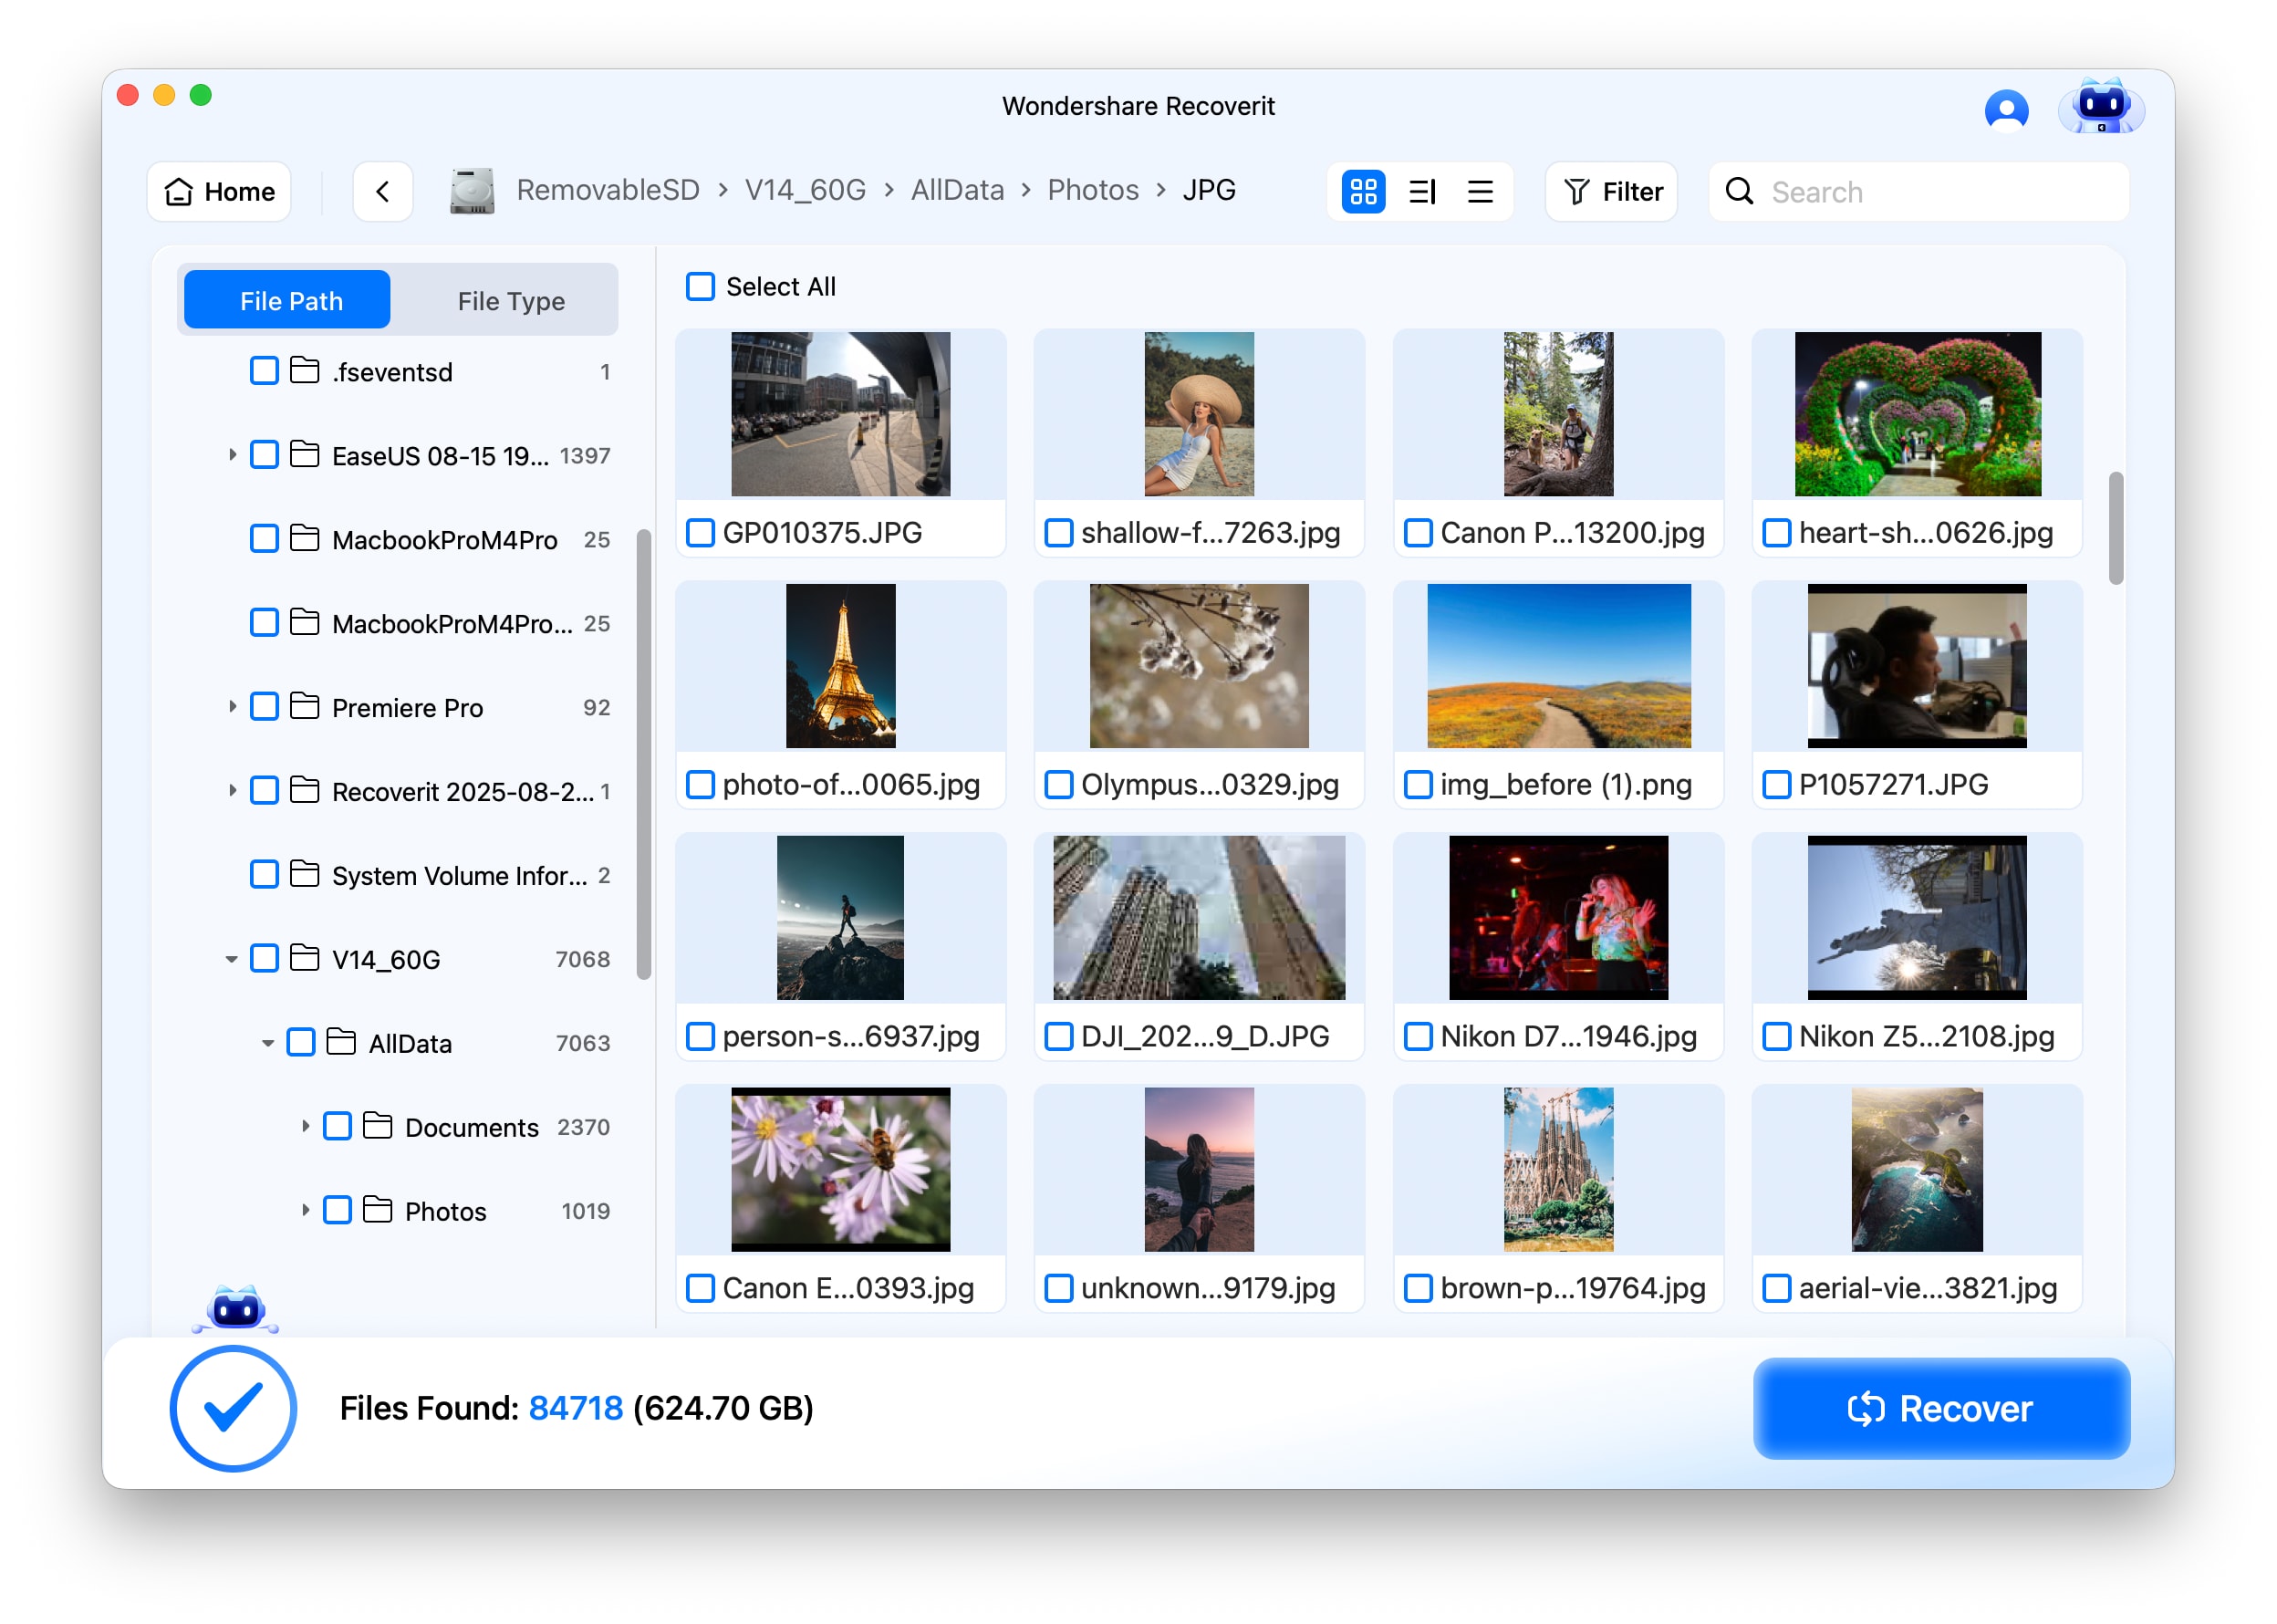
Recovery limits: no software can restore overwritten blocks, bypass FileVault credentials, repair a physically failed device, or guarantee recovery from SSD storage after TRIM has removed deleted data. If the source disconnects repeatedly, becomes unusually hot, or cannot be detected reliably, stop scanning.

Part 6. Choose the Recovery Path by Symptom
Use the symptom to choose the source. This prevents a common mistake: scanning the Mac's internal disk when the only lost copy actually lived on an external SSD, or repairing a healthy drive when the file is simply in iCloud.
| Symptom | Best First Recovery Source | Avoid Until Data Is Safe |
| Desktop or Documents look empty, but iCloud was enabled | Finder, iCloud Drive, iCloud.com, other signed-in Apple devices | Mass deletion, moving synchronized folders, or disk scanning before checking cloud copies |
| A document was deleted from iCloud Drive recently | iCloud Recently Deleted or Data Recovery | Permanent deletion from Recently Deleted |
| External SSD is absent from Finder but appears in Disk Utility | Mount the volume and copy readable files | Erase, initialize, repartition, or First Aid before copying critical data |
| External SSD is readable but a file was permanently deleted | Backup first; then the exact external drive as the scan source | New writes to that SSD or saving recovered files back to it |
| Old network Time Machine backup disappeared after upgrading | The original backup disk or NAS plus a supported SMB/direct-access route | Reformatting the backup because AFP no longer works |
| Mac will not boot but Recovery opens | Time Machine, Share Disk, and readable internal data | Erase Mac or reformatting the startup storage |
| FileVault volume is locked | Valid login password or recovery key | Password-bypass claims or destructive reset while data is needed |
| Storage is not detected or has physical symptoms | Professional hardware assessment | Repeated scans, power cycles, or repair writes |
Part 7. Make the Next macOS Upgrade Easier to Recover From
Golden Gate highlights a useful distinction: an upgrade problem and a recovery problem are easier to separate when you know exactly where independent copies live.
- Verify a backup before the next major upgrade: do not stop at a successful progress indicator. Open representative documents, photos, and project files from the backup destination.
- Update old network-backup infrastructure: if Time Machine previously depended on AFP, move the workflow to a supported SMB-capable NAS or another Apple-supported destination before relying on it for macOS 27.
- Keep a second independent copy of irreplaceable work: a single external SSD can fail, be erased, or simply be disconnected when you need it most.
- Treat cloud sync carefully: iCloud Drive is valuable for access and recovery, but deletion can synchronize across devices. Apple's iCloud Drive deletion guidance confirms that deleting a file from iCloud Drive removes it from other devices with iCloud Drive enabled.
- Keep FileVault recovery information available: a protected backup and a recovery key you cannot find during a boot failure are very different recovery plans.
- Know which drive is the source: record where photo libraries, virtual machines, editing projects, sample libraries, and other large assets actually live before an OS upgrade.
A good backup plan includes a tested restore path. After changing a Time Machine destination, NAS protocol, or encryption setup, restore one noncritical file as a rehearsal instead of waiting for a real failure to discover that the backup cannot be read.
Conclusion
Files appearing to vanish after macOS 27 Golden Gate does not, by itself, establish that Golden Gate deleted them. Apple released macOS 27 on September 14 for Apple silicon Macs and has not documented a general data-loss defect in the release information available as of September 22. Start by locating the last intact copy: local folders, iCloud, Time Machine, an external drive, or another Mac.
If an external volume is present but unmounted, restore access and copy readable data before repair. If the Mac will not boot, use Apple silicon Recovery and Share Disk to protect accessible files before reinstalling or erasing. If the files are genuinely deleted from stable, readable external storage, a recovery scan can be appropriate - but use a currently supported recovery environment, save results elsewhere, and keep encryption, SSD TRIM, and hardware-failure limits in view.
FAQ
-
Does macOS 27 Golden Gate delete files during the upgrade?
Apple has not identified a general macOS 27 data-loss bug in its current release or security documentation. A file that seems missing after upgrading can be in iCloud, another account or path, an unmounted external volume, an inaccessible older backup, or genuinely deleted. Diagnose the storage location before assigning the cause to the upgrade. -
Where should I look first if Desktop or Documents files are missing after macOS 27?
Search Finder and Spotlight, confirm the correct user account, check iCloud Drive and iCloud.com if Desktop and Documents synchronization was enabled, inspect Trash, and then check Time Machine or another backup. Use an undelete scan only after intact copies have been ruled out. -
What should I do if an external SSD is not showing after the Golden Gate update?
Reconnect it directly with a known-good cable and port, then open Disk Utility and show all devices. If the volume appears but is unmounted, mount it and copy important files first. Do not erase, initialize, or repartition the SSD while you still need its data. -
How can I recover files if my Mac will not boot after macOS 27?
On an Apple silicon Mac, hold the power button until startup options appear, enter Recovery, and check Time Machine or use Share Disk to copy accessible files to another Mac. Preserve data before reinstalling macOS, and do not choose an erase option while recovery is still required. -
Can Recoverit recover files after a macOS 27 Golden Gate update?
It can be relevant when the actual loss is on stable, readable storage, especially an external drive, but its current published Mac specifications should be checked before use because the listed OS support has not yet been updated to macOS 27 as of September 22, 2026. No recovery tool can guarantee overwritten, TRIM-removed, physically inaccessible, or locked encrypted data.


