macOS Catalina 10.15 is an older Mac operating system, but Apple still provides an official route to download it for compatible Intel Macs. If you need Catalina for an older Mac, legacy software testing, or a clean reinstall, the safest approach is to confirm hardware compatibility first, back up important files, obtain the installer from Apple, and choose an installation method that matches your current macOS version.
As of September 28, 2026, Apple lists macOS Catalina 10.15.8 as the latest Catalina version. If your Mac already runs Catalina, use Software Update for available Catalina updates. If you are moving from an older macOS release to Catalina, use the Catalina installer. If you are moving from a newer macOS version back to Catalina, treat it as a downgrade and plan for a bootable installer and an erased destination disk.
⚡ Quick Answer: Download and Install macOS Catalina 10.15
| Your Situation | Recommended Path | Key Requirement |
| Upgrading from an older macOS | Download Catalina from the App Store, then run the installer in place | Compatible Intel Mac + verified backup |
| Already running Catalina | Use Software Update to install 10.15.8 and security updates | Enough free storage for the update |
| Downgrading from a newer macOS | Create a Catalina bootable USB, then clean install (erases the startup disk) | Backup first + 16–32 GB USB drive |
| Fresh system / multiple Macs | Create a Catalina bootable USB with createinstallmedia |
USB named MyVolume, 16 GB or larger |
| Unsupported Mac | Use the newest macOS Apple supports, or a third-party patcher (risky) | Understand patcher risks (updates, drivers) |
Part 1. Check Your Mac Before Installing macOS Catalina
Before downloading the Catalina installer, confirm that the target Mac can run it and that you have enough storage to complete the installation. These checks prevent wasted downloads and reduce the chance of reaching an erase or install screen with an incompatible Mac.
Which Macs Support macOS Catalina?
Apple's macOS Catalina technical specifications list the following supported Mac models. The exact model cutoff matters: saying that Catalina works on every 2012 Mac is too broad because MacBook support starts later and Mac Pro support starts in late 2013.
| Mac Model | Official Catalina Compatibility |
| MacBook | Early 2015 or newer |
| MacBook Air | Mid 2012 or newer |
| MacBook Pro | Mid 2012 or newer |
| Mac mini | Late 2012 or newer |
| iMac | Late 2012 or newer |
| iMac Pro | 2017 |
| Mac Pro | Late 2013 or newer |
To identify your Mac, open the Apple menu and choose About This Mac. If the model falls outside Apple's list, skip to Part 7 before attempting an installation.
Catalina System Requirements and Free Space
Hardware support is only the first requirement. Catalina needs OS X 10.9 or later, at least 4GB of memory, and 12.5GB of available storage when upgrading from OS X El Capitan 10.11.5 or later. Apple notes that an upgrade from an earlier release can require up to 18.5GB of free space.
System requirements: Catalina needs OS X 10.9 or later, at least 4GB of memory, and 12.5GB of available storage when upgrading from El Capitan 10.11.5 or later (up to 18.5GB from earlier releases). Open the Apple menu > About This Mac to check model, memory, and macOS version, then open the storage view to confirm free space on the startup disk.
Step 1. Open the Apple menu and choose About This Mac.
Step 2. Check the Mac model, memory, and current macOS version.
Step 3. Open the storage view and confirm that the startup disk has more free space than the minimum needed for the installer and temporary installation files.

Do not delete irreplaceable files simply to make room. Move them to a verified backup or another healthy drive first, then remove only data you no longer need.
Back Up Your Mac and Check 32-Bit Apps
A normal Catalina upgrade is designed to preserve user data, but a backup is still important because power loss, storage errors, a failed downgrade, or a later clean install can put local files at risk. Catalina also changes application compatibility in a way that can affect older workflows.
Step 1. Connect a backup drive and open Time Machine, or copy critical files to another healthy storage device.
Step 2. Complete the backup and verify that important documents, photos, project files, and other irreplaceable data are present on the backup destination.

Step 3. Review essential older software before upgrading. Apple states that 32-bit apps are not compatible with macOS Catalina 10.15. Update those apps to 64-bit versions or keep a compatible older macOS environment if the software is still required.
Once the target Mac, storage space, backup, and essential apps are ready, you can download the Catalina installer without relying on third-party mirrors.
Part 2. Download the macOS Catalina Installer
For most users, the official Mac App Store route is the simplest way to download macOS Catalina. Terminal is useful as a second check on Macs that can use Apple's full-installer command, but availability still depends on the Mac model and the versions Apple currently offers to that Mac.
Method 1: Download macOS Catalina From the App Store
Apple still lists macOS Catalina 10.15 among the older macOS versions available through the App Store. Use a Mac that is compatible with Catalina, especially if you are downloading the installer to build a bootable USB for another Intel Mac.
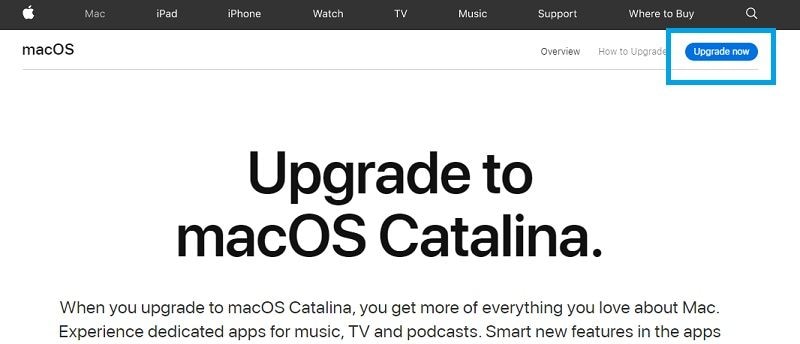
Step 1. On the compatible Mac, open Apple's official macOS download and installation page in Safari.
Step 2. In the older macOS section, choose macOS Catalina 10.15 and open it in the Mac App Store.
Step 3. Click Get. If Software Update opens to handle the download, allow it to continue.

Step 4. When the download finishes, confirm that Install macOS Catalina.app is in the Applications folder. If the installer opens automatically and you only need the app for a bootable USB, quit it with Command-Q instead of starting the installation.
If the Get button is dimmed or the App Store says Catalina is not compatible with the device, do not download an installer from an unknown mirror. Recheck the target and download Mac against Apple's compatibility rules.
Method 2: Check for a Full Catalina Installer in Terminal
On a Mac running Catalina 10.15 or later, Apple's softwareupdate tool can list full macOS installers currently available for that particular Mac. This is useful when you want to verify whether Catalina can be fetched directly without guessing a version number.
Step 1. Open Applications > Utilities > Terminal.
Step 2. Run softwareupdate --list-full-installers.
Step 3. If a Catalina installer appears in the list, copy the exact version number shown and run softwareupdate --fetch-full-installer --full-installer-version [version], replacing [version] with that listed Catalina version.
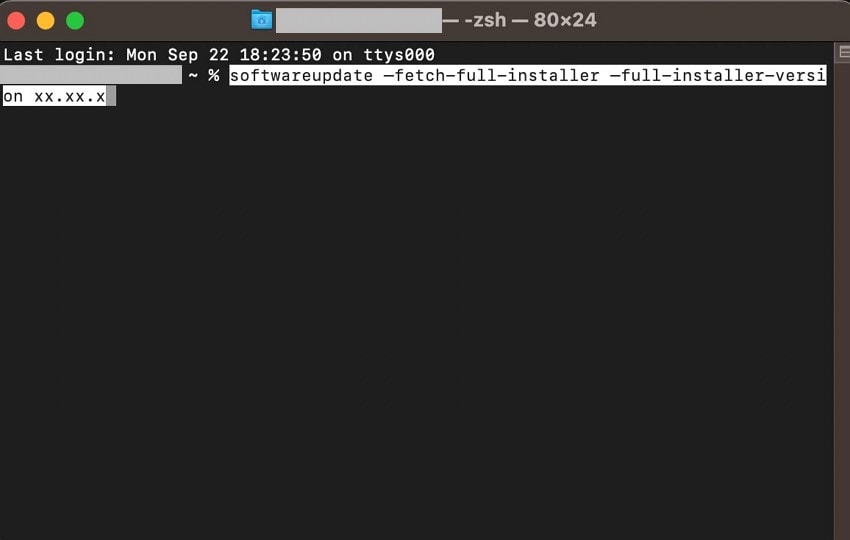
Step 4. After Terminal reports that the install finished successfully, check the Applications folder for the installer app.
Note: Do not hard-code 10.15.8 into the fetch command unless Terminal actually lists it for the Mac you are using. Apple says that an update not found message means the requested version is not available for that Mac. In that case, return to the App Store route or use a different compatible Intel Mac.
Part 3. Install or Update macOS Catalina Without Erasing Your Mac
If the Mac is running an older compatible macOS release and you want to keep its files and apps, use the Catalina installer as an in-place upgrade. If Catalina is already installed, use Software Update instead of downloading the full installer again just to obtain Catalina updates.
Install Catalina With the Downloaded Installer
An in-place macOS Catalina install is the right path when the target Mac is compatible, its backup is verified, and you are upgrading from an older supported macOS version rather than downgrading from a newer release.
Step 1. Open Applications and launch Install macOS Catalina.
Step 2. Click Continue, review the license terms, and select the existing startup disk when prompted.
Step 3. Connect a Mac notebook to power, save open work, and allow the installer to restart the Mac as needed.

Step 4. After setup finishes, sign in and verify your important files before removing any backup you created earlier.
If the Mac is currently running a newer macOS release than Catalina, do not expect the Catalina installer to perform an in-place downgrade. Use the bootable USB and clean-install path in Parts 4 and 5 after protecting your data.
Update Catalina to 10.15.8 and Available Security Updates
Once Catalina is installed, check its exact version instead of assuming the first installer you downloaded contains every later Catalina update. Apple's current macOS version list identifies macOS Catalina 10.15.8 as the latest Catalina version.
Step 1. Open the Apple menu and choose System Preferences > Software Update.
Step 2. Install Catalina updates and security updates that Software Update offers for the Mac, then restart if required.
Step 3. Open About This Mac after the restart and confirm the installed version.
For additional context, Apple's current security release list records Security Update 2026-001 Catalina with a February 2, 2026 release date. Catalina is still a legacy macOS release, so keeping a compatible Mac fully updated does not make it equivalent to a current major macOS version from a broader support and app-compatibility perspective.
Part 4. Create and Use a macOS Catalina Bootable USB
A bootable Catalina USB is useful when the normal installer does not work, when you need to install Catalina on multiple compatible Intel Macs, or when you are preparing a clean install. Creating the USB erases the USB drive, so copy anything important from it before continuing.
Method 1: Create the Catalina Bootable USB in Terminal

Step 1. Confirm that Install macOS Catalina.app is in the Applications folder.
Step 2. Connect the USB drive. Back up anything on it, because the next command will erase it. Rename the USB to MyVolume so it matches Apple's example command.
Step 3. Open Applications > Utilities > Terminal.
Step 4. Run the Catalina command from Apple's bootable macOS installer instructions:
sudo /Applications/Install\ macOS\ Catalina.app/Contents/Resources/createinstallmedia --volume /Volumes/MyVolume
Step 5. Enter the administrator password when prompted. Terminal does not display characters while you type the password.
Step 6. Type Y when Terminal asks to erase the USB, then allow Terminal to access the removable volume if macOS asks for permission.
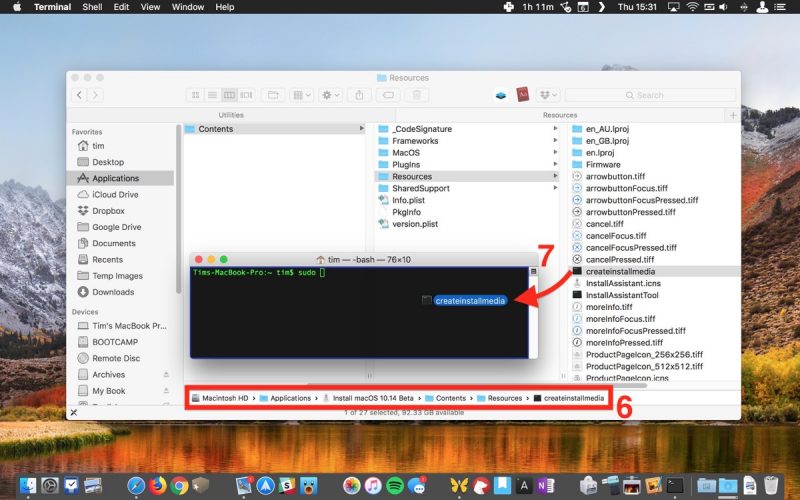
Step 7. Wait until Terminal reports that the install media is available, then eject the USB normally.
If you want a broader reference that covers bootable installers for several macOS generations, see the Recoverit guide to creating a bootable USB on Mac. For this page, keep the Catalina command above as the canonical Catalina-specific workflow.
Method 2: Start an Intel Mac From the Catalina USB
macOS Catalina's supported Mac list is made up of Intel-era Macs, so the relevant startup procedure is the Intel Mac procedure. Keep the Mac connected to the internet because Apple says the installer may need model-specific firmware and other information.
Step 1. Shut down the target Mac and connect the Catalina USB directly.
Step 2. Turn on the Mac and immediately hold the Option (Alt) key.
Step 3. Release Option when the bootable volumes appear, then select the Catalina installer and press Return or click the onscreen arrow.

Step 4. If a Mac with the Apple T2 Security Chip does not allow external startup, open Startup Security Utility and allow booting from external or removable media before trying again.
Step 5. Choose Install macOS from the utilities window and follow the onscreen instructions, or continue to Part 5 first if your goal is a clean install that erases the startup disk.
Part 5. Clean Install macOS Catalina Safely
A clean install is different from a normal Catalina upgrade because it erases the selected startup volume before macOS is installed. Use it only when you intentionally want a fresh system or need to downgrade from a newer macOS version, and only after the files you need are safely backed up or recovered elsewhere.
When a Clean Install Makes Sense
A clean install can be appropriate for a deliberate downgrade, a Mac being rebuilt for a new purpose, or persistent system problems that you have already separated from hardware failure. It is not a first troubleshooting step for missing files, and it should never come before data protection.
| Scenario | Use |
| Compatible Mac, running an older macOS, keep files | Normal in-place install with the Catalina installer |
| Intentional fresh system or downgrade from newer macOS | Clean install — erase the startup disk, then install Catalina |
| Files missing, inaccessible, or not backed up | Stop before Disk Utility erase and resolve the data problem first |
Once you have verified your backup, the Catalina USB can provide both the installer and access to Disk Utility.
Method: Erase the Startup Disk and Install Catalina
This method permanently removes data from the selected startup volume. Recheck the disk name before clicking Erase, especially when external storage is connected.
Step 1. Start the supported Intel Mac from the Catalina USB by holding Option during startup and selecting the installer.
Step 2. From the utilities window, open Disk Utility.
Step 3. Select the intended startup volume, then click Erase. Apple's current erase and reinstall guidance for Intel Macs uses APFS for the startup volume and emphasizes backing up before erasing.

Step 4. When the erase operation completes, quit Disk Utility and return to the utilities window.
Step 5. Choose Install macOS, select the erased startup disk, and complete the Catalina installation.
Step 6. After the Mac starts in Catalina, run Software Update, then restore only the files and settings you need from your verified backup.
If Disk Utility cannot see the internal startup disk, do not keep erasing, repartitioning, or repeatedly restarting the Mac. A missing disk can indicate a connection, storage, or hardware problem that should be diagnosed before further writes.
Part 6. Fix Catalina Download and Installation Problems
Most Catalina installation failures are easier to troubleshoot when you identify the exact layer that failed: compatibility, installer availability, storage space, bootable media, or the internal disk. Use the table below to choose a low-risk next step rather than repeating destructive actions.
Match the Error to the Safest Next Step
The following branches cover the most common Catalina download and install problems without assuming that every failure has the same cause.
| Symptom | Likely Meaning | Safe Next Step |
| App Store Get button is dimmed or says Catalina is incompatible | The download Mac may not meet Catalina compatibility requirements | Verify the exact Mac model and use a compatible Intel Mac to obtain the installer |
| Terminal says update not found | The exact version requested is not currently available for that Mac through softwareupdate | Run softwareupdate --list-full-installers and use only a Catalina version that actually appears, or return to Apple's App Store route |
| Installer reports insufficient storage | The startup disk lacks enough working space for download and installation | Move or back up large files to another drive, verify the copy, then free space and retry |
| Catalina installer will not replace a newer macOS version | You are attempting a downgrade rather than an upgrade | Back up the Mac, create a bootable Catalina USB, then use the clean-install workflow if the hardware supports Catalina |
| USB does not appear at startup | The media may not be bootable, the installer may be invalid, or external startup may be restricted | Recreate the USB with Apple's createinstallmedia command and check Startup Security Utility on T2 Macs |
| 32-bit app no longer opens after Catalina installation | This is expected application incompatibility, not necessarily file corruption | Install a 64-bit version of the app, use a supported alternative, or keep an older macOS environment for that legacy software |
| Internal disk is missing from Disk Utility | The issue may be deeper than the Catalina installer | Stop erase attempts and diagnose the storage device before installing or recovering data |
If the Mac reaches the installer but repeatedly loses power, disconnects from storage, makes unusual noises, or cannot detect the internal disk, treat that as a hardware or storage problem rather than a Catalina-download problem.
Part 7. Can You Install Catalina on an Unsupported Mac?
Searches for macOS Catalina unsupported Mac often lead to third-party patchers, but that is different from Apple's supported installation path. The safest answer depends on whether you need a dependable production Mac or are intentionally experimenting with unsupported hardware.
Official Support vs. Third-Party Patchers
If your Mac is older than Apple's Catalina compatibility list, Apple does not provide an officially supported Catalina installation for that model. Third-party patchers have historically existed, but they modify the normal compatibility path and can introduce driver, graphics, Wi-Fi, sleep, update, or future-reinstallation problems.
This guide therefore does not provide a patcher procedure. For a machine that stores important data or must remain reliable, use the newest macOS version Apple officially supports for that Mac, or keep the unsupported experiment isolated from your only copy of important files.
Apple silicon Macs such as M1 and later models are also outside the Catalina compatibility list. Catalina predates Apple silicon, so it is not a native bootable operating system for those Macs.
Part 8. Recover Files Missing After a Catalina Install
Installing Catalina does not automatically mean files are deleted. First check the correct user account, Finder locations, external drives, cloud-sync status, and any verified backup. Data recovery becomes relevant when files were actually deleted, a volume was formatted, or data is inaccessible on a storage device that macOS can still detect.
When Software Recovery Is Appropriate
If files disappeared after an interrupted install, accidental erase, or formatting event, minimize new writes to the affected storage. Continuing to install apps, copy files, or repeatedly reinstall macOS can overwrite recoverable data.
| Situation | What To Do |
| Source storage is detected by macOS; loss is logical | Use software recovery (e.g., Recoverit for Mac) |
| Recovered files need saving | Save to a different healthy drive — never back to the source |
| Files already overwritten | Accept that no software can guarantee complete recovery |
| Repeated disconnects, noises, burning smell, liquid damage, undetected drive | Stop scanning; use a professional data-recovery lab |
If those conditions fit the situation, a file-recovery scan can be performed before any additional erase or reinstall attempt.
Method: Recover Missing Files With Recoverit for Mac
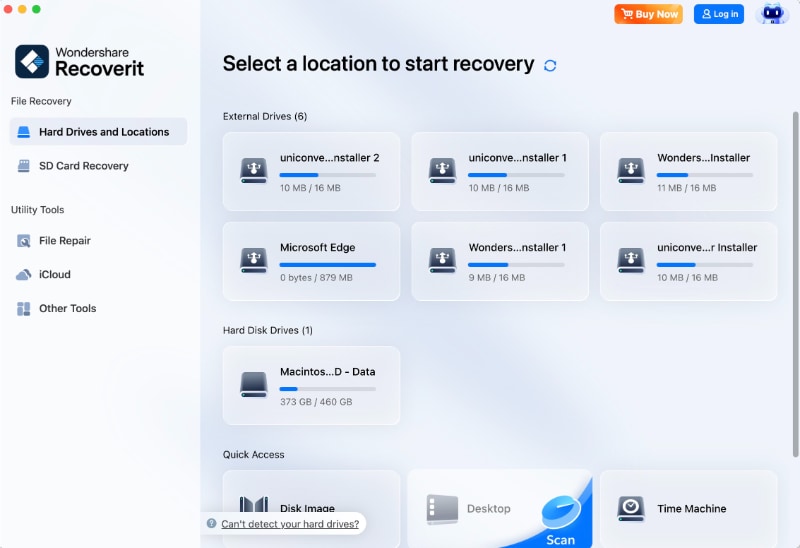
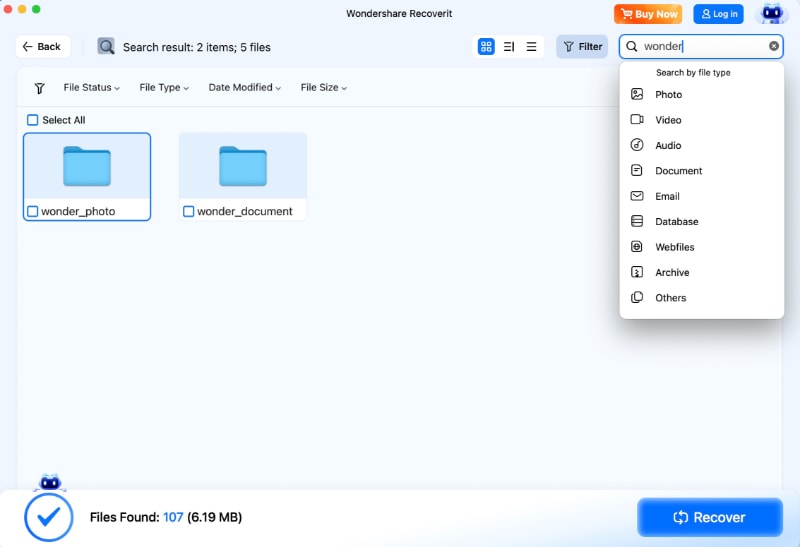
Recoverit for Mac can scan a Mac-detectable storage location for deleted or inaccessible files. Use it only after stopping unnecessary writes to the affected source, and save recovered files to a different healthy drive.

- Select the location — launch Recoverit and choose the storage location where the missing files were originally stored.
- Scan — start the scan; use file type, path, search, or other filters to narrow results while the scan progresses.
- Preview and select — preview recoverable files when possible, choose the items you need, and hit Recover.
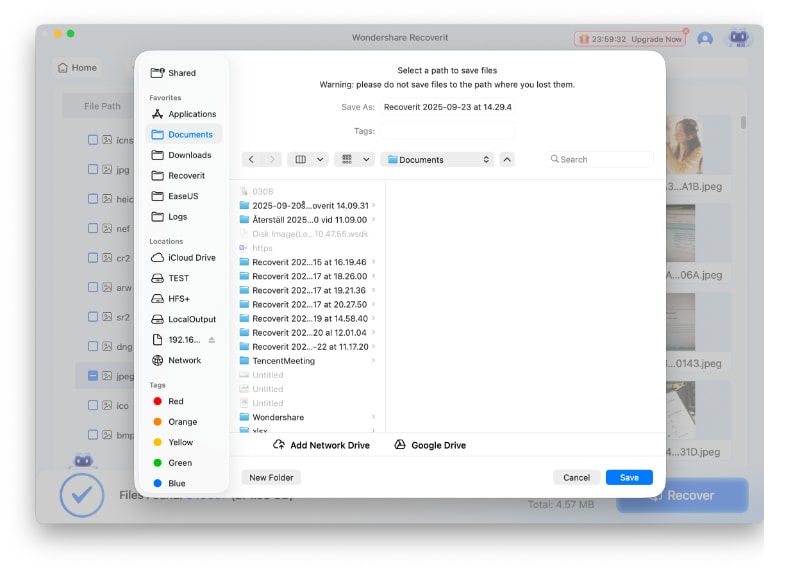
- Save to a different drive — save recovered files to a different healthy physical drive, then open a sample to verify before making further changes to the original source.
Recovery software cannot repair a physically failing drive or guarantee files that have been overwritten. If the source disappears from Disk Utility or shows physical-failure symptoms, stop scanning and consider a professional data-recovery service.
Conclusion
The current safe path to install macOS Catalina is straightforward once the scenario is clear: verify that the target Intel Mac is officially compatible, back up important files, download Catalina from Apple, and use the normal installer for an in-place upgrade. Use a Catalina bootable USB when the standard installer is unavailable, when you need multiple installs, or when a clean install or downgrade is intentional.
After installation, update Catalina to 10.15.8 and install any Catalina security updates offered to the Mac. If you lose access to files, protect the source before erasing, reinstalling, or writing more data to it.
FAQ
-
Which Macs support macOS Catalina?
Apple's compatibility list: MacBook (Early 2015 or newer), MacBook Air (Mid 2012 or newer), MacBook Pro (Mid 2012 or newer), Mac mini (Late 2012 or newer), iMac (Late 2012 or newer), iMac Pro (2017), Mac Pro (Late 2013 or newer). Open About This Mac to check your model. -
How do I download macOS Catalina?
On a compatible Intel Mac, open Apple's macOS download page, choose macOS Catalina 10.15, and click Get in the Mac App Store. Alternatively, runsoftwareupdate --list-full-installersin Terminal, thensoftwareupdate --fetch-full-installer --full-installer-version [version]. -
How do I create a Catalina bootable USB?
Connect a 16GB or larger USB (rename itMyVolume), open Terminal, and runsudo /Applications/Install\ macOS\ Catalina.app/Contents/Resources/createinstallmedia --volume /Volumes/MyVolume. Enter your admin password, type Y to erase the USB, and wait for "Install media is available". -
Can I install Catalina on an unsupported Mac?
Apple does not officially support Catalina on Macs older than its compatibility list. Third-party patchers (e.g., OpenCore Legacy Patcher) exist but can cause driver, graphics, Wi-Fi, sleep, or update problems and may require a redo. For dependable machines, use the newest macOS Apple officially supports. -
Can I recover files missing after a Catalina install?
First check the correct user account, Finder locations, external drives, and backups. If files were actually deleted or a volume was formatted, stop writing to the drive and scan with Recoverit for Mac, saving files to a different healthy drive.


