 TL;DR:
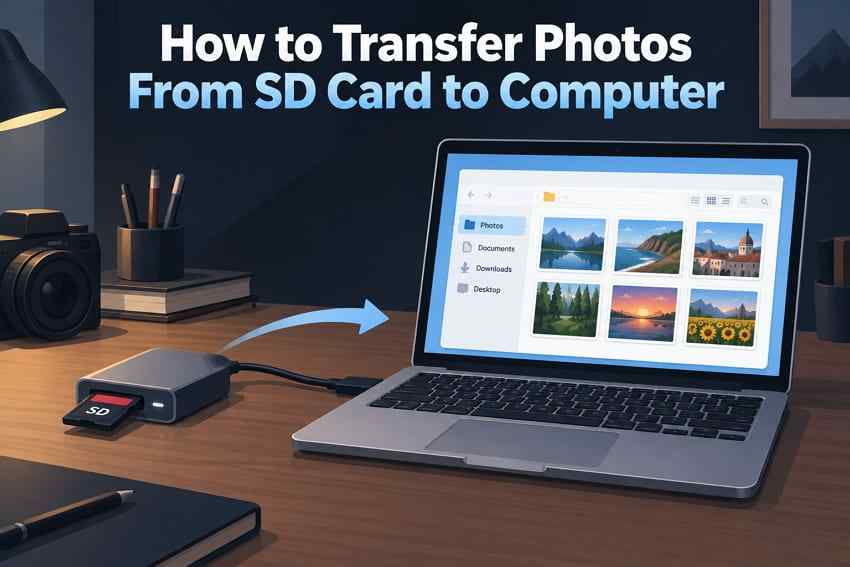
To safely transfer photos without losing quality, connect the SD card using a built-in slot or compatible reader, use File Explorer on Windows or Finder on Mac to copy the files, and verify the new copies open correctly before ejecting or formatting the card.
● Choose Microsoft Photos on Windows or Apple Photos on macOS if you prefer a guided import for long-term library organization, or use Image Capture on macOS for selective downloads to a specific folder.
● Always use the copy function instead of cut to preserve the original camera folder structure, ensuring you do not leave behind RAW files, MOV/MP4 video clips, or XMP sidecars stored outside the main DCIM folder.
● If Windows or macOS prompts to format the card or files disappear, cancel the prompt and stop writing new data immediately; only use data recovery software like Recoverit if files are missing and the card is still detectable, making sure to save recovered items to a completely different drive.
Ask AI for a summary
 ChatGPT
 Perplexity
 Gemini
 Claude
 Grok
Grok
"Is there an ideal way to move the pictures from the SD card to my computer? I had been plugging it into my computer with an adapter, but an error message came up needing me to format the SD card..." - gracerose217 on Reddit
Learning how to transfer photos from an SD card to a computer is usually straightforward: connect the card through a built-in SD slot or a compatible card reader, then copy or import the pictures. On Windows, File Explorer gives you direct file control while Microsoft Photos offers a guided import. On Mac, Finder, Photos, and Image Capture cover direct copying, library importing, and selective importing.
For a normal transfer, use Copy rather than Cut or Move so the SD card keeps its original files until you have checked the new copy. Direct file copying does not intentionally recompress JPEG, RAW, video, or sidecar files. Before deleting images or formatting the card, open transferred photos, compare file counts, and preferably make a second backup.
If the card asks to be formatted, photos have disappeared, or some files cannot be opened or copied, stop writing new data to the SD card. Normal transfer methods should come first; photo recovery is relevant only when files are missing, deleted, formatted, corrupted, or inaccessible.
In this article
Part 1. How to Transfer Photos From an SD Card to a Computer: Quick Answer
If you are asking, "How do I transfer photos from SD card to computer?" choose the method that matches how you want the files organized after transfer. The quickest answer is to insert the card, open it in File Explorer on Windows or Finder on Mac, copy the photos, paste them into a destination folder, verify the new copies, and then eject the card safely.
| Method | Platform | What It Does | Best For |
| File Explorer | Windows | Copies files or complete folders to a location you choose | Direct control of originals, RAW files, videos, and sidecars |
| Microsoft Photos | Windows | Imports selected photos and videos from a connected device | Guided importing and browsing |
| Finder | macOS | Copies files or folders directly from the card | Original filenames, camera folders, RAW workflows, and external-storage destinations |
| Apple Photos | macOS | Imports media into the Photos library | Long-term photo library organization and browsing |
| Image Capture | macOS | Downloads selected items to a folder you choose | Selective imports outside the Photos library |
Your computer needs a built-in SD card slot or a compatible reader. If you use microSD, you may need a microSD-to-SD adapter or a reader with a microSD slot. Apple's current SD and SDXC card-slot guidance confirms that smaller cards such as microSD require an adapter for Mac SD card slots.
Best default for most users: Use File Explorer on Windows or Finder on Mac when you want exact control over which folders and original files are copied. Choose Microsoft Photos or Apple Photos when you prefer an import workflow that helps organize your media.
Part 2. What to Do Before Transferring Photos From an SD Card
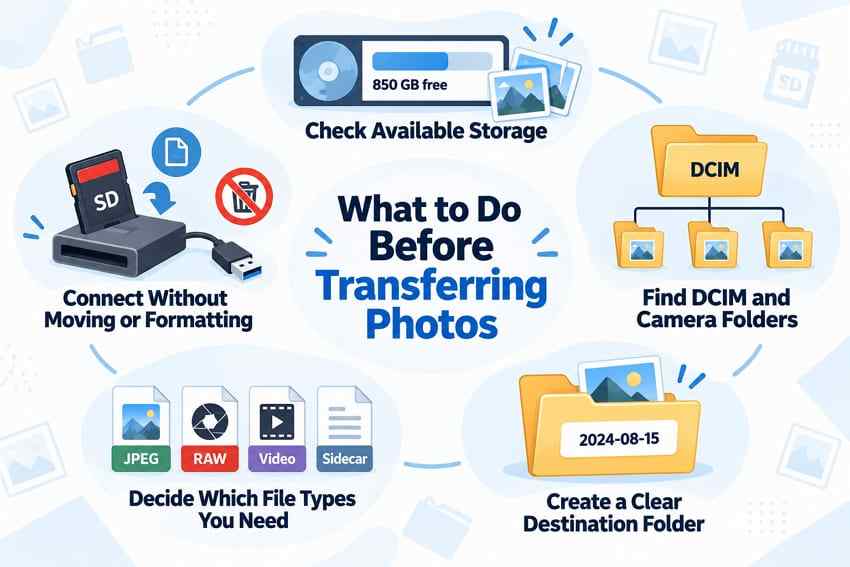
Before you put pictures on a computer from an SD card, spend a minute preparing the source card and destination. These checks reduce failed transfers and make it easier to confirm that nothing was missed.
- Check the computer's available storage: Make sure the destination drive has enough free space for the photos, videos, RAW files, and any associated sidecar files. Leave extra working space rather than filling the drive completely.
- Connect the card without moving or formatting it: Insert the card into a built-in slot or reliable card reader. If Windows or macOS asks to format or initialize the card and the files matter, cancel that prompt until the photos have been copied or recovered.
- Find DCIM and other camera folders: Most digital cameras place photos in DCIM, often inside numbered or camera-named subfolders. Videos, proxy files, sidecars, thumbnails, or camera databases may live elsewhere on the card.
- Decide which file types you need: Do not copy only JPEGs if your workflow also depends on RAW files, MOV/MP4 clips, audio, or XMP sidecars.
- Create a clear destination folder: Use a project, date, event, or camera name, such as 2026-09-15_Wedding_A_Card1. Clear folder naming makes later verification easier.
- Copy before deleting: Keep the originals on the SD card until the transfer has been verified and, for important work, backed up a second time.
For professional shoots or one-time events, treat the SD card as the source copy until your computer copy has been checked. The practical goal is not merely to finish the transfer, but to prove that the files you need exist in at least one verified destination before the card is reused.
Part 3. How to Transfer Photos From an SD Card to a Windows Computer
Windows 11 users can transfer pictures with File Explorer or import them through Microsoft Photos. Microsoft also documents copying files with external storage such as an SD card. For a photography workflow, File Explorer gives the most direct control over folder structure and non-photo files.
Method 1. Copy Photos With File Explorer
File Explorer is the simplest answer for users asking how to get photos from an SD card to a computer without importing them into a managed photo library.
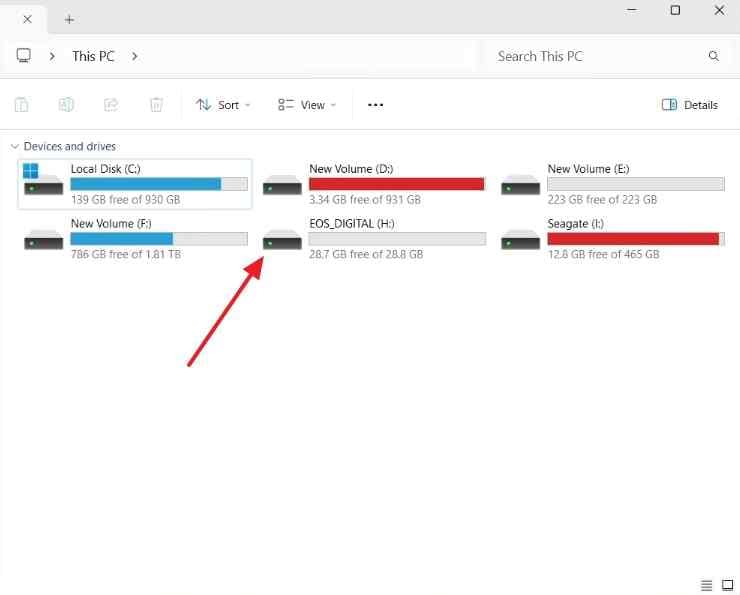
Step 1. Insert the SD card directly or through a compatible reader. Open File Explorer > This PC, then select the SD card under Devices and drives. If the card does not appear, skip to Part 7 rather than formatting it immediately.
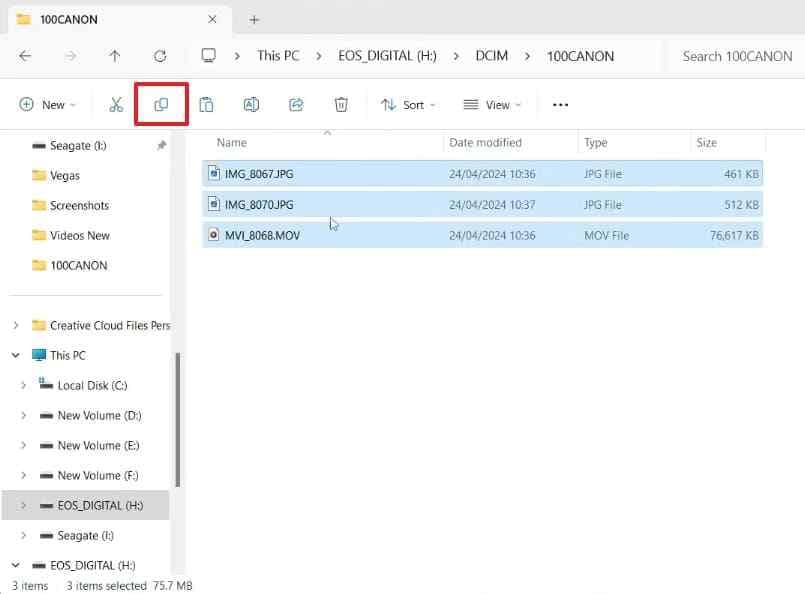
Step 2. Open the DCIM folder or another folder that contains the photos. Select the files you want and choose Copy, or press Ctrl + C. Copying is safer than Cut because the originals remain on the card until you verify the new copy.
Step 3. Open the destination folder on the computer and press Ctrl + V or choose Paste. Wait for the copy operation to finish, then open several files from the destination before ejecting the card.
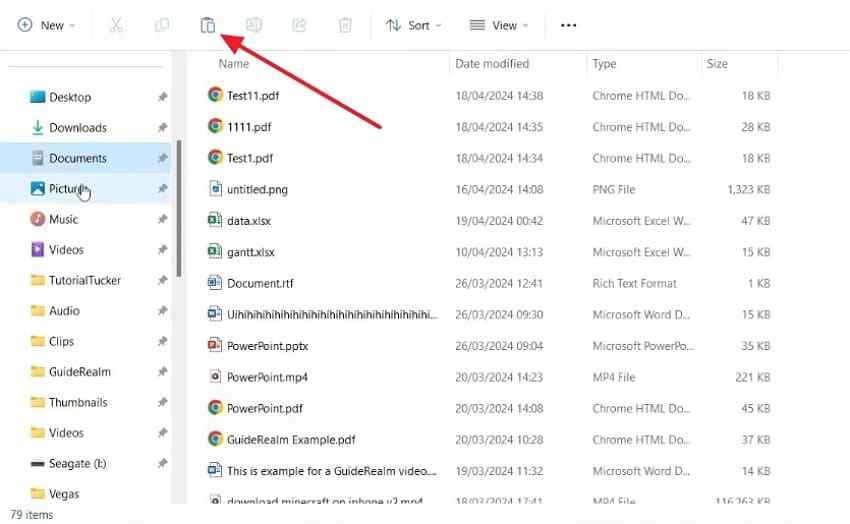
When you are finished, use Windows' Safely Remove Hardware and Eject Media option before unplugging an external card reader when the device is presented as removable storage.
Method 2. Copy the Complete Camera Folder
Copy the whole DCIM folder when you want to preserve the camera's existing subfolder structure or when there are too many files to select one by one. This is often more reliable for photographers who shoot RAW+JPEG or who need related video clips and camera-created subfolders.
Instructions: In File Explorer, select the entire DCIM folder, choose Copy, and paste it into the destination folder. Then check the card's root for other relevant folders so you do not leave behind video, audio, proxy, or sidecar data stored outside DCIM.
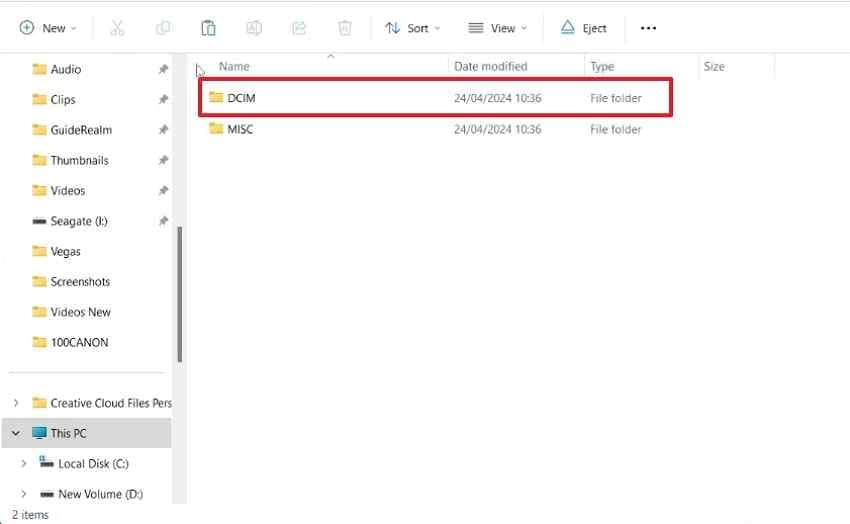
If you need to preserve an editing workflow, keep the source folder structure unchanged in your first archive copy. You can reorganize a working copy later without losing the original camera layout.
Method 3. Import Selected Pictures With Microsoft Photos
Microsoft Photos provides a guided import option. Microsoft's current Photos documentation states that the app can import media from a camera's SD card, USB drive, phone, or other device. The original Microsoft import guide also shows the current connected-device workflow.
Step 1. Insert the SD card and open Photos. Select Import, choose the connected card or device, and allow Photos time to scan the available photos and videos. Microsoft describes this general flow in its Photos import guidance.
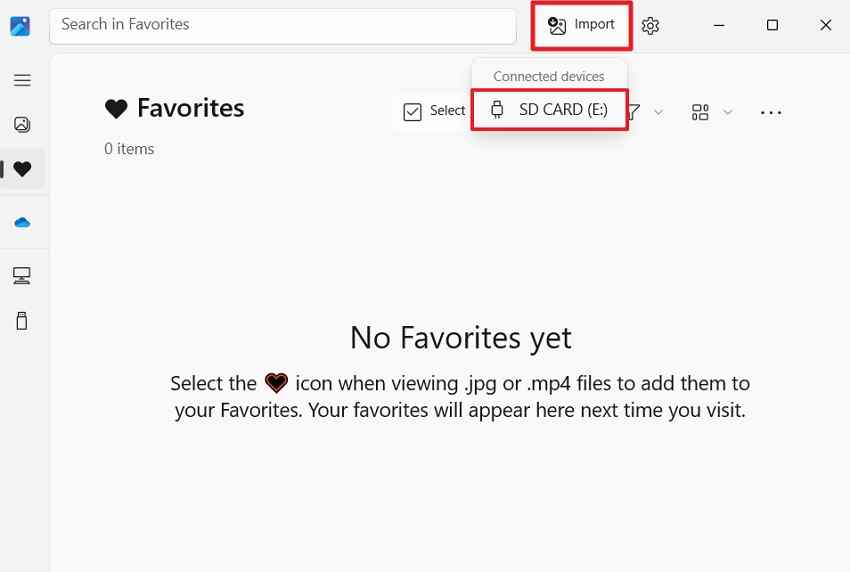
Step 2. Select the pictures or videos you want to import. If your Photos version offers a selection or Add Items control, use it to confirm the files you want rather than importing everything automatically.
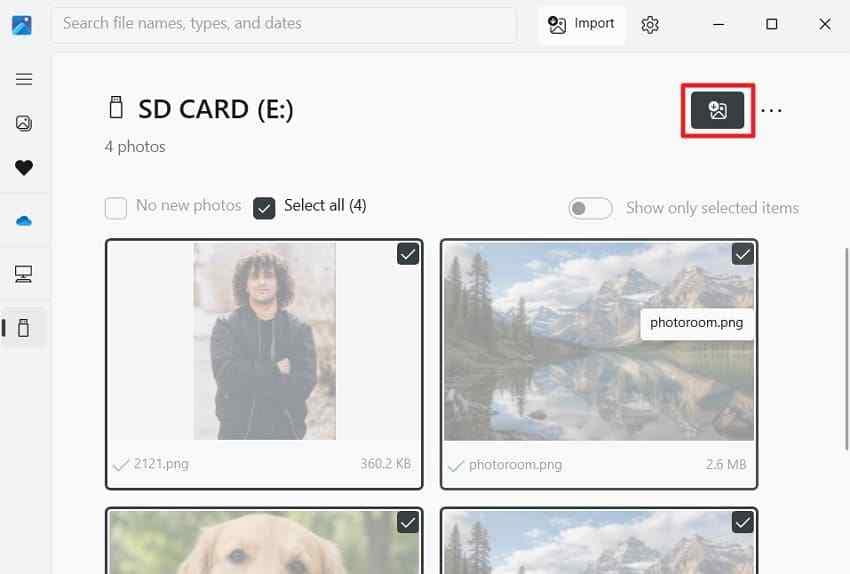
Step 3. Choose the destination offered by Photos and start the import. After it finishes, browse to the destination or open the imported items and verify that the photos you need are present.
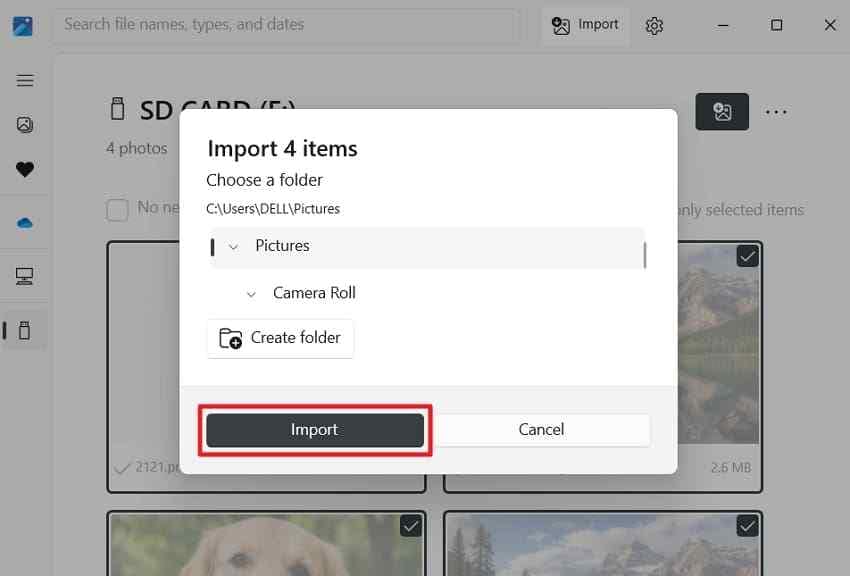
Note: Microsoft can change Photos interface labels between app versions. If the card does not appear in Photos but does appear in File Explorer, use File Explorer instead of troubleshooting the Photos app first.
File Explorer vs. Microsoft Photos for Camera Files
| Consideration | File Explorer | Microsoft Photos |
| Destination control | Choose any accessible folder directly | Choose a destination through the import workflow |
| Original filenames | Preserved during normal copying | Imported media remains available through the Photos workflow; check the destination if exact file handling matters |
| Camera folder structure | Preserved when you copy whole folders | Import focuses on selected media rather than reproducing the card's entire folder tree |
| RAW and sidecar files | Copied like other files | Import support can vary by file type and Photos version |
| Best use | Archiving, RAW workflows, complete card copies, and exact file management | Guided importing, browsing, and casual photo/video organization |
Choose File Explorer when exact originals and folder structure matter. Choose Microsoft Photos when the main goal is a guided import of selected pictures and videos.
Part 4. How to Transfer Pictures From an SD Card to a Mac
Mac users have three useful built-in choices: Finder for direct file copying, Photos for a managed library, and Image Capture for selective downloads to a normal folder. Apple's current documentation supports importing from storage devices into Photos and importing through Image Capture.
Method 1. Copy Photos With Finder
Finder is the Mac equivalent of direct file management. It is usually the best choice when you want original filenames, camera folders, RAW+JPEG pairs, videos, or sidecars outside the Photos library.
Step 1. Insert the SD card and open Finder. Select the card under Locations. If it does not mount, reinsert it and test another reader or port before considering any format operation.
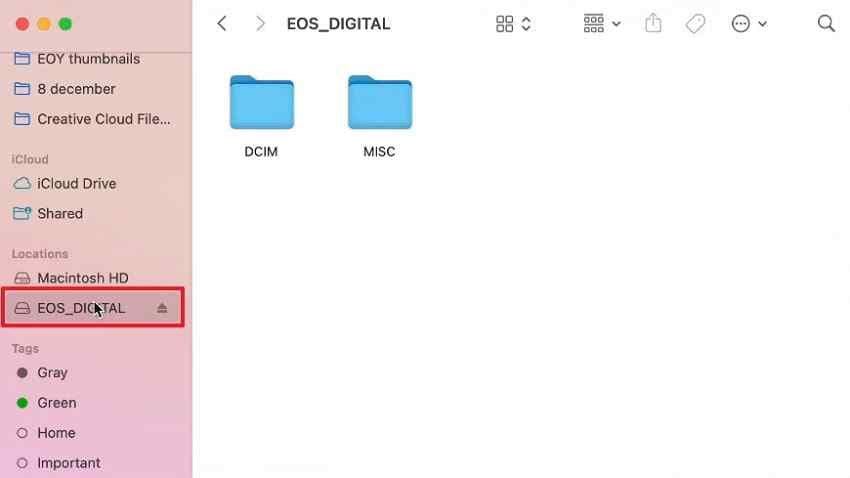
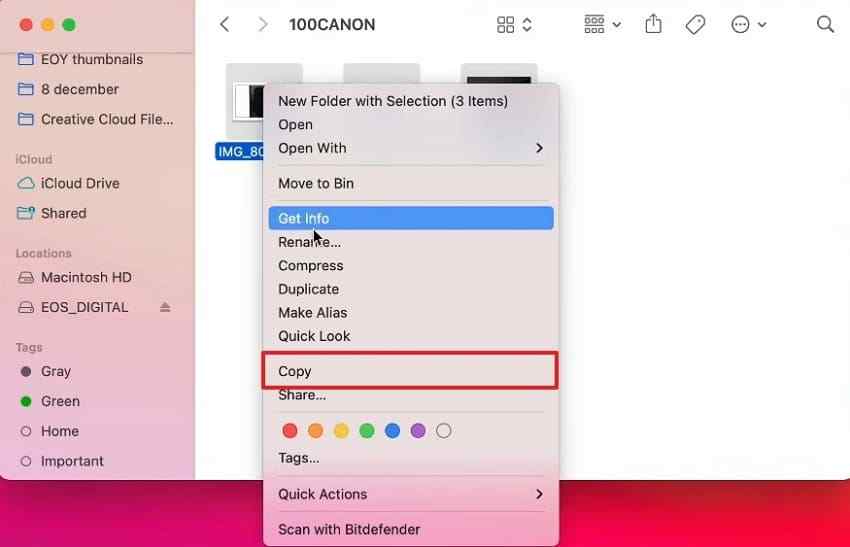
Step 2. Open DCIM or the folder containing your media. Select the files, Control-click, and choose Copy. You can also use Command + C.
Step 3. Open a destination such as Pictures, a project folder, or an external drive, then choose Paste or press Command + V. After the copy is verified, click the Eject button beside the card in Finder before removing it.
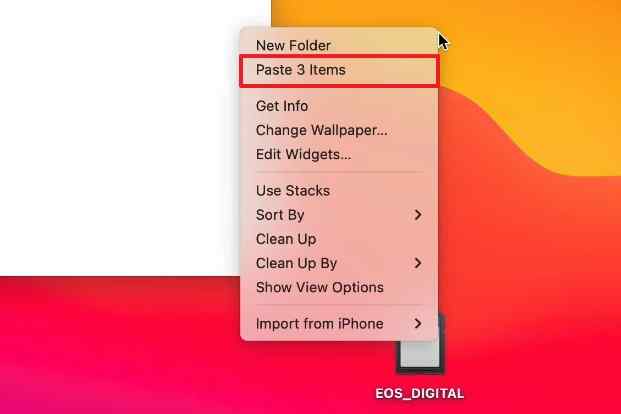
Apple specifically warns not to remove an SD card while a Mac is asleep and recommends ejecting the card before physical removal. See Apple's original SD card slot guidance for supported cards, adapters, mounting, and ejection.
Method 2. Import Photos With Apple Photos
Apple Photos is better when you want the pictures managed inside a photo library rather than left as a normal camera-folder archive. Apple's guide explains that Photos can import media from a card reader or SD card.
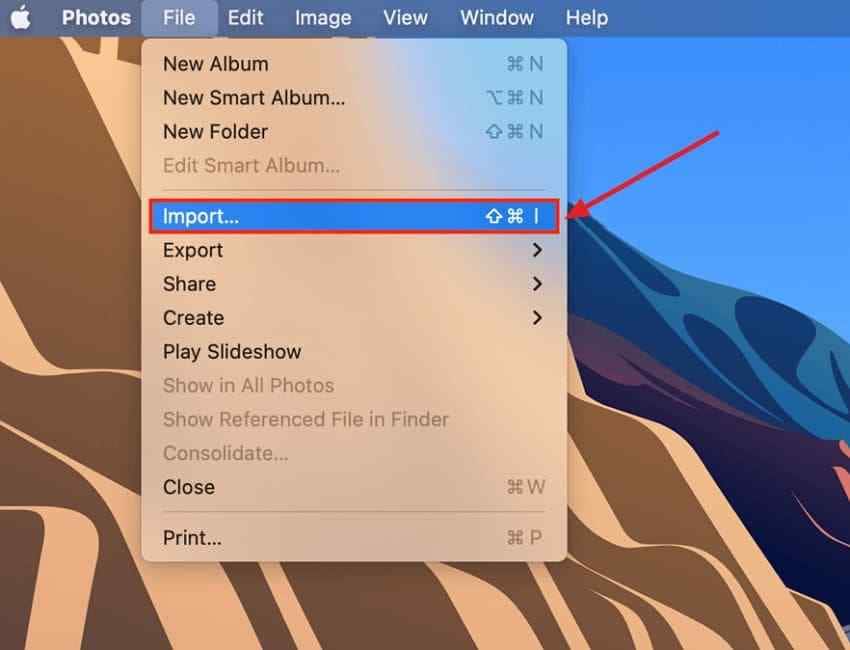
Step 1. Insert the card, open Photos, then choose File > Import. Select the card or the media you want to bring into the library and choose Review for Import.
Step 2. Choose Import All New Photos or select specific images and choose Import Selected. Keep the original items on the SD card until the imported files have been checked and backed up.
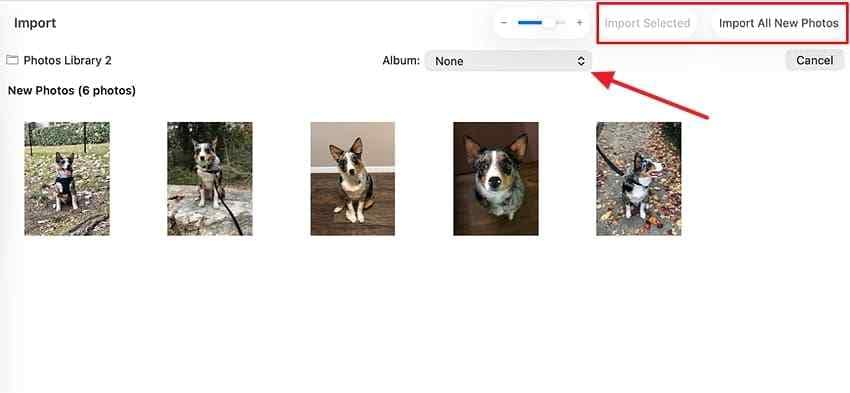
Important: Photos is a library-management workflow. If you need to preserve the camera's original folder tree as an archive, copy the card with Finder first or maintain a separate folder-based backup.
Method 3. Import Selected Files With Image Capture
Image Capture sits between Finder and Photos. It lets you select items from a connected device and save them to a normal folder without adding them to the Photos library.
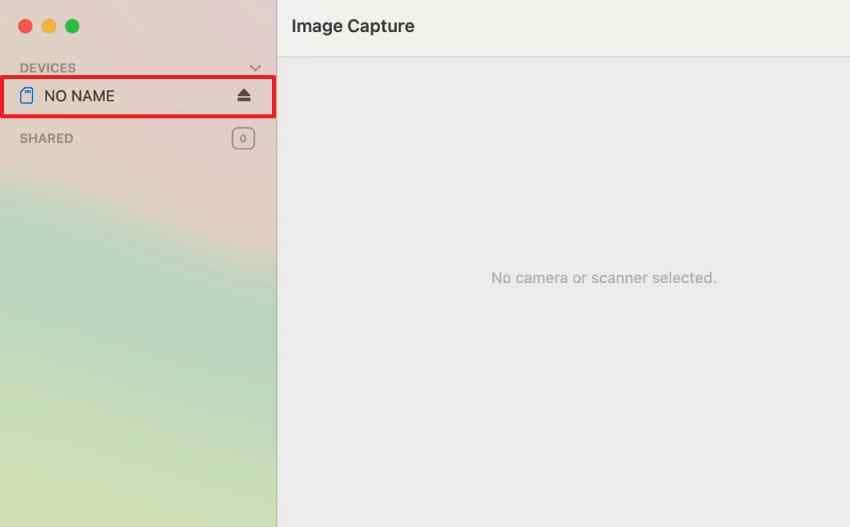
Step 1. Open Image Capture and select the SD card or connected camera under Devices in the sidebar.
Step 2. Open the Import To menu and choose a destination folder. Select the photos you want and click Download. Use Download All when you want every available item.
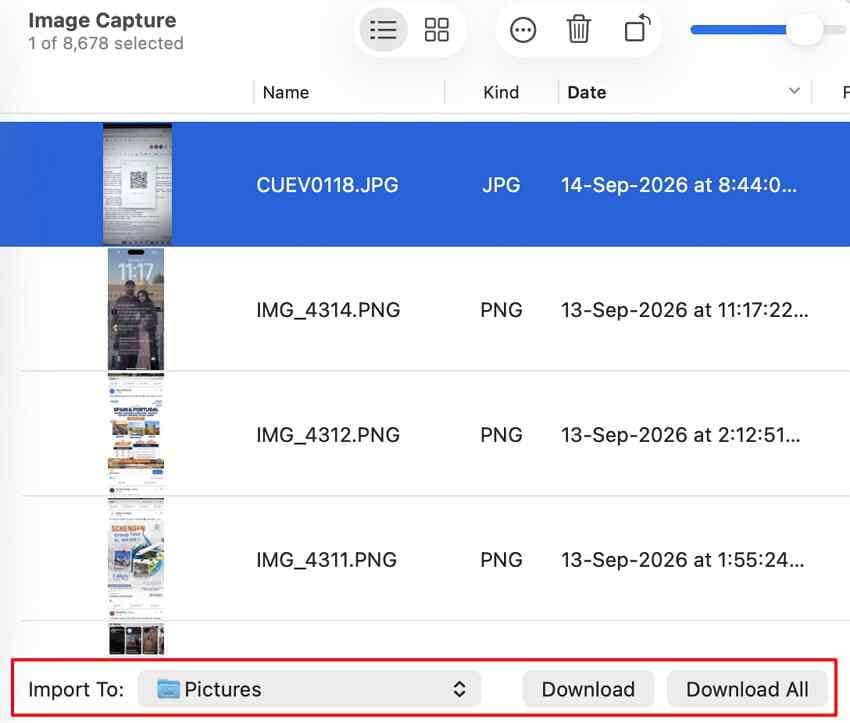
Apple notes that Image Capture normally keeps originals on the source device unless you explicitly choose an option that removes them after import. For important SD card transfers, keep originals until the computer copy has been verified.
Finder vs. Photos vs. Image Capture
| Tool | Where the Files Go | Choose It When |
| Finder | A folder or drive you choose | You want exact original files, camera folders, RAW files, videos, and sidecars |
| Photos | The Photos library | Long-term browsing, albums, search, and library organization matter most |
| Image Capture | A folder you choose | You want a selective import without manually browsing the card in Finder or adding files to Photos |
For a photo archive, Finder gives the clearest direct control. For a personal photo collection, Photos is often more convenient. Use Image Capture when you want selective importing to an ordinary folder.
Part 5. How to Transfer Photos From an SD Card Without Losing Quality
Users asking how to transfer pics from an SD card to a computer often worry that copying will reduce image quality. A normal file copy transfers the file data without intentionally decoding and recompressing the image, so the copied JPEG or RAW file should remain the same file content unless another application modifies it.
- Use direct copy for untouched originals: File Explorer and Finder are the most transparent ways to preserve original files and names.
- Keep RAW and JPEG pairs together: Cameras set to RAW+JPEG create two separate files for the same exposure. Copy both when you want editing flexibility plus an immediately viewable JPEG.
- Copy videos and sidecars: Do not leave behind MOV/MP4 clips, audio, proxy files, or XMP sidecars that belong to the shoot.
- Preserve metadata: Camera metadata is often embedded in the photo, while editing instructions may exist in separate sidecar files. Adobe explains that Camera Raw settings can be stored in XMP sidecars, so those files should travel with their matching RAW files.
- Copy originals before editing or exporting: Editing software can create a new JPEG, TIFF, DNG, or other derivative. Keep an untouched source copy so an export setting does not replace your only original.
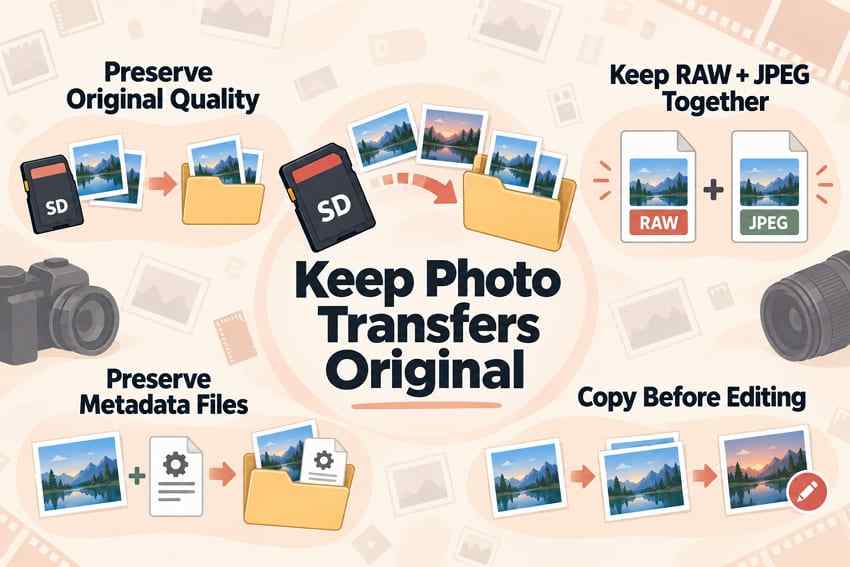
For valuable shoots, the safest workflow is card -> verified computer copy -> second backup -> card reuse. Formatting the card should come only after the copies you need are confirmed.
Part 6. How to Verify Photos After Transferring Them
A progress bar reaching 100% only tells you that the transfer operation finished. Before reusing the SD card, verify the results.
- Open photos from different dates or folders: View samples from the beginning, middle, and end of the shoot. Open RAW files in a compatible app and play a few videos as well.
- Compare file counts and approximate folder sizes: Confirm that the number of copied files is close to what you intended. A large count or size mismatch is a sign to investigate before deleting anything.
- Confirm every required file type: Check for JPEG, HEIC, RAW, video, audio, and sidecar files instead of looking only at visible thumbnails.
- Keep the SD card unchanged: Do not delete or format the originals immediately after the first copy. Keep the card as a temporary safety copy while you verify the destination.
- Create a second backup: For work, travel, weddings, client shoots, or irreplaceable photos, copy the verified folder to a second physical drive or a trusted backup destination before reusing the SD card.
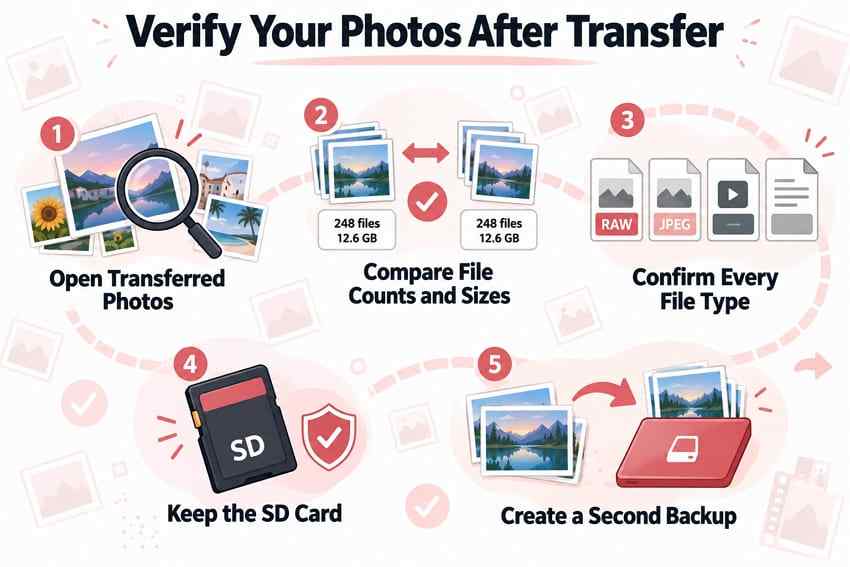
Microsoft likewise recommends verifying copied files before removing external storage, then ejecting the device so pending writes are completed. This is particularly important when the transfer included large RAW sets or video files.
Part 7. Why Photos Will Not Transfer From an SD Card
If photos will not copy or import, identify what the computer can still see before trying repairs. A reader problem, a missing drive letter, file-system damage, a corrupted file, or a nearly full destination can produce very different symptoms.
| What You See | What to Check First | Safest Next Move |
| The computer does not detect the SD card | Reader, adapter, USB port, built-in slot, another computer, Disk Management on Windows | Try a known-good reader or port. If the card is not detected anywhere, avoid repeated DIY scans and consider professional recovery if the data is important. |
| The card opens but photos are missing | DCIM and other camera folders, hidden or camera-specific folders, correct card | Stop writing new data if files should be there. Use recovery before format or repair if important photos are genuinely missing. |
| Some photos copy but others fail | Problem files, destination free space, unstable reader, damaged file system | Copy readable files in smaller batches first. Protect the accessible data before attempting card repair. |
| Photos app cannot import the card | Whether File Explorer, Finder, or Image Capture can read the card | Use a direct file-copy method if the card itself is readable. |
| Windows or macOS asks to format the card | Whether the card still appears as a storage device with the expected capacity | Cancel the prompt if the photos matter. Recover or copy files before formatting. |
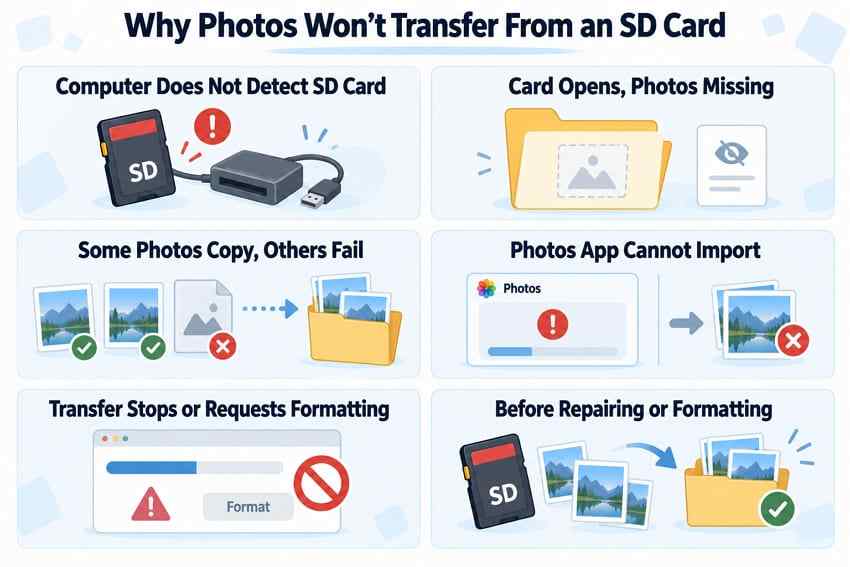
If the card is missing in Windows: A card can be absent from File Explorer yet still appear in Disk Management. The Recoverit guide to an SD card not showing up in Windows 11 explains how to distinguish a missing drive letter, reader problem, RAW file system, and full detection failure before formatting.
If the card is detected but unreadable or asks for formatting: Do not start with CHKDSK, First Aid, repartitioning, or formatting when the photos are not backed up. The guide to damaged or corrupted SD card recovery covers a recover-first sequence for cards that remain detectable.
If photos disappeared after a format: Stop using the card immediately. A dedicated guide explains how to recover photos from a formatted SD card before new files overwrite recoverable data.
Do not confuse a transfer problem with a physical card failure. If the SD card is cracked, water-damaged, overheating, or undetected through multiple known-good readers and computers, software cannot reliably scan it. Professional recovery is safer when the files are valuable.
Part 8. Recover Missing SD Card Photos Before Transfer With Recoverit
Normal copy and import methods are enough when the photos are visible and readable. Recoverit Photo Recovery becomes relevant when photos are deleted, formatted, missing, or inaccessible and the SD card remains detectable by the computer. Recoverit is a data recovery tool; it does not repair a broken card reader, physically failed SD card, or damaged computer port.

When Recoverit Is Needed and When Normal Copying Is Enough
| Situation | Use Normal Transfer? | Consider Recoverit? |
| Photos are visible and open normally | Yes | No. Copy or import them normally. |
| Photos were accidentally deleted | No for the missing files | Yes, if the card is still detectable and the data has not been overwritten. |
| Card was formatted and photos are missing | No | Yes, scan before reusing the card. |
| Card opens but some folders or photos are inaccessible | Copy accessible files first | Yes for missing or inaccessible files if the card remains stable and detectable. |
| Card is not detected by any reader or computer | No | Software recovery is not appropriate. Consider professional recovery for important data. |
Recoverit's current photo-recovery page states that it can scan readable SD cards and memory cards for recoverable JPG, PNG, HEIC, TIFF, RAW, and other image formats. Recoverability depends on the card's condition, overwriting, fragmentation, encryption, and whether the storage remains detectable. For broader SD, microSD, CF, and camera-card scenarios, see Recoverit Memory Card Recovery.
How to Recover Missing SD Card Photos With Recoverit
Stop using the source card before scanning it. Do not take more photos, format the card, or save new files to it, because new writes can overwrite recoverable data.
Step 1. Select the SD Card and Start the Scan
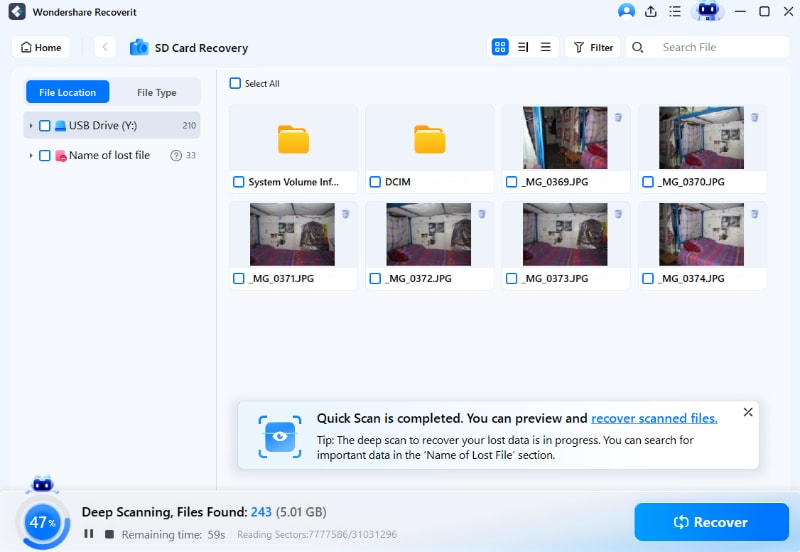
Connect the SD card through a stable reader, open Recoverit, choose SD Card Recovery, select the correct card, and start the scan. Confirm the card by capacity and device information so you do not scan the wrong disk.
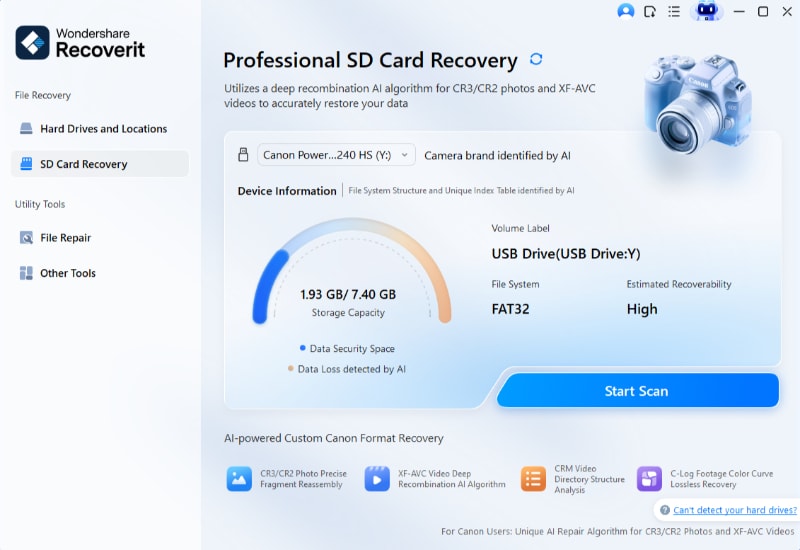
Step 2. Scan the Card and Filter for Photos
Let Recoverit scan the card. Use file type, filename, path, size, or other available filters to narrow the results. Preview supported photos when possible before selecting them for recovery.
Step 3. Preview and Recover the Missing Photos
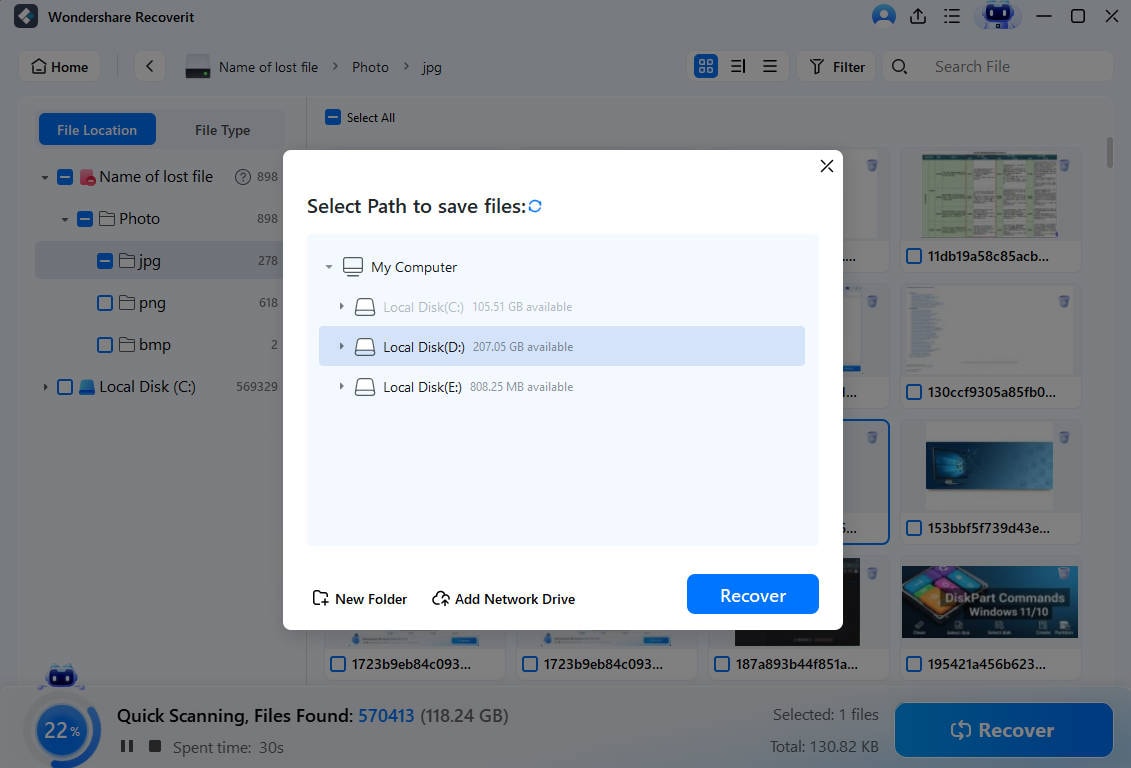
Select the photos you need, click Recover, and save them to the computer's internal drive or another external drive. Do not save recovered files back to the source SD card, because doing so can overwrite other recoverable data.
If the card is physically unstable, disconnects repeatedly, becomes unusually hot, or disappears during scans, stop repeated software attempts. A professional recovery service is more appropriate for hardware-level failure.
Recover Missing SD Card Photos Before Transfer With Recoverit
 Security Verified. Over 7,302,189 people have downloaded it.
Conclusion
The safest answer to how to transfer pictures from an SD card to a computer is simple: copy first, verify second, erase or format last. File Explorer on Windows and Finder on Mac are best for direct control of original files and folders. Microsoft Photos, Apple Photos, and Image Capture are useful when you want a guided or selective import workflow.
Keep the SD card unchanged until the transferred files open correctly and important shoots have a second backup. If the card asks to be formatted, photos disappear, or files become inaccessible, stop writing to the card. Use recovery only for the missing data, and save recovered photos to a different drive.
FAQ
-
What Is the Easiest Way to Transfer Photos From an SD Card to a Computer?
For direct copying, use File Explorer on Windows or Finder on Mac. Insert the SD card, open its DCIM folder, copy the photos, paste them into a folder on the computer, verify the new files, and then eject the card safely. Microsoft Photos, Apple Photos, and Image Capture are alternatives when you prefer an import workflow. -
Can I Transfer Photos From an SD Card Without Losing Quality?
Yes. A normal direct file copy transfers the original file data without intentionally recompressing the image. Keep RAW+JPEG pairs and associated sidecar files together, and avoid editing or exporting over your only original copy. -
Where Are Camera Photos Stored on an SD Card?
Most cameras store still photos in a DCIM folder, usually inside camera-specific subfolders. Videos, audio, proxy files, thumbnails, or sidecar files may also be stored in other folders, so check the entire card if you need a complete project copy. -
Should I Delete Photos From the SD Card After Transferring Them?
Do not delete the originals immediately. First open transferred photos, compare file counts, confirm RAW, JPEG, video, and sidecar files are present, and preferably create a second backup. Reuse or format the card only after the copies you need are verified. -
Can I Recover Photos That Will Not Transfer From an SD Card?
If the photos are missing, deleted, formatted, or inaccessible and the SD card is still detectable, Recoverit can scan the card for recoverable image files. Stop using the card first and save recovered photos to a different drive. If the card is physically damaged or undetected everywhere, software recovery is not the right approach.


