
 TL;DR:
Configuring OpenVPN on a Synology NAS establishes secure remote access to local network storage but requires manual port forwarding and specific text edits to the exported client configuration profile.
● External connectivity mandates assigning a static IP address to the Synology NAS and configuring the local router to forward UDP port 1194.
● The exported .ovpn file will fail to connect unless manually edited to replace the server IP placeholder with a DDNS hostname, remove the hash symbol before redirect-gateway def1 for full-tunneling, and include client-cert-not-required for compatibility with newer OpenVPN clients.
● Because the VPN and home network operate on distinct subnets, enabling two-way communication between local network machines and remote VPN devices requires configuring a manual static route on the router using the NAS IP as the gateway.
Ask AI for a summary
 ChatGPT
 Perplexity
 Gemini
 Claude
 Grok
Grok
Accidentally deleted important files on Synology NAS?
No worries. Wondershare Recoverit can get back your lost files within 3 steps. The ultimate and professional NAS data recovery software is totally reliable and 100% safe.
Cybersecurity is everyone’s primary concern when using the internet today. Even though technology has never been more advanced, neither were cyberattacks. In fact, experts estimated the global cost of cybercrime at around $8.4 trillion in 2022, while they expect the number to surpass $11 trillion in 2023. That’s why more and more people worry about using their devices safely.
An easy way to ensure you’re safe while browsing the internet is to use a VPN. OpenVPN is a popular choice among internet users and here you can learn everything about the Synology OpenVPN server. We’ll cover all the essential information about it, including installing and using OpenVPN on Synology NAS.
In this article
What Is OpenVPN?
Before we jump into how to install and use Synology OpenVPN, it’s necessary to say something about OpenVPN.
OpenVPN is a free and open-source virtual private network (VPN) software that implements secure point-to-point or site-to-site connections. It’s suitable for various operating systems, including Windows, macOS, Linux, and mobile devices.
OpenVPN creates a secure and encrypted connection between two endpoints, a client and a server, over a public network. That allows users to access network resources as if they were on the same local network, even if they are physically in different locations.
Individuals and businesses commonly use OpenVPN to securely connect to a remote network, such as a company network from a remote location, or to access internet resources from a restricted network.
OpenVPN uses the OpenSSL library and the SSL/TLS protocol to encrypt and secure data transmission. It supports a wide range of encryption algorithms and protocols, and you can configure it for use in various network topologies, including bridged, routed, or gateway configurations.
Additionally, OpenVPN provides flexible authentication options, including certificate-based authentication and support for two-factor authentication. Having that in mind, Synology NAS OpenVPN is an excellent solution for anyone using the Linux operating system.
Advantages of Using OpenVPN on Synology NAS
There are many advantages people can experience when using OpenVPN on a Synology NAS. Here are some of the most important:
- Security: OpenVPN provides a secure and encrypted connection between the client and the server, which helps protect sensitive data from unauthorized access and eavesdropping. Not only does that keep cyber attackers at bay, but it also ensures all user data stays safe and secure.
- Remote access: OpenVPN allows users to securely access network resources from remote locations as if they were on the same local network. That can be helpful for remote workers or traveling employees who need to access corporate resources. Worrying about someone intercepting the connection and accessing confidential data becomes a thing of the past.
- Compatibility: OpenVPN is compatible with a wide range of operating systems, including Windows, macOS, Linux, and mobile devices, which makes it easy to use on any device.
- Ease of use: Synology NAS devices have a user-friendly interface that makes it easy to set up and manage OpenVPN connections. Synology NAS also provides a centralized location for VPN management, which can simplify VPN administration for administrators. So, even if you’re not tech-savvy, you can set up OpenVPN Synology quickly and easily.
- Centralized storage: Synology NAS provides centralized storage that you can access over the OpenVPN connection, making it easier for users to access and share files and data from remote locations. Both companies and individual users highly request centralized storage, so having access to it is always a plus.
- Enhanced privacy: You can use OpenVPN to securely access the internet from a restricted network, which can help protect users’ privacy and maintain their anonymity online. With enhanced privacy, everyone can continue browsing the internet securely without any restrictions.
- Customization: You can configure OpenVPN to meet specific security and performance requirements, making it a flexible and customizable solution for various use cases. As a result, it’s an ideal solution for both individual users and large companies.
Apart from OpenVPN, you can also install WireGuard on Synology NAS for data security. If you lose your data from Synology NAS due to virus attack, power outage, or system crash, there are also several methods available for recovering deleted files from Synology NAS.
How To Set Up OpenVPN on Synology NAS
If you want to install and use OpenVPN on Synology NAS, this step-by-step guide will provide you with all the information you need.
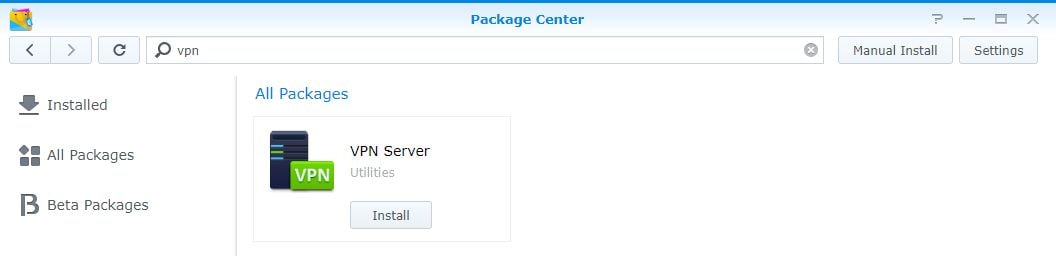
Step 1Installing OpenVPN on Synology NAS
- Open the Package Center and click the Install button on the VPN Server application.
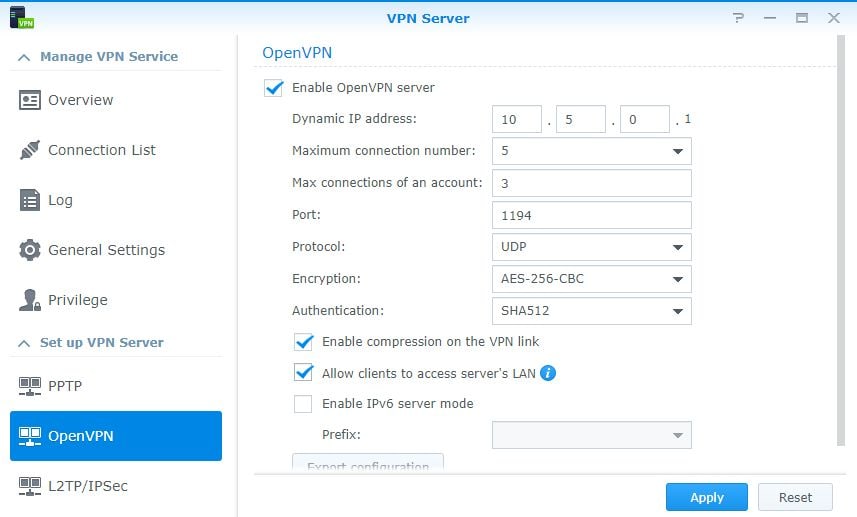
- Open the installed application and find the OpenVPN section.
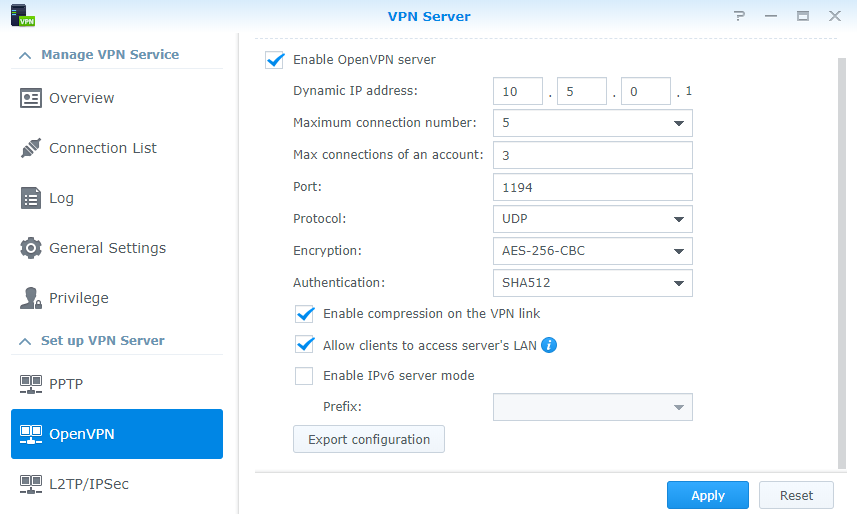
- Tick the Enable OpenVPN Server box.
- Tick the Allow clients to access the server’s LAN box.
- Optional: Change the range of the Dynamic IP address and maximum connection properties.
- Click the Apply button.
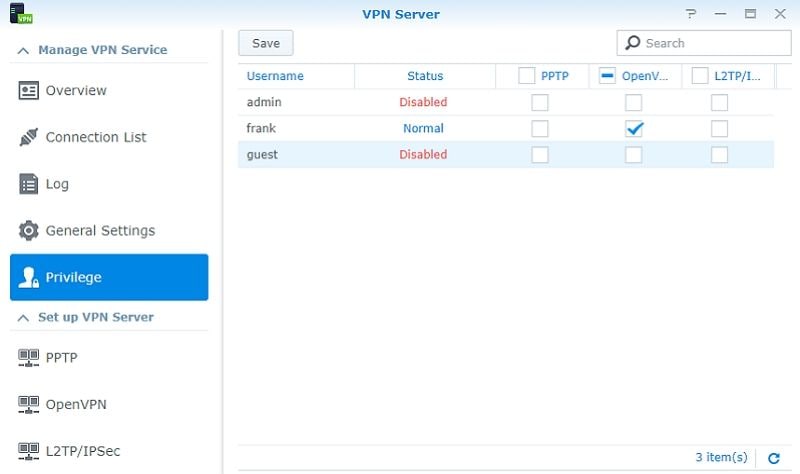
- Open the Privilege section and enable the permission for OpenVPN for the user account you’d like to connect to the VPN.
Step 2Configuring Your Firewall
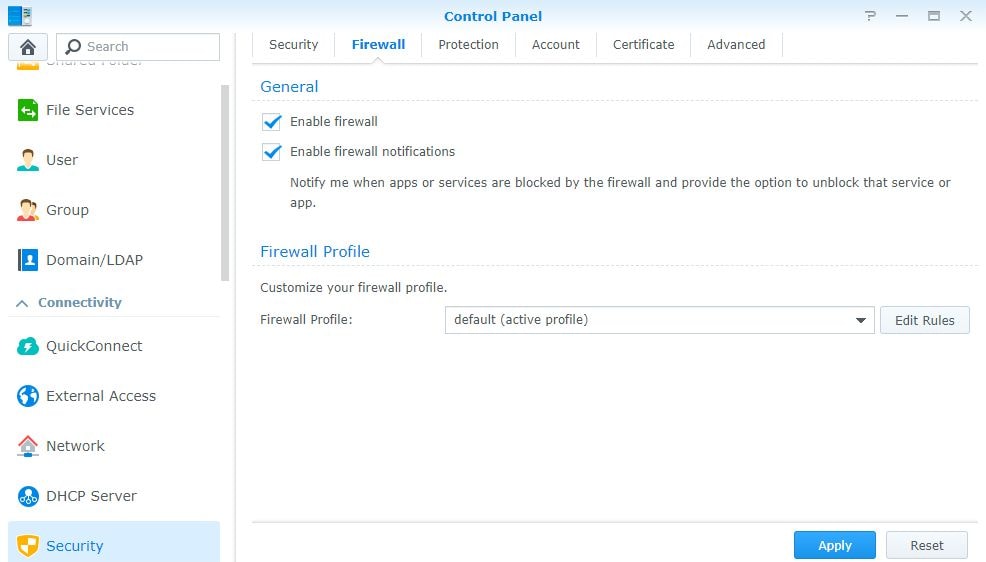
- If you’re a user of Synology’s firewall, open the Control Panel.
- Navigate to the Security section.
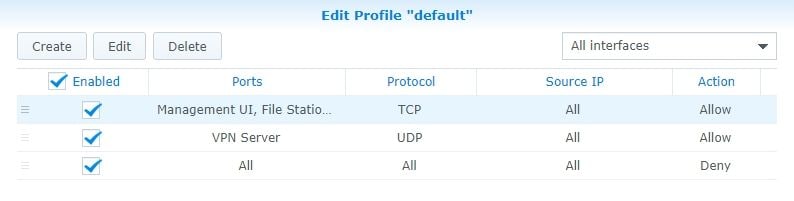
- Click the Firewall and Edit Rules section.
- Tick the box next to the VPN Server (OpenVPN) application with UDP port 1194.
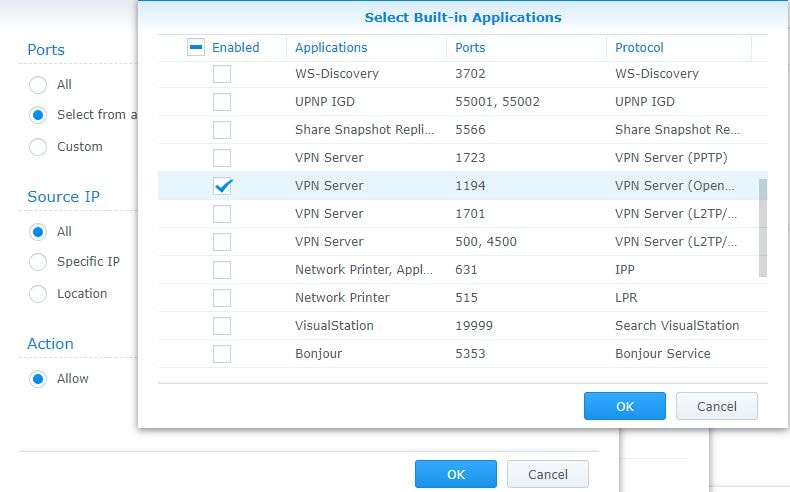
- Once you click the OK button, the rule should appear above the Deny All rule.
Step 3Setting up Automatic Port Forwarding
After completing the Synology firewall configuration, you must port forward the UDP port 1194 on your router to the Synology NAS. Doing so will allow you to automatically open ports on the router with NAS and allow you to access OpenVPN docker Synology. Each router is set up differently, so the port forwarding process differs for every brand.
- Make sure you have a static IP address setup.
- Use your Synology NAS’s IP address to create a port forwarding rule for UDP port 1194.

Step 4Modifying Configuration File
Once you configure your server, it’s time to modify the Synology OpenVPN config file.
- Configure your DDNS. You can do so by using a free Synology hostname. Users confident they have a static external IP address don’t have to set up their DDNS.
- Open the VPN Server application.
- Select OpenVPN.
- Click the Export configuration button.
- Extract all of the contents you find in the folder.
- Open the .ovpn file with a text editor.
- Use the unique Synology OpenVPN certificate at the bottom to authenticate your VPN.
- Modify the details of your configuration file:
- YOUR_SERVER_IP: Insert your DDNS hostname.
- redirect-gateway def1: Choose between a full-tunnel and split-tunnel VPN. Delete the # symbole to enable the former. Users with an iPhone iOS 7 or a newer model must include redirect-gateway ipv6.
- dhcp-option: You can add the DNS server IP address here (optional). In case you can’t configure a local DNS server, OpenVPN will use public DNS records from Google by default.
- client-cert-not-required: Include client certification if you’re using one of OpenVPN’s latest clients to avoid receiving an error when trying to connect.
- Save the configuration file.
- Add the configuration file to the devices you wish to use to test the VPN connection.
- Make sure you’re testing the Synology OpenVPN config via an external network.
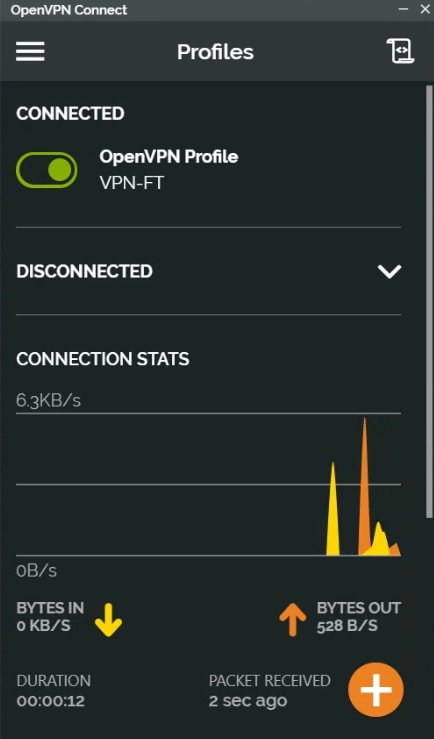
Step 5Client Configuration
The next step is configuring your Synology OpenVPN client by following the steps below.
- Download the OpenVPN client software designed for your device.
- Click the Add button.
- Select Choose File.
- Browse and select the previously created .ovpn file.
- Upload the selected file and log in with DSM credentials.
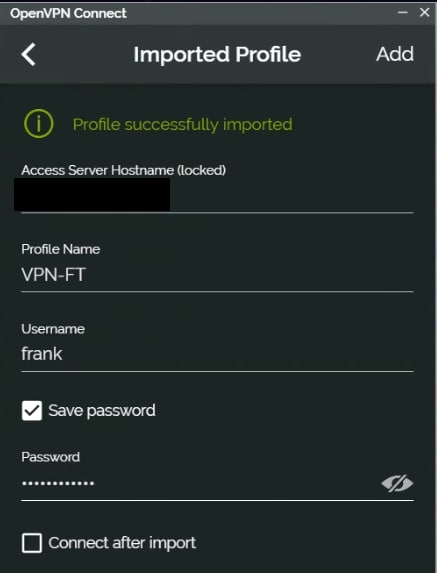
- Connect to the VPN.
Step 6Configuring a Static Route
You can skip this step if you’re not accessing VPN devices from your home network. Since the home network and VPN are set up on different subnets, local devices can only communicate with the machines on their subnet.
To change that, you need to configure a static route and implement the necessary transmission OpenVPN Synology. The steps will differ for each router, but here’s how the process looks.
- Enter the IP range you are using into the IP Subnet Mask field.
- Enter the IP address of the Synology NAS into the Gateway IP Address field.

Conclusion
That’s it! With these six simple steps, you can quickly install and use OpenVPN on Synology NAS. Whether you’re an experienced Linux user or a beginner, this step-by-step guide equips you with all the information you need to successfully install OpenVPN on your Synology NAS.
Once you do it, you won’t have to worry about unauthorized users accessing or stealing your data. Instead, all your files will be safe, and only approved people will get access to it.
For Windows XP/Vista/7/8/10/11
For macOS X 10.10 or later


