One of the most commendable aspects of Linux systems is that it uses two kinds of memory- Random Access Memory and Swap files. The main aim of these is to ensure that there's enough space available in the system to run programs and services. The swap files are whoever is more important, considering the fact that they're a type of temporary allocation.
Nonetheless, you may want to add swap space Ubuntu Linux, considering the variety of benefits it offers. Consider adding swap space in Linux to increase space or to store some extra data. This guide helps you understand how to add swap space on Ubuntu Linux.
Try Wondershare Recoverit to Perform Linux Recovery

In this article
What is the Swap Partition?
You may want to know what is the swap partition? A swap file Ubuntu refers to the system file that helps create a temporary storage space for an SSD or hard drive. This is usually applicable to computers running on low memory. The RAM storage will eventually swap a section from any program that isn't running and create space for the new or other programs.
Swapping a file size ensures that your computer can use more space than is actually available. Therefore, more programs can now be run into your system than they existed. Swap files are more of a virtual memory, which aren't stored physically in RAM.
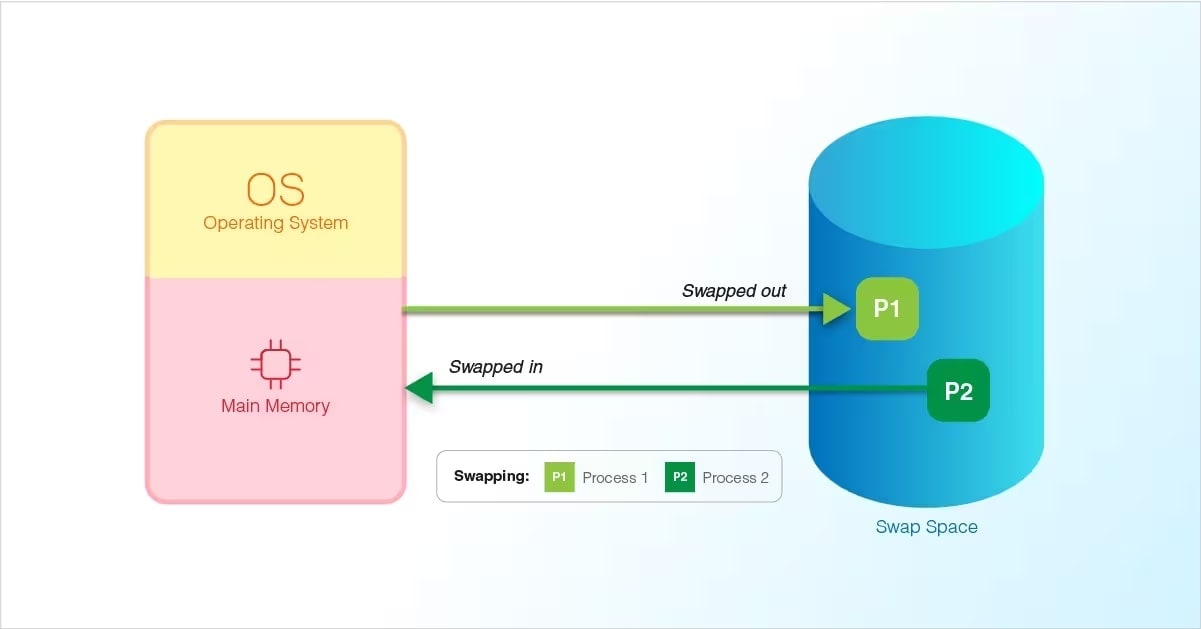
Swapping a file helps in kind of pretending that there is more RAM than actually exists. It will swap the program and help list the files used in relation to the hard disk until needed. Therefore, new programs will be added and fills will be added to the RAM.
Linux Swap files are often referred to as page files, swap space or paging files. It has several benefits when integrated into the operating system. Therefore, with the help of swap space, the OS will create files accordingly and release drive space when it isn't necessary.
Advantages and Disadvantages of Using Swap Space
Having Swap Space in your system can be extremely beneficial in the long run. Some of the key advantages to add swap file Linux are as follows:
- Swap space in Linux Ubuntu can play an important role in increasing space across the hard disk by acting like virtual memory, which helps increase the available memory capacity.
- The operating system can swap out space from the disks that are less used, like any physical memory. The OS can play an important role in increasing the performance by freeing up the unused space.
- Swap space paves the way for increasing flexibility across the system by dynamically allocating and deallocating the memory as required.

While there are numerous advantages to using Swap space, there are some disadvantages as well to Ubuntu increase swap, like the following:
- There is always a risk of data corruption and loss.
- Swapping space will always allocate a specific number of space in the disk to be used as virtual memory. This will lead to a reduction in the space in the disk, which could have been used for other things.
- In the case of swap space, it will become slower to access data, which might affect the overall performance.
How to Add Swap Space on Ubuntu Linux?
If you are facing an out-of-memory problem in your Ubuntu Linux, that's probably because you need to add Swap Space on your system. Doing so will play an essential role in increasing space and determining that you don't face any problems in running any commands.
Here are the key steps on how to add swap space Ubuntu Linux:
Step 1: Checking Swap Information
Before beginning the process, it is important to check if sufficient swap space is available in the system. For this, you must use the swapon command.

After entering the command, if you do not see any output, there is no swap space available. Therefore, you may confirm the same if no space is available using the free command.
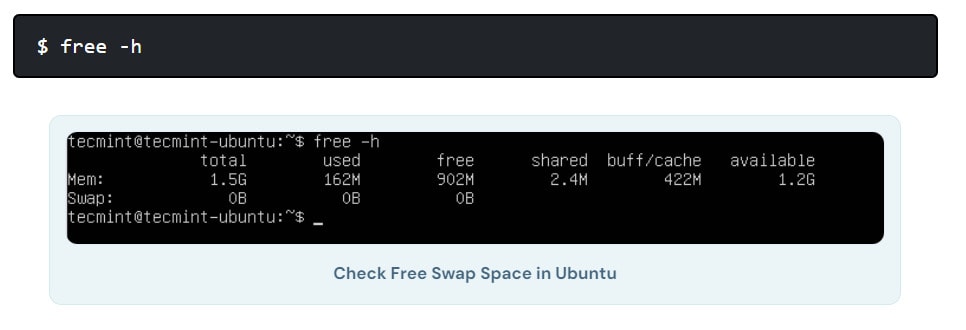
If a similar output is available, it would indicate that there is no active swap space available in the system.
Step 2: Checking Available Space on the Partition
You must verify your current disk usage to check for the available space on the partition. Your current disk usage will help you check if there is enough space in your system for the creation of a swap file system.
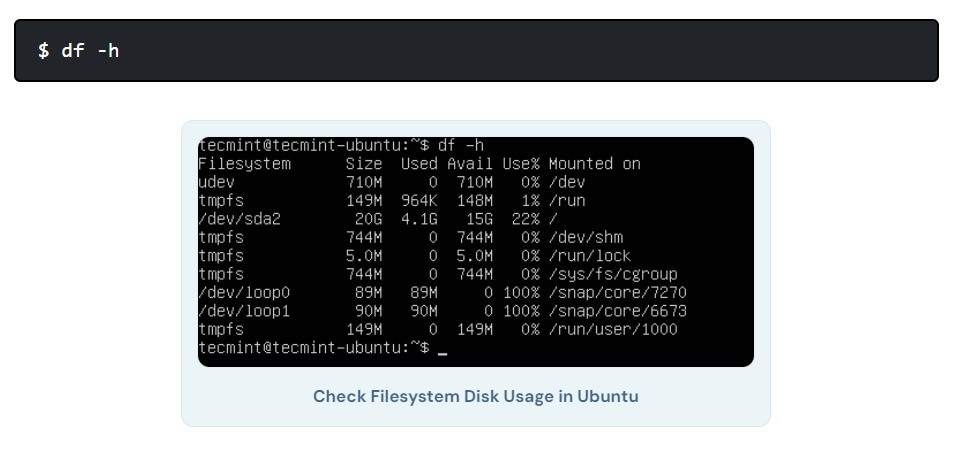
Once you check the disk usage partition, you can get a complete idea of whether enough space is available to create swap files.
Step 3: Creating a Swap File in Ubuntu
On the Ubuntu (/root) directory, you will now have to create a swap Image named swap.img. There must be a size of 1 GB, and you need to use the fallocate command. Depending on your requirements, you may also adjust the size. Now, you may use the Is command to verify the swap size.
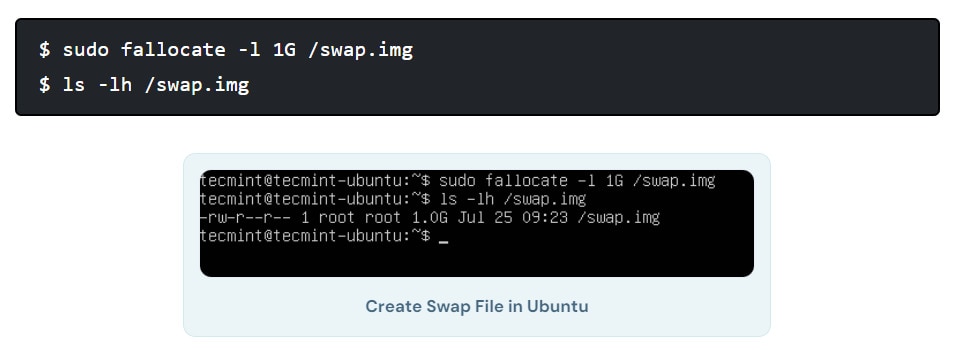
The above image indicates that the swap file created has the correct space size, around 1 GB.
Step 4: Enabling the Swap File in Ubuntu
You need to provide the proper permissions to add swap space Linux. Doing so will allow only root users to access the file.
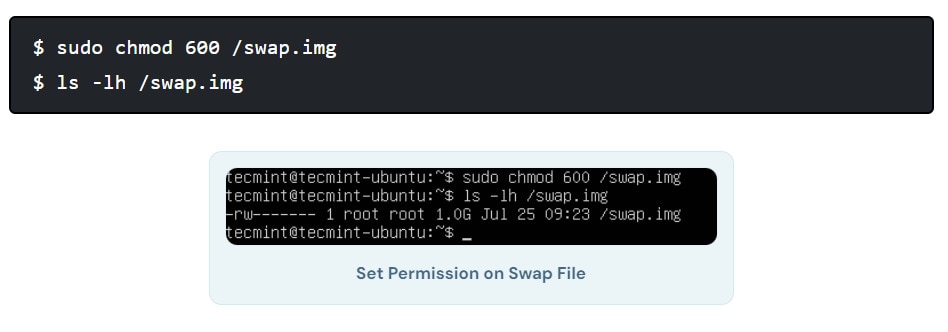
Now, the root will have the read and write permission.
After that, you must run the commands below to mark the swap space and enable the swap file to be used in the system.
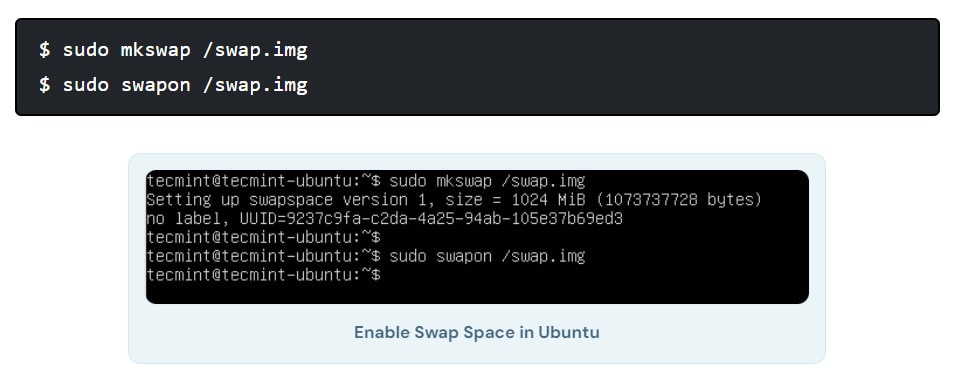
It is now time to check again if enough swap space is available or you need to add swap space. So, you must run the following commands.
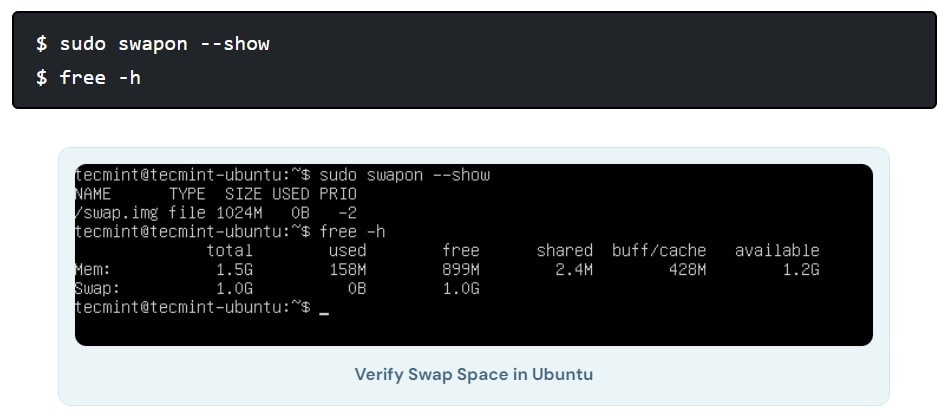
Once the verification is done, it will be determined that the new swap file has been created successfully in the Ubuntu system. Therefore, you can start using it as you need.
Step 5: Mount the Swap File Permanent in Ubuntu
Now, you need to permanently mount the swap file in Ubuntu. For this, you must make the swap space file information in the /etc/fstab file and verify it. The verification must only be made by running the following command:
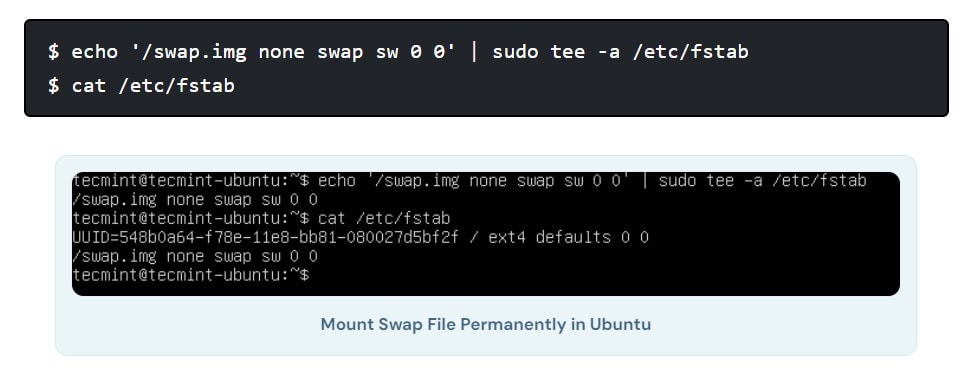
Step 6: Tuning Swap Settings in Ubuntu
To tune Swap space in Linux Ubuntu, you will have to configure the settings. This is to determine proper performance while using Swap.
Adjust the Swappiness Value
Swappiness is one of the most important Linux kernel parameters, and it helps specify how much your system swaps data from the RAM to the swap space. The default value can range from anything between 0 to 100. Therefore, the Kernel determines that the higher the value, the higher will be the usage.

Enter the command given below to check the current swappiness information:

If you are using a desktop, the ideal swappiness value must be 60, however, it can also be set to 10.

You must now enter the command below to make the swappiness value permanent.
Adjust the Cache Pressure Setting
Altering the vfs_cache_pressure command can be extremely useful for determining the settings. It helps to understand how much will opt for the cache inode and sentry details. This will be applicable to other data.
You can run the process filesystem to verify the current value.

You can adjust the settings to fit your system's requirements. Keeping an ideal setting to 50 would be appropriate.

Hit enter and type the command /etc/sysct1.conf file for making the settings permanent.

Save and close the command box as soon as you're done.
Step 7: Removing a Swap File in Ubuntu
You need to run the command given below to completely remove the swap file in Ubuntu:
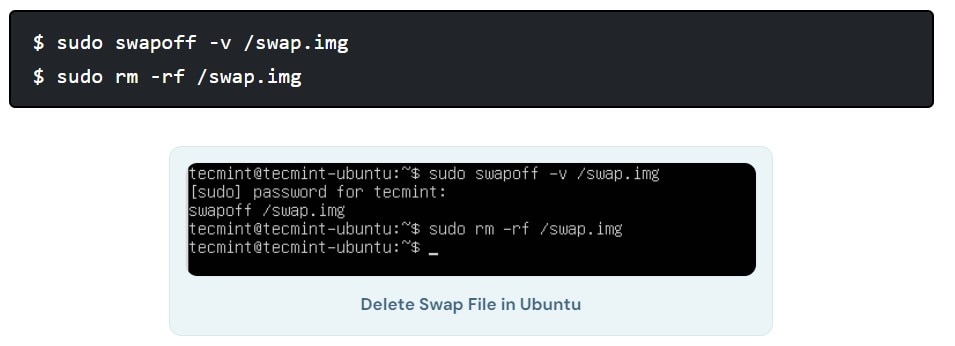
Now, the swap file will be completely deleted from the /etc/fstab file.
Bonus Tip: How To Recover a Deleted Swap File with Recoverit?
If you accidentally deleted any files on Ubuntu, you should recover them soon. This is mainly because there's always a higher risk of high-demand programming running slow. If you have lost the data, you can definitely recover it using a data recovery tool.
Wondershare Recoverit is one of the most reliable tools, and it is free and completely safe to use. Whether you're a beginner or a complete expert, you can use this platform. This platform plays an important role in ensuring that you recover the data.
You must download Wondershare Recoverit on your PC for your Mac or Windows OS. Either of these versions can determine higher compatibility and great functioning. It can work seamlessly across all Linux distributions, such as Manjaro, Solus, Debian and more.
Some of the key steps you must follow to run Wondershare Recoverit for recovery of deleted swap files via Wondershare Recoverit Linux Recovery are as follows:
Step 1: As soon as the Wondershare Recoverit is installed in your system, you must open it. You must click on the NAS and Linux option under More Recovery Features on the main screen. Then, click on the Linux Recovery option.
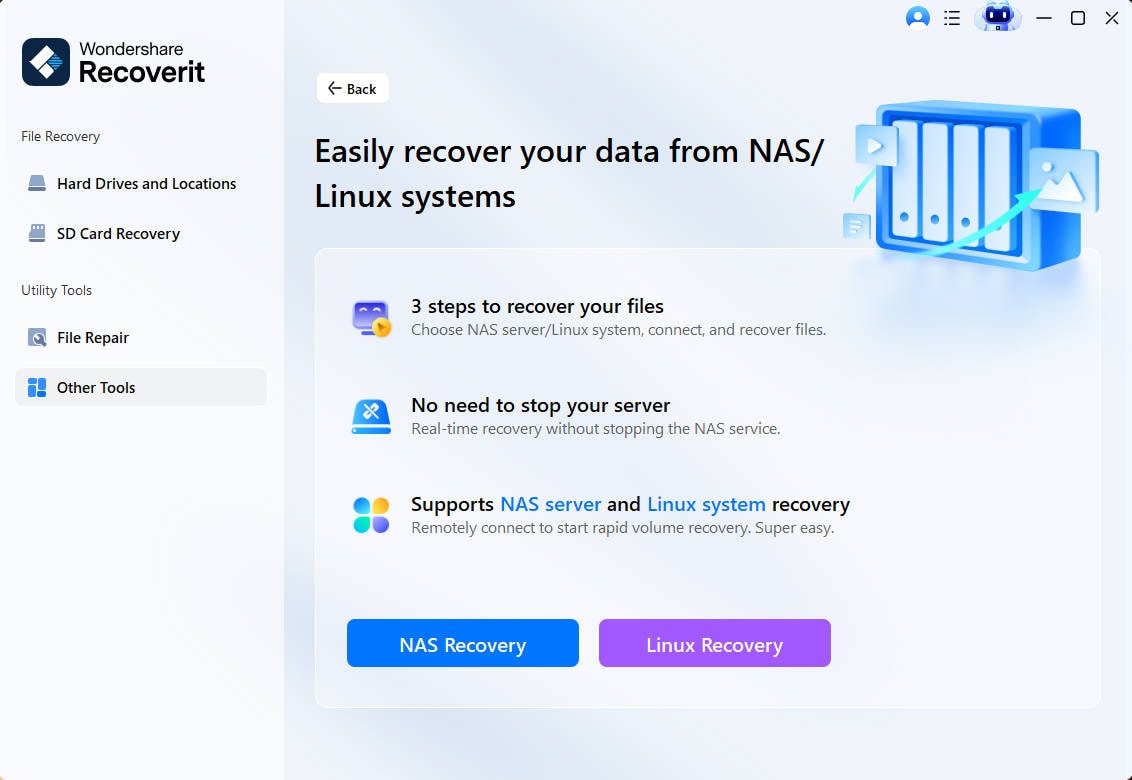
Step 2: Establish a connection between the program and the Linux computer. You will be asked to enter all the information. Enter the information with relevant fields. Click on Connect to establish the remote connection between the data recovery tool and the Linux device.
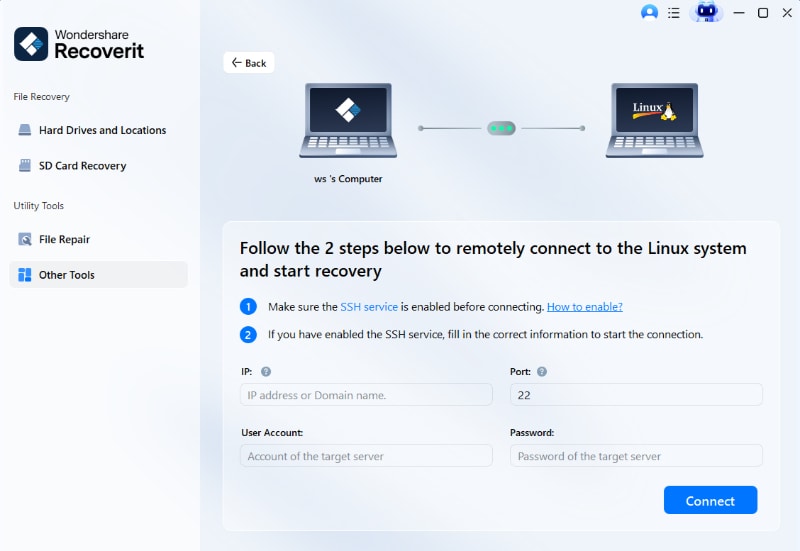
Step 3: Immediately after the connection is established, Wondershare Recoverit will begin the automatic scan process. You can also opt for filter options like date modification, file type, and more. However, if you want to pause, you can also stop the scanning process.
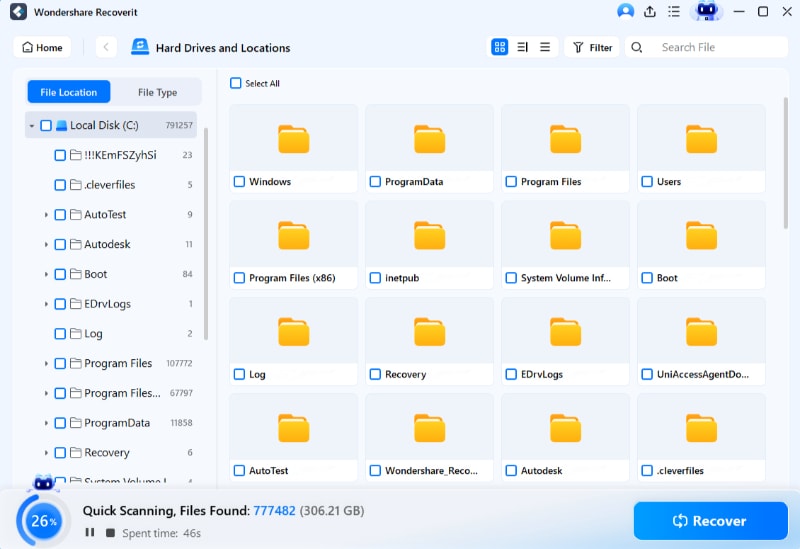
Step 4: Once the scanning is completed, all the recovered information will be available on the screen. You need to click on the preview and, after that, choose the Recover button. Select the location where you want to save these files and proceed.

How Much Swap Space Ubuntu?
When determining the swap space size, Ubuntu recommendations go into hibernation for the account. When using hibernation for this purpose, it is essential to ensure that the swap size equals the amount of RAM with the square root of the RAM amount.
However, if you don't need the hibernation, the required to add swap Ubuntu is as follows:
- If the space is less than 1 GB of RAM, the swap size should at least be the size of RAM or double it.
- If the space is more than 1 GB, then the swap size should equal the square root of RAM or even double.
- If RAM is being used as a callback, the swap size over 4 GB is not really necessary.
Swap size is one of the most integral parts of your Ubuntu device. Therefore, it is essential to check the memory to determine how much space is available for active processes. If the system lacks swap space and RAM, it will crash completely.
Conclusion
If you want to add swap space Ubuntu, adopting the proper steps to fix this problem is advisable. Adopting the appropriate methods can be essential in determining efficiency and avoiding potential risks. Furthermore, you can eventually work towards increasing the space and check your system compatibility. However, if you accidentally deleted any of the files, you may adopt a data recovery tool to get back all your lost data and information.
FAQ
-
1. How to add a swap area in Ubuntu?
In order to add a swap area in Ubuntu, you need to check if enough space is available in your system. All the necessary steps to add a swap area in Ubuntu without running out of space, as discussed above. You can adjust the swappiness from the settings to increase the swap usage. -
2. How do I get swap space in Linux?
You can get swap space in Linux by using the swapon-show command. This command will allow you to check the swap space available in your system. You can also use the free command, which will allow you to view your system's swap and memory usage. -
3. How to increase the swap file size in Ubuntu?
At the beginning of every command, you must add sudo. You can also run a sudo bash before making the commands. These small steps can play an important role in increasing the swap file size in Ubuntu.


 ChatGPT
 Perplexity
 Google AI Mode
 Grok
Grok


