File Recovery
- Recovers deleted or lost files effectively, safely and completely.
- Supports data recovery from 500+ data loss scenarios, including computer crash, partition loss, accidental human error, etc.
- Supports 1000+ file formats recovery with a high success rate and without any quality loss.

[2026]High CPU or Disk Usage by Ntosknl.exe on Windows 10/11

Jun 03, 2026 • Filed to: Windows Computer Solutions • Proven solutions
 TL;DR:
To resolve high CPU or disk usage caused by the Ntoskrnl.exe memory management process in Windows 10/11, you must address underlying memory leaks by modifying system configurations, updating drivers, or running system repair commands.
● Disable Windows Search Service via Computer Management and stop the Runtime Broker by unchecking Windows tips in System Notification settings to reduce background resource consumption.
● Execute the Dism/online/Cleanup-image/RestoreHealth command as an administrator to repair system components, or use the Windows Performance Toolkit to capture a 60-second diagnostic trace log to identify problematic programs.
● Update network and graphics drivers using the hdwwiz.cpl run command, set the Clear Page File Shutdown registry value to 1 to clear memory upon reboot, and perform a Microsoft Defender Offline Scan to eliminate malware.
Ask AI for a summary
 ChatGPT
 Perplexity
 Gemini
 Claude
 Grok
Grok
Users of Windows 10/11 often complain about system issues related to Ntoskrnl.exe. The use of this system file often leads to an over-bloated RAM and CPU, leading to frustrating experiences such as the Blue Screen of Death. While this may appear an insurmountable challenge at first, there are effective ways to fix the problem. This article will show you how.
Part 1. What is Ntoskrnl.exe, and What Does It Do?
Ntoskrnl.exe is a chief operating system that handles memory operations in Windows 10. Another name for this file is (Windows NT operating system kernel or kernel image). The kernel image is responsible for providing the executive and kernel layers of Windows NT with sufficient kernel space. Besides this, it is also responsible for hardware visualization, memory, and process management. What this goes on to show is that Ntoskrnl l.exe is indeed a very vital organ of a Windows 10 system.
If a task is loaded to your RAM along with the task executor program, the Central Processing Unit (CPU) will execute the task, after which it will record results in the memory at first and later by the loaded program. This action also has access to several devices in your PC, such as the CPU, GPU, ROM, HDD, and SSD. After the program is closed, the task is removed from the memory as well as the data is processed to free up space for newer tasks.
Part 2. Why Ntoskrnl.exe consumes a lot of Disk Space, Memory and CPU?
Although the kernel system file manages memory space, it tends to consume quite a lot of space, most of which are caused by hardware and malware viruses, leading to memory leaks.
Part 3. 8 Solutions to Fix High CPU or Disk Usage by Ntoskml.exe in Windows 10/11
There are so many ways to fix a high CPU or Disk usage using Ntorrskrnl.exe on your Windows 10/11, but in this article, we will show you 8 quick and easy methods to get the job done.
Video Tutorial on How to Fix High CPU or Disk Usage by Ntoskml.exe in Windows 10/11?
Method 1. Disable Windows Search Service
The first thing you can try to fix this issue on your Windows 10 is to disable Windows Search Service. To do so, follow the steps below:
Step 1. On your PC keyboard, tap Windows key + X at once and click on Computer management.

Step 2. Expand the services and application section and click Services> Windows Search.
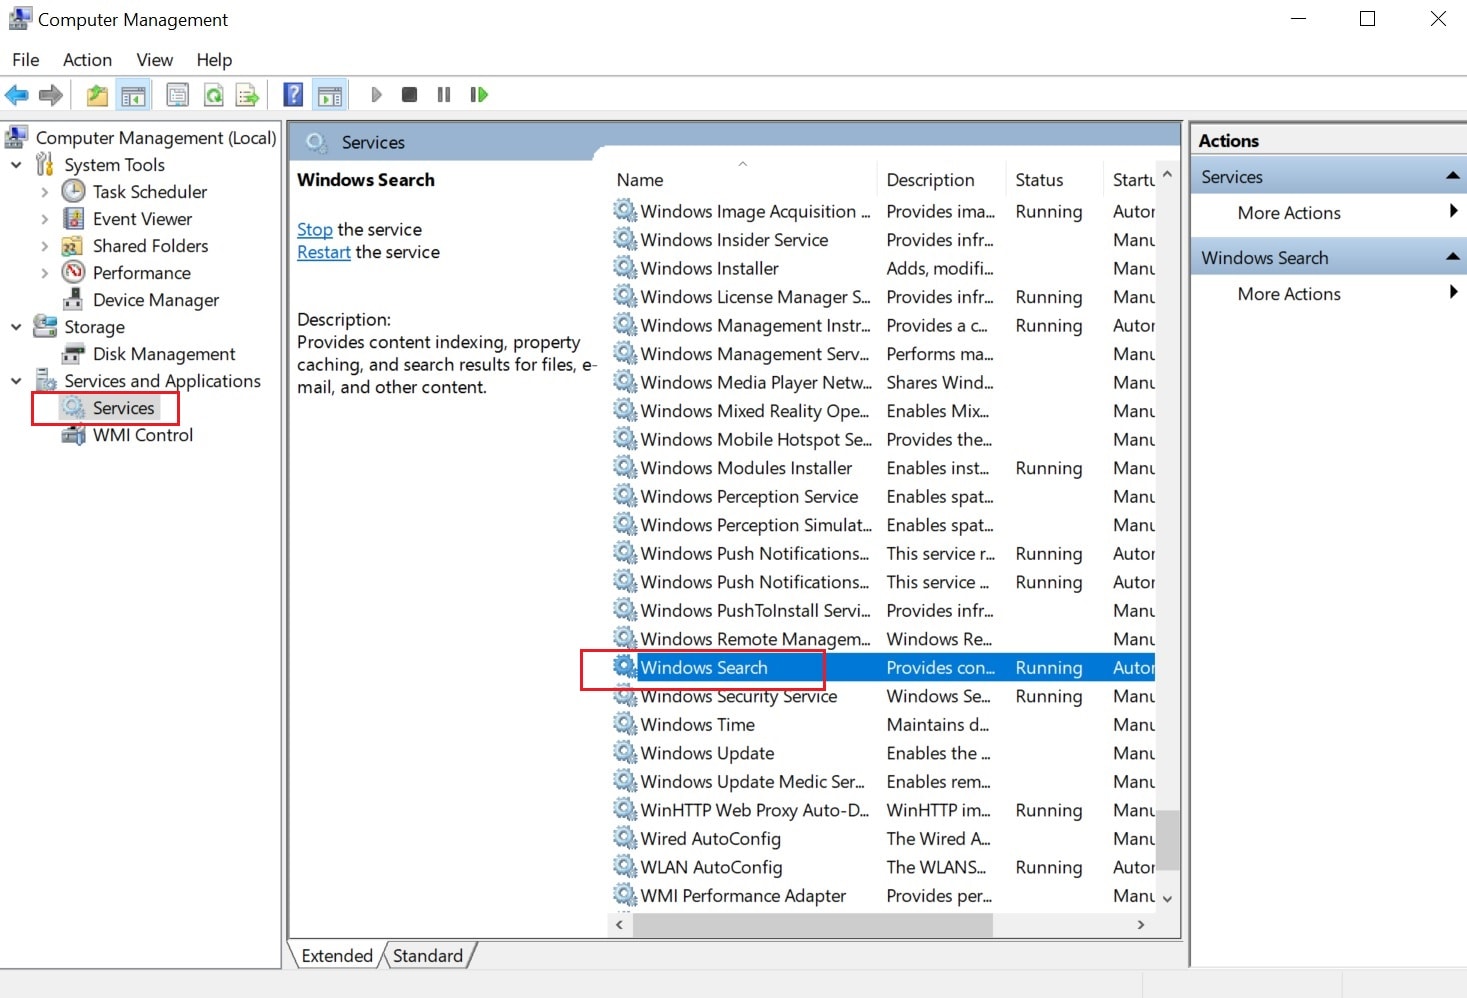
Step 4. Click Stop in the General Tab.
Step 5. Once the service stops, click Ok to save and then exit.
Method 2. Check for Incompatible Programs
If you are currently dealing with high disk usage, you may need to check for incompatible programs running on your system. One such program to be on the lookout for are anti-virus programs which may be at variance with some other programs in your Windows. Pay attention to see which program is causing your CPU to take in so much data or causing your system to malfunction in general. If you can identify the program, do not hesitate to uninstall it. If the program is important to you, you can reinstall it again.
Method 3. Run Command
You can run a command on your Windows device by following the steps below:
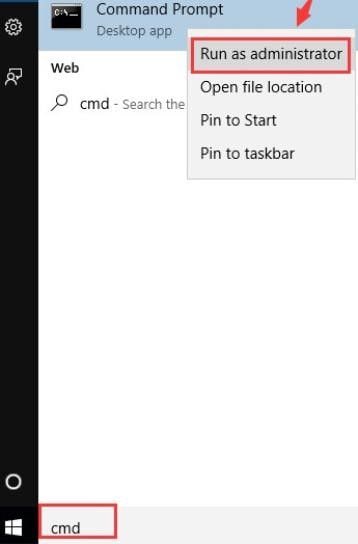
Step 1. Tap your Windows key and type the words cmd. After right-clicking the Command prompt, click on Run as administrator.
Step 2: Type this code Dism/online/Cleanup-image/RestoreHealth then tap Enter. This process takes a few minutes.

Step 3. After following the steps mentioned above, the problem should be resolved, but if not, you may need to run the command for a second time.
Method 4. Use Windows Performance Toolkit to Diagnose
To diagnose for errors, here are the steps to follow:
Step 1. Install a Windows Performance Toolkit (WPT).
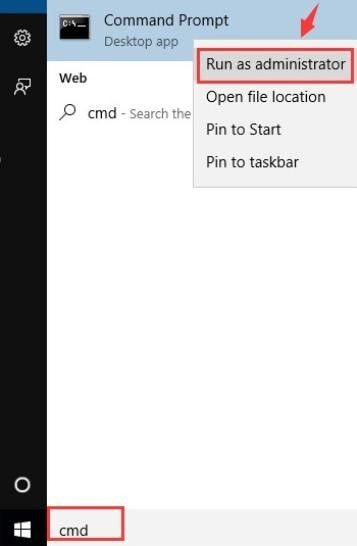
Step 2. Tap the Windows key on your keyboard and type the words cmd, and right-click the Command Prompt. After doing this, click Run as the administrator.
Step 3. Copy-paste this command Xperf -on latency -stackwalk profile -buffersize 1024 -MaxFile 256 – FileMode Circular && timeout -1 && xperf -d cpuusage.etl
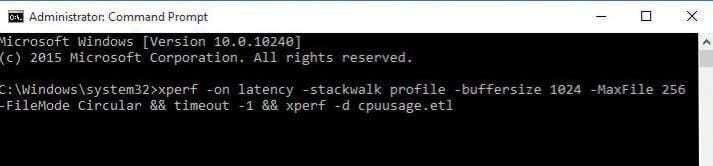
Step 4. Let the command run for about 60 seconds to enable it to capture your system's high CPU usage. The command will run a trace and give you a prompt warning, after which it will revert to C:\prompt.
Step 5. The system log will be kept safe in C:\\Windows\system32 including the file name cpuusage.etl
Step 6. From the diagnostic file, you will see the problematic programs.
By the way, you can also apply the KB4515384 patch to fix high CPU usage issue .
Method 5. Update Your Drivers
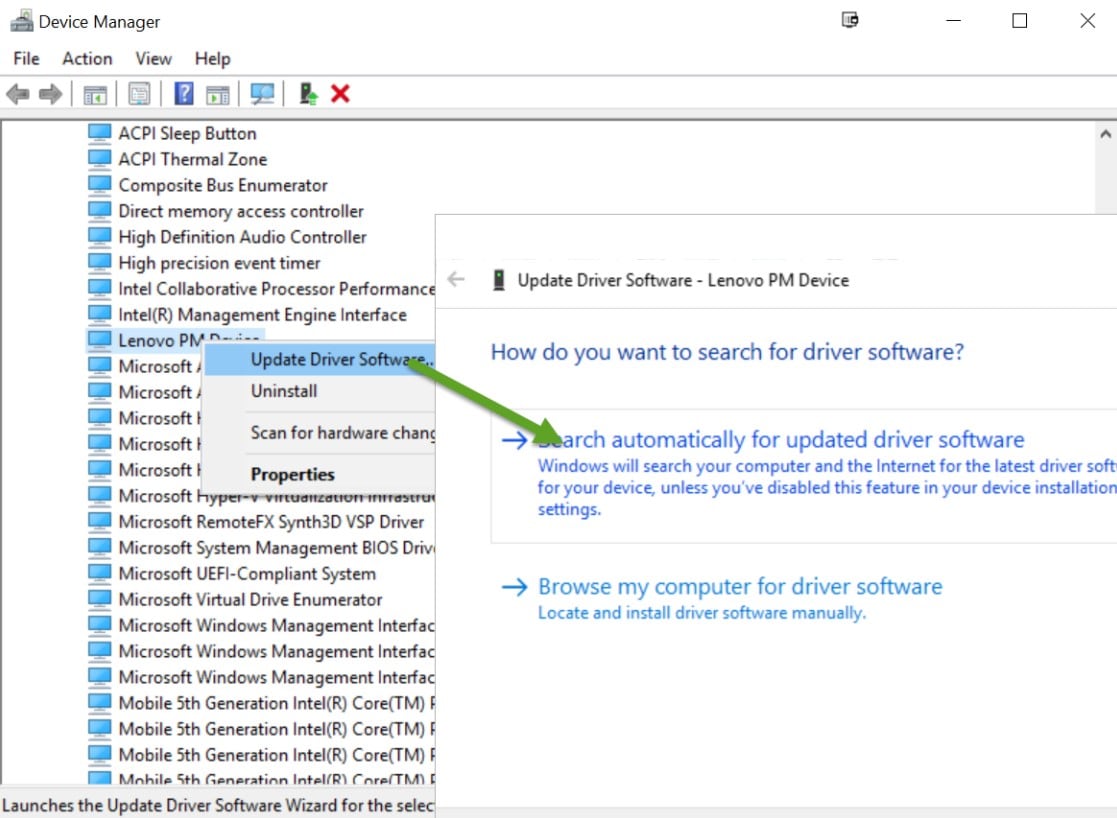
After updating to Windows 10, the network drivers and graphics might be the first thing that can cause this issue on your system. So, to update your drivers, here are the steps to follow:
Step 1. Hold down the Windows Key and Press R. Now, type hdwwiz.cpl and tap on OK.
Step 2. Navigate to the Drivers tab and tap on Update Drivers.
Step 3. Choose the automatic option to search and install the updated drivers from the internet.
Step 4. Finally, restart your system.
By the end of Step 4, the system's driver will be updated, and the issue will be fixed. And if, in any case, the problem still persists, then move on to the following method for fixing this issue.
Method 6. Disable Runtime Broker
Runtime Broker is a system process that consumes a massive portion of the CPU storage due to insufficient memory optimization. This thing can cause memory leaks and can be fixed by disabling the Runtime Broker.
To disable Runtime Broker, you need to:
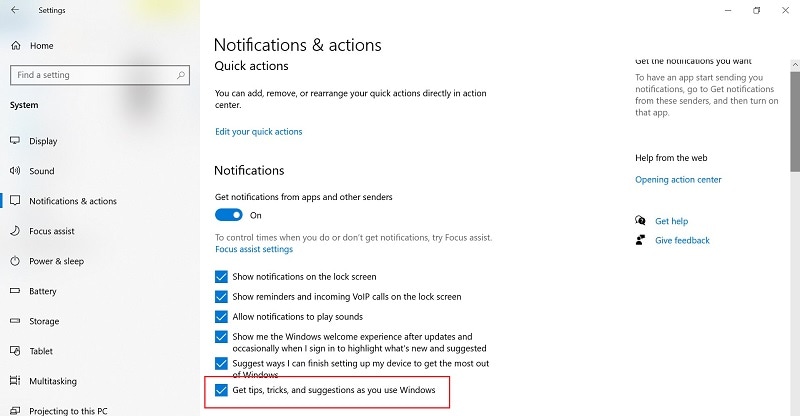
Step 1. Select the Start menu and click on the Settings app.
Step 2. Now, go to System and select Notification and Actions.
Step 3: Here, deselect the Show me the Windows... and Get tips, tricks and suggestions as you use Windows option and lastly, restart your PC.
After restarting your PC, you can check if the issue is fixed or not. If no, then we have got another solution for you.
Method 7. Changing Registry Settings
Sometimes the outdated registry settings need to be changed in order to offer better performance. To change the registry settings, you need to follow a series of steps that are mentioned below:
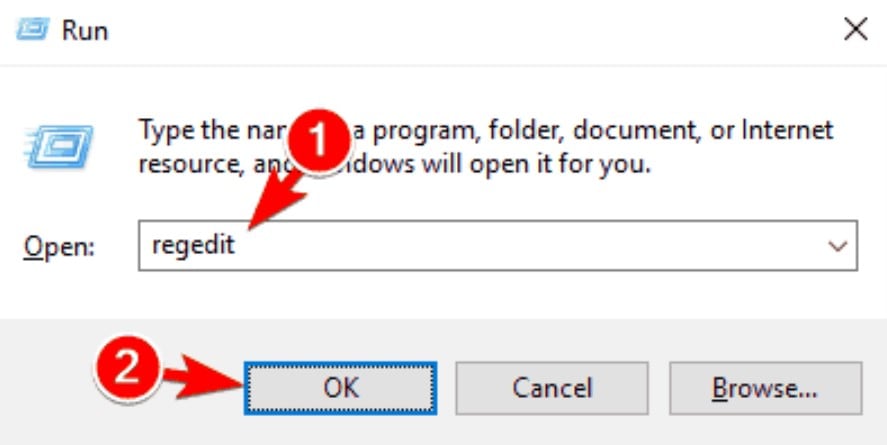
Step 1. Press the Windows + R key together. This will open the Run window.
Step 2. Enter regedit here and click on the OK button.
Step 3. Now, navigate to the below-mentioned address.
HKEY_LOCAL_MACHINE>SYSTEM>CurrentControlSet>Control>Session Manager>Memory Management.
Step 4. Go to the Clear Page File Shutdown registry in the right panel and double click on it.
Step 5. Here, change the Value Data to 1 and hit the OK button.
Step 6. Finally, restart your computer and examine if the issue still exists.
Method 8. Check for Viruses or Malware
Sometimes the malware and virus in your PC can cause this issue. So, it is always a good practice to conduct a malware or virus scan on your PC. To carry out a virus or malware scan, you need to:
Step 1. Go to the Start menu and open Windows Settings. In Windows Settings, select Update & Security and then click on the Open Windows Security button.
Step 2. Under Windows Security, go to Virus & Threat Protection> Scan Options and from the given options, choose the Microsoft Defender Offline Scan option.
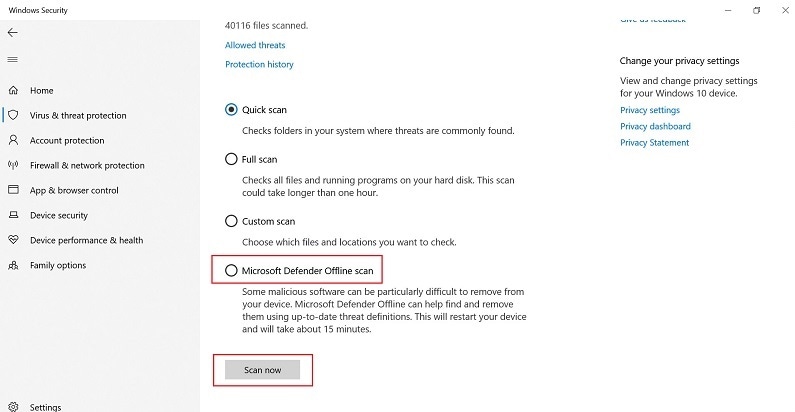
Step 3. Now, click on Scan Now to reboot your PC and start the malware or virus scanning process. If any virus or malware is detected, you will be asked if you want to remove it or not! You can pick any of these options as per your choice, but in terms of security, you should choose to remove it.
Conclusion
Fixing a high CPU or Disk usage by Ntoskrnl.exe on Windows 10 is quite easy if you use any of the methods shown above. Although your PC may run very slowly or stop abruptly when running programs because of a loaded CPU, this problem is not without remedy. The steps to fix the problem is easy and will take only a few minutes to complete.
Computer Troubleshooting
- Win System Crash
- Crack Bios Password
- Fix Run Dll Errors
- Fix Taskbar Disappeared Error
- Fix BootMGR Image Corrupt
- MBR Errors Fixed
- Windows Tips
- How to Edit DLL Files
- How to Test Hard Drive Speed
- Bootcamp Windows 10 No Sound Issue
- Download iCloud on PC
- Difference between File Systems
- Fix Computer Overheat
- Computer Problems
- Best Bad Sector Repair Tools
- Audio Not Working in Windows 10
- Fix Windows 10/11 Error Code 0xc000014c
- Fix Windows 10 Error Code 0xc0000034
- SMART Status Bad Error
- Fix Grub Loading Error
- Remove Admin Password
- Blue Screen Errors


David Darlington
staff Editor