

 TL;DR:
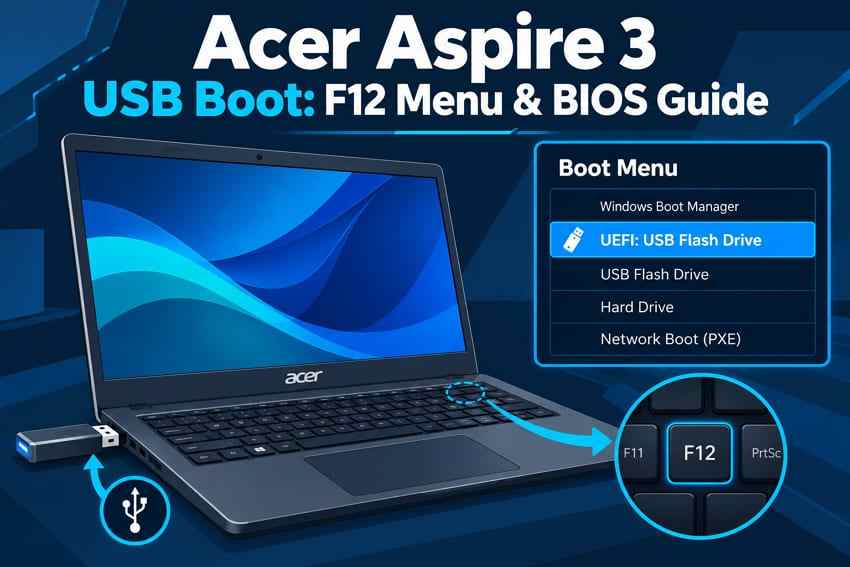
To successfully boot an Acer Aspire 3 from a USB, insert a properly prepared UEFI-compatible drive while the laptop is off, power it on, tap F12 at the Acer logo to open the one-time Boot Menu, and select the USB entry.
● If the F12 key does not open the menu, restart the laptop, tap F2 to access the BIOS setup, enable the F12 Boot Menu option located under the Main tab, and press F10 to save changes.
● The laptop will not recognize a flash drive containing a manually copied ISO file; you must use an official utility like the Microsoft Media Creation Tool to configure an 8 GB or larger drive specifically for UEFI systems.
● Leave Secure Boot enabled unless your specific third-party recovery media strictly requires disabling it, as modifying firmware security settings can trigger a 48-digit BitLocker recovery prompt on encrypted devices.
Ask AI for a summary
 ChatGPT
 Perplexity
 Gemini
 Claude
 Grok
Grok
For an Acer Aspire 3 boot from USB, start with the one-time F12 Boot Menu. Insert a correctly created bootable USB while the laptop is off, power it on, tap F12 at the Acer logo, select the UEFI USB entry, and press Enter. If F12 does nothing, press F2 at startup and enable F12 Boot Menu in BIOS when that option exists.
The boot key is only part of the process. The USB also needs valid boot files that match the laptop's firmware configuration. This guide separates the Acer Aspire 3 boot menu, BIOS settings, USB-media preparation, Secure Boot checks, and data-protection steps so you can fix the exact point of failure without changing unrelated firmware options.
In This Article
Part 1. Acer Aspire 3 Boot Menu Key and BIOS Keys
The main Acer Aspire 3 boot menu key is F12 on supported models, while F2 opens BIOS or UEFI Setup. These keys lead to different screens: F12 is for choosing a device for the current startup, while F2 opens persistent firmware settings.
| Key | What It Does | When to Use It |
| F12 | Opens the one-time Boot Menu on supported Acer notebooks | Select a USB, Windows Boot Manager, or another startup device for this boot |
| F2 | Opens BIOS or UEFI Setup | Enable F12 Boot Menu, review Secure Boot, or check saved boot settings |
| F10 | Saves BIOS changes and exits | Apply a documented firmware setting change |
| F9 | Loads setup defaults on supported Acer firmware | Restore defaults after a bad or unintended BIOS change |
| F5/F6 | May move entries in boot priority on firmware that shows these controls | Change permanent boot order only when necessary |
F12 Opens the One-Time Boot Menu
Acer documents F12 as the Boot Menu key on supported notebooks and netbooks. The advantage is that it changes the startup device for one boot without permanently moving the USB ahead of Windows Boot Manager. For a one-time repair, recovery session, or Windows installation, this is usually the safest route.
F2 Opens BIOS or UEFI Setup
Use F2 at the Acer logo when F12 does not open the menu or when you need to inspect a firmware setting. BIOS and UEFI are often used interchangeably in support instructions, but current Aspire 3 models typically use UEFI firmware even if the setup screen is still labeled BIOS.
F10 Saves Changes and F9 Loads Defaults
Inside Acer firmware, F10 commonly saves changes and exits. Acer also documents F9 for loading setup defaults on supported systems. Do not use F9 casually if the laptop relies on a specific storage-controller or boot configuration; record important settings first and change only what the troubleshooting path requires.
Why the Exact Aspire 3 Model Matters
Aspire 3 is a product family rather than one firmware design. A315, A314, A317, and other generations can expose different tabs, storage-controller settings, Secure Boot behavior, or Boot Menu options. Find the exact model, serial number, or SNID using Acer's official instructions, then check the model's documentation before following a BIOS step that is not visible on your machine.
If you are working with another Acer line rather than an Aspire 3, use the broader Acer laptop boot-from-USB guide instead of assuming every Aspire 3 setting applies.
Part 2. Prepare a Bootable USB for the Acer Aspire 3
The F12 menu cannot make a normal flash drive bootable. The drive needs valid startup files created for the task you intend to perform. For Windows 11, Microsoft's current consumer workflow is the simplest choice because it prepares the USB as installation media rather than asking you to manually copy an ISO file.
Create Windows 11 Media With an Official Tool
For a Windows 11 install or reinstall, use the official Windows 11 download page and Media Creation Tool. Microsoft currently requires a blank USB flash drive with at least 8 GB of space for this workflow and warns that the contents of the selected USB will be deleted.
If your goal is Windows recovery rather than installation, a previously created Windows Recovery Drive can provide recovery tools. A recovery drive is not a backup of personal files.
| Goal | Recommended USB | Main Risk |
| Install or reinstall Windows 11 | USB created with Microsoft's Media Creation Tool | The USB is erased during creation; later setup choices can erase the internal drive |
| Open Windows recovery tools | A Recovery Drive previously created for that PC | Reset or reinstall choices inside recovery can remove apps or files |
| Run a trusted third-party recovery tool | Boot media created by that tool's official writer | The creator may erase the USB; later recovery actions can write to storage if misused |
Protect the USB and Internal Files Before You Start
Copy anything important off the USB before creating boot media. If the Acer contains files you still need, also back them up before you start a reset, clean installation, partition deletion, formatting, or other destructive step. Simply opening the F12 menu or booting into Windows Setup does not by itself erase the internal drive, but choices made after the environment loads can.
Keep Windows 11 Media Compatible With UEFI
Windows 11 requires UEFI firmware with Secure Boot capability. Let Microsoft's official tool prepare current Windows 11 installation media rather than forcing Legacy/CSM mode as a generic workaround. If you manually build installation media, follow Microsoft's USB installation guidance exactly.
Connect Power and the USB Before Startup
- Connect AC power: Avoid a low-battery shutdown during installation or recovery.
- Disconnect unrelated storage: Remove external drives that are not needed so you are less likely to select the wrong disk later.
- Insert the USB before powering on: This gives the firmware a chance to enumerate it before the F12 menu opens.
- Use a direct port: While troubleshooting, connect the USB directly to the laptop instead of through a dock or hub.
Part 3. Boot the Acer Aspire 3 From USB With F12
Use F12 first because it changes the startup device only for the current boot. This avoids unnecessary permanent boot-order changes and is the fastest path when the USB is already prepared correctly.
Open the F12 Menu and Select the USB
Step 1. Shut down the Acer Aspire 3 completely. Insert the bootable USB, press the power button, and tap F12 repeatedly as soon as the Acer logo appears.

Step 2. In the Boot Menu, highlight the entry that matches the USB. For current Windows 11 installation media on a UEFI-configured Aspire 3, choose the UEFI USB entry when that label is shown, then press Enter.
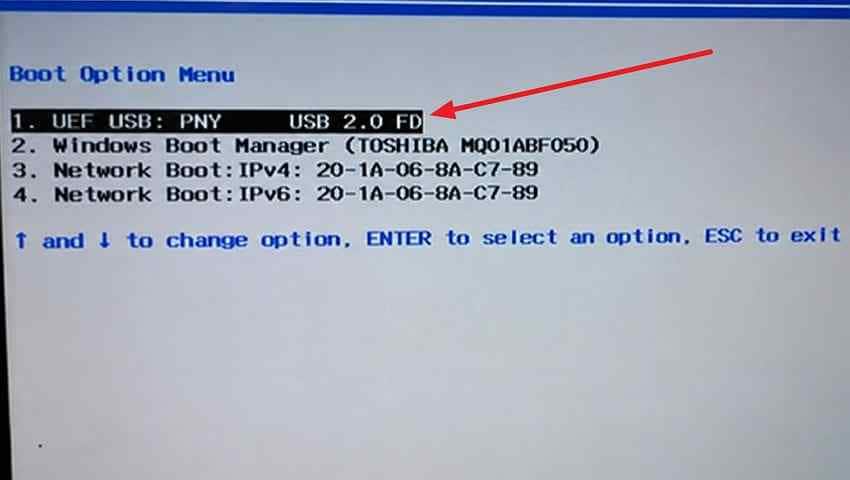
Step 3. Wait for Windows Setup, Windows Recovery Environment, or the trusted boot tool you intended to launch. If Windows starts from the internal drive instead, return to Part 5 or Part 6 rather than changing several BIOS settings at once.
Confirm the Correct Installer or Recovery Environment
Before you click Install, Reset, Format, Delete, or similar controls, confirm that the expected environment opened and that you understand the next operation. If the wrong tool, edition, or drive is shown, choose Back, Cancel, or Exit where available and restart instead of proceeding.
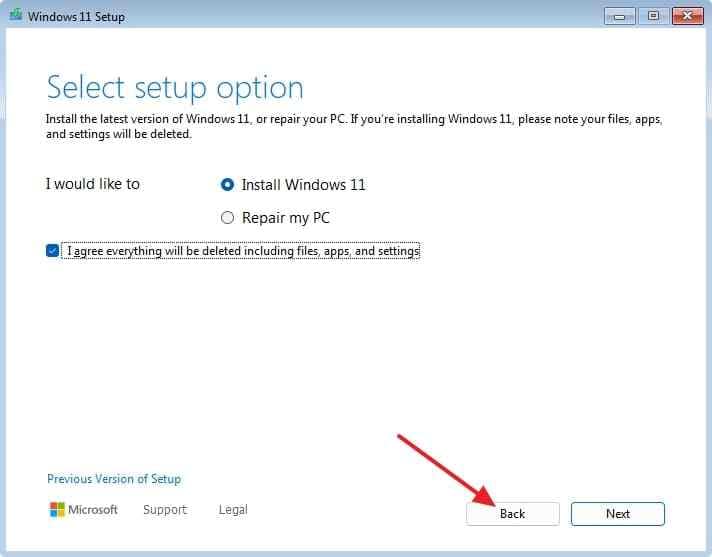
This is especially important when the internal drive contains the only copy of personal data. Booting from USB is reversible; deleting partitions or formatting the internal drive is not.
Part 4. Enable the F12 Boot Menu in Acer Aspire 3 BIOS
If pressing F12 does nothing and Windows starts normally, the one-time Boot Menu may be disabled. Acer's current F12 Boot Menu guidance confirms that some notebook and netbook models ship with F12 disabled by default.
Enable F12 Boot Menu From the Main Tab
Instructions. Restart the Aspire 3 and tap F2 while the Acer logo is visible. Open the Main tab, highlight F12 Boot Menu, press Enter, choose Enabled, and press Enter again. Press F10 and confirm the save operation to restart.
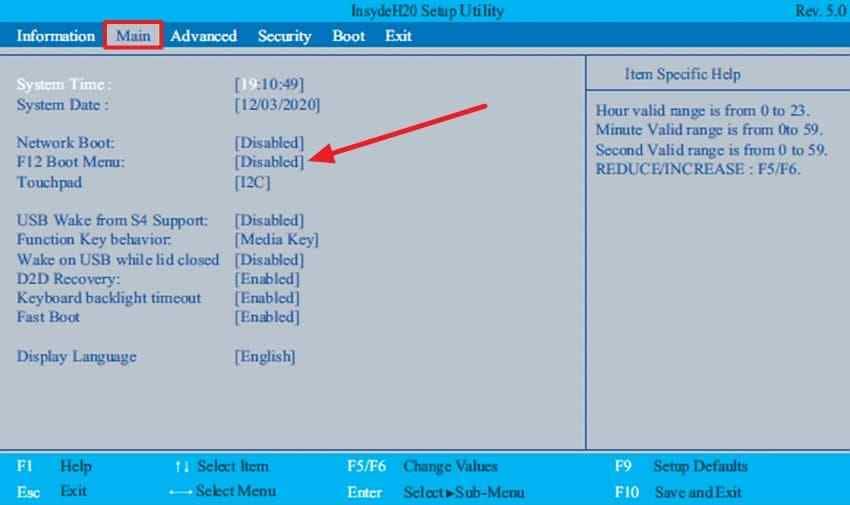
After the restart, keep the USB connected and tap F12 again. Enabling F12 does not move the USB permanently ahead of Windows Boot Manager; it only makes the one-time menu available.
Use the Exact Model Manual if the Option Is Missing
Acer explicitly notes that not every notebook or netbook includes the F12 Boot Menu feature. If the option does not exist, do not search for undocumented BIOS unlock methods. Identify the exact Aspire 3 model and use Acer's Drivers and Manuals page to check the firmware controls provided for that model.
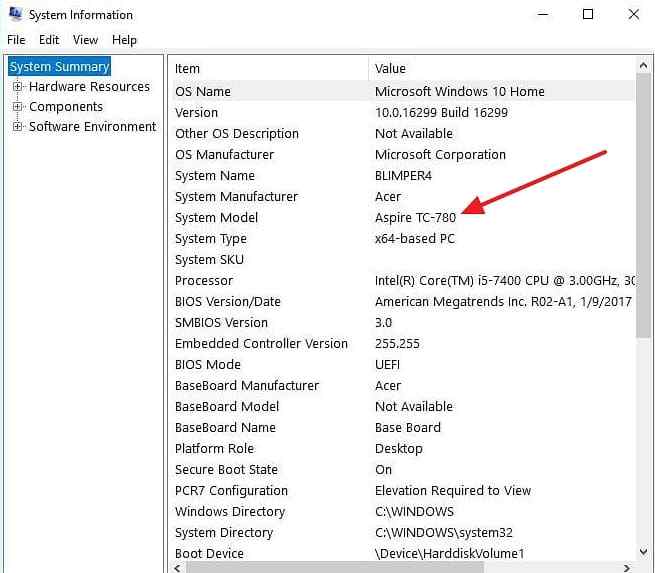
Step 1. Open System Information in Windows, when available, and record the System Model. You can also use the label on the laptop or its SNID.
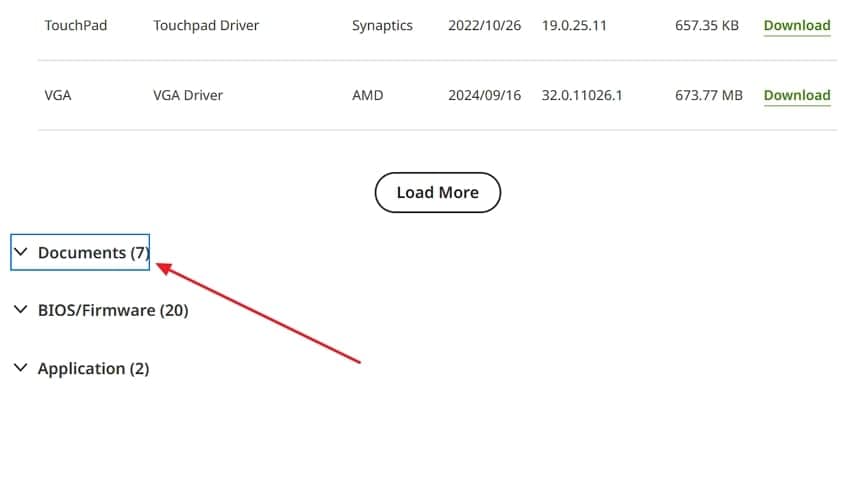
Step 2. Open Acer Support, locate the exact model, and check its manual or BIOS documentation before changing boot mode, Secure Boot, storage-controller, or password settings.
For a broader explanation of Acer recovery, BIOS, and boot-menu differences, see the Acer recovery and boot menus guide.
Part 5. Fix an Acer Aspire 3 USB That Does Not Appear
If F12 opens correctly but the USB is missing, the problem is usually the boot media, USB connection, firmware compatibility, or a security setting. Work from the lowest-risk check to the highest-risk change.
Rebuild and Retest the USB Before Changing BIOS
- Recreate the media: For Windows 11, rebuild the USB with Microsoft's Media Creation Tool. A flash drive is not bootable merely because an ISO file was copied onto it.
- Try another direct USB port: Remove hubs and docks, reconnect the USB directly, and reopen F12.
- Test another known-good flash drive: If a second properly created drive appears, the first USB may be faulty.
- Test the bootable USB on another compatible PC: If the USB fails everywhere, recreate the media before touching Acer firmware.
Change Secure Boot Only When the Media Requires It
Do not disable Secure Boot as the first response to a missing USB. Acer's current Secure Boot guidance for notebooks says the setting may need to be changed for another operating system or certain recovery tools, but Acer recommends re-enabling Secure Boot after the task is complete.
On some Acer notebooks, Secure Boot is grayed out until a Supervisor Password is set. Only create one when the exact model requires it, record it securely, and remove it afterward if it was created solely for the firmware change. A forgotten firmware password can create a new access problem.
Instructions. If the trusted media provider specifically requires Secure Boot to be disabled, enter BIOS with F2, locate Secure Boot under the Security, Boot, or Authentication tab, change only that setting, and save with F10. Restore the original setting after the USB task is finished.
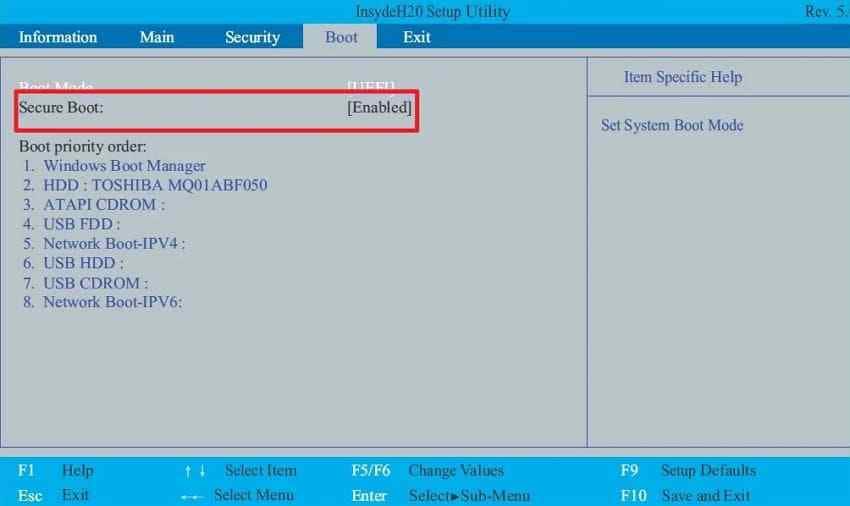
Note: Microsoft states that hardware, firmware, or boot changes can trigger a BitLocker recovery prompt. Keep the 48-digit recovery key available before modifying firmware on an encrypted device. See Microsoft's BitLocker overview for the recovery-key behavior.
Secure Boot is also undergoing certificate updates in 2026. Microsoft advises users not to disable Secure Boot simply to work around certificate expiration; keep Windows and the Acer firmware current instead when certificate servicing is the issue.
Restore BIOS Defaults After Problematic Changes
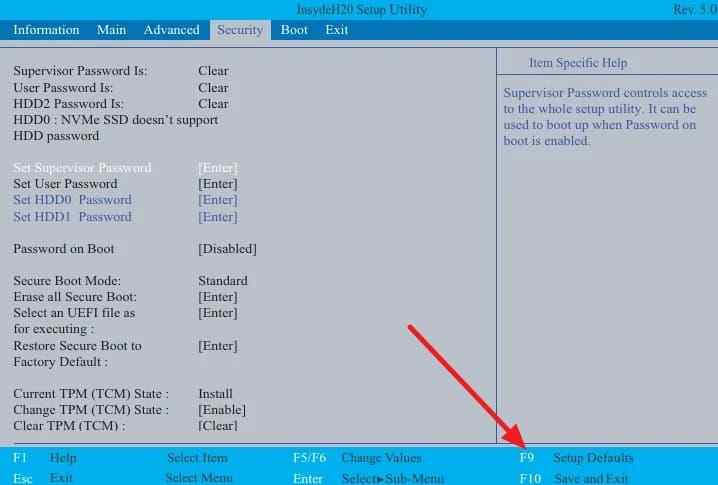
If an earlier BIOS change made the USB or Windows stop appearing, restore the known-good values first. Acer's current No Bootable Device troubleshooting guidance documents F9 for loading setup defaults and F10 for saving on supported Acer systems.
Instructions. Enter BIOS with F2, press F9, confirm loading setup defaults, then press F10 and confirm the save. After the restart, recheck only the specific setting you actually need, such as F12 Boot Menu.
Important: If the internal SSD or HDD disappears from BIOS, repeatedly drops out, or reports hardware errors, stop changing firmware settings. Protect important files before additional repair attempts.
Part 6. Fix a USB That Appears but Will Not Start
If the USB is visible in the Acer Aspire 3 boot menu, the firmware is detecting the device. A failure after you select it usually points to the bootloader, boot mode, installation media, or an installation-stage storage problem rather than the F12 key itself.
Match the Failure to the Next Safe Check
| What Happens | Likely Area | Next Safe Check |
| Windows starts normally after you select the USB | Wrong entry, invalid USB boot files, or firmware rejected the media | Reopen F12, choose the correct USB entry, and recreate the media if it also fails on another PC |
| The USB opens to a black screen or immediate error | Damaged, incomplete, or incompatible boot media | Rebuild the USB from the official source and retest before changing BIOS |
| Windows Setup opens but cannot see the internal SSD | Storage-controller configuration, missing installer driver, or storage hardware issue | Confirm the drive is still detected in BIOS and use the exact Aspire 3 model's storage-driver guidance |
| Setup reports a partition-style problem | The existing disk layout does not match the required installation path | Back up data before conversion or repartitioning; use Microsoft's supported tools only when their prerequisites are met |
| Windows stops booting after a UEFI or Legacy change | The installed Windows configuration no longer matches the firmware mode | Restore the original boot mode before assuming the drive failed |
For supported Windows system disks, Microsoft MBR2GPT can convert a qualifying MBR system disk to GPT without deleting data. That is an installation or migration task, not a general fix for an Aspire 3 USB that will not boot, so use it only when the disk layout is actually the blocker and important files are already protected.
Use Permanent Boot Priority Only When F12 Is Unavailable
The F12 one-time menu is preferable because it leaves the normal boot order intact. If F12 is unavailable and the model supports saved boot-priority changes, open BIOS with F2, move the bootable USB ahead of Windows Boot Manager only for the task that requires it, then save with F10.
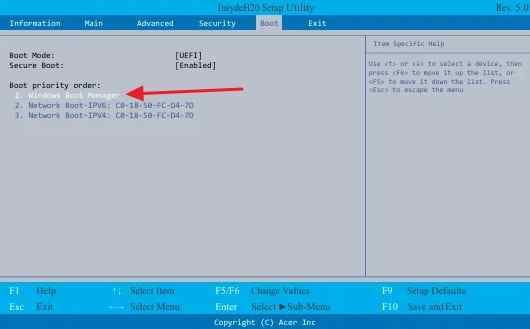
Restore Windows Boot Manager After the USB Task
After installation, repair, or recovery, remove the USB and restore Windows Boot Manager to its normal priority if you changed the saved order. Microsoft also warns that leaving installation media ahead of the internal disk can return the PC to Windows Setup after a restart.
If you never changed the saved order and used F12 only, there is usually nothing to restore.
Part 7. Protect or Recover Files Before Reinstalling Windows
Booting an Acer Aspire 3 from USB is often a means to an end: repairing Windows, reinstalling it, or accessing data on a PC that no longer starts. Protect the files first when the next operation can delete partitions, format the internal drive, reset Windows, or replace storage.
Back Up Normally When Windows Still Starts
If Windows starts and the files are readable, copy them normally to a separate external drive or trusted cloud location. Data recovery software is unnecessary when ordinary file access still works.
Recover Files Before a Clean Install or Partition Change
If files are already deleted, missing, or inaccessible, stop writing new data to the source drive. Recover files before a clean install, partition deletion, formatting, or another operation that can overwrite recoverable data. The user-specified Recoverit Windows Data Recovery page covers recovery from readable Windows storage and 1000+ supported file types.
Recoverit is a data recovery tool, not a BIOS or Windows repair tool. It cannot fix the F12 menu, repair Secure Boot, bypass BitLocker, or restore a physically failed drive that is no longer detectable.
Use Recoverit Bootable Recovery When Windows Cannot Start
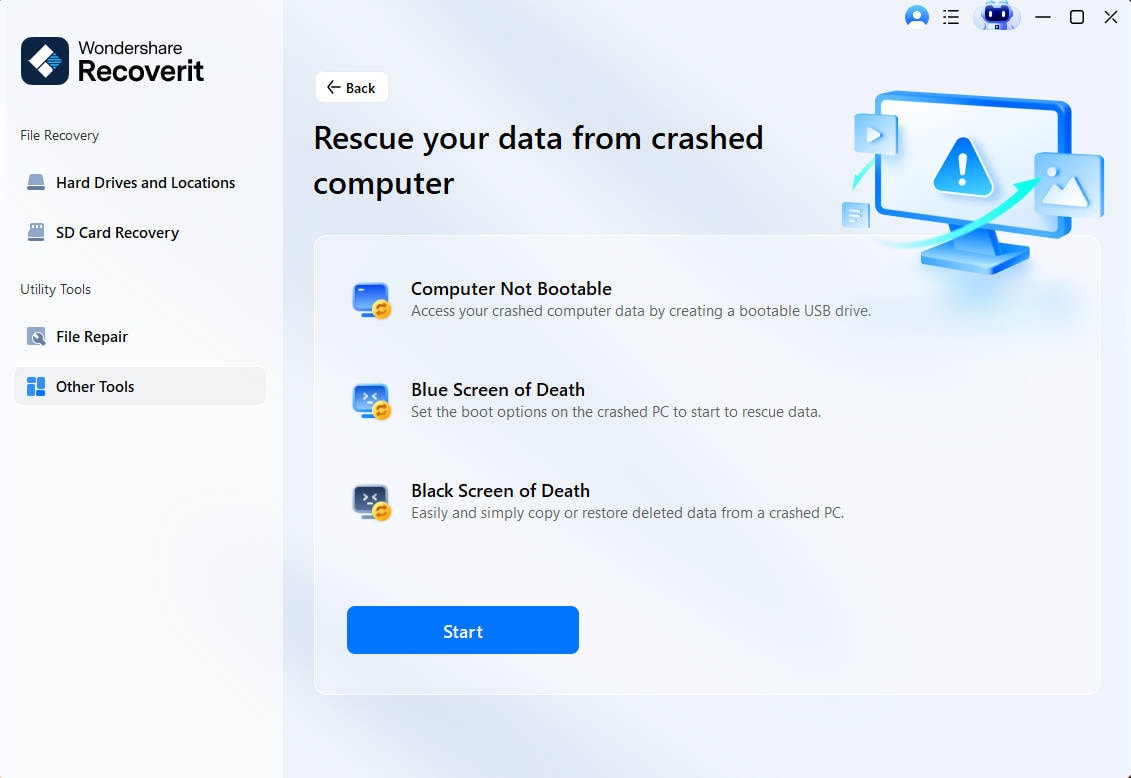
When Windows is inaccessible but the internal SSD or HDD remains detectable, Recoverit's current Windows recovery guide provides a bootable-media workflow under Other Tools > System Crashed Computer. Use a working PC and a blank USB; the USB is formatted during media creation.
Step 1. Start System Crashed Computer Recovery
Install and launch Recoverit on a working Windows computer, open Other Tools, select System Crashed Computer, and click Start.
Step 2. Create the Bootable USB
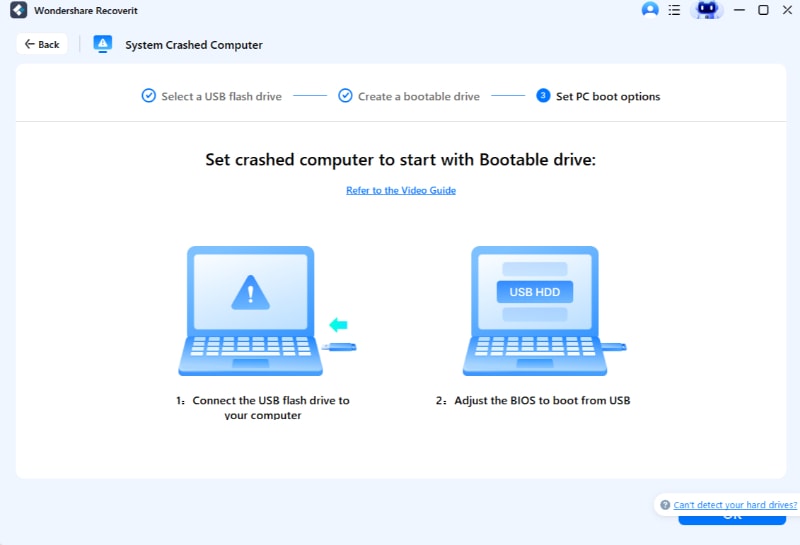
Connect a blank USB drive that the working PC can recognize, select it in Recoverit, and create the bootable media. Back up anything on that USB first because the creation process formats it.

Step 3. Boot the Aspire 3 and Recover to Another Drive
Connect the recovery USB to the powered-off Aspire 3, tap F12, select the USB, and start Recoverit. Choose Data Recovery, scan the detectable internal drive, preview the files you need, and save recovered data to a different healthy drive.
For the broader unbootable-PC workflow and limitations, see Windows System Recovery.
Stop Software Recovery for Physical Drive Failure
Do not keep scanning if the internal drive disappears from BIOS, disconnects repeatedly, reports persistent read failures, makes unusual mechanical noises, smells burnt, or shows another sign of physical damage. Power the laptop off and use a professional data recovery service. Software recovery depends on the storage remaining detectable and readable enough to scan.

Conclusion
For an Acer Aspire 3 boot from USB, the safest first path is simple: create valid boot media, connect it before power-on, tap F12 at the Acer logo, and select the correct UEFI USB entry. If the Acer Aspire 3 boot menu does not open, use F2 to enable F12 when the model provides that setting, then save with F10.
Do not treat Secure Boot, Legacy mode, storage-controller settings, or permanent boot priority as generic fixes. Change them only when the exact media or Aspire 3 model requires it, and restore the original configuration afterward. If the USB is being used for a reset or Windows reinstall, protect important files before any destructive step.
FAQ
-
What Is the Acer Aspire 3 Boot Menu Key?
F12 is the Acer Aspire 3 boot menu key on supported models. Press it repeatedly as the Acer logo appears. If nothing happens, press F2 to enter BIOS and enable F12 Boot Menu under the Main tab when that option is available. -
How Do I Boot an Acer Aspire 3 From a USB Drive?
Create a valid bootable USB, shut the laptop down, connect the USB, power on, and tap F12 at the Acer logo. Highlight the appropriate UEFI USB entry and press Enter. Use the BIOS route only if F12 is disabled or unavailable. -
Why Is My USB Not Showing in the Acer Aspire 3 Boot Menu?
The USB may not contain valid boot files, may have been connected too late, may be incompatible with the current UEFI configuration, or may not be detected through that port. Recreate the media from the official source and test another direct port before changing firmware settings. -
Should I Disable Secure Boot to Boot Acer Aspire 3 From USB?
Not by default. Keep Secure Boot enabled when current trusted media boots correctly. Disable it only when the boot-media provider and the exact Acer model instructions require that change, keep the BitLocker recovery key available, and re-enable Secure Boot after the task.


