

“I've tried everything. First, I attempted to connect it to my phone (which has a USB-C), but the phone couldn't detect it either. I also removed the device from Device Manager, but that didn't help. I tried formatting it using Disk Management, but there are no partitions visible for the flash drive listed as Disk 2…” - DomitoriS
Traditional low-level formatting refers to factory-level physical media initialization that normal Windows software cannot perform on modern USB flash drives. Search results promote it for drives showing zero bytes or strange capacities. Such tools perform real operations, but their names misrepresent what often happens.
The term format low level USB often refers to zero-writing host-addressable drive sectors. This guide covers DiskPart clean and clean all, plus HDDGURU's whole-device formatting tool for Windows. Recover important files with Recoverit first because data overwritten by destructive operations may no longer be recoverable.
In This Article
Part 1. Can You Really Low-Level Format a USB Drive?
The answer depends on what low-level formatting means for modern USB flash storage. Knowing this distinction shows what current formatting tools do and what they cannot.
The Short Answer: Logical Whole-Drive Operations
Low-level formatting once created physical track and sector structures on early hard drives. Modern flash drives use controllers that manage how data reaches physical memory cells. Consumer software cannot recreate the factory structures established within USB flash storage devices.
Instead, Windows tools can overwrite sectors that the USB controller exposes to Windows. A flash drive low-level format tool often refers to this zero-write process.
Quick Format vs. Full Format vs. clean vs. clean all
These 4 operations serve different purposes and affect stored data in different ways. The table below compares what each operation changes and leaves on USB storage:
| Operation | What It Does | Data Recoverable After | Time |
| Quick Format | Writes a new file system table | Potentially, if data remains unoverwritten | Seconds |
| Full Format | Creates a new file system and checks the accessibility of sectors across the formatted volume | Usually not from overwritten host-addressable sectors | Minutes |
| DiskPart clean | Removes partition and volume metadata | Potentially, as most sectors remain unoverwritten | Seconds |
| DiskPart clean all | Sets every sector to zero | No, from host-visible sectors | Longer |
The “clean” command removes partition or volume formatting information from the selected disk. It overwrites partitioning information without writing zeros across every sector on the disk. Adding “all” sets every sector on the selected disk to zero during cleaning. Microsoft states that quick formatting deletes file tables without scanning sectors for defects.
Zero-Filling Is Not a Factory-Level Format
Zero-filling overwrites existing addressable sectors without recreating their factory storage structures or layout. A factory low-level format establishes physical recording structures before consumers receive storage devices.
Consumer software cannot perform that factory process on modern USB flash storage devices. The term low-level format for USB disks often describes host-level overwrites of sectors.
Why Wear Leveling Limits Secure-Erase Claims
Flash controllers use wear leveling to distribute writes across available physical memory cells. They can also reserve spare flash capacity that remains hidden from host access. When Windows writes zeros, the controller maps those writes to physical flash locations. Some retired blocks and reserved areas can remain outside the host-addressable sector space.
Because of this, zero-filling cannot guarantee erasure of every physical NAND location on flash storage. This limitation matters most when a USB drive contains data requiring sanitization assurance. NIST defines media sanitization as making access to target data infeasible for a defined level of effort. For sensitive data, use device-supported sanitization methods or physical destruction under suitable policies.

Part 2. Recover Important Files Before Any Destructive Method
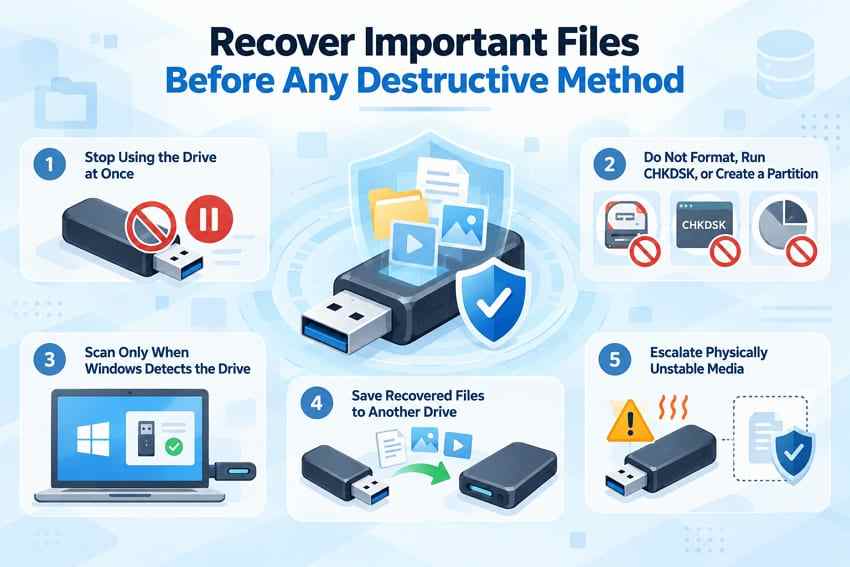
Every destructive method below can erase files you may still need from storage. Below are 5 precautions before a low-level format pendrive procedure removes recoverable data.
- Stop Using the Drive at Once: Avoid copying, deleting, formatting, or writing new data to the drive. New writes can overwrite sectors that still contain recoverable files.
- Do Not Format, Run CHKDSK, or Create a Partition: These operations can modify file-system or partition structures. Recover important files before running any write-based repair or formatting command.
- Scan Only When Windows Detects the Drive: Recovery software can scan the USB when Windows recognizes it as a storage device, even if File Explorer cannot open it. A completely undetected drive may need hardware diagnosis instead.
- Save Recovered Files to Another Drive: Store recovered data on another healthy disk, not the affected USB. Writing files back to the same drive can overwrite data that has not yet been recovered.
- Escalate Physically Unstable Media: Repeated disconnects, overheating, disappearing capacity, or frequent read errors can indicate hardware failure. Avoid repeated scans or zero-fill attempts if continued access may worsen the condition.
Important files can become unrecoverable once a USB drive low-level format, zero-fill, or repartitioning operation overwrites existing data. Before using DiskPart or another destructive formatting method, recover any files you still need. Recoverit USB Drive Recovery can scan detected USB flash drives, pen drives, external disks, and memory cards for recoverable data.

Use Recoverit before running clean all, formatting, or creating new partitions on the affected USB. Save recovered files to a different physical drive so further changes to the source device do not overwrite remaining data.
Key Features
- RAW Volume Scanning: Scans detected USB storage that Windows cannot open normally, helping recover files before formatting or repartitioning the drive.
- AI Search for Scan Results: Uses natural-language search assisted with AI to help locate specific recovered files across large scan results.
- Advanced File Filtering: Combines search with file filters, making it easier to narrow recovered results by relevant file criteria before saving them.
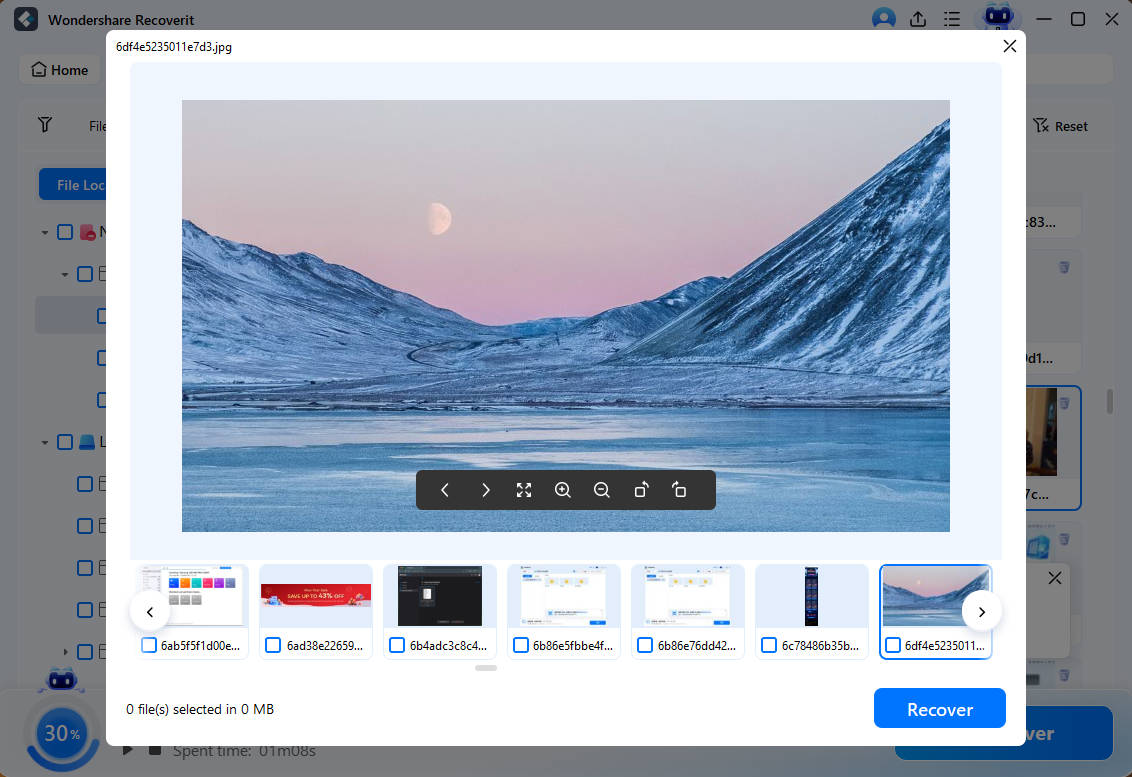
- Improved File Preview: Provides a clearer preview experience so users can inspect recoverable files before restoring them to another drive.
- exFAT Recovery Optimization: Includes improvements related to exFAT path handling, which can help when recovering files from affected exFAT storage devices.
Guide to Recover Important Files With Recoverit
Now, follow the steps below to recover your important files with Recoverit first:
Step 1. Connect and Select the USB Drive
Connect the USB drive to the PC > Open Recoverit > Select “Hard Drive and Location” > Choose your USB drive.

Step 2. Scan the USB drive
Recoverit starts scanning your device. During this process, see the scanned files in the “File Path” panel. To narrow down the process, use “Filter” and select specific file types.

Step 3. Preview and Download Your Files
Lastly, preview the scanned files > Click “Recover” to save them to your PC.
Note: Complete this step before any method below, since none of them can be reversed once started.
Recover Important Files With Recoverit
 Security Verified. Over 7,302,189 people have downloaded it.
Part 3. Choose the Correct Operation for Your Goal
With files secured, choose a low-level format USB disk operation matching your goals. Look at the table below to compare suitable operations for common USB storage goals:
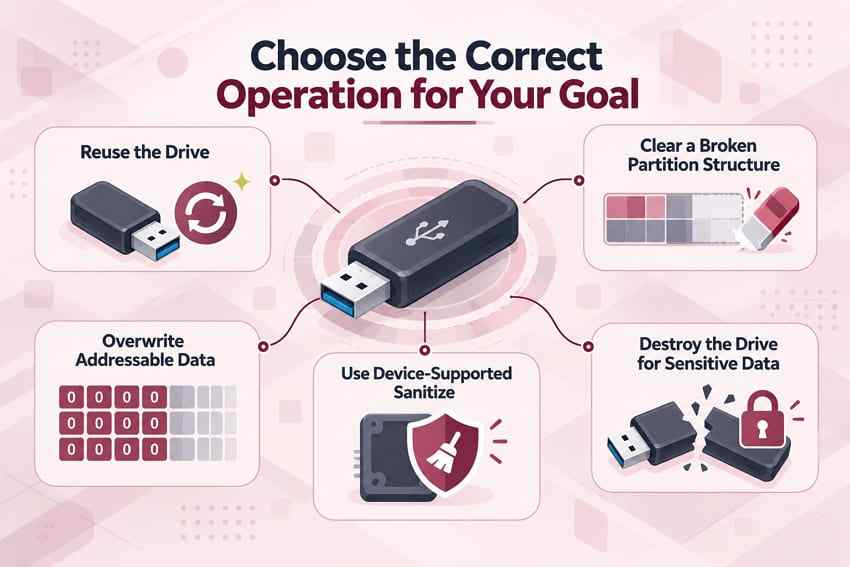
| Your Goal | Right Operation | Data Recoverable After |
| Reuse a Working Drive | Quick format | Potentially, until overwritten |
| Fix a Broken Partition Table | DiskPart “clean” | Potentially, because most file data is not overwritten |
| Overwrite Host-Addressable Sectors Before Reuse or Transfer | DiskPart “clean all” | No, from host-visible sectors |
| Meet a Security Policy | Device-supported sanitize command | Depends on device support and policy requirements |
| Dispose of Sensitive Data | Physical destruction | No |
After comparing each low-format USB drive option, consider what each method changes. Let's examine each choice before selecting the operation that best matches your goal:
- Reuse the Drive: Quick format creates a new file system without overwriting all existing data sectors. Use it for routine reuse when secure erasure is not required.
- Clear a Broken Partition Structure: DiskPart “clean” removes partition and volume formatting information from the selected disk. Use it when damaged or unwanted partition structures prevent normal reuse.
- Overwrite Addressable Data: DiskPart “clean all” writes zeros across sectors Windows can address. Use it when you need a logical whole-drive overwrite rather than simple partition removal.
- Use Device-Supported Sanitize: Some storage devices support firmware-level sanitize or secure-erase functions. Availability depends on the controller, firmware, interface, and whether the USB connection passes those commands through.
- Destroy the Drive for Sensitive Data: Physical destruction may be appropriate when sensitive data requires stronger disposal assurance than software wiping can provide. Follow the applicable security or sanitization policy for the data involved.
Part 4. Rebuild a USB Drive With DiskPart clean
DiskPart clean removes partition and volume formatting information from the selected USB drive. It can help when damaged or unwanted partition structures prevent normal formatting or reuse. This differs from a low-level format USB disk operation that overwrites storage. Follow the steps below to rebuild your USB drive with DiskPart “clean” commands:
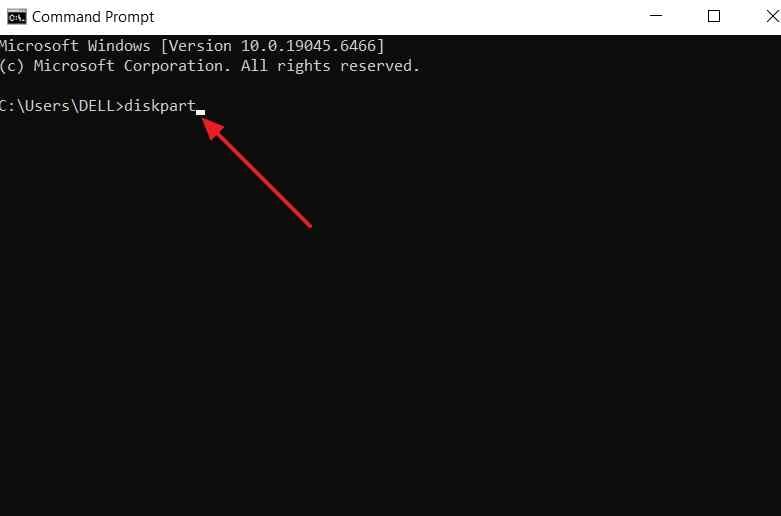
Step 1. First, open “CMD” as administrator > enter “diskpart.”
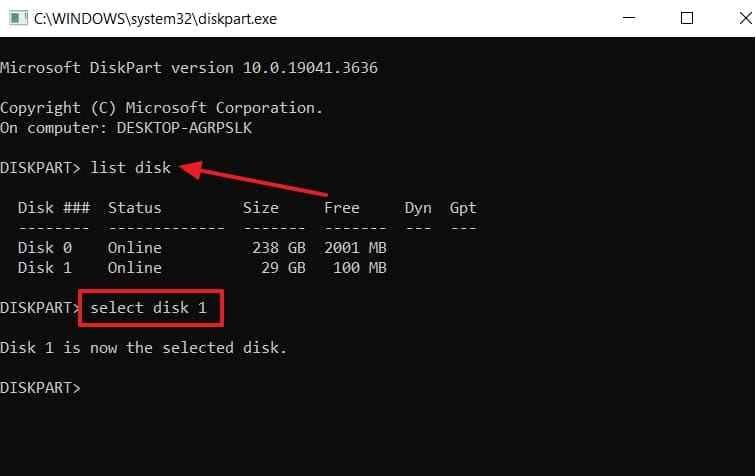
Step 2. Once DiskPart opens, run “list disk” > Identify the USB by capacity. Then, enter “select disk x” > Replace “x” with your disk number.
Note: Run “detail disk” to verify the model and device identity before continuing.
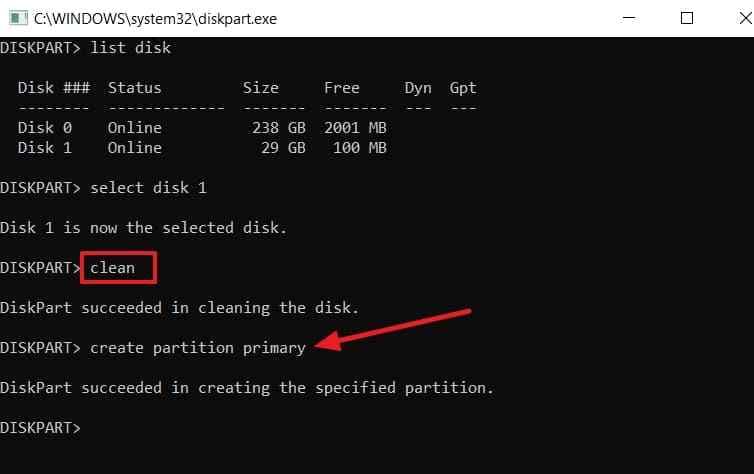
Step 3. After that, run “clean” to remove the drive’s partition information > Enter “create partition primary.”
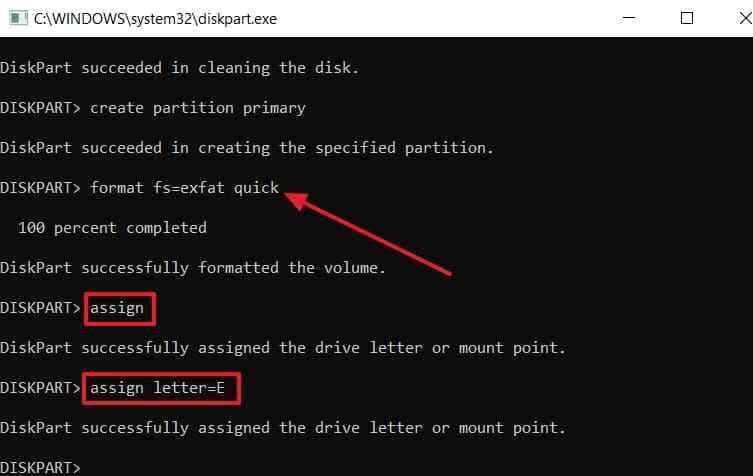
Step 4. Afterward, use “format fs=exfat quick” > Enter “assign” to assign the drive a letter. If you want a specific letter, use “assign letter=X.”
Note: Use exFAT here as an example. Choose another supported file system if the target device requires it.
DiskPart “clean” removes partition information without overwriting every data sector on the drive. Microsoft documentation confirms that “clean” removes partition or volume formatting from the selected disk.
Existing files may remain recoverable until new writes overwrite relevant data sectors. Therefore, use “clean” to rebuild USB drives, not for secure data erasure.
Part 5. Zero-Fill a USB Drive With DiskPart clean all
DiskPart "clean all" writes zeros across accessible sectors, making the process take longer. Use this option when ordinary partition removal does not meet your erasure goal. Check the selected disk first, since this low-level format tool for USB drives destroys data, and confirm its details with "detail disk." Let's look at how to perform a zero-fill using DiskPart "clean all:"
Instructions. Open “DiskPart” and select your USB drive using the previous method. Then enter “clean all” to write zeros across its accessible sectors. Once complete, create a primary partition, format it as exFAT, and assign a drive letter as shown in the previous method.
Note: DiskPart may appear inactive while clean all runs. Do not disconnect the USB until DiskPart reports completion.
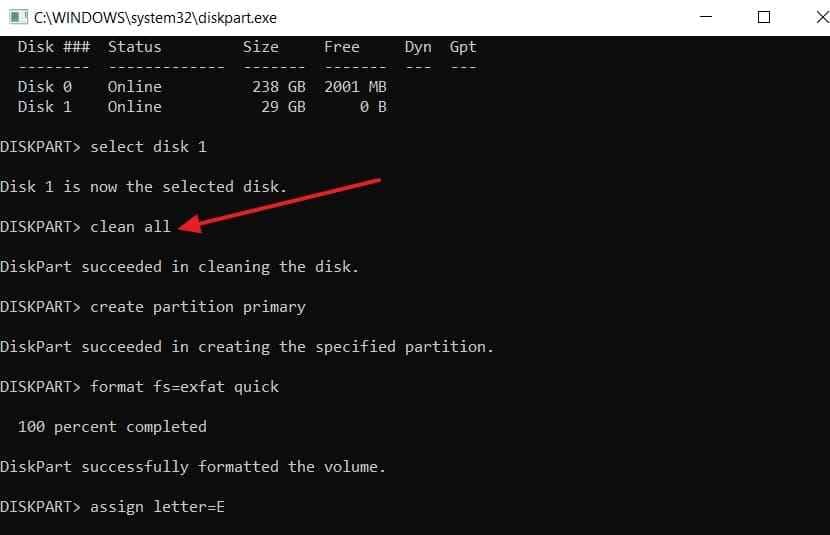
DiskPart “clean all” takes more time because it writes across the selected drive. Larger USB drives can take longer because more sectors need zero writes. Unlike “clean,” this process overwrites the drive’s addressable sectors instead of removing partition information.
This provides a logical wipe across sectors that Windows can address on USB. Flash wear leveling can still leave physical NAND locations outside direct Windows access. For regulated or highly sensitive data, follow an approved sanitization standard rather than relying on “clean all” alone.
Part 6. Use a Third-Party Whole-Device Tool Carefully
Third-party tools offer another option when users want a dedicated whole-device formatting utility. HDDGURU provides HDD Low Level Format Tool, a Windows utility that can perform destructive whole-device zero-writing on USB flash drives. Despite its name, this operation is not a factory-level NAND format. Before using this tool, understand the operation and verify the correct USB drive first:
- Whole-Device Zero-Writing: The Low-Level Format operation writes zero-filled buffers across the entire selected physical drive.
- Read Verify: Performs full-device sequential raw reads without writing, while showing progress, elapsed time, ETA, and logs.
- Physical Drive Inspection: Displays Windows identity plus available NVMe, ATA/SATA SMART, and USB SAT information when exposed through the storage path.
- Separate TRIM Operation: Offers discard/TRIM on supported storage paths. TRIM is different from zero-writing and may be unavailable through many USB connections.
- Detailed Operation Logs: Provides operation logs, exportable inspection information, and startup diagnostics for reviewing drive operations.
- USB Path Limitations: SMART, health data, and TRIM capabilities may be unavailable when the USB controller or bridge does not pass those commands through.
How to Use HDD Low Level Format Tool
Now, follow the steps below to zero-write your USB drive using HDDGURU safely:
Step 1. Once you open the tool > Select your USB drive > Choose “Low-Level Format.”
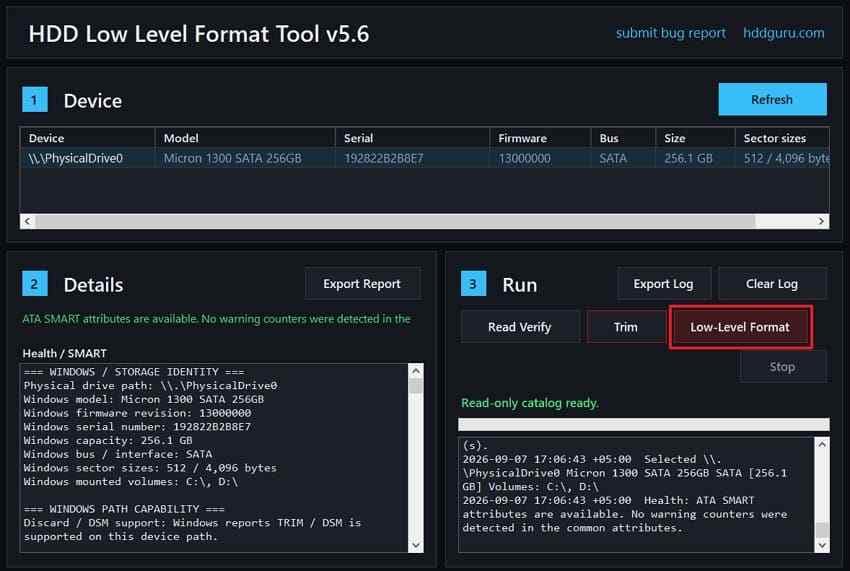
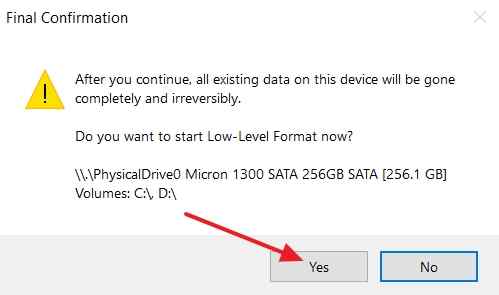
Step 2. Verify the drive model and capacity. Start the zero-write operation > Confirm the warning prompts > Wait for the process to finish.
Part 7. Choose the New File System
After a low-level format pendrive process, choose a suitable file system next. The table below compares common file systems for different USB storage needs and devices:
| File System | Max File Size | Best For | Trade-off |
| exFAT | Very large files, far beyond typical USB capacities | Large files, cross-platform use | No permissions or journaling |
| NTFS | Effectively unlimited | Windows-focused use | No native macOS write support |
| FAT32 | 4 GiB minus one byte | Older devices, car stereos, TVs | Cannot store files 4 GiB or larger |
exFAT is a file system commonly used across Windows and macOS. NTFS provides journaling, permissions, and compression for drives intended for Windows-based storage use. macOS reads NTFS by default but requires added software for writing to volumes.
Apple notes that Macs may read NTFS storage but cannot write to it by default. FAT32 supports older devices but limits individual files to four GiB minus one byte.
Part 8. When Formatting Does Not Fix the USB Drive
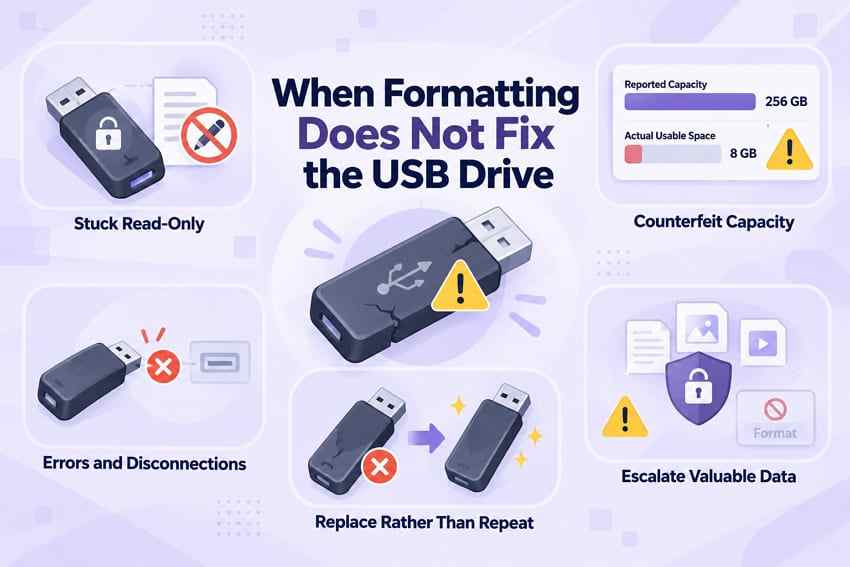
Formatting assumes the USB drive can still accept writes and function without errors. Repeating a flash disk low-level format cannot repair controller or hardware faults. Now, let's look at signs that USB formatting cannot solve the underlying problem.
- The Drive Is Stuck Read-Only: A failing or protective controller state can force the USB into read-only mode. Formatting and other write operations may continue to fail even when Windows detects the drive.
- The Capacity Is Counterfeit: Counterfeit or failing USB drives can report more storage than is physically available. Capacity-verification tools can expose false capacity by testing whether data can be written and read back correctly.
- Errors and Disconnections Recur: Repeated read/write errors, disappearing storage, or random disconnects can point to failing hardware. Test another USB port or computer before concluding that the drive itself is defective.
- Replace Rather than Repeat: Running clean all or another zero-write again only adds more writes to the flash. Replace the USB if errors continue after reasonable troubleshooting.
- Escalate Valuable Data: Stop formatting or wiping when important files remain on an unstable drive. Professional recovery may be safer when hardware failure prevents reliable software access.
Conclusion
In summary, a format low-level USB request usually means rebuilding the drive or overwriting its host-addressable storage. DiskPart clean removes partition and volume information, while clean all writes zeros across sectors Windows can address. Recover important files with Recoverit before either operation, and use stronger sanitization methods when sensitive data requires higher assurance.
FAQ
-
Is DiskPart clean all the same as low-level formatting a USB drive?
No. DiskPart clean all writes zeros across sectors Windows can address. Traditional factory-level low-level formatting is not exposed to normal consumer software on modern USB flash drives. -
What is the best low-level format tool for a USB flash drive?
DiskPart clean all is the built-in Windows option for zero-filling host-addressable sectors. HDDGURU’s HDD Low Level Format Tool provides a graphical alternative with device inspection, Read Verify, zero-write, and supported TRIM operations. -
Can low-level formatting fix a write-protected or 0-byte USB drive?
Sometimes. DiskPart clean may help when damaged partition metadata causes the issue. It cannot repair failed NAND, a defective controller, permanent read-only firmware state, or a USB drive that Windows cannot access correctly. -
Can you recover data after a USB low-level format?
Data may still be recoverable after DiskPart clean because it does not overwrite the entire disk. After clean all or another successful zero-write, overwritten host-addressable data is no longer recoverable through normal data-recovery methods.


