


 TL;DR:
You can quickly fix audio-video sync issues in VLC media player on the fly using keyboard shortcuts, or apply a permanent delay offset in the software's settings for consistent hardware lag.
● Press 'J' to make the audio play earlier or 'K' to delay it in 50-millisecond increments during active playback, and press 'Shift + K' to reset the synchronization.
● To fix constant latency from wireless hardware like Bluetooth headphones, navigate to Tools > Preferences > Audio and set a permanent negative value (e.g., -200 ms) under "Audio desynchronization compensation" to force audio to send earlier.
● On the VLC Android app, you can manually adjust the sync for the currently playing video by tapping the "..." menu, selecting "Audio delay," and using the on-screen slider or buttons.
Ask AI for a summary
 ChatGPT
 Perplexity
 Gemini
 Claude
 Grok
Grok
Do you often find yourself frustrated when watching videos on VLC, only to realize that the audio is out of sync with the video? This is a problem that many VLC users have, but don't worry—we can help! In this detailed guide, we'll show you different ways to fix audio delay in VLC and make your viewing experience better.
Whether you're watching a movie, a TV show, or a video you made yourself, having the sound match the picture is important for a good experience. We'll explain how to fix audio delay in VLC using simple fixes.
By the end of this article, you'll know how to handle any sound synchronization problems you might face.
Part 1: What Causes Audio Delay in VLC?
It's important to understand why audio delay occurs in VLC. Here are some common causes behind the audio out of sync VLC issue:
- Corrupted or damaged video files
- Incompatible video codecs
- Hardware limitations or outdated drivers
- Network streaming issues
- Incorrect audio track selection
- VLC configuration problems
- System performance issues
- Improperly encoded video files
- Inconsistent frame rates
- Audio processing delays in your sound system
Understanding these causes can help you prevent audio delay issues in the future and choose the most appropriate fix for your situation.
| Symptom | Likely Cause | Recommended Fix |
| Constant delay (e.g., exactly 1s off) | Encoding / Global Offset | Fix 2: Set Track Sync Value |
| Delay increases as video plays | Frame Rate Mismatch | Fix 5: Update VLC / Re-encode |
| Lag only when using Bluetooth | Wireless Buffer Latency | Fix 3: Permanent Desync (-200ms) |
| Audio stutters then lags | Hardware Bottleneck | Enable Hardware Acceleration |
Part 2: How To Adjust Audio Sync In VLC Player
Now that we know what causes audio delay in VLC, let's explore various methods to fix this issue. We'll cover why each fix is useful, how it helps, and provide step-by-step instructions to fix the audio out of sync VLC issue:
Fix 1: Fix Audio Video Delay in VLC using Keyboard Shortcut Keys
Keyboard shortcuts provide a quick and easy way to adjust audio sync in VLC on the fly. They're especially useful for minor synchronization issues that don't require permanent changes.
By using keyboard shortcuts, you can instantly adjust the audio delay without pausing the video or navigating through menus. This method allows for real-time fine-tuning of the audio-video synchronization.
Steps to adjust audio delay in VLC using keyboard shortcuts:
Step 1: Open your video in the VLC media player. While the video is playing, use the following keyboard shortcuts:
- Press 'J' to decrease audio delay (make audio play earlier)
- Press 'K' to increase audio delay (make audio play later)
- Each press adjusts the delay by 50 milliseconds
Step 2: Continue adjusting until the audio and video are in sync. To reset the audio sync, press 'Shift + K'
Remember, these changes are temporary and will only affect the current playback session. If you need a more permanent solution, consider the following fixes.
Fix 2: Set Track Synchronization Value
This method allows for more precise control over audio synchronization and can be useful for videos with consistent audio delay throughout.
By setting a specific synchronization value, you can accurately adjust the audio timing to match the video. This is particularly helpful when you know the exact amount of delay present in your video.
Steps to adjust audio delay in VLC:
Step 1: Open your video in the VLC media player. Click on "Tools" in the top menu. Select ""Track Synchronization"" from the dropdown menu.
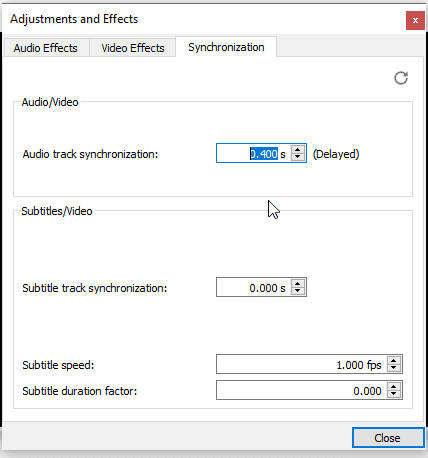
Step 2: In the "Track Synchronization" window, you'll see an "Audio track synchronization" field. Enter a positive value (in seconds) to delay the audio, or a negative value to make it play earlier. Click "Close" to apply the changes.
Fix 3: Set the VLC Audio Desynchronization Permanently
If you frequently encounter audio delay issues with specific file types or sources, setting a permanent audio desynchronization can save you time and effort.
By configuring VLC to apply a default audio delay to all videos, you can ensure consistent synchronization without having to manually adjust each time you play a video.
Steps to adjust audio delay in VLC by setting permanent audio desynchronization in VLC:
Step 1: Open the VLC media player. Click on "Tools" in the top menu. Select "Preferences" from the dropdown menu. In the Preferences window, click on "Audio" in the left sidebar. Find the "Audio desynchronization compensation" option.
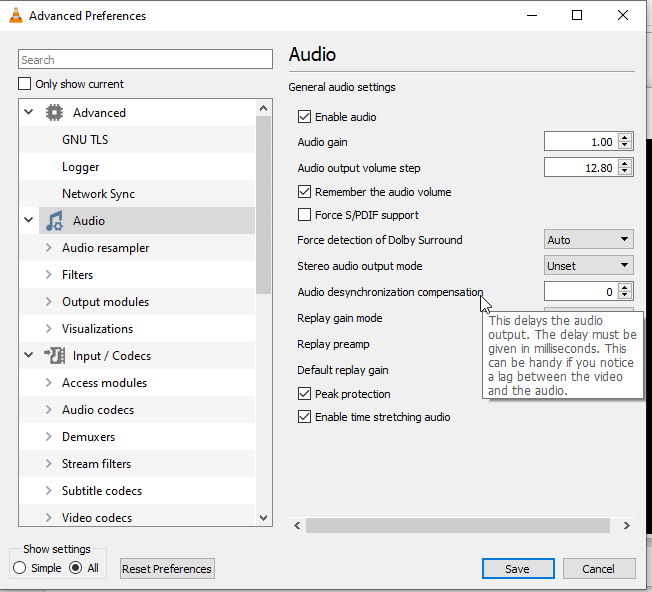
Step 2: Enter a value in milliseconds. Positive values delay the audio, while negative values make it play earlier. Click "Save" to apply the changes.
Remember that this setting will affect all videos played in VLC, so use it cautiously and only if you consistently experience the same audio delay across multiple files.
Pro Tip: Compensating for Bluetooth Headphones
Most modern wireless earbuds (like AirPods or Sony XM5s) have a natural latency of 150ms to 250ms. If you primarily watch VLC with Bluetooth, set your "Audio desynchronization compensation" to a negative value (e.g., -200 ms). This forces the audio to send earlier, perfectly hitting your ears when the light hits your eyes.
Fix 4: Adjust Audio-Video Delay in VLC on an Android Device
Many people use VLC on their Android devices to watch videos on the go. Knowing how to adjust audio sync on mobile devices is crucial for a seamless viewing experience.
This method allows you to fix audio delay issues directly on your Android device, ensuring you can enjoy properly synchronized videos wherever you are.
Steps to adjust the audio-video delay in VLC on Android:
Step 1: On your Android phone, open the VLC app. Try opening the video with an audio delay. Tap on the screen to show the playback controls. Tap on the "..." (more options) button. Select "Audio delay" from the menu.

Step 2: Use the slider or the "+" and "-" buttons to adjust the audio delay. Positive values delay the audio, while negative values make it play earlier. Once you've achieved synchronization, tap "OK" to apply the changes.
These changes will only affect the current video playback. You'll need to readjust for other videos if necessary.
Fix 5: Update VLC Player
Outdated software can often lead to various issues, including audio delay problems. Keeping VLC up to date ensures you have the latest bug fixes and improvements.
Updating VLC can resolve known audio synchronization issues, improve codec support, and enhance overall performance, potentially eliminating audio delay problems.
Steps to update VLC Player:
Step 1: Open the VLC media player. Click on "Help" in the top menu. Select "Check for Updates" from the dropdown menu.
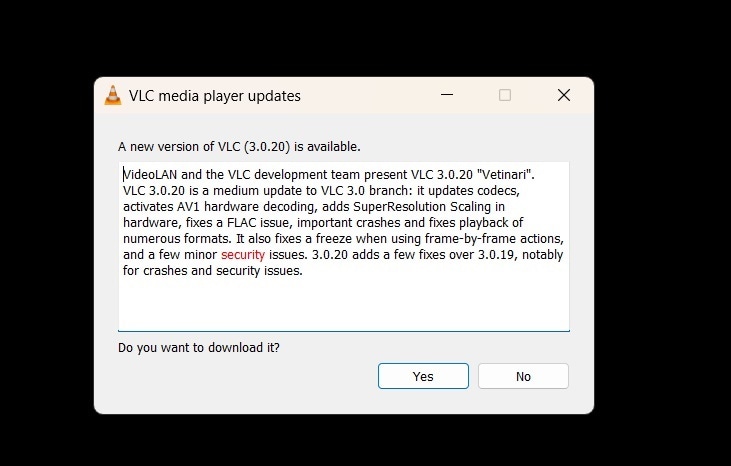
Step 2: If an update is available, follow the prompts to download and install it. Once the update is complete, restart VLC.
For manual updates:
Step 1: Visit the official VLC website (videolan.org). Navigate to the download section.
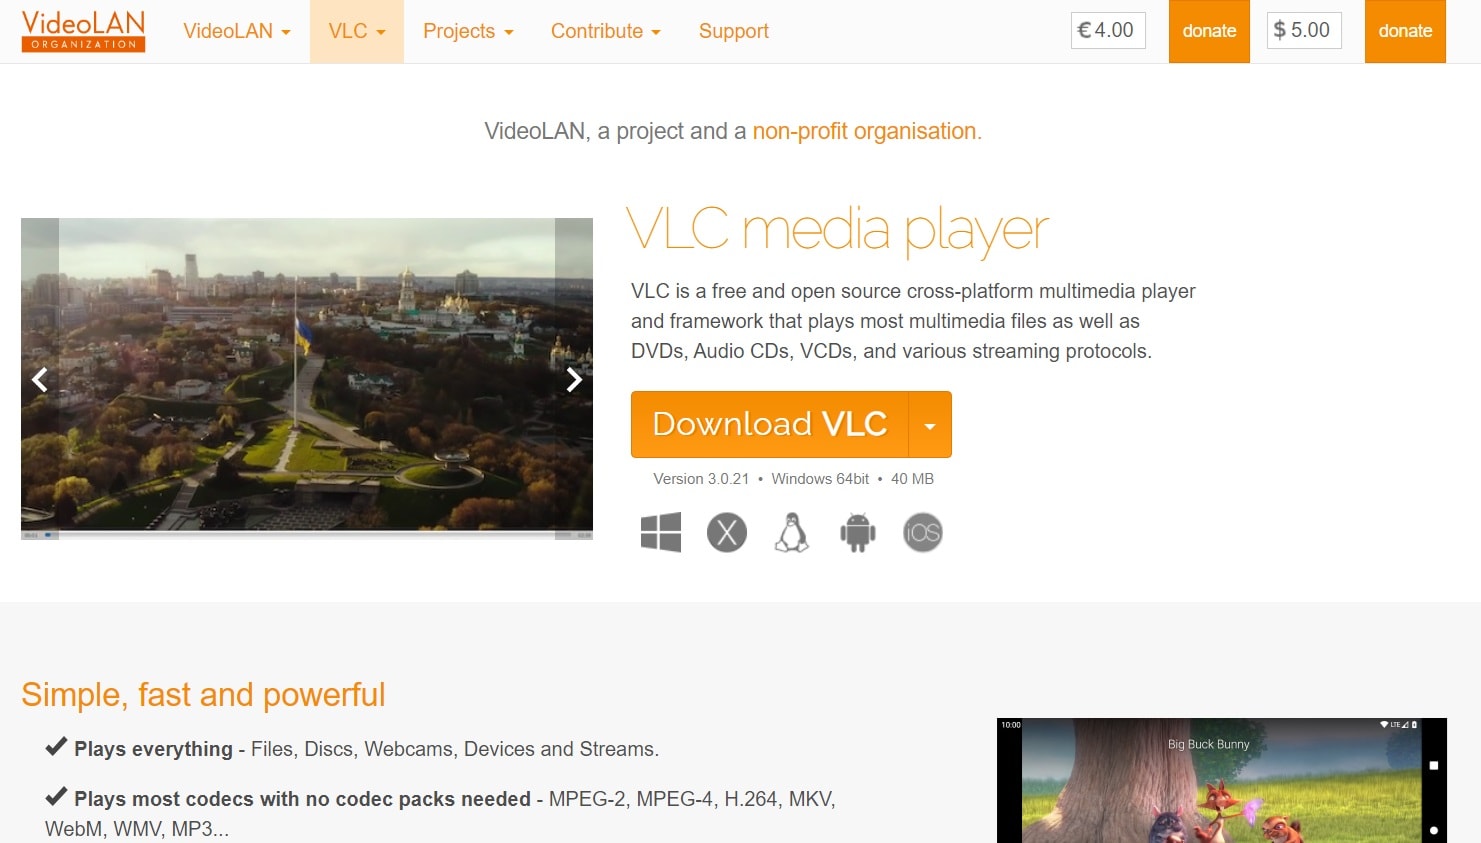
Step 2: Download the latest version for your operating system. Install the downloaded file, following the on-screen instructions. Restart your computer after the installation.
Keeping VLC updated not only helps with audio sync issues but also ensures you have access to the latest features and security improvements.
You may be also interested in: Top 5 Free AI Audio Recovery Tools.
Part 3: Lost VLC Video Files? Use Recoverit Data Recovery Software Today!
While trying to fix audio delay in VLC, you might accidentally delete or lose important video files. In such cases, don't panic! Recoverit Data Recovery Software can help you retrieve your lost videos.
Recoverit is a powerful tool designed to recover various file types, including audio, video files, from different storage devices.
Here's how you can use it to recover lost video files:
Step 1: Install Recoverit Data Recovery Software from the official website. Launch the program and select the drive where your lost video files were stored. Click "Start".
Step 2: The scanning process will begin. After the scan you can even filter the search results based on file size, file type if you are particularly looking for lost/deleted video files.

Step 3: Once the scan is complete, preview the recoverable files. Select the video files you want to recover and click "Recover" to save them to a safe location.

Remember to always save recovered files to a different drive to avoid overwriting data and potentially losing files permanently.
Fixing Audio Sync by Repairing the Video Metadata
If your audio lag only happens in one specific file and keyboard shortcuts don't help, the file's index or header might be corrupted. Wondershare Recoverit features an Advanced Video Repair mode. It doesn't just recover deleted files; it can analyze a broken VLC file, compare it with a working "sample" file from the same camera/source, and realign the audio and video streams at the metadata level to fix permanent desync issues.
Part 4: Tips to Avoid Audio Delay in VLC
Here are some tips to help you avoid audio delay issues in VLC:
- Keep VLC updated: Regularly check for and install VLC updates to benefit from the latest improvements and bug fixes.
- Use appropriate codecs: Make sure you have the necessary codecs installed for the video formats you frequently use.
- Optimize your system performance: Close unnecessary applications and processes while playing videos to ensure smooth playback.
- Check your audio settings: Ensure your system's audio settings are correctly configured and not causing delays.
- Use wired connections: When streaming, use a wired internet connection for more stable playback.
- Adjust buffer settings: If you frequently stream videos, try increasing VLC's network buffer settings.
- Convert problematic files: If a specific file consistently causes issues, consider converting it to a different format.
- Use hardware acceleration: Enable hardware acceleration in VLC settings to improve playback performance.
- Check for conflicting software: Ensure no other software is interfering with VLC's audio processing.
By following these tips, you can significantly reduce the likelihood of encountering audio delay issues in VLC.
Related Video >>: How to Resolve Video Not Playing in VLC?
Conclusion
Audio delay in VLC can be frustrating, but as we've seen, there are numerous ways to fix this issue and adjust audio sync in VLC. From simple keyboard shortcuts to more advanced synchronization settings, you now have a toolkit of solutions to tackle any audio-video sync problems you might encounter.
Whether you're using VLC on your computer or Android device, you can now enjoy your videos with perfectly synchronized audio. Don't let audio delay issues ruin your entertainment – put these easy fixes into practice and enhance your VLC experience today!
FAQ
-
Q1: Why does audio delay occur in VLC?
Audio delay in VLC can occur due to various reasons, including corrupted video files, incompatible codecs, hardware limitations, network streaming issues, or incorrect VLC settings. It can also be caused by system performance problems or improperly encoded video files. Understanding these causes can help you prevent and fix audio delay issues more effectively. -
Q2: Can I fix audio delay in VLC permanently?
Yes, you can set a permanent audio desynchronization in VLC to fix audio delay issues. Go to Tools > Preferences > Audio and adjust the "Audio desynchronization compensation" value. This setting will apply to all videos played in VLC, so use it cautiously and only if you consistently experience the same audio delay across multiple files. -
Q3: How do I sync video and audio in VLC on my Android device?
To sync video and audio in VLC on an Android device, start playing the video, tap the screen to show playback controls, select the "..." (more options) button, choose "Audio delay," and use the slider or buttons to adjust the synchronization. Positive values delay the audio, while negative values make it play earlier. This method allows you to easily adjust audio sync in VLC on your mobile device.


