 TL;DR:
To fix a video appearing to play in slow motion on Windows, first verify the media player is set to a 1× playback speed, and if the picture drops frames while audio continues normally, test the clip in a second app like VLC to isolate decoding performance from actual file damage.
● If high-resolution formats like 4K or HEVC/H.265 stutter, check Task Manager using Ctrl + Shift + Esc for background resource overload, update Windows 11 graphics drivers, and match external display refresh rates rather than disabling hardware acceleration system-wide.
● Reserve Wondershare Recoverit 15 Corrupted Video Repair exclusively for local files that fail at the identical timestamp across multiple compatible players, as container repair cannot resolve online YouTube buffering or reconstruct missing frames captured in a native slow-motion mode.
● Before initiating any software repair, duplicate the damaged file to a healthy drive, and only utilize the Advanced Repair function with an intact sample video from the identical capture device if the standard processing preview remains unplayable.
Ask AI for a summary
 ChatGPT
 Perplexity
 Gemini
 Claude
 Grok
If a video on your Windows PC suddenly looks like it is playing in slow motion, check the player's playback speed first. A setting below 1× (normal speed) is easy to fix. But if the picture freezes, skips frames, or keeps buffering while the sound continues, the cause may be decoding performance, an unstable stream, or a problem with that specific file.
Before changing Windows settings or installing repair software, play a different video and open the affected clip in another compatible player. Those two quick comparisons usually tell you where to troubleshoot next without changing the original recording.
In This Article
Part 1. Identify Why Your Video Looks Slow
“Playing in slow motion” can describe two very different symptoms: the video runs at a steady but reduced speed, or it struggles to display frames smoothly. The distinction matters because adjusting playback speed will not repair a struggling decoder, and file repair will not fix a slow internet connection.
| What you notice | Most useful first check | Likely next step |
| Movement and speech are consistently slowed in one app | Look for a playback rate below 1× | Set the player to Normal or 1× |
| Picture freezes or jumps while the sound continues | Try a second player and a smaller, ordinary video | Investigate graphics decoding, system load or video stuttering |
| Only YouTube or another website stops to load | Check whether an offline video plays normally | Investigate the connection and stream quality |
| One local clip fails in several compatible players at the same point | Compare the original recording or another intact copy | Consider an incomplete transfer or file damage |
| Every video began struggling after a system or graphics change | Check CPU/GPU use, Windows updates and the display setup | Troubleshoot the PC rather than altering each file |
Important: Footage deliberately recorded or exported in slow motion will still look slow when played at 1×. In that case, you need the original normal-speed recording or a separate editing adjustment; changing Windows drivers will not restore frames that were never recorded.
Part 2. Restore Normal Playback Speed
Start with the controls inside the player. If only one app is affected, keep the video file unchanged while you test its speed setting and format support. If different players behave the same way, move on to the Windows or file-specific checks.
Check the Player's Speed Setting
Use this when: The picture and audio play continuously, but everything seems slower than normal.
- Open the video in the app where the problem occurs and find Playback Speed, Speed or a similar control. Select Normal or 1×.
- In VLC on Windows, open Playback > Speed and choose the normal-speed option. VLC's default hotkey for normal playback rate is =; shortcuts can differ if you have customized them.
- If this happens on YouTube, open the video's Settings menu, choose Playback speed and restore Normal. Then replay the same section.
Check the result: The video and voices should run at their expected speed without a persistent 0.5× or similar indicator. If the app already shows 1× but the picture still skips, move to the next check rather than forcing it to 2×.
The older Windows Media Player and the newer Media Player app do not expose identical controls on every build. If your player has no speed option for that file type, use the comparison below instead of searching for an obsolete Control Panel setting. The VLC documentation describes the normal-rate shortcut.
Play the Same Clip in Another Player
Use this when: The speed appears normal, or one video still looks slow in its usual app.
- Keep the original recording intact. If it is on a healthy SD card, USB device or network share, make a separate copy to a healthy local folder before troubleshooting. If the source repeatedly disconnects or shows physical failure symptoms, stop using it and seek specialist advice.
- Play the copied video in a different trusted player that supports its format, such as VLC, then play a second known-good video in both apps.
- Compare the same 20- to 30-second section. Notice whether the audio slows with the picture, the picture drops frames, or the failure occurs at exactly the same timestamp.
What it means: If the clip plays normally in a different app, the original file is probably readable; focus on the first player's settings or codec support. If only very high-resolution files struggle in both players, investigate decoding performance. If one copied file breaks at the same point in multiple compatible players, check the source or backup before considering file repair.
If your symptom is frame skipping rather than an actual speed change, the more detailed Windows video lag troubleshooting guide covers that neighboring problem.
Check Video Decoding and Graphics Acceleration
Use this when: 4K, HEVC/H.265 or other demanding files stutter or appear to run slowly, while ordinary low-resolution MP4 videos play normally.
- Check whether the media player can decode the file's video format. An MP4 extension alone does not tell you which codec is inside it. Compare with a known-good H.264 MP4 if you have one.
- In a player with a hardware-decoding setting, begin with its default or Automatic mode. Restart the app after making a change and replay the same clip. If the GPU path creates visible glitches, you can temporarily compare it with software decoding, then restore whichever setting works better.
- For Microsoft Edge browser playback, see Microsoft's graphics acceleration and codec checklist. The setting and available decoders depend on the system and browser build.
Do not turn off hardware acceleration system-wide as a blanket fix. Supported GPU decoding often reduces CPU workload, and disabling it can make high-resolution playback worse. The older advice to change a generic acceleration slider in Control Panel is not a dependable Windows 11 troubleshooting step. If the video is simply too demanding for your device, test a lower-resolution copy without overwriting the original.
Part 3. Fix Windows and Streaming Playback Problems
If several normal videos struggle across multiple apps, check the PC rather than the files. Begin with software maintenance and a quick look at system load; only investigate the network when the problem is limited to online playback.
Update Windows and Your Graphics Driver
Use this when: Playback problems affect multiple programs, started after a system change, or occur with supported files that previously worked.
- Save your work. On Windows 11, open Start > Settings > Windows Update and choose Check for updates.
- Install the appropriate available updates, restart when prompted, then test the same video again. A system update is a diagnostic step, not a guaranteed repair.
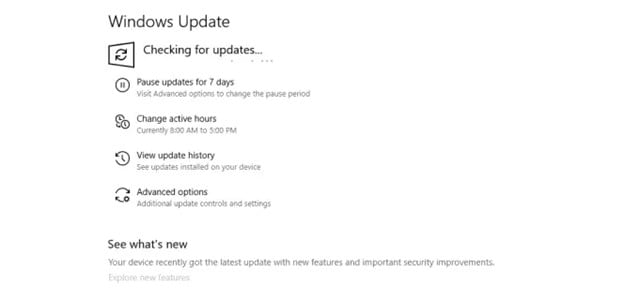
If a graphics problem remains, identify your GPU and check the PC or graphics-card manufacturer's official driver page for a compatible update. Avoid unrelated driver-updater programs. Microsoft's Windows Update instructions explain the current Windows settings path.
Check the result: Replay the same local clip after restarting. If the issue affects only a particular media app, check its own update and support options before changing more Windows settings. If a new driver introduced the problem, review the device maker's rollback guidance rather than repeatedly changing unrelated settings.
Reduce System Load and Check Your Display
Use this when: High-resolution videos become jerky during heavy multitasking, on battery power, or when using two monitors.
- Press Ctrl + Shift + Esc to open Task Manager. Check whether CPU, memory, disk or GPU activity is unusually high during playback. Close only unused applications and browser tabs you recognize; do not end unknown system processes.
- If you are using a laptop, test it while connected to reliable power and using an appropriate Windows power mode. Compare the same clip at the same resolution.
- If playback stalls specifically when an external monitor is connected, inspect the displays' refresh-rate settings and test a compatible matching refresh rate. Microsoft notes that different rates across monitors can affect smooth playback for some apps.
Check the result: If playback improves when background load falls or the external display configuration changes, keep that adjustment and avoid replacing RAM or opening the computer without separate evidence of a hardware limitation. If it does not improve, return to the player and codec checks above.
Microsoft's Windows video playback settings guidance describes the display-refresh-rate issue. Options can vary by Windows edition, GPU and app.
Troubleshoot Online Buffering Separately
Use this when: Videos saved to your PC play normally, but browser or app streams pause, buffer or repeatedly drop quality.
- Test a different website or stream and check whether the connection is stable. If possible, try wired Ethernet or a stronger Wi-Fi connection.
- Temporarily lower the streaming resolution and close network-heavy downloads or unused tabs. YouTube, for example, lists approximately 5 Mbps sustained speed for 1080p and 20 Mbps for 4K UHD; these are YouTube recommendations, not a universal minimum for every service.
- Return to your usual quality after the connection stabilizes and check whether buffering stops. If the offline file still stutters, use the local playback checks instead.
See YouTube's current playback requirements for resolution-specific guidance. Clearing the entire browser history, repairing an MP4, or buying more RAM should not be your first response to a network-only problem.
Part 4. Repair a Damaged Local Video With Wondershare Recoverit
Most slow-looking playback is a player or performance issue, not a damaged recording. File repair is worth considering only after the checks above point to a specific local file that remains faulty in multiple compatible players. It is not a fix for YouTube buffering, an intentionally slow-motion clip, or a laptop that struggles to decode every 4K video.
Check Whether the Video File Is Actually Damaged
First look for an intact original, backup, or complete copy from the camera or phone. A partial transfer can resemble corruption even when the source recording is fine. If the source media may have deleted or missing footage, preserve it and use the separate video recovery workflow; recovery and repair solve different problems.
Try file repair when: The video file exists, is accessible on a healthy drive, and repeatedly freezes, fails or shows structural playback errors in different compatible players. Make a working copy before any repair attempt. A video with frames never captured or data permanently overwritten cannot be fully reconstructed merely by repairing its container.
Try Corrupted Video Repair and Verify the Result
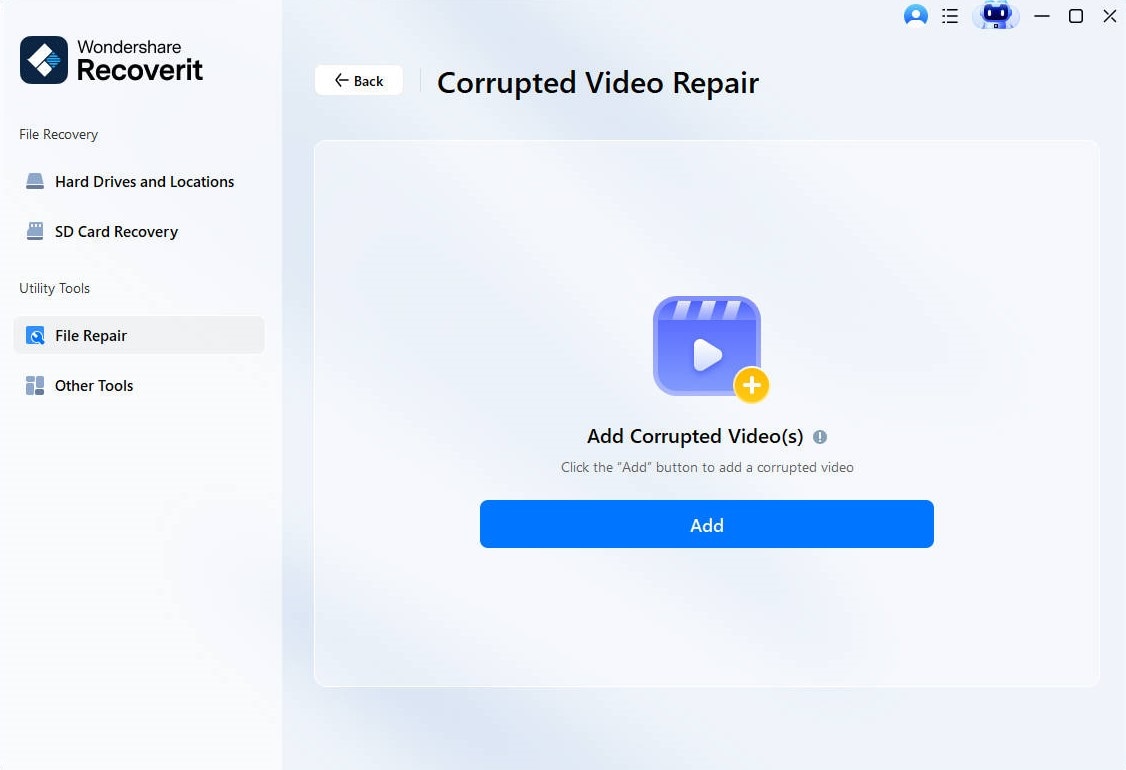
Wondershare Recoverit 15 includes File Repair > Corrupted Video Repair on Windows. The official Recoverit Windows Guide documents adding a damaged video, running repair, previewing the result and saving it separately. Use this workflow only for an existing damaged local file.
Step 1. Add a copy of the damaged video. Install or open Recoverit on Windows. Select File Repair, choose Corrupted Video Repair, and use Add Files or the video add control to select your working copy.
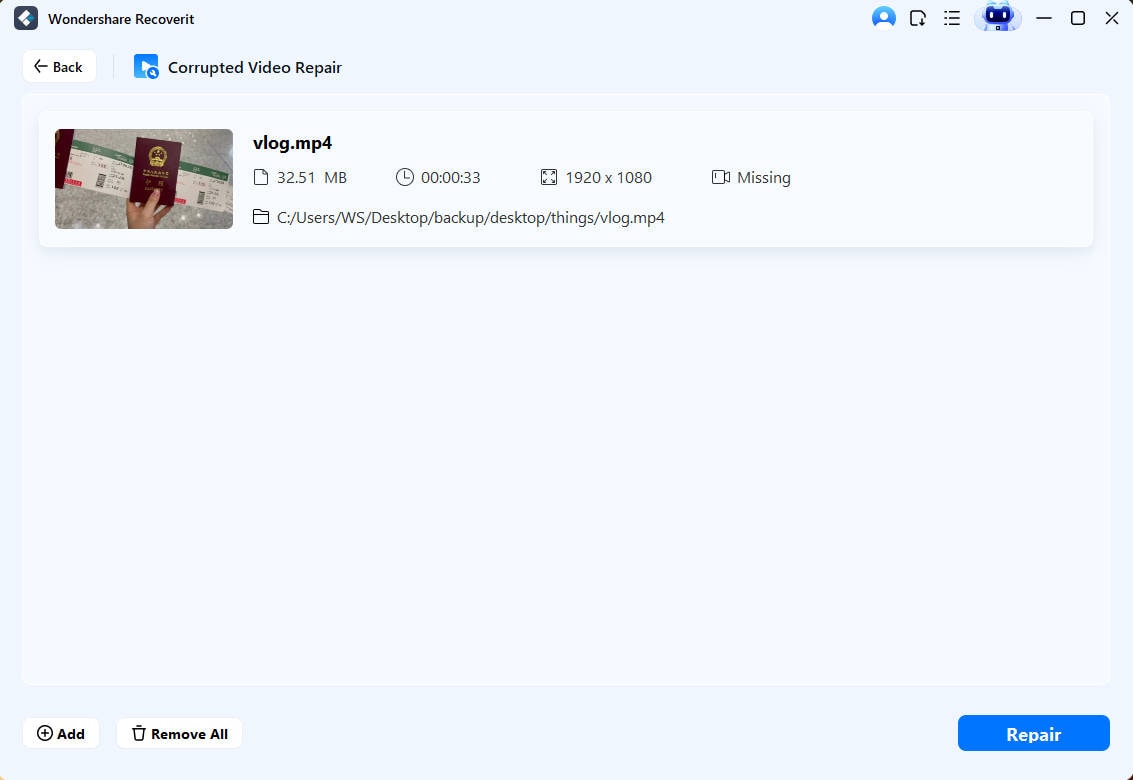
Step 2. Start repair. Confirm that the correct file appears in the list, then select Repair. Wait for the operation to complete before checking the result.
Step 3. Preview before saving. Use Preview to watch the affected section and listen for normal sound. Check at least the beginning, middle and end; a completion message by itself does not prove every frame is intact.
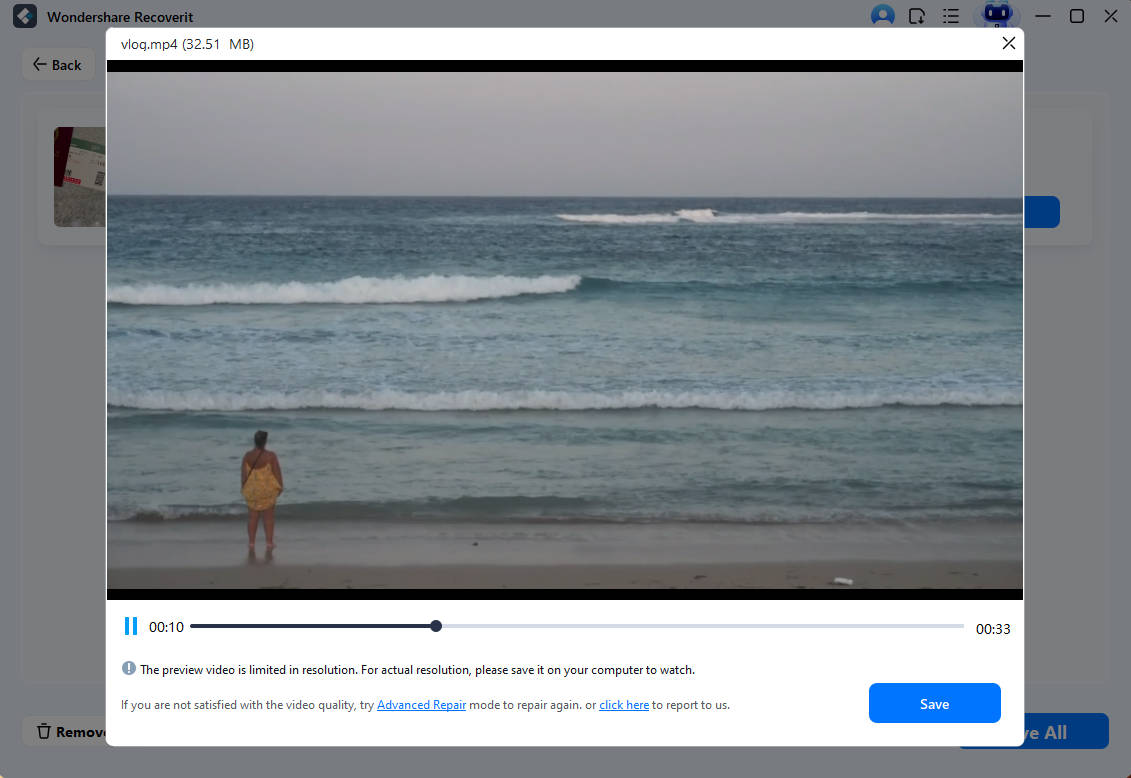
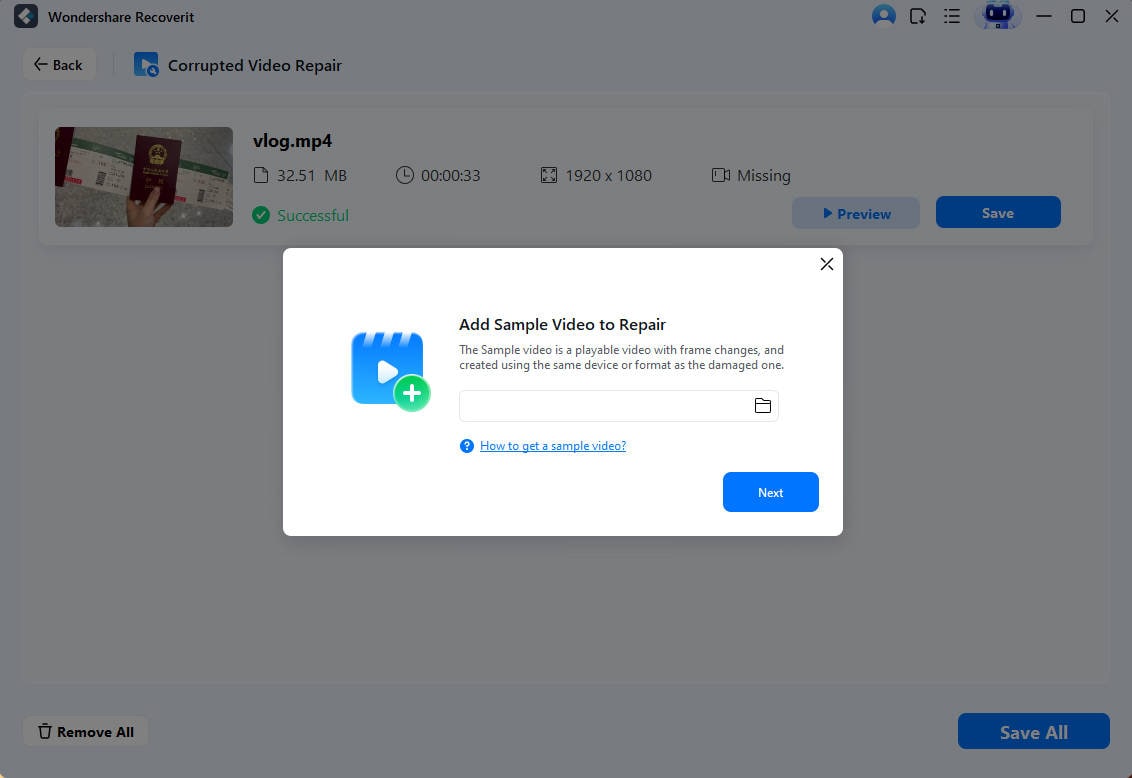
Step 4. Use Advanced Repair only if necessary. When the standard result is insufficient and the option is available, the official guide describes an Advanced Repair attempt using a healthy sample video of the same format, preferably captured by the same device. A matching sample can guide the attempt but cannot guarantee that missing video data will return.
Step 5. Save to another location. If the preview is usable, save the repaired output to a different healthy folder or drive. Open that saved copy in your normal player and compare the original failing timestamp. Keep the original file and working copy until the result has been checked.
Repair results depend on what file data is still present, and the available preview or saving options can depend on your product license. A free download does not mean every repaired-file export is free. For released feature information, check the Recoverit for Windows page.
If repair does not help: Do not repeatedly overwrite or convert your only source file. Recheck the original transfer, codec compatibility and any backup. If the storage device is unstable, seek professional advice before additional reads or repairs.
Part 5. Confirm the Fix and Avoid Losing the Original
Use a repeatable check before declaring the problem solved:
- Play the same section at 1× speed and make sure both movement and voices sound normal.
- Test another video in the same player. If the problem follows the app or PC, keep investigating playback settings, codecs or hardware load rather than editing files.
- If you repaired a local video, reopen the saved copy separately and watch the beginning, middle, end and previously faulty section. Keep the original unchanged.
- If streaming was the problem, confirm normal playback at the intended quality after reconnecting. Do not use a single successful low-resolution test as proof that 4K streaming will be stable.
Maintaining current graphics drivers, reliable backups of original footage and a separate folder for repaired outputs helps you diagnose future playback problems without sacrificing source recordings.
Conclusion
When a video plays in slow motion on Windows, check 1× playback speed and compare another player before changing system settings. For frame skipping, focus on codecs, graphics decoding and PC load. For online pauses, test the connection and stream quality. Consider Recoverit's corrupted-video repair only when a specific local file remains damaged after those checks, and always verify a separately saved result.
FAQ
-
Why does my video look slow while the audio sounds normal?
The picture may be dropping frames rather than playing at a slower rate. Compare the same clip in another compatible player, check whether CPU/GPU use spikes, and test a less demanding video. If only one app struggles, review its decoding settings before touching the file. -
Why does one MP4 play slowly in Windows Media Player?
MP4 is a container, so two MP4 files may use different video codecs or resolutions. Check that the playback rate is normal, try a second trusted player and inspect codec support. If only the file fails everywhere, compare an intact original before attempting repair. -
Will setting the player to 1× remove slow motion recorded by my camera?
No. The 1× control restores normal playback of the file as encoded. If the source footage was recorded or exported as slow motion, you need a normal-speed original or a separate video-editing adjustment; this is not a corrupted-file problem. -
Should I disable hardware acceleration to fix slow video?
Not as a general Windows fix. Compatible GPU decoding often improves demanding playback. Keep the player's default or automatic setting unless you have evidence that its GPU path is failing; if you test another mode, change one setting at a time and restore the better result. -
Can Recoverit fix slow YouTube streams or a generally slow laptop?
No. Recoverit's corrupted-video repair is for existing damaged local files. A slow online stream needs network or browser troubleshooting, while a laptop that struggles with every video needs player, driver or performance checks.


