

 TL;DR:
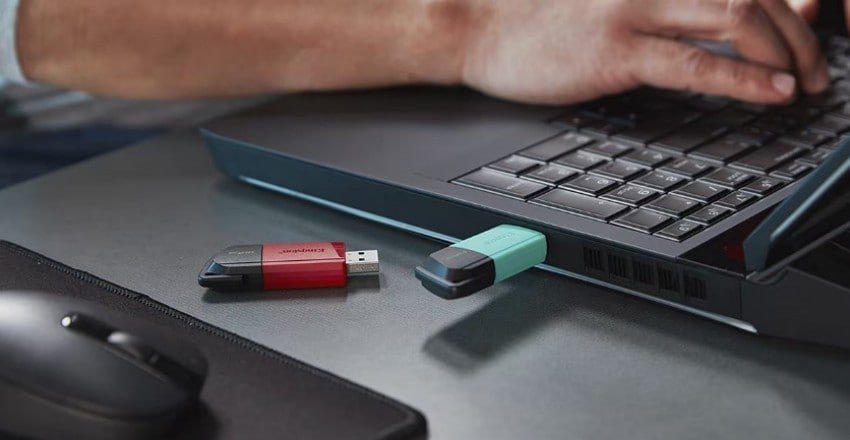
To fix the media is write protected error in Windows 10/11, unlock the physical switch on your external drive or force the removal of the read-only state using Diskpart or Registry Editor modifications.
● Clear drive-level read-only attributes by running Command Prompt as administrator, launching diskpart, selecting your target disk, and executing the attributes disk clear readonly command.
● Disable system-wide write protection by opening Registry Editor, navigating to the Control then Storage folder, and changing the WriteProtection DWORD value data to 0.
● If the drive remains locked after applying software fixes, the flash storage hardware has likely reached its natural usage limit and permanently locked itself, requiring data extraction tools like Recoverit before replacing the device.
Ask AI for a summary
 ChatGPT
 Perplexity
 Gemini
 Claude
 Grok
Grok
Seeing the the media is write protected error can stop your work quickly. This message blocks simple actions and leaves your important files completely locked in place. Many people face this issue when using USB drives or memory cards. Still, simple fixes can solve this problem without causing extra stress.
As a result, you can safely restore normal access within a few minutes. In addition, these steps protect your data from accidental loss every time. This guide explains methods for removing write protection on Windows devices.
Try Recoverit to Perform Data Recovery
 Security Verified. 3,591,664 people have downloaded it.
In this article

Part 1. Understanding “The Media Is Write Protected” Error in Windows
This error means Windows sets your drive into a strict read-only state. As a result, the device lets you view files but blocks changes for safety. In many cases, you see it while copying, renaming, deleting, or formatting data. Ultimately, this media is write protected state prevents damage from aging or failing storage. In addition, this protection helps avoid accidental corruption during normal device use.

Part 2. 6 Causes for “The Media Is Write-Protected” Error
Understanding these points is important before checking why your device becomes write-protected. The causes below explain why Windows blocks changes and forces the drive into read-only mode:
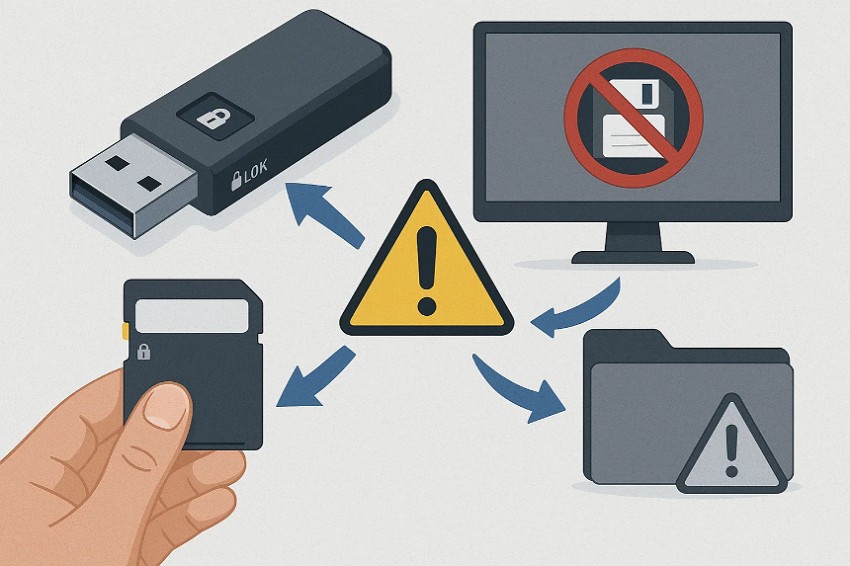
- Physical Switch: Many storage cards include a small switch that controls write access. When locked, Windows sets the device to read-only protection automatically.
- Read-Only Flag: Drives can be marked read-only through simple commands or system tools. Once active, this setting blocks formatting, deleting, or creating new files.
- Policy Settings: Windows can use policy values that control write access on devices. When enabled, these settings force every removable drive into read-only mode.
- File Corruption: Drive errors may appear after unsafe removal or sudden power loss. These issues make Windows mount the device in a protected read-only state.
- Malware Interference: Some harmful programs block write actions to stop users from removing their files. Security tools may also lock drives temporarily during basic protection tasks.
- Hardware Damage: Aging flash storage can fail after reaching its natural usage limit. When this happens, controllers lock the device to protect the remaining stored data.
Part 3. 7 Proven Fixes to Remove Write Protection in Windows 10/11
Review the following methods to fix the write protection in Windows 10/11 effectively:
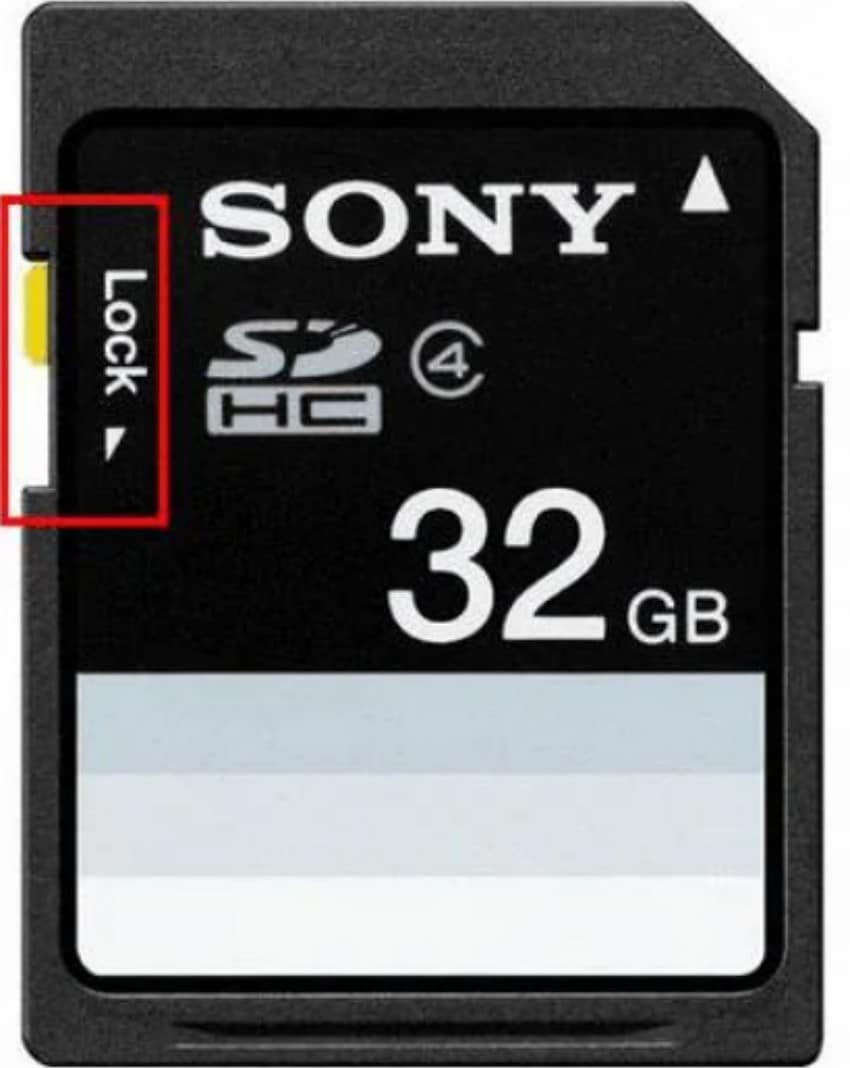
1. Check for a Physical Lock Switch
A small lock switch controls write access on many SD and USB devices. When locked, Windows blocks changes because the media is write protected by hardware. Sliding the switch upward unlocks normal writing again. This fix works instantly without software or advanced tools. It remains the only solution when hardware protection is enabled.
2. Remove Read-Only Attribute with Diskpart
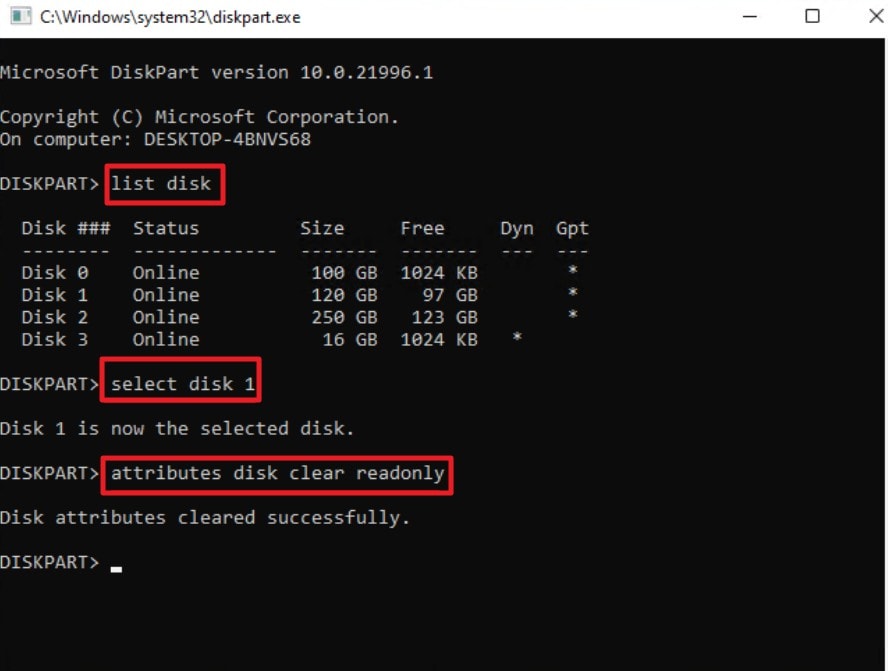
Diskpart can clear the read-only tag that stops Windows from writing normally. Once cleared, Windows stops thinking the device is media write protected during use. This lets you save, delete, and format files across the whole drive. Above all, it helps when simple menu options do not work at all. Review the stepwise guide below to use Diskpart in the following way:
- 1. First, search for Command Prompt in the "Start" menu, then click "Run as administrator" to launch it with elevated permissions.
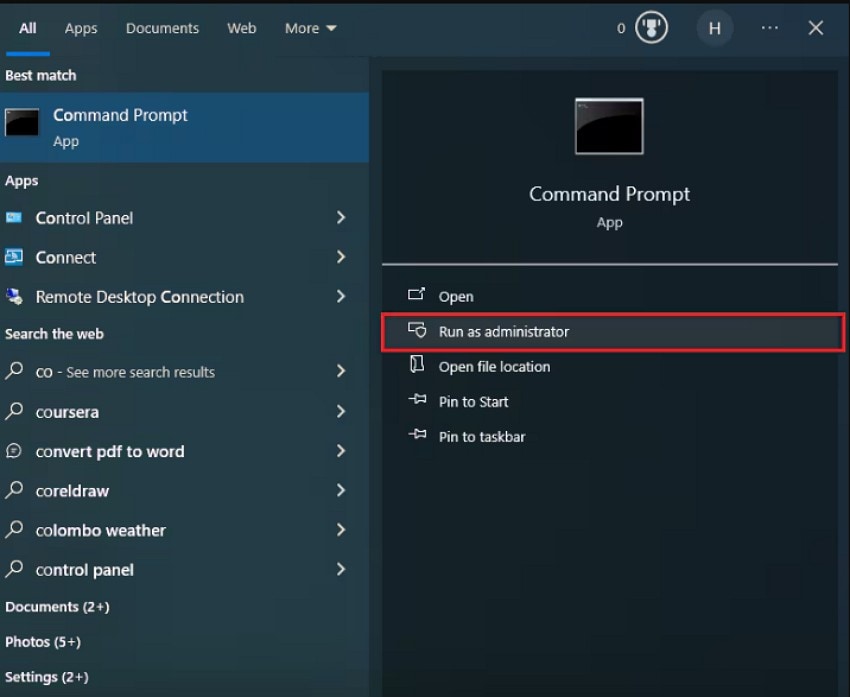
- 2. Afterwards, in the Command Prompt window, type "diskpart," then run the command "list disk." Next, type the command "select disk 1," and "attributes disk clear readonly" and hit "Enter" to remove the read-only status from the selected disk.
3. Uncheck Read-Only in Properties
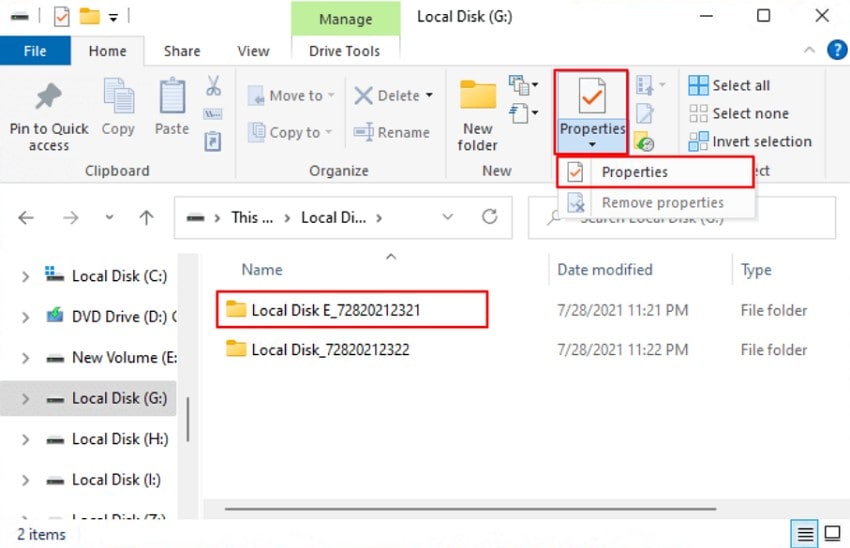
Some files may have a read-only mark that stops basic file changes. Removing this mark prevents Windows from showing that media is write protected for those files. After clearing it, you can edit, save, and rename items normally. This fix is quick and works well for small file problems as it focuses on single items instead of the full storage drive. Now, follow the guide below to use this fix for removing read-only restrictions:
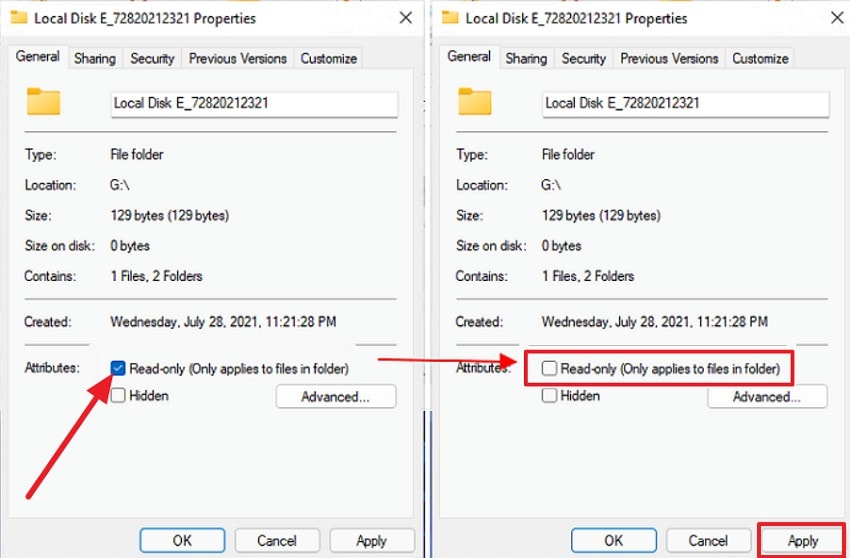
- 1. Start by right-clicking the target folder shown in File Explorer and selecting the "Properties" option from the ribbon menu to access its attribute settings.
- 2. On the "Properties" window, select the "General" tab, deselect the "Read-only (Only applies to files in folder) box, and save changes by clicking the "Apply" button.
4. Edit Registry to Disable Write Protection
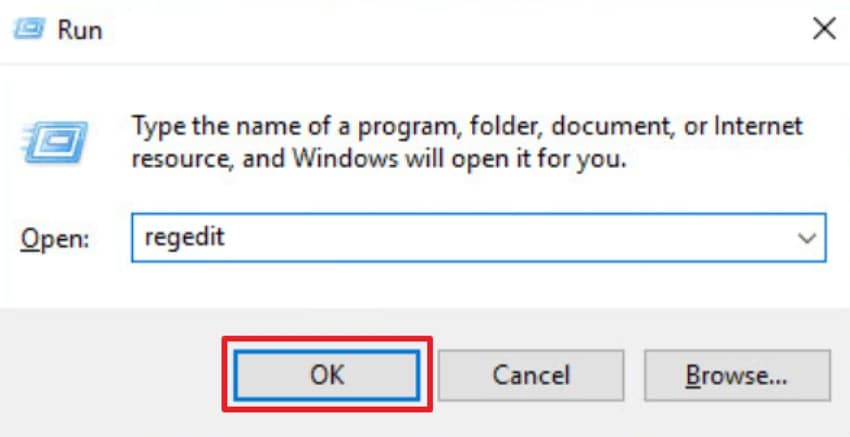
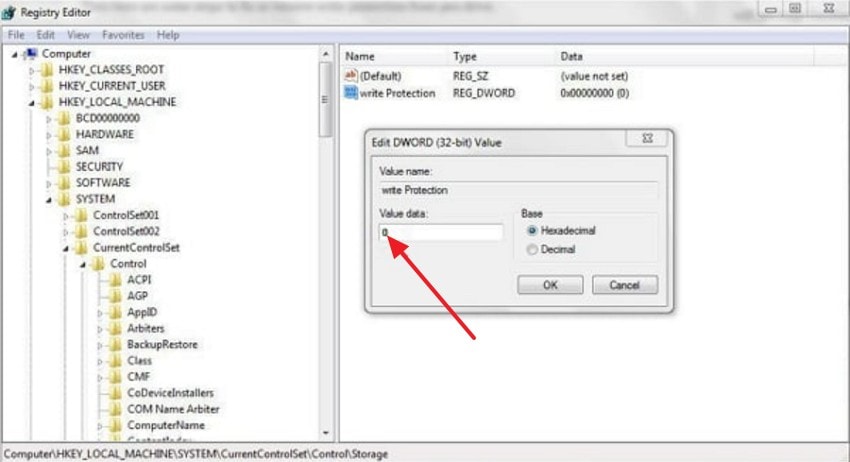
Few registry settings force all drives into a strict read-only mode. Setting the value to 0 stops Windows from treating media is write protected usb devices as locked. After the change, your drives allow full writing again. This fix helps when the system blocks every device you plug in to bring back full access across all connected drives. Consider using the guide below to change this simple registry value:
- 1. To start, press Win + R to open the Run box, type "regedit," and click "OK" to launch the Registry Editor.
- 2. Next, in the left pane, expand Computer> HKEY_LOCAL_MACHINE>SYSTEM> CurrentControlSet, then open the "Control" folder and select "Storage".
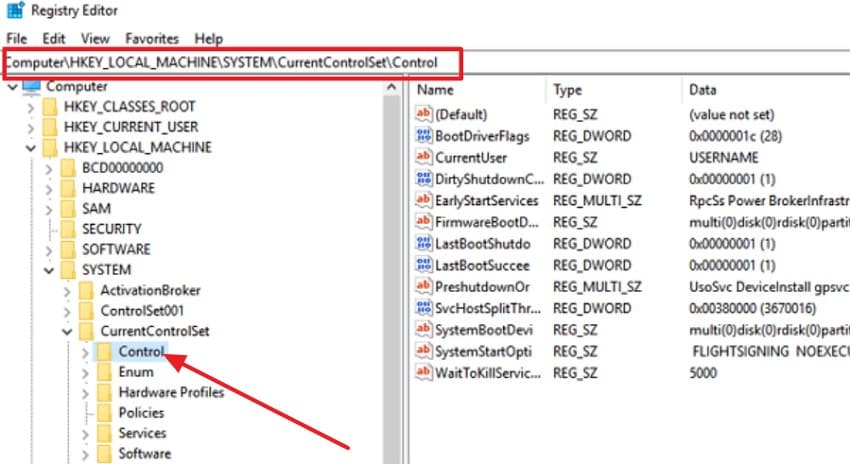
- 3. Lastly, double-click the "WriteProtection DWORD," change the "Value data" to 0, and press the "OK" button to disable write protection.
5. Scan for Viruses and Malware
Sometimes the harmful apps lock drives, so users cannot remove unwanted files easily. Clearing these threats restores normal access when the media is write protected windows 11 message keeps appearing. Additionally, a full scan removes blocked actions and brings back normal writing. After cleaning, your drive works in a safe and steady way to protect your system from other dangers. Adhere to the stepwise guide below to apply this fix easily:
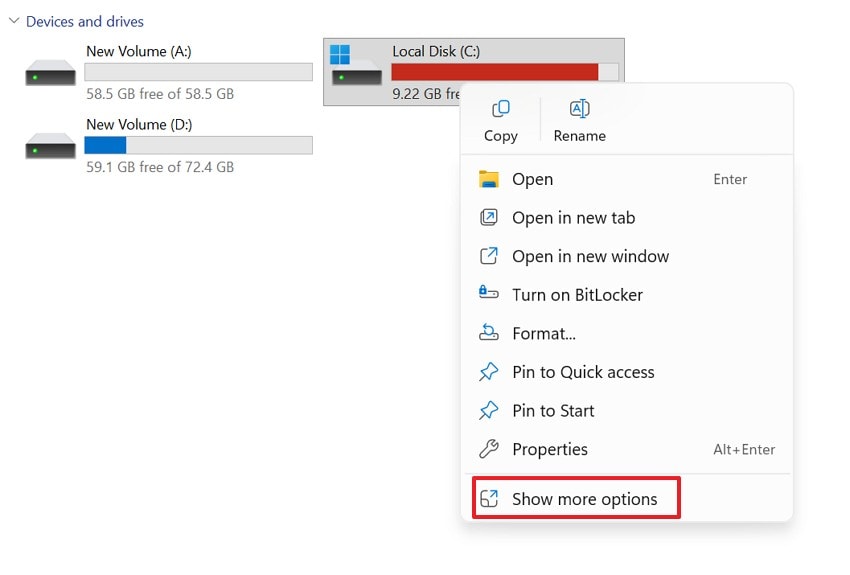
- 1. Firstly, right-click the target drive in File Explorer and select "Show more options" to access the context menu.
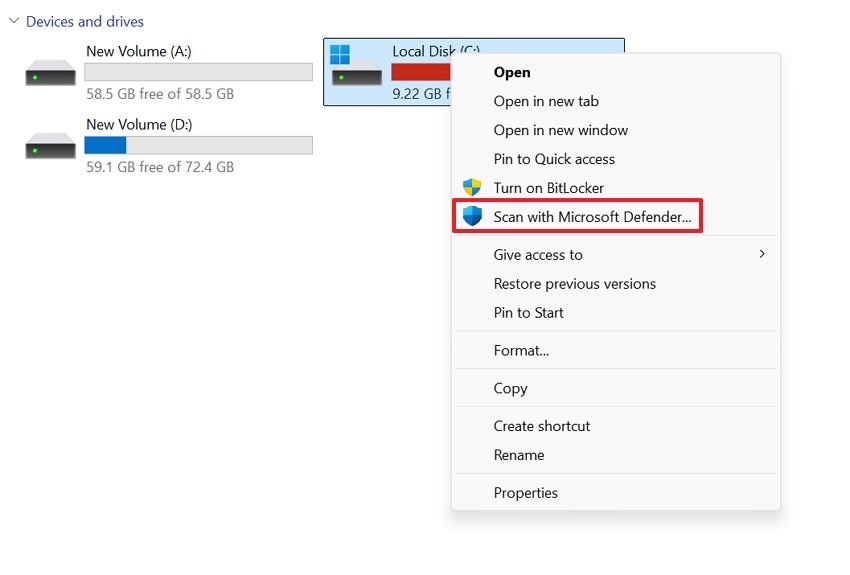
- 2. Later, in the expanded menu, click "Scan with Microsoft Defender…" to start scanning the selected drive for viruses and malware.
6. Try a Different PC or USB Port
Bad ports or simple driver issues can create a false write-protected state. Testing the drive elsewhere shows if the media is write protected message appears again. If it works on another system, your first computer caused the problem. This saves you from buying new drives without any real need to see if the fault is local or device based.
7. Replace, Back Up, or Recover Data as Needed
A weak or aging drive may lock itself to protect the last readable data. When this happens, Windows shows that the device is media write protected because the hardware is failing. Backing up your files keeps important data safe from sudden loss. If your storage device becomes unreadable or locked, Recoverit can help restore files effectively. It works when your device shows errors, stops responding, or enters a write-protected state.
Moreover, the software can scan USBs, SD cards, and external disks, and even damaged system storage. Recoverit guides you through a simple recovery process that shows which files can still be saved. This makes it helpful when every other fix fails, and the drive continues to block access. With safe scanning and clear steps, Recoverit offers a strong chance to recover your data before replacing the failing device.
Key Features
- Deep Scan: Recovers files from damaged, unreadable, or write-protected drives with strong sector-level scanning.
- Wide Support: Works on USBs, SD cards, external disks, and failing internal storage devices easily.
- Safe Recovery: Restores lost files safely without harming the drive or changing any saved data structure.
Guide to Recover Data From a Drive with Recoverit
Let’s walk through the step-by-step guide below to recover data safely with Recoverit:
- Select the Location to Start Recovery
First, locate the "Hard Drives and Locations" option in the left sidebar to start the Recovery process.

- Initiate the Scanning to Proceed
After the scan starts, all the recoverable files will appear under the "File Location" tab in the "Name of Lost File" folder.

- Preview the Files and Recover
Lastly, preview the file, select the ones you want to recover, and press the "Recover" button to complete the recovery.

Conclusion
To conclude, fixing the media is write protected error becomes simple when you understand its causes and apply the right steps. This article explained why the issue appears and how to remove restrictions safely on Windows 10 and 11. If your drive remains locked or unreadable, using Recoverit is a reliable way to rescue essential files before replacing the device.
FAQ
1. Why does Windows show the media is write-protected?
When the drive cannot be written to save data, this message is displayed in Windows. This occurs due to settings, system problems, or a poor and broken device.2. Can Recoverit help when my drive stays write-protected?
Yes, Recoverit can scan the locked drive and safely recover still-readable files. It works even when Windows fails repeatedly, and normal fixes no longer restore access.3. How do I remove write protection from a USB drive?
You can clear write protection by checking the lock switch or using DiskPart. These simple steps remove writing limits and let Windows handle file changes normally.4. Is my data safe when the drive becomes write-protected?
Yes, write protection helps stop unwanted changes and keeps your important files safe. This protected state guards data until you repair the issue or recover the needed files.


