

 TL;DR:
You should disable hardware acceleration in Windows 11 only if you are experiencing screen flickering, random black screens, unexpected app crashes, or video encoding glitches, otherwise it is safer to leave it enabled to optimize GPU rendering.
● To turn off hardware acceleration system-wide, navigate to Settings > System > Display > Graphics, and toggle off the "Hardware-accelerated GPU Scheduling" option.
● If visual glitches are isolated to specific programs, leave the Windows settings alone and disable hardware acceleration directly within the individual settings menus of Chrome, Firefox, Edge, or Microsoft Office apps.
● Keep hardware acceleration enabled if you use multi-monitor 4K setups, play 3D games, or run creative software like Photoshop, as disabling it on stable systems will unnecessarily shift heavy rendering workloads back to the CPU.
Ask AI for a summary
 ChatGPT
 Perplexity
 Gemini
 Claude
 Grok
Grok
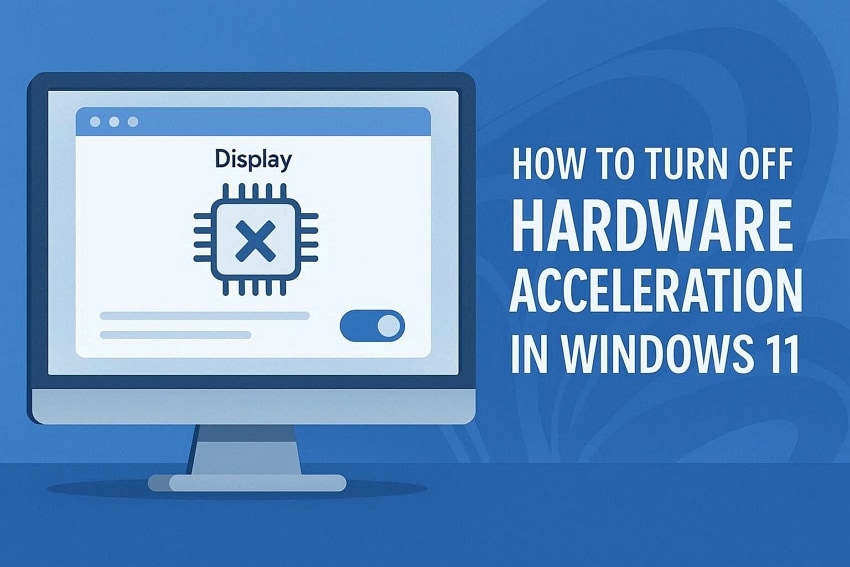
If you are dealing with issues like screen flickering, random black screens on Windows 11, hardware acceleration could be the reason. Many Windows users notice this issue after upgrading Windows, connecting a new monitor, or installing a new graphics driver. That is why turning off hardware acceleration on Windows 11 is essential.
So, this guide will cover all the essential information to know how to turn off hardware acceleration in Windows 11. Furthermore, if your PC crashes, we will introduce an efficient recovery tool to retrieve your lost data.
Try Recoverit to Perform File Recovery
 Security Verified. 3,591,664 people have downloaded it.
In this article

Part 1. What Hardware Acceleration Actually Does in Windows 11
Hardware acceleration in Windows 11 is a built-in feature that shifts heavy tasks from the general CPU to specialized hardware. In everyday use cases, it means that graphics-intensive work like rendering and video playback is handled directly by the GPU. This scheduling feature allows the operating system to queue and manage graphics work more efficiently.
Is Hardware-Accelerated GPU Scheduling Worth Disabling in Windows 11?
Before deciding whether to turn off hardware acceleration, it's important to understand some details:
- FPS and Performance Impact: Hardware-Accelerated GPU Scheduling in Windows 11 rarely delivers big FPS gains and shows minimal frame rates.
- Creative Pro Workloads: Some creative and pro apps that rely heavily on GPU rendering can benefit from it, as it offloads some scheduling work.
- Old Hardware and Driver Issue: With the old GPU and buggy drivers, it can trigger issues like stuttering and random crashes.
- Newer System and Stability: On newer systems and updated Windows 11, HAGS tends to be stable and mostly transparent, with no major downsides.
Overall, disabling HAGs is "worth it" only if you have found out it is causing errors or see no benefit in your workloads. Otherwise, leaving these settings on default is considered safe and smoother.
Part 2. 5 Common Signs Hardware Acceleration Is Causing Problems
With a basic understanding in place, let's look at the common warning signs that indicate hardware acceleration issues:
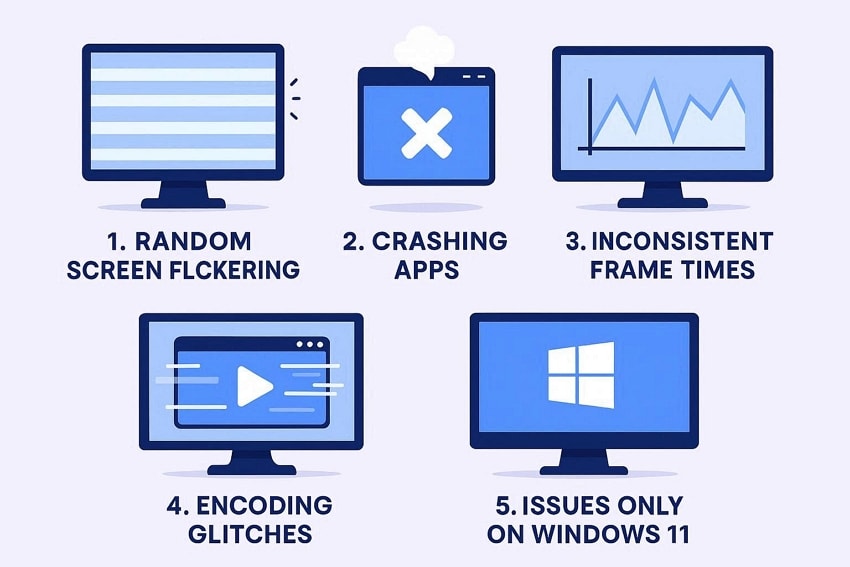
- Random Screen Flicking: The display goes black or shows tearing when someone does a task on their Windows. These flickers appear during routine actions, often signaling underlying graphics synchronization problems.
- Crashing Apps: Without any error, games or apps close without error and abnormally exit the screen during 3D scenes. Heavy rendering workloads expose driver failures, forcing applications to close unexpectedly.
- Inconsistent Frame Times: FPS numbers look okay, but you feel micro-stutters when streaming or recording a video. Performance feels uneven despite stable FPS, especially during live streaming sessions.
- Encoding Glitches: Video encodes, or previews, show dropped frames when hardware acceleration is on. Acceleration conflicts disrupt video processing, resulting in skipped frames and preview errors.
- Issues Only on Windows 11: The same hardware works fine on Windows 10, but when using Windows 11, it starts freezing. Further, system-level changes in Windows 11 introduce freezes absent in earlier versions.
Part 3. Turn Off Hardware Acceleration from Windows 11 Settings - Complete Guide
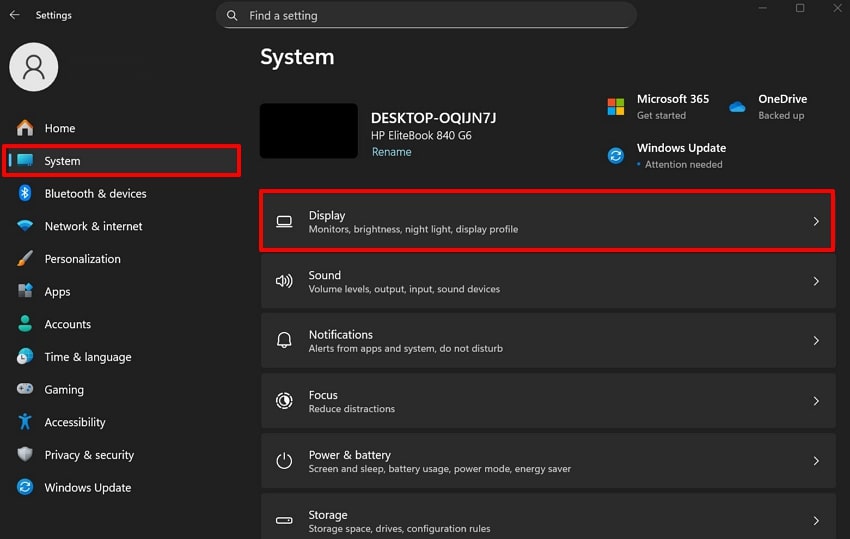
Turning off hardware acceleration through the Windows 11 settings app is one of the safest ways. Without touching any system registry or command-line, it lets you disable it by simply toggling it off. Furthermore, it is completely supported by Microsoft, so changes apply smoothly to all apps after a reboot. Upon hearing the feature, if you are exploring how to turn off hardware acceleration in Windows 11, follow this guide:
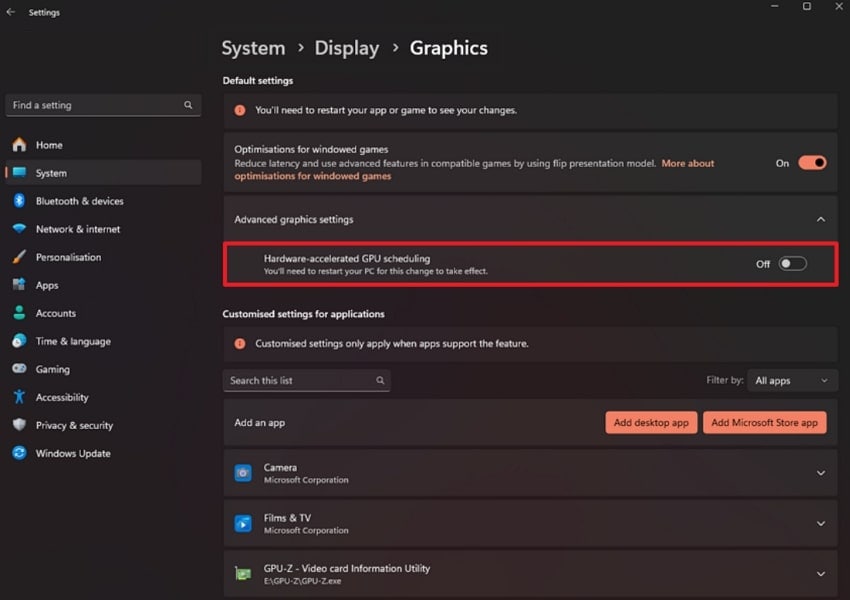
- Go to the "Settings" app and choose the "System" option from the left toolbar. Following this, select the "Display" option to jump into the next interface.
- Afterwards, scroll down the screen and select the "Graphics" option.
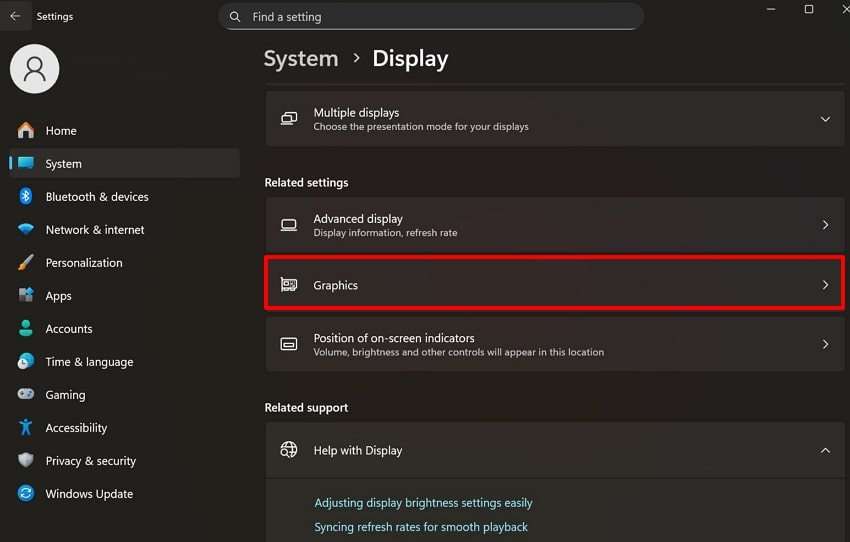
- Now, toggle off the "Hardware-accelerated GPU Scheduling" button to turn off the hardware acceleration settings.
Part 4. How To Turn Off Hardware Acceleration in Chrome and Edge Browsers
Besides settings, you can also disable it through various browsers, including Chrome, Firefox, and Edge. This method is beneficial to fix browser problems without changing Windows system graphics settings. Through this, you can easily determine whether the issue is with the browser or the system. Here we have listed down all the guides to turn off the hardware acceleration with different browsers.
Extensive Guide to Turn Off Hardware Acceleration with Chrome
Once you have identified the potential cause of hardware acceleration, let's explore how to turn off hardware acceleration in Chrome:
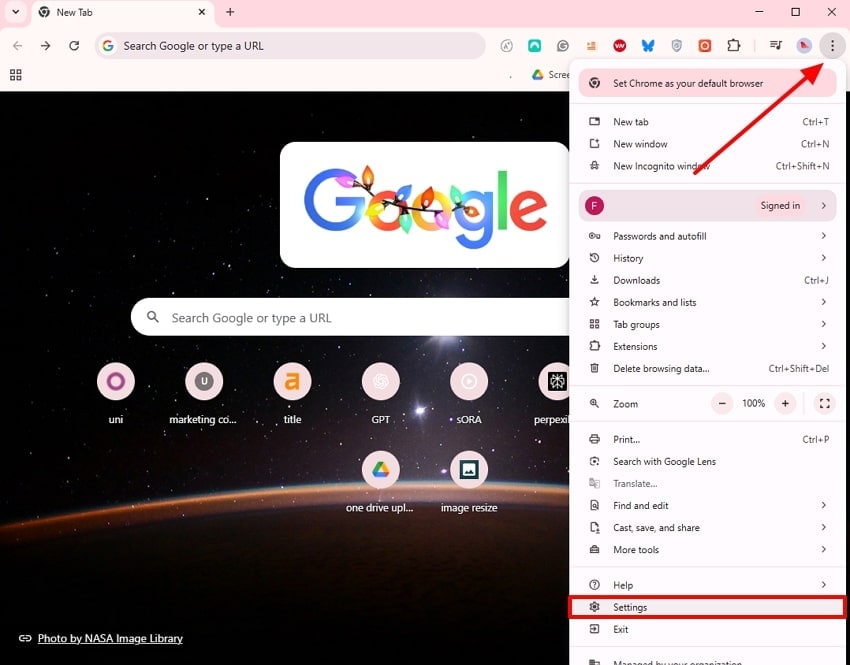
- Open the Chrome browser, click on the "3 Dots" available, and choose the "Settings" option in the pop-up menu.
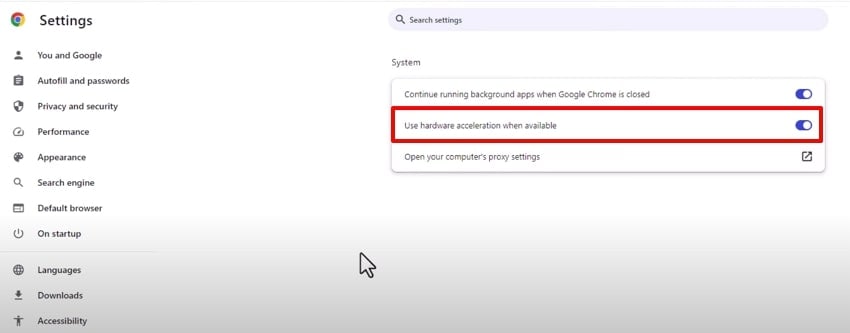
- Here, click on the "System" option and toggle off the "Use Hardware Acceleration When Available" option.
Guide to Disable the Hardware Acceleration in Firefox
Now, let's walk through the detailed steps to turn off hardware acceleration in Firefox safely and effectively:
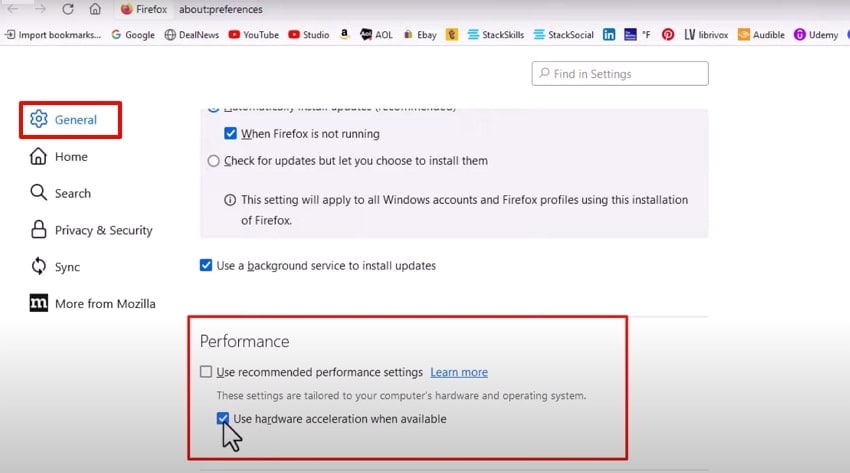
- Go to the Firefox browser, choose the "3 lines" menu, and select the "Settings" option to access its next interface.
- Next, choose the "General" from the left tab and disable the use of Recommended Performance Settings." Following this, uncheck the "Use Hardware Acceleration When Available" option to turn off the settings.
Disabling Hardware Acceleration in Microsoft Edge: A Detailed Walkthrough
If you are a Microsoft Edge user and want to explore how to turn off hardware acceleration in Windows 11, then go ahead:
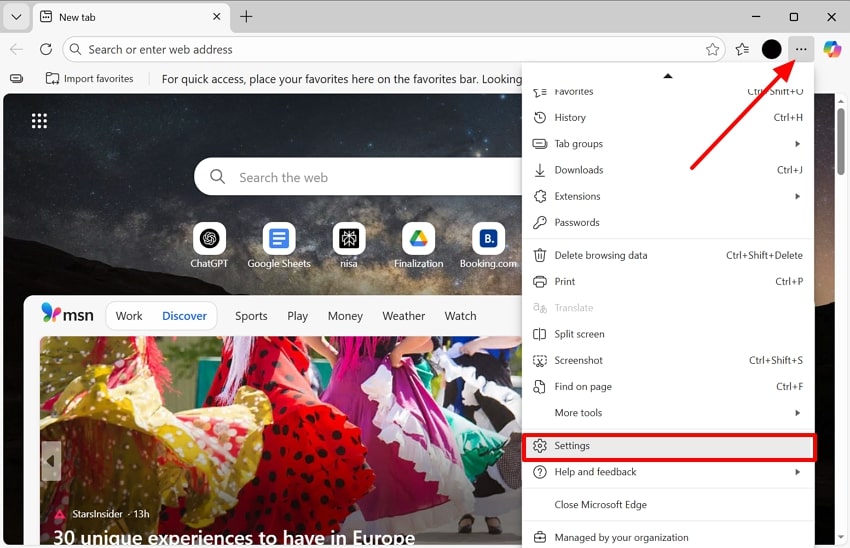
- Upon entering the "Microsoft Edge" browser, click the "3 Dots" from the right side and select the "Settings" option.
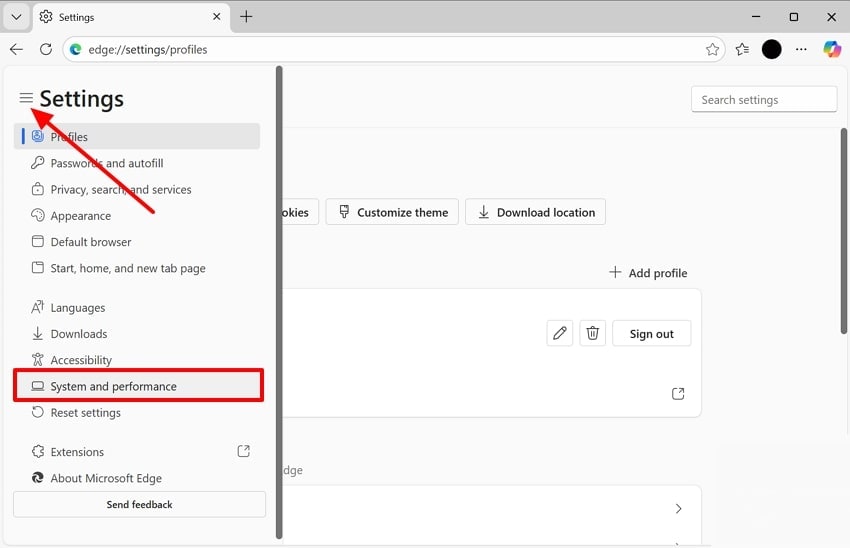
- Next, select the "3 lines" and choose the "System and Performance" option.
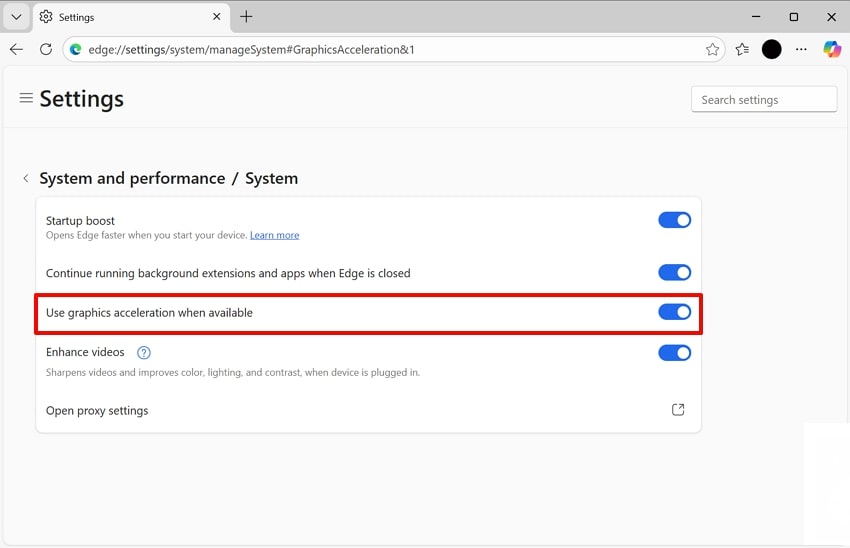
- Here, disable the "Use Graphics Acceleration When Available" option from this interface.
Part 5. Stop Hardware Acceleration in Microsoft Office Apps
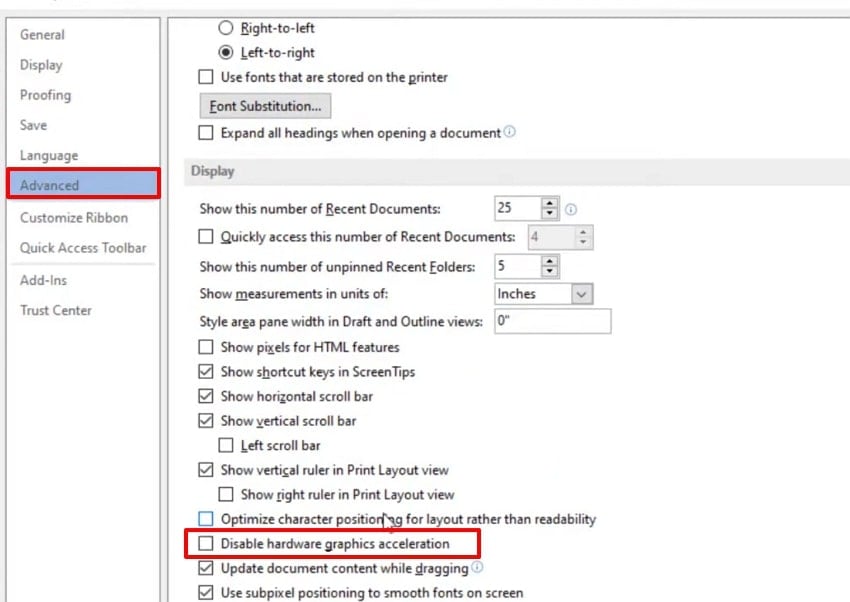
When your Microsoft Office is misbehaving, try disabling the hardware acceleration in the Word app. This method fixes flickering, lag, or visual glitches inside the Microsoft app without disturbing the whole system. Moreover, it provides an intuitive pathway of simply toggling the hardware acceleration in the Options settings. After reviewing these features in mind, follow these steps to turn off hardware acceleration:
- With MS Word running, locate the "More" option and then choose the "Options" option from the pop-up menu.
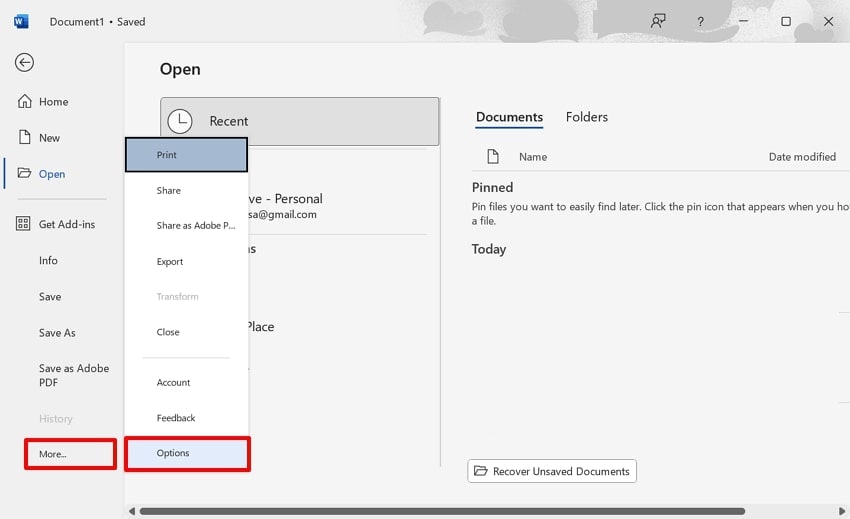
- Here, select the "Advanced" option from the left tab and enable the "Disable Hardware Graphics Acceleration" option, and restart the app.
Pro Tip: PC Crashes or Missing Files? How to Recover Data with Recoverit
Suppose you worked all night on a video editing project to submit it before the deadline. However, when you restart the PC, it starts showing a blue screen whenever you access any file. With this ongoing error, you suddenly lost one of your editing files. So, in this scenario, we recommend using Recoverit, which lets you retrieve lost data from different scenarios.
This AI-powered tool provides wide support to various file formats, including images. PDFs, videos, and Emails. Moreover, users can pinpoint the file by specifying their file name and type. To save your time efficiently, it provides a batch processing system to retrieve multiple files at once. Plus, it lets you preview the recovered file to ensure its completeness before saving it to the device.
Key Features
- Device and Location Flexibility: Recoverit provides border support to various external drives and even specific locations like the Recycle Bin.
- Bootable Scenarios: Its paid version lets you retrieve data from an unbootable drive using a bootable USB or Linux cloud service.
- Multiple Scan Modes: Users can efficiently choose between Quick and Deep scanning modes depending on their data loss scenarios.
Complete Walkthrough: How to Retrieve Lost Data with Recoverit
While exploring how to turn off hardware acceleration in Chrome, if you want to restore your lost data, then follow this extensive guide:
- Choose the Target Location to Start Data Recovery
As you enter the Recoverit tool, click on "Hard Drive and Location" from the left-side panel. Next, navigate to the "Quick Access" tab to select the location where the data was lost.
- Initiate the Scanning Procedure to Locate Lost Files
Upon selecting a location, Recoverit will start the scanning procedure and show all to-be-recovered files under the "File Location" tab.
- Preview the Recovered Files To Finish the Procedure
Now, you can preview the recovered files and click on the "Recovery" button to complete the recovery.
Part 6. When Keeping Hardware Acceleration Enabled Makes Sense

- High-Performance Graphics: Enabling hardware acceleration helps games and 3D apps run more smoothly by shifting from CPU to GPU.
- Video Playback and Streaming: GPU acceleration enhances video decoding and playback to reduce CPU load and power consumption.
- Creative and Productivity Software: Professional apps like Photoshop depend on the GPU, so enabling it cuts down the export time.
- Multi-Monitor Display: When using multiple monitors or 4k screens, enabling it prevents UI lags when switching between apps.
- Stable, Updated Software: If your PC runs on a stable internet and doesn't face flickering or crashes, there is no need to disable it.
Final Verdict: Should You Disable Hardware Acceleration in Windows 11
Whether you should turn off hardware acceleration or not depends on the stability and performance. If you have modern PCs or updated drivers, keep the hardware acceleration enabled, as it can slightly improve the responsiveness. However, if you are using unstable drivers, then it can trigger screen flickering or stuttering in the games.
On the other hand, if your system runs smoothly and you regularly use GPU-intensive software, then keeping your hardware acceleration makes sense. Overall, the final verdict is to treat hardware acceleration as a testable utility and check in which scenario your system works better.
Conclusion
Concluding it, now you can turn off their hardware acceleration to boost your workflow. This article has covered various methods to explore how to turn off hardware acceleration in Windows 11. Furthermore, if you lost data, we recommend using Wondershare Recoverit, which lets you restore numerous files simultaneously to save time.
FAQ
-
1. Will turning off hardware acceleration damage my PC?
No, disabling hardware acceleration in Windows 11 only changes how graphics tasks are scheduled. Overall, it does not harm your hardware and can be changed when needed. -
2. Is turning off hardware acceleration the same as using my integrated GPU?
No, disabling hardware acceleration does not force your PC to use integrated graphics. It simply reduces GPU-scheduling optimizations used by Windows. -
3. Will disabling hardware acceleration improve battery life on a laptop?
Disabling hardware acceleration can improve battery life on a laptop, but it varies by system. On some laptops, it can slightly extend the battery life of the system. -
4. What to do if you lose your essential files from your device?
In this situation, we recommend using Recoverit, which offers multiple scanning modes. Furthermore, it has newly launched V14, which provides advanced features with complete accuracy.


