How to Fix No Bootable Device Insert Boot Disk

Jun 03, 2026 • Filed to: Windows Computer Solutions • Proven solutions
 TL;DR:
You can resolve the Windows "No Bootable Device - Insert Boot Disk" error by setting the boot mode to UEFI in the BIOS menu, repairing the boot manager, or removing the motherboard's CMOS battery to restore factory settings.
● Running Automatic Startup Repair or executing the bootrec.exe /FixMbr, /Fixboot, and /rebuildbcd commands in Command Prompt requires booting the system from a separate Windows Installation Media USB or DVD.
● If the hard drive has physical damage or remains undetected in BIOS after testing SATA cables, you must replace the drive and can retrieve your files first by creating a bootable USB using Wondershare Recoverit on a functional computer.
Ask AI for a summary
 ChatGPT
 Perplexity
 Gemini
 Claude
 Grok
Grok
"No Bootable Device - Insert Boot Disk" is a Windows error that probably no one would want to see on their screen. The error simply means that your system has failed to locate the boot drive and can't find the necessary boot files. While the error is usually caused due to physical damage to the hard drive, several software-related issues can also trigger this error.
Fortunately, there are ways to fix the "No Bootable Device - Insert Boot Disk" error and get your PC to work again without spending a hefty amount on repairing costs. Let us walk you through various working solutions that'll help you fix this issue on your Windows PC/laptop.
4 Easy Solutions to Fix No Bootable Device Insert Boot Disk
What are the causes of the error?
As we mentioned earlier, the "No Bootable Device" error is usually caused due to a damaged hard drive. If you've accidentally dropped your laptop or hit the CPU (in case of a PC), chances are you might have damaged the hard drive inside.
In the case of physical damage, the only way to fix this error is to replace the hard drive with a new one. Although you can call a technician, it's extremely challenging to repair a broken hard drive.
It's worth noting that you can completely avoid this error by handling your PC/laptop with extreme care. Being an electronic device, even a minor fall can have drastic consequences.
However, if the error is caused due to a software-related issue, you can try the following different troubleshooting methods to fix it on your own.
Solution 1: Change the Boot Mode to UEFI
Changing the boot sequence to UEFI has helped many users fix this particular error. UEFI is low-level software that's loaded before booting the operating system. This is the advanced version of BIOS and can be found in almost every latest PC/laptop. UEFI is designed to support high-end hard drives and graphic cards.
In case, the boot sequence is accidentally changed on your PC, it won't load the required UEFI files and interrupt the booting process as well. In this case, you can simply change the Boot Mode back to UEFI by accessing the BIOS menu.
- Turn-off your PC and power it back on by pressing the "Power" button.
- Enter the BIOS menu by pressing the right BIOS key (F1, F2, F8, F11, DEL). Keep in mind that the BIOS key can vary for different laptop/PC models.
- Once you're in the BIOS menu, navigate to the "Boot Mode" and set its value to "UEFI".

- Go to the "Exit" menu and choose "Save and Exit" to apply your changes.
Solution 2: Reset the Boot Manager via Command Prompt
If changing the Boot Mode doesn't help, you can also try resetting the Boot Manager through Command Prompt. However, since you won't be able to boot into your system, you'll have to launch Command Prompt by going to the Advanced Repair window.
To do so, you'll need a Windows Installation Media (a bootable USB drive or DVD). If you already don't have one, you can create an Installation media using a Windows image file or by downloading the Media Creation Tool from Microsoft's official website.
Once you have the Windows image file, you can simply use a tool like Rufus to create a bootable USB Drive.
Note: Make sure to choose the right settings (as per your PC's hardware) while creating the Installation media otherwise you won't be able to boot from it.
Once the Windows Installation Media is ready, simply follow these instructions to launch Command Prompt and reset the boot manager.
- Connect the Installation media and use it to boot your PC/laptop.
- You'll be prompted to the Windows setup wizard. Choose the right language and region.
- Click "Next" and tap on "Repair Your Computer" in the bottom-left corner.

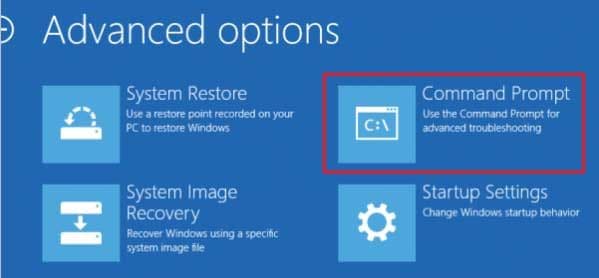
- Now, select Troubleshoot>Advanced Options.
- In the Advanced Recovery window, select Command Prompt.
- Execute the following commands:
bootrec.exe /FixMbr
Bootrec.exe /Fixboot
Bootrec.exe /rebuildbcd
- Wait for the command to execute and then try rebooting your system normally.
Solution 3: Unplug CMOS Battery to push the device back to factory settings
If you couldn't find the right settings in BIOS and thought it was extremely complicated, we have a simpler solution for you. However, in this case, you'll need to open up the laptop and remove the CMOS battery. So, make sure you have all the right tools to open your laptop.
Removing the CMOS battery will automatically restore all the factory settings on your laptop. It means if you had accidentally changed any BIOS settings, they'll be restored to defaults.
To remove the CMOS battery, open the back panel of your laptop and look for a small "coin cell battery" on the motherboard. Gently pull it out and wait for 10-15 minutes. Now, insert the battery again and reassemble your laptop.
Try booting the laptop. If the error was caused due to BIOS settings, it is most likely to be gone at this point.
Solution 4: Undertake startup Repair
If nothing fixes the "No Bootable Device" error, you can launch the "Automatic Startup Repair" to let your system automatically diagnose the problem and troubleshoot it accordingly. Automatic Repair is Windows built-in feature that's designed to help users repair their system when they can't do it manually.
Again, to launch the "Automatic Startup Repair", you'll need the Windows installation media we created earlier. After that, simply follow these instructions to fix the error using Startup Repair.
- Connect the Installation media again and make your system boot from it.
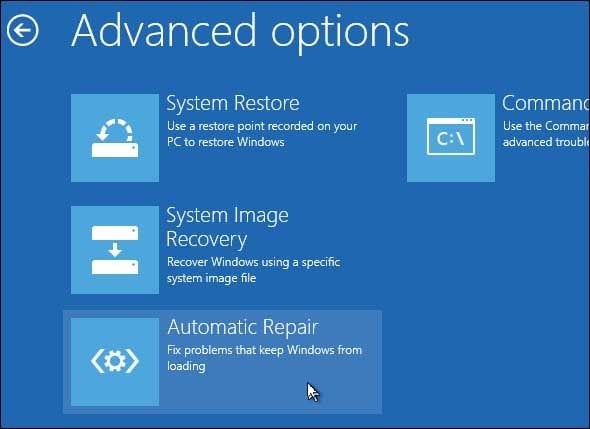
- Click "Repair Your Computer" and go to Troubleshoot>Advanced Options.
- Click "Automatic Repair" and wait for the system to automatically troubleshoot the error.
Once the repairing process completes, reboot your system and check if the error is gone or not.
How to recover data from the computer when all solutions fail to fix the issue?
There will be situations when all the above methods fail to fix the issue, especially if the hard drive has been physically damaged. Of course, you'll have to replace the hard drive with a new one to get rid of the error, but before that, you must recover all your data from the older hard drive so that you don't have to deal with any data loss at all.
But, since you can't access the system, you'll have to follow a different approach to recover the data. We recommend using Wondershare Recoverit, a data recovery tool, that will help you recover files from a system, even if it's not booting up properly or stuck in a booting loop.
Recoverit will allow you to create a bootable USB drive and use it to recover different types of files from your system. One of the major advantages of using Recoverit is that it allows users to preview the files before restoring, making it easier to restore all the valuable data.
So, if you also don't want to lose your valuable data, install Recoverit on another PC/laptop, and follow the below-mentioned instructions to restore files from the unbootable system.
Step 1: Install and launch Recoverit on a different laptop and select "System Crash Data Recovery" from its main interface.

Step 2: Connect the USB drive (8GB or more) and check the "Create USB Bootable drive" radio button. Now, click "Create".

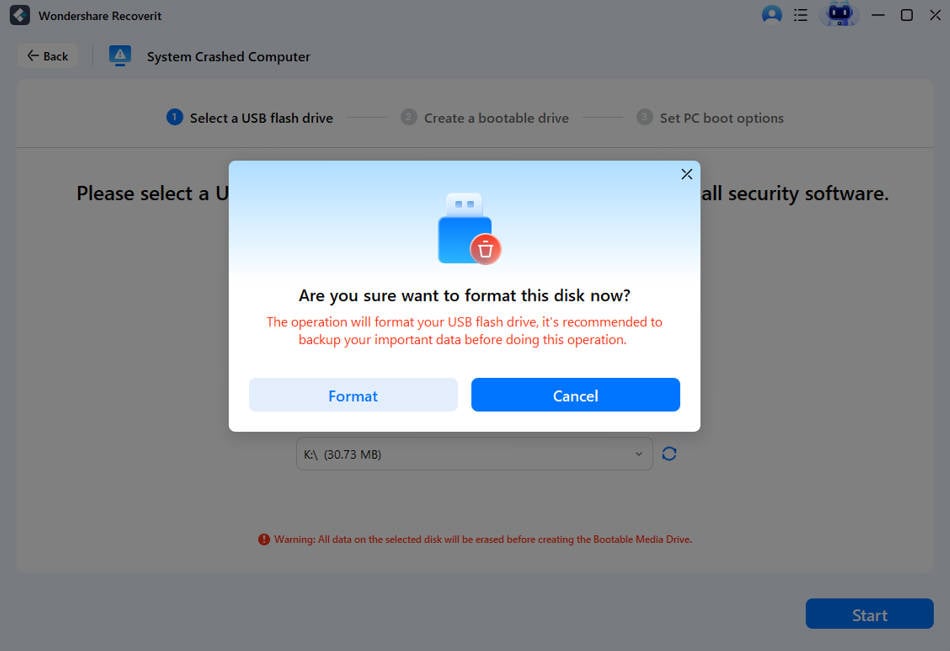
Step 3: A warning will pop-up on your screen asking you to format the USB drive. Click "Format Now" to continue with the process.
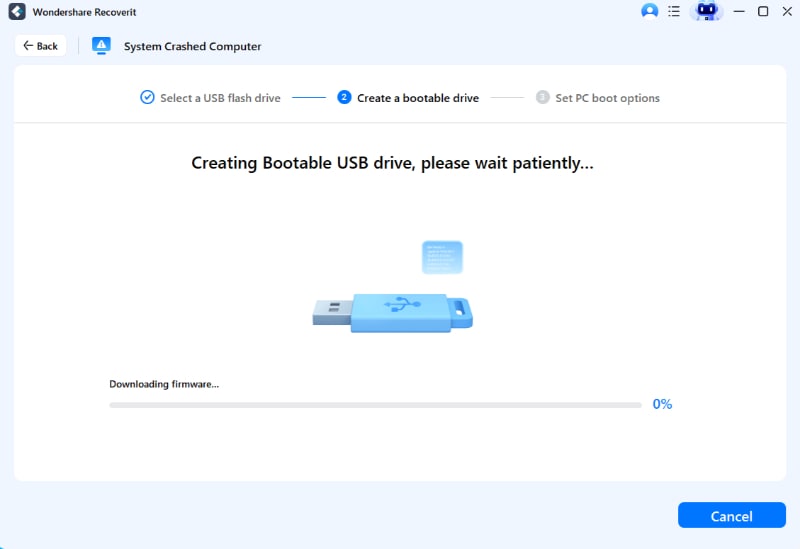
Step 4: Recoverit will automatically start creating a bootable USB drive. Be patient as this process can take several minutes to complete.
Step 5: Once the process completes, remove the USB drive and connect it to the unbootable PC. Make the PC boot from the USB drive. Learn more about how to set the computer to boot from a USB drive.

Step 6: After the computer boot from the USB drive, Recoverit will start automatically. Restore the files on an external storage drive.

Summary
Seeing your Windows system flash "No Bootable Device" can easily be the most terrifying situation for every user. However, instead of getting panicked, it would be better to immediately take over the reins and try fixing the error using the right solutions. Always remember that if the error is caused due to physical damage to the hard drive, you'll have to replace it with a new one. But, to avoid any data loss, you can use Recoverit to retrieve all your data from the broken hard drive.
People Also Ask
-
What does "No Bootable Device - Insert Boot Disk" mean?
It indicates your computer cannot find an operating system to load. Common causes include:
Boot order misconfiguration in BIOS/UEFI.
Corrupted or missing operating system files.
Failed hard drive/SSD.
Disconnected or faulty storage cables.
Incorrect BIOS settings (e.g., disabled storage controller). -
What should I do if my hard drive isn't detected in BIOS?
If the drive doesn't appear in BIOS:
1.Try another SATA ports/power connector.
2.Check unusual sounds that suggest physical failure.
3.Test with another cable.
4.Reset BIOS to default settings.
If still undetected, the drive may have failed and require professional recovery. -
How can I recover my data if I keep getting no bootable device insert boot disk?
To restore your data, you can try the following steps:
1.Download and install Wondershare Recoverit.
2.Launch Recoverit and scan the drive.
3.Preview and recover the files.
Computer Troubleshooting
- Win System Crash
- Crack Bios Password
- Fix Run Dll Errors
- Fix Taskbar Disappeared Error
- Fix BootMGR Image Corrupt
- MBR Errors Fixed
- Windows Tips
- How to Edit DLL Files
- How to Test Hard Drive Speed
- Bootcamp Windows 10 No Sound Issue
- Download iCloud on PC
- Difference between File Systems
- Fix Computer Overheat
- Computer Problems
- Best Bad Sector Repair Tools
- Audio Not Working in Windows 10
- Fix Windows 10/11 Error Code 0xc000014c
- Fix Windows 10 Error Code 0xc0000034
- SMART Status Bad Error
- Fix Grub Loading Error
- Remove Admin Password
- Blue Screen Errors


Theo Lucia
chief Editor