How to Fix Windows Cannot Repair This Computer Automatically”?
Resolve the "Windows cannot repair this computer automatically" startup error by running built-in Windows recovery utilities like Bootrec and CHKDSK from the Advanced Boot menu, adjusting BIOS SATA modes, or performing a clean boot in Safe Mode.
● Access the Command Prompt via the "Repair your computer" menu to rebuild the boot configuration using the Bootrec /fixmbr and Bootrec /fixboot commands, or run chkdsk d: /f/r to repair corrupted file systems and bad hard drive sectors.
● If command-line repairs fail, enter your system's BIOS settings and toggle the SATA Storage Configuration mode between IDE and AHCI to reset the hard drive's communication protocol.
● Before resorting to a clean Windows installation, rescue trapped files by opening Notepad via the Command Prompt to trigger a manual file explorer GUI, or use Recoverit on a secondary computer to create a bootable data extraction drive.
Ask AI for a summary
While starting your computer, are you getting an error message, "Windows cannot repair their computer automatically?" Well, this could be because of your damaged file system or hard drive or because of some virus attack. Are you looking for ways to fix this issue?
This article will guide you with the possible causes of this error and different ways to solve the problem. You will also learn how to get lost data with Recoverit.
Go through it to resolve the issue and browse your system without facing any trouble.
Part 1: What causes this error?
Before learning the different ways to fix the "Windows cannot repair their computer automatically" issue, you must know the cause of it. Some of the common reasons that lead to this problem are:
1. Damaged File System
While working on your system, if you experience any sudden power outage, it can corrupt the file system. Moreover, any virus attack or disk writing error can also cause this issue. When the file system gets corrupted, Windows try to repair the damaged file. But if it fails, it shows the error on your screen.
2. Damaged hard drive
If there is some problem with a computer's hard drive, it might not boot. Problems like the formation of bad sectors in your hard drive can interrupt the normal startup.
3. Virus or Malware attack
A virus or malware attacks on the systems boot file can change the coding of the file and make it unusable. If this happens, it hinders the boot process of the system.
4. Power fluctuation
If you do have a voltage stabilizer for your computer, then the fluctuations can also damage the system's power supply. Any damage to the power supply of computer or any other hardware can prevent it from booting normally.
Part 2: Fixes for "Startup Repair Cannot Repair This Computer Automatically"
You now know the possible causes of the error - Startup Repair Cannot Repair This Computer Automatically. Now we will discuss the possible solutions.
Solution 1: Utilize the Bootrec Tool (bootrec.exe)
The Microsoft tool, Bootrec, or bootrec.exe utility helps in Windows recovery. If the problem is because of damaged BCD or MBR, then you can go for this solution. Proceed with the following steps:
Step 1: First restart your system, and when you see your Windows logo, press F8 when Windows prompts you to do so.
Step 2: Navigate through the options of "Advanced boot" and select "Repair your computer" and click on "Command Prompt."


Step 3: Run the commands mentioned below:
- Bootrec /fixmbr
- Bootrec /fixboot
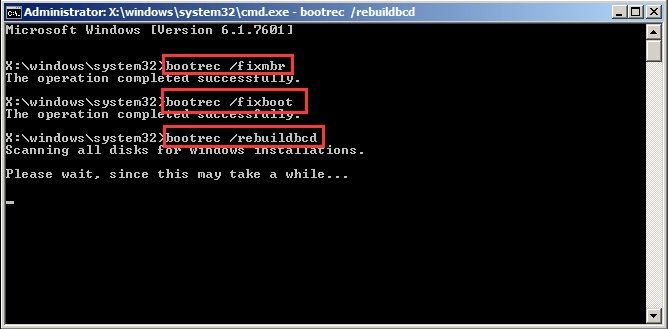
Once the commands completed successfully, try rebooting the system and see if the problem is fixed.
Solution 2: Using the CHKDSK feature
CHKDSK is the popular utility that you can use to fix system errors. From identifying bad sectors to making your system error-free, it can help you in all. Proceed with the following steps to solve the problem:
Step 1: First restart your system, and when you see your Windows logo, press F8 when Windows prompts you to do so.
Step 2: Select "Repair your computer" and then "command prompt" in the same way as done in the above solution.
Step 3: Type chkdsk d: /f/r and press the Enter key.
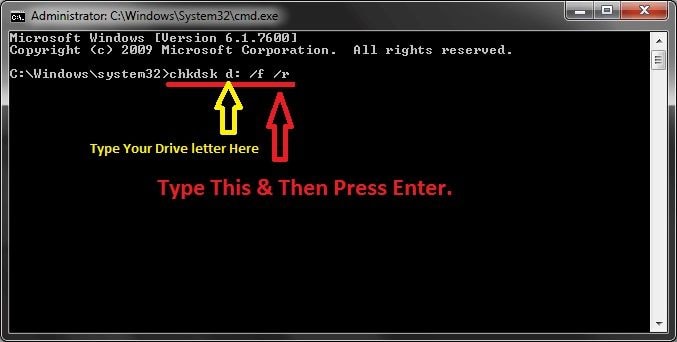
Step 4: Restart the computer, CHKDSK will now scan your hard drive to fix if it finds any problem.
If you face any trouble while running the chkdsk commands, then run these commands first. Here -> represents enter.
diskpart -> list disk -> select disk * (*=0, 1, 2 means your disk number) -> attrib disk clear read-only

diskpart -> list vol -> sel vol * (*=0, 1, 2 means your disk number) -> attrib vol clear read-only
After running both the above commands, try to execute the CHKDSK command once again.
Solution 3: Perform a Clean Boot
Restart your system into safe mode for the clean boot. Once the system starts in safe mode, immediately take backup to avoid any data loss. Here are the detailed steps for the clean boot.
Step 1: Hold the keys "Windows + R" to open "Run." Now type MSConfig followed by entering.

Step 2: Now proceed the following path
Boot - > Safe Boot -> Minimal - > Apply

Step 3: Go to "Services" select the option "Hide all Microsoft services" then click "Disable all" and "Apply." It will disable all the installed third-party services.

Step 4: Tap on Startup, select Disable all and click on Apply.

Step 5: Now restart the system by selecting "start Windows normally."
Solution 4: Try modifying the SATA Mode
SATA identifies how your hard drive interacts with the system. You have three options - AHCI, IDE, and RAID, to configure SATA. IDE is the simple mode, and AHCI enables the usage of advanced features. Try changing the modes with the below steps:
Step 1: Restart your computer and press DEL or F2 to enter BIOS. Find the "Storage Configuration." Usually, it is in "Main."
Step 2: Here, interchange the modes. Like if its IDE converts it to AHCI or vice versa.
Step 3: Now move to "Advanced -> Onboard Devices Configuration."
Step 4: As done in Step 2, again interchange the modes, but this time change it for "Controller"
Now check whether the system boots normally.
Solution 5: Back up your Data
Before analyzing your hard drive, it is necessary to back up the data first. Proceed with the following steps:
Step 1: Open the command prompt and enter notepad

Step 2: Now follow the following path in Notepad.
File -> Open - > Files of type -> All files
Now all the files all visible
Step 3: Choose the data for which you need backup. Here right-click on it and then select copy
Step 4: Open "My Computer" select the external hard drive to paste all the required data in it.
Solution 6: Verify your computer's HDD Physically
Examine the hard drive physically. There may be chances of loose connections. Connect it on other system and chkdsk. Make sure that on the systems hard drive, the option is set to boot priority. Still, if the issue is not resolved, you need to install a clean version of Windows again. But do not forget to take the backup.
However, due to some reason, if you are unable to take the backup, do not worry. Retrieve your data with the Recoverit data recovery software.
Part 3: How to recover data from the unbootable computer if the above methods fail?
After trying all the above methods, if you fail to boot your system, and have lost your data, then Recoverit data recovery software comes as your savior. Safe and reliable software recovers all your lost data safely and effectively from the system. It doesn't matter how, and from where you have lost data, the data recovery software has the maximum recovery rate.
Follow the below steps to recover your data:
Step 1: Create Bootable Drive

Download Recoverit and install it on some other computer. Now to create a bootable drive, connect any blank CD/DVD or USB drive with the system. Launch the software, select your recovery mode. Now select "Recover from Crash Computer" and then click on "Start."
Step 2: Select Mode

Select the bootable drive from CD/DVD or USB. Click on "Create" and then on the option "Format now."
Step 3: Format the Bootable Drive
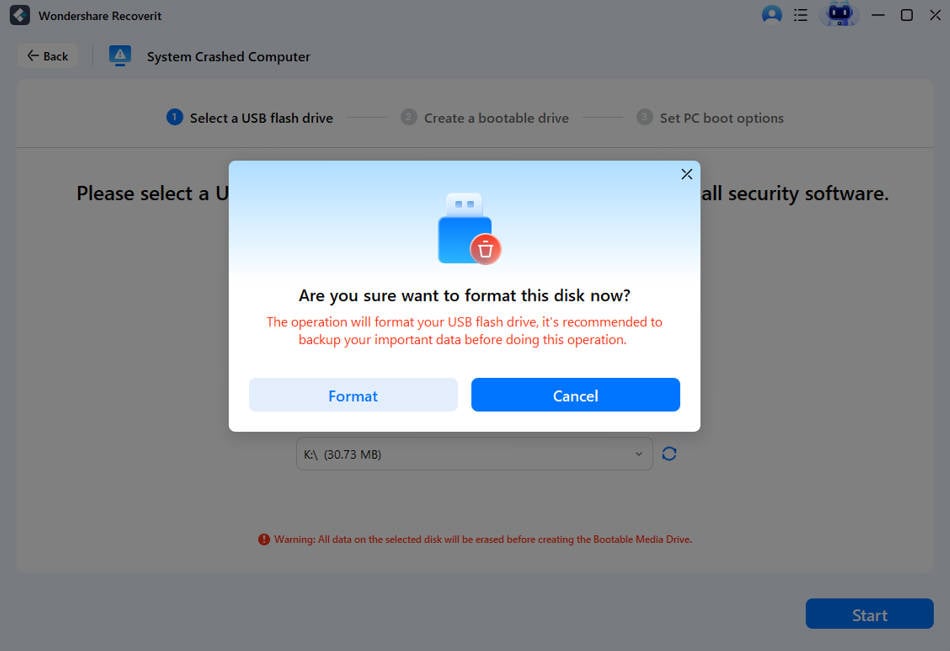
When prompted, click on the "Format Now" option.
Step 4: Bootable Drive Creation
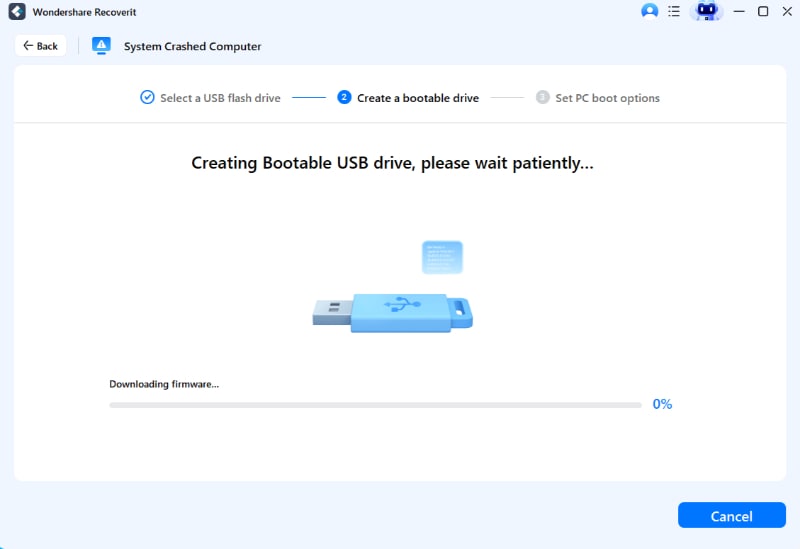
Do not eject the drive when the bootable drive creation is in progress. Once the process completes, you will see the below screen.
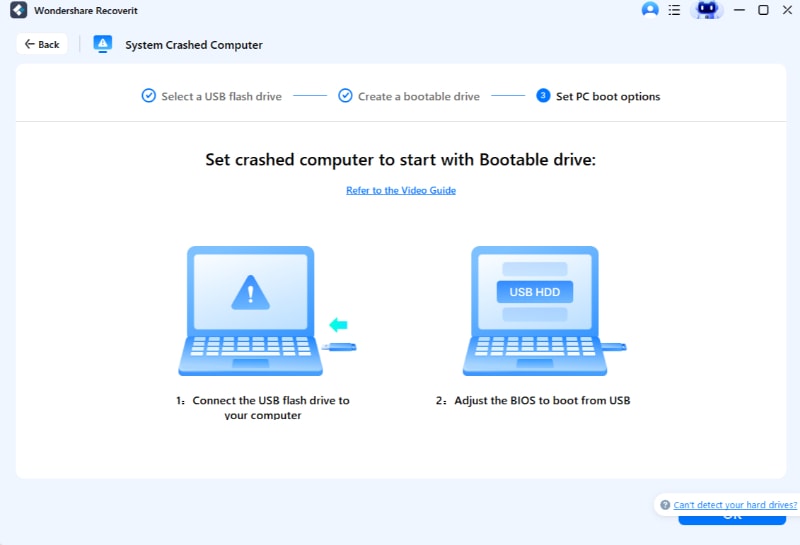
Step 5: Recover Data
Take out the bootable drive and boot the unbootable computer with the bootable media. Check out how to set the computer to boot from a USB drive.

Launch Recoverit with bootable drive and move to the option – copy data from hard disk, or you can select recover lost data from Windows. Follow the instructions, and you can easily recover all your data.

Conclusion
Now you know the methods to repair the windows boot error; use them to boot your unbootable computer. If all these methods are not able to fix the bootup error, you need to format the system and reinstall the windows after taking a backup of all your data. However, if you fail to take the backup of your data, recover your data with the best data recovery software Recoverit.
Computer Troubleshooting
- Win System Crash
- Windows Tips
- Computer Problems
- Blue Screen Errors


 ChatGPT
 Perplexity
 Gemini
 Claude
 Grok
Grok


Theo Lucia
chief Editor