
Jun 03, 2026 • Filed to: Windows Computer Solutions • Proven solutions
 TL;DR:
You can permanently remove Windows Error Reporting files using native utilities like Storage Settings and Disk Cleanup, deleting the folders manually, or running third-party erasure software like Stellar BitRaser.
● Disk Cleanup requires administrative privileges to successfully remove these system files; without admin access, the deletion process will fail.
● For manual deletion, use the Run dialog to access and empty either %ALLUSERSPROFILE%\Microsoft\Windows\WER\ReportQueue or %USERPROFILE%\AppData\Local\Microsoft\Windows\WER\ReportQueue, then clear your Recycle Bin.
● Stellar BitRaser is best suited for users who need scheduled automated deletions or require a permanent wipe that prevents any data recovery.
Ask AI for a summary
 ChatGPT
 Perplexity
 Gemini
 Claude
 Grok
Grok
To let users, have a seamless experience, Windows has developed a dedicated error reporting system. WER, which is commonly known as Windows Error Reporting, is the native event-based feedback system that is an evident part of Windows. Though, there are times when users wish to delete Windows Error Reporting files. Ideally, Windows utilizes these files to gather information from its users and access their experience. Afterward, an available solution is provided to them. Nevertheless, these files can contain some crucial information and should be deleted regularly. In this tutorial, we will teach you how to delete Windows Error Reporting files permanently.
Part 1: How to Delete Windows Error Reporting Files
While you can always disable the feedback process for Windows Reporting, it can be quite tough to delete these files permanently from the system. Don't worry! We are here to assist you.
Method 1- Stellar BitRaser
By using Stellar BitRaser for file, you can get rid of any kind of data from your system and that too without any scope of recovery. BitRaser can be used to delete different kinds of system traces including temporary files, registry, windows error reporting files, memory dump files, and more.
Furthermore, you can also perform a scheduled deletion of your content with BitRaser. It can be used to make free space on your disk and can remove all kinds of Internet activities on your system. The tool has an easy to use interface and provides 100% guaranteed results with the generation of an erasing certificate in the end. Here are some of its added features.
- BitRaser for the file is a complete data eraser tool that can remove files, folders, Internet activities, applications, and more.
- It can also remove system traces of all kinds with no recovery scope.
- You can also wipe an entire hard disk or external storage device with BitRaser.
- It performs a scheduled deletion of data with its automated process.
- You can free up unused space on your disk using BitRaser for the file.
- It generates an erase certificate after completing the process.
- Users can pick the kind of algorithm they want to implement from its Settings.
- The tool is compatible with all the leading versions of Windows.
Step 1: Download Stellar BitRaser for the file on your Windows computer and launch it.
Step 2: From the left panel, you can access all the major features of the application. Simply click on the "System Traces" option to delete Windows Error Reporting files or any other kind of data.
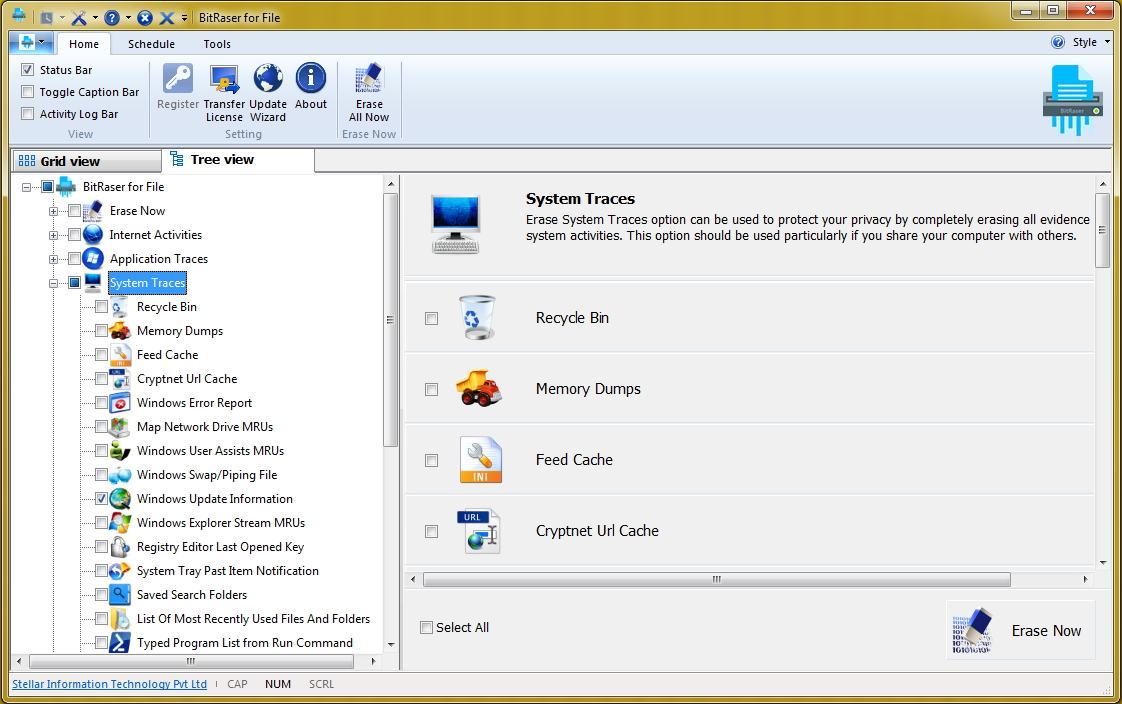
Step 3: This will load several options on the right panel. Out of all the provided options, select "Windows Error Report" and click on the "Erase Now" button.
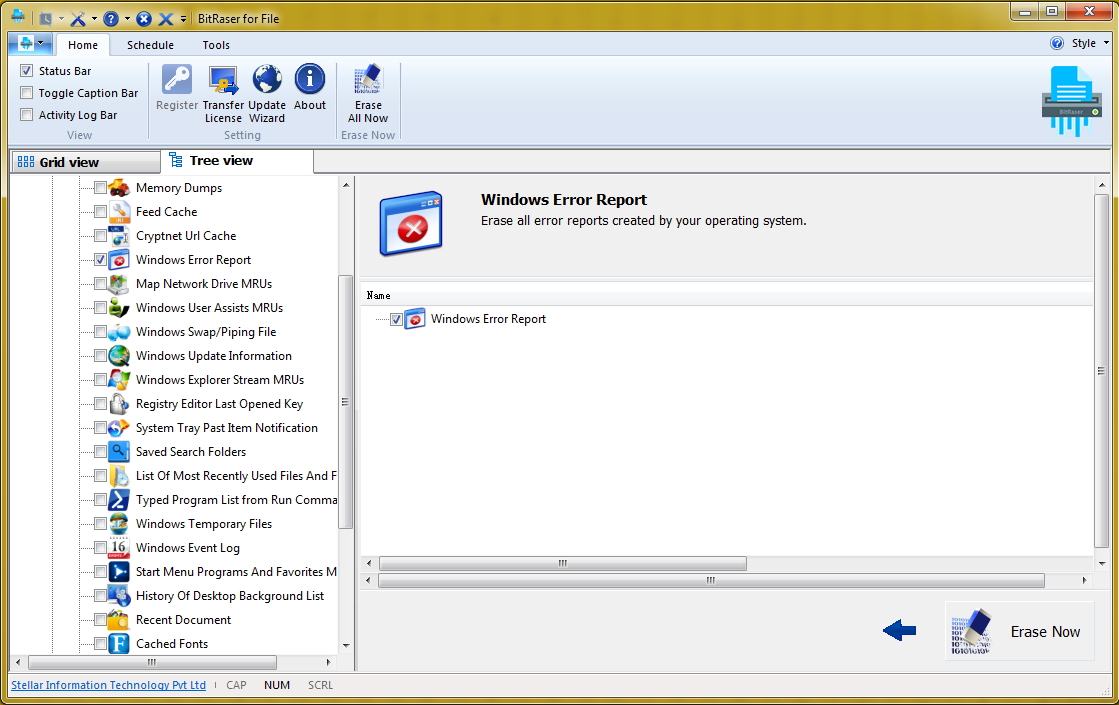
Step 4: In no time, your Windows Error Reporting files would be deleted from your system permanently with no scope of recovery.
After your system would be restarted, you will realize that all the Windows Error Reporting files have been permanently removed from it. Even though a single pass would be enough, you can perform multiple passes to get an added assurance. Ideally, three passes would be sufficient for a guaranteed deletion of your data.
Method 2- Delete Windows Error Reporting Files via Settings
To delete Windows error reporting files via Settings, follow the below steps:
Step 1: Go to your system’s settings. Open Storage and launch Free Up Space Now.
Step 2: Select “System created Windows Error Reporting files” and check its box while leaving the other unchecked.
Step 3: Click on the “Remove Files” button to successfully delete all the Windows Error Reporting files from your system.
Method 3- Delete Windows Reporting Files via Disk Cleanup
If you want to use the disk cleanup method:
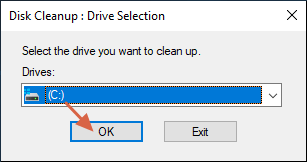
Step 1: Open the “Disk Cleanup: Drive Selection” dialog box after typing disk cleanup in the task bar. Choose the system disk and click OK.
Step 2: Now, from the list, select all the options you want to cleans and click on the “Clean up system files” button in the lower-left corner.
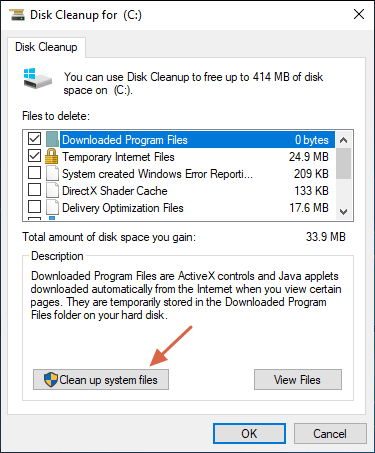
Step 3: Repeat the step that requires you to select the system disk again. Tick the box for “System created Windows Error Reporting files” from the list and press OK.
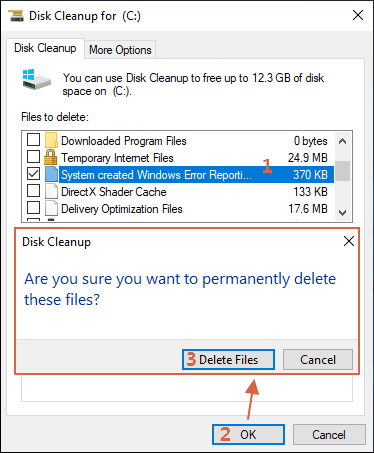
A confirmation prompt will open. Confirm to delete the selected files to allow the Disk to delete the type of data you want to remove.
Method 4- Deleting the Windows Reporting Files manually
If the above three methods fail to give you the desired results, you can try deleting the System Windows Error Reporting files manually also. After manually browsing and deleting the files from their locations, the files can also sometimes get deleted from the Disk Cleanup. For the manual process:
Step 1: Press Windows + R to open the “Run” dialog box, and paste the command
“%ALLUSERSPROFILE%\Microsoft\Windows\WER\ReportQueue” in it. Hit Enter.
Step 2: If the box doesn’t recognize this command, you can try using the
“%USERPROFILE%\AppData\Local\Microsoft\Windows\WER\ReportQueue” command.
It is also advised to immediately delete any subfolders or files you might find in the folder. Then, soon after, empty your Recycle Bin. After doing this, reboot your computer and open Disk Cleanup utility. Check if you see any Windows Error Reporting files recommended for deletion.
Part 2: Learn more about Windows Error Reporting
The Windows Error Reporting feature was originally introduced in Windows Vista and has been continued with all the versions after that. Whenever a system crashes or malfunctions, a response is provided to the main Windows server. The kernel in the operating system reports this error. If there is any error related to an application, then WER API is used to generate (and report) this error.
Furthermore, while recording the error, applications might also provide an added description. The motive behind Windows Error Reporting features it to get feedback from users regarding Windows. This helps Microsoft to diagnose various errors that they were not able to detect during the beta release of the operating system. Additionally, it helps them come up with a better version of the OS in the future.
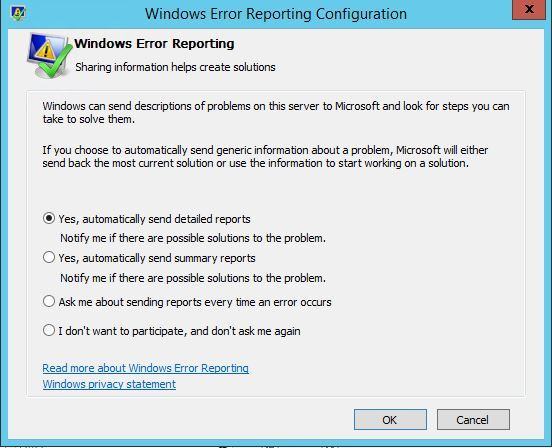
When the WER interface reports the error to the server, it can provide different kinds of responses.
- If a similar error has already been reported before, Windows can help you diagnose it with a simple solution. Therefore, it provides an easy way to resolve the issue.
- Chances are that your problem can be under investigation as well. The server might ask for more information from you to diagnose it. The communication would be made from the WER interface.
- In case if your problem is not diagnosed, then the server reports it to an official developer. A further investigation of the problem is followed.
This will help you resolve the problem related to any application or Windows native interface. Additionally, you can access all the solutions that are provided by Windows as well to get instant help. Since these Windows Error Reporting files can contain crucial information related to your system, they should be deleted on a regular basis.
Even though you can turn this feature off from the Windows native interface, it is recommended to delete Windows Error Reporting files permanently using BitRaser. It is a highly secure and efficient tool that can be used to delete system traces of all kinds. As an easy to use the application, it will let you delete Windows Error Reporting files without any recovery scope. Feel free to use it and let us know about your feedback in the comments below.
Part 3: What Causes the Windows Error Reporting (WER) Files Issues?
After analyzing several user reports, it has been verified that certain situations are responsible for this issue to occur. Here are the two most likely causes:
-
Disk Cleanup utility is glitched
In this case, there is some issue in the disk cleanup utility. So, to fix it and delete Windows Error Reporting Files, you can locate the files on the disk and then delete them manually.
-
Disk Cleanup doesn’t have administrative privileges
In the majority of cases, this problem occurs due to a privilege issue when you try to run disk cleanup without granting admin access to the utility. So, it is obvious that Disk Cleanup will be unable to remove a couple of Windows Error Reporting Files, until you open the Disk Cleanup utility and grant it
Computer Troubleshooting
- Win System Crash
- Crack Bios Password
- Fix Run Dll Errors
- Fix Taskbar Disappeared Error
- Fix BootMGR Image Corrupt
- MBR Errors Fixed
- Windows Tips
- How to Edit DLL Files
- How to Test Hard Drive Speed
- Bootcamp Windows 10 No Sound Issue
- Download iCloud on PC
- Difference between File Systems
- Fix Computer Overheat
- Computer Problems
- Best Bad Sector Repair Tools
- Audio Not Working in Windows 10
- Fix Windows 10/11 Error Code 0xc000014c
- Fix Windows 10 Error Code 0xc0000034
- SMART Status Bad Error
- Fix Grub Loading Error
- Remove Admin Password
- Blue Screen Errors


David Darlington
staff Editor