


 TL;DR:
Because Apple Music lacks a "Recently Deleted" folder, recovering lost songs requires re-downloading purchased tracks, re-syncing your streaming library, or restoring local files via backups or recovery software.
● For Apple Music streaming tracks or iTunes purchases, toggle "Sync Library" in your device settings or redownload the missing songs directly from the iTunes Store "Purchased" tab.
● For locally stored MP3 files on a Mac, restore the missing files using a Time Machine backup or extract them from the hard drive using Wondershare Recoverit.
● Restoring missing iPhone music via an iCloud backup requires performing a full factory reset ("Erase All Content and Settings"), which will delete all current data on your device.
Ask AI for a summary
 ChatGPT
 Perplexity
 Gemini
 Claude
 Grok
Grok
How do I get back deleted music? All my songs got deleted by accident. I want to recover them from my Mac computer. Can anyone tell me what to do? Many thanks!
Many of us cannot imagine our daily lives without music. Whether traveling to work, school, or lounging at home, you may want to blast your favorite songs and create a fitting atmosphere.
What happens if you accidentally delete your valuable audio files? Is there a way to bring back what you've lost? There is.
Buckle up; we'll show you how to recover deleted songs on iPhone and Mac devices. Let's see why Apple Music deletes songs first.
Table of Content
Quick Guide: Which Recovery Method Do You Need?
| Music Type | Best Method |
| Apple Music (Streaming) | Re-Sync Library or Re-Add |
| iTunes Purchased Songs | Re-Download from Store |
| Local MP3 Files (Mac) | Recoverit Software or Time Machine |
| iPhone Local Files | iTunes/iCloud Backup |
Why Has Apple Music Deleted My Songs?

A few reasons may affect your Apple Music experience, causing the app to delete some files. In most scenarios, the issues aren't significant and won't affect the experience you get on your device. You can check out some of the most common reasons below.
- Subscription issues - If you've missed paying for a subscription on your Apple Music account, the app may delete your files and prevent you from accessing your favorite tunes.
- Storage capacity - The most common reason behind music deletion on Apple Music is insufficient storage. If your phone gets low on storage, it'll automatically delete some files to free up space for new data.
- Outdated operating system - If you haven't updated your OS version, you may experience bugs and random deletion issues. The OS may be unable to handle all the activities, leading to music loss.
Where Are Music Files Stored on a Mac?
If you use your Mac device as primary storage for music files, you may wonder where they all go once you download your favorite tunes. By default, the music should be in the Music folder on your device. You can find this folder by heading to Go > Home > Music.

However, if you've changed the settings and chosen a different destination for your music files, you should search for them in that folder.
Universal Solution: Recover Deleted/Lost Songs With Wondershare Recoverit
If you deleted local music files (like MP3s downloaded from other sources) stored on your Mac's hard drive or SD card, Wondershare Recoverit is the best solution. (Note: For Apple Music streaming library recovery, try the syncing methods below.)
- Recovers lost songs, photos, videos, documents, and other 1000+ file types safely, and completely.
- Manages over 500 data loss situations, such as sudden deletion, formatting, system crash, and disk corruption.
- The user-friendly interface allows you to recover data in just a few clicks.

If you're in a pickle and need a fast yet highly successful solution, head to the official Wondershare website, download the Wondershare Recoverit data recovery for Mac version, and follow the steps below.
- Open Wondershare Recoverit on your Mac and head to Hard Drives and Locations.
- Choose the storage containing your Music file.

- Once you pick the location, the program will automatically start scanning. You can pause this process if needed.

- You can filter the Audio file type to accelerate the process.
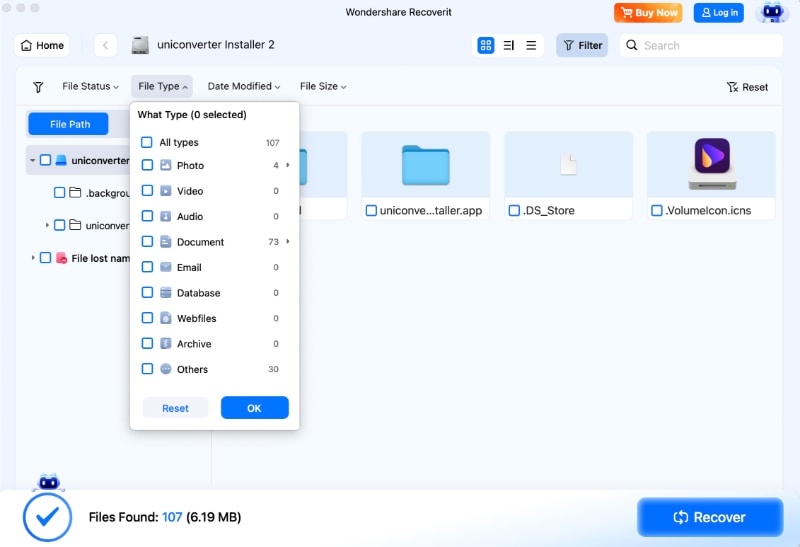
- Once the program finishes scanning, preview the music files and select what to save. Click Recover.

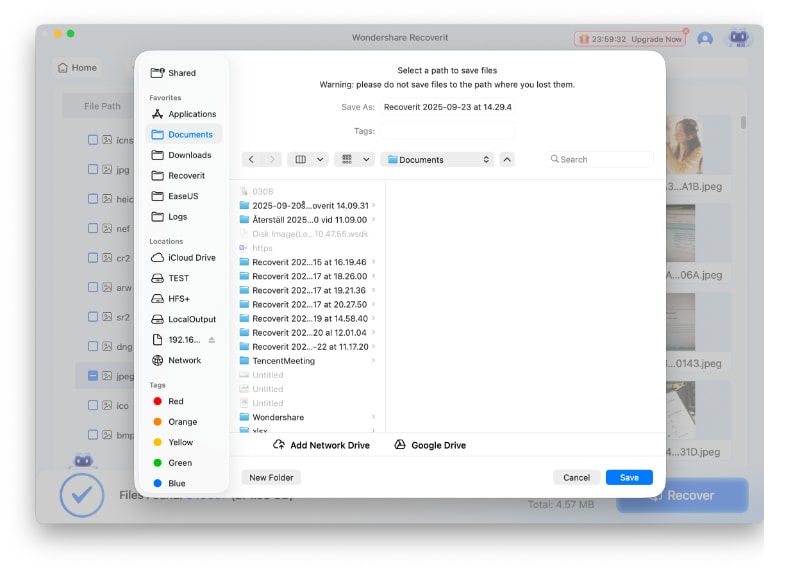
- Choose a destination.
How To Recover Deleted Songs on a Mac and iPhone
Below is a list of other methods to retrieve your favorite tunes and make them available on your iPhone or Mac. We'll present step-by-step guides you can follow for the smoothest journey.
Way 1. Sync Your Music Again
If you cannot see some of the tunes you have on your iPhone or Mac on other devices, it's a sign of syncing issues. You can enable this feature on your Music application to resolve the issue and make all your favorite songs appear across your devices. Check out how to do it below.
On iPhone
- Open the Settings app on your phone.

- Go to Music and toggle on the Sync Library switch.

On Mac
- Open the Music app on your Mac.

- Click Account in the menu bar.
- Go to File > Library > Organize Library.
- Tick the Consolidate files checkbox and click OK.

- Go to Music > Settings in the menu bar.

- Tick the Sync Library checkbox in the General tab and click OK.

Way 2. Download the Songs Again
In some cases, music file deletion is a random bug, and the best way to recover lost files is to download them again. Don't worry; you won't have to repurchase your favorite tunes. They should all be in your Music account and available for download. Here's how to access them.
On Mac
- Open the iTunes Store from your Music application.

- Click Purchased under Music Quick Image names.
- Find your tunes under Not in My Library. If you cannot find all the missing songs, click the All tab.

- Click the Download icon on individual songs or hit Download All.
On iPhone
- Open the Music app.

- Go to Account > Purchased.
- Find the song you want to get and click the Download icon.

Way 3. Re-Add Your Songs
You can still find your missing files on your Mac even when they're no longer in the Music app. You can then add them to the Music app to refresh your library. You can do it by following the steps below:
- Browse your Mac for the lost files.

- If you find them, open the Music app and head to File > Import.

- Select the files you wish to re-add.
After that, you should have your lost files back. You can sync your Music app so that the re-added files appear on your iPhone.
Way 4. Use Time Machine
Time Machine is a powerful tool that will keep your data safe if things go sideways. You can back up all sorts of data, including documents, pictures, and music. If you've enabled Time Machine, you're lucky since you'll be able to retrieve your all-time favorite tunes.
You only need to follow the steps below for an efficient recovery:
- Head to Finder > Applications on your Mac and open Time Machine.

- Find the missing songs in the app and click Restore.

Regaining access to the missing files will only take a few minutes. Once you have them back, you can use the sync tip we mentioned earlier to transfer your songs to your iPhone.
Way 5. Use an iTunes Backup
You can back up your iTunes library and access it whenever you want. However, you'll need both your smartphone and desktop devices to extract data from your iTunes backup.
Connect your iPhone to the desktop with a USB cable and follow the steps below to view and restore from an iTunes backup:
- Launch iTunes on your desktop and click the Phone icon to select your iPhone.
- Click Music.
- Tick off the Sync Music option.
- Choose between the Entire music library or Selected playlists, artists, albums, and genres.
- Click the Sync button.

After completing these steps, your previous playlists should appear on your Music application.
Way 6. Recover Songs From an iCloud Backup
iCloud is another excellent way to protect your data in case of numerous data loss scenarios. Whether you've accidentally deleted your files or experienced more complicated issues, iCloud can help you retrieve lost data.
You can recover your songs from an iCloud backup by following the steps below on your iPhone:
- Go to Settings > General.

- Head to Reset > Erase All Content and Settings.

- After your phone resets, follow the on-screen instructions.
- Once you encounter the App & Data section, select Restore from iCloud Backup.

- Sign into your iCloud account.

- Choose the backup with the missing music files.

Recovering music files from an iCloud backup can be risky since you must factory reset your mobile device. That will delete all the files on your iPhone, so we advise you to create a backup beforehand. For the best results, you can use third-party software solutions like Wondershare UBackit to put all your data in one place and avoid potential issues.
After recovering your files from an iCloud backup, you can sync your music with a Mac computer by following the steps in the first section. You'll then have all your deleted music files back in one place.
Conclusion
Music can make our days and lives better. It can motivate us, get us moving, or simply set the mood for the day. However, in some cases, it can cause trouble. For example, if you lose some of your favorite tunes, you may feel discouraged or stressed.
Fortunately, we've shown you how to recover deleted songs from iPhone and Mac devices. All these solutions should be successful, but we recommend using a universal tool like Wondershare Recoverit to save time and nerves. This software will retrieve all your files within minutes, no matter the data loss scenario, so you can continue vibing to your most precious tunes.
FAQ
-
How can I recover deleted music on my Mac?
If you've accidentally deleted music on your Mac, check your Trash folder. If it's not there, you can use macOS's Time Machine backup to restore the music. If you have no backup, third-party Mac data recovery software can help recover the deleted files. -
Can I recover deleted music from my iPhone?
To recover deleted music on your iPhone, you can restore from an iCloud or iTunes backup. If no backup is available, consider using third-party iPhone data recovery tools to scan for and recover lost music files. -
What should I do if I can't delete or recover music files on my Mac?
If you're unable to delete or recover music files on your Mac, try restarting your Mac and using the "Force Quit" option to close any apps that might be locking the files. For stubborn files, use Terminal or third-party apps like "CleanMyMac" to force deletion. -
Is there any way to recover music without a backup on iPhone?
If you don't have a backup, you can try third-party iPhone data recovery software to recover deleted music. These tools scan your iPhone's storage for traces of deleted files and can help restore your music even without a backup.


