

 TL;DR:
To resolve constant Mac crashes and "out of application memory" freezes following the macOS Tahoe update, you must address beta bugs, software incompatibilities, or resource shortages through system resets or an OS downgrade.
● Update your system from the macos 26 tahoe beta to the public release, or clear NVRAM (Option + Command + P + R) and SMC to wipe corrupted system preferences causing stability issues on M1 Macs.
● If unoptimized third-party apps continue to deplete your RAM or conflict with core processes, run Apple Diagnostics (Command + D) or use a bootable USB to cleanly reinstall macOS Tahoe or downgrade to macOS Sequoia.
● Because downgrading the operating system requires erasing the internal drive via Disk Utility, you must back up your files first or use a tool like Wondershare Recoverit to retrieve data lost during the crashes.
Ask AI for a summary
 ChatGPT
 Perplexity
 Gemini
 Claude
 Grok
Grok
Consider you have a Mac and usually use it every day to do business, only to realize that it has crashed several times after the tahoe update. This has the potential to break your productivity and cause general frustration.
In case this situation is what you have heard, you are not the only one. It has been noted that the installation of the Tahoe update has resulted in the crashing of the system. In this ultimate guide, you will get to know the most prevalent causes and how to provide an effective solution to regain the reliability of your Mac.
Try Recoverit to Perform Mac Tahoe Data Recovery
 Security Verified. 3,591,664 people have downloaded it.
In this article

Part 1. Common Reasons Mac Keeps Crashing After Tahoe Update
Several factors may cause your mac keeps crashing after upgrading to macOS Tahoe. Here are some of the potential reasons that can cause the shutdown of the Mac system:
- Software Incompatibilities: Software incompatibility is one of the most common reasons why macOS Tahoe crashes following the update. Numerous third-party applications are not optimized for the new system, and they conflict with the core processes of macOS.
- Obsolete Device Drivers: macOS Tahoe must have recent drivers to communicate properly with Mac hardware devices, such as graphics cards. In case the drivers are old or incompatible, the stability of the system can be compromised.
- Corrupted System Files: System files can be corrupted either in the course of an upgrade or as a result of disk errors that are present before the upgrade. Corrupted files result in system unpredictability and system extension failure.
- Insufficient Free Disk Space and Memory: Tahoe’s new features and background processes require adequate free RAM and disk storage to operate efficiently. Running the OS with low available resources can cause performance degradation and system crashes.
More related: What to Do When macOS Installation Couldn't Be Completed.

Part 2. Mac Keeps Crashing After Tahoe Update | Quick Fixes
Having learned the main cause of the system crash after the update, let us now have a look at the effective solutions to fix this issue.
1. Update Your macOS
If you have installed the beta version of macos 26 tahoe on your device, update the system to the public release to fix system crashes. Apple frequently releases incremental updates to fix bugs in major releases. Upgrading from the beta version to the public release may potentially fix the system-crashing issue. To learn how to update the system on your Mac, follow the steps mentioned next:
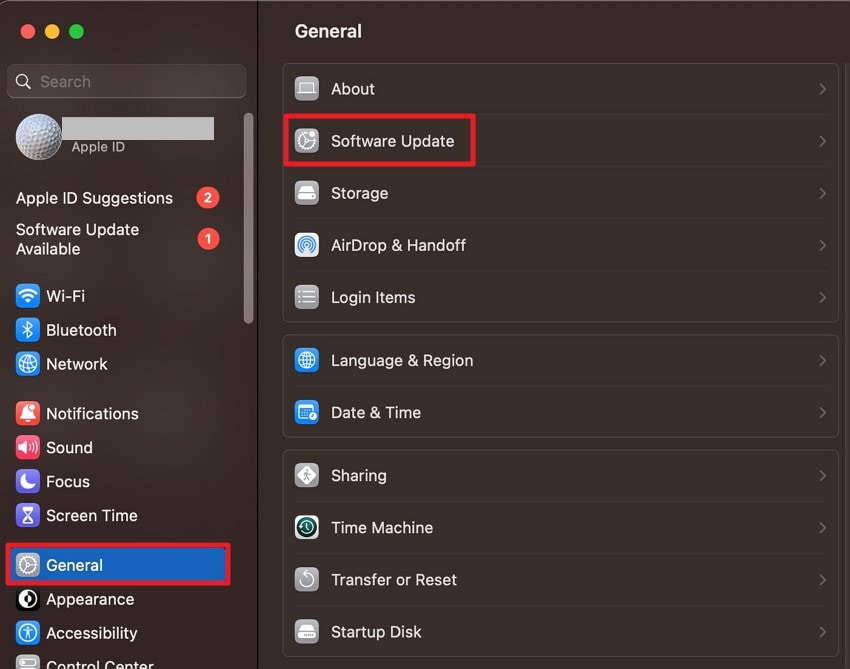
- Head to the "System Settings" on your device, enable the "General" section, and press the "Software Update" option.
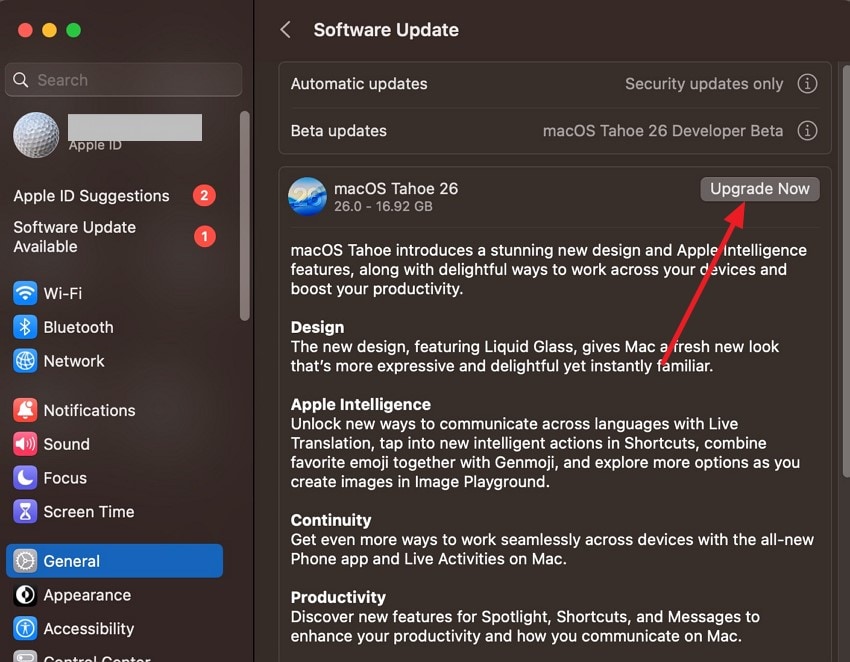
- Here, locate the latest update available by applying and clicking on the "Upgrade Now" button to begin the software update process.
2. Run Diagnostics
Another way to resolve the mac keeps crashing after tahoe update issue is by running diagnostics on your Mac. By running these diagnostics, users can differentiate whether crashes stem from hardware faults or software conflicts. Importantly, it runs independently of the operating system and requires minimal user interaction. Follow the instructions provided next to learn how to learn diagnostics on a Mac:
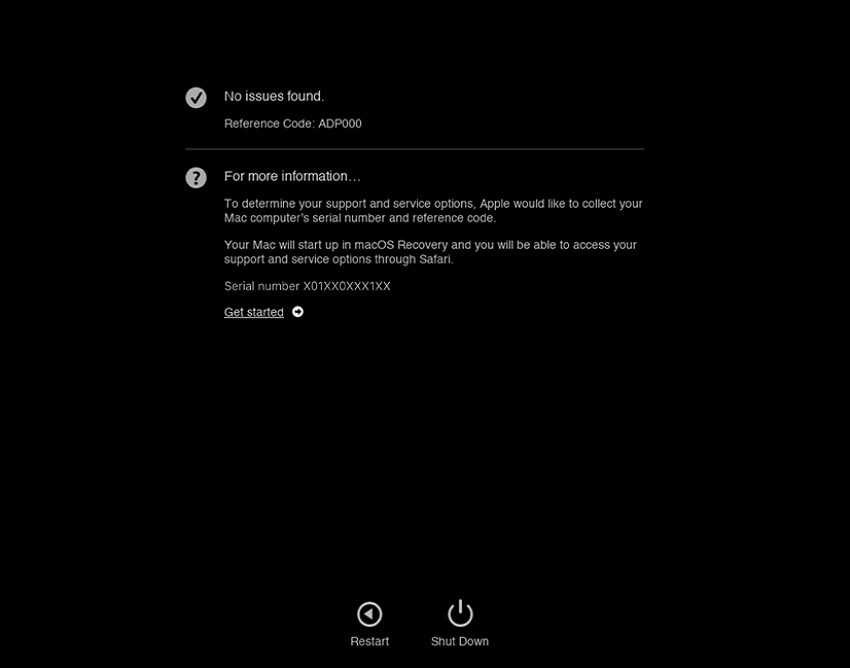
Instructions. Shut down your Mac completely after removing all the peripherals. Press and hold the power button to start the Mac until the startup options appear, then press "Command + D" to launch Diagnostics. Follow the on-screen prompts to run the diagnostics test. Once complete, review any error codes displayed and take note for further troubleshooting or Apple Support.
3. Reset NVRAM and SMC
Resetting NVRAM and SMC are effective troubleshooting methods for resolving Mac stability issues after an update like macos 26 tahoe. Doing so clears potentially corrupted preferences that can cause unexpected behavior. Read the steps mentioned next to learn how to reset the NVRAM and SMC effectively:
Resetting NVRAM
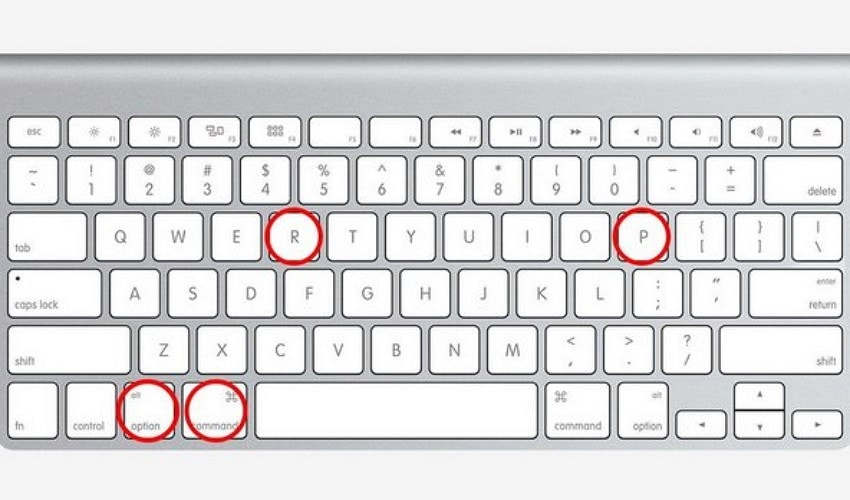
Instructions. Shut down your device and power it on immediately while holding down the "Option", "Command", "P", and "R" keys at once. Hold the keys until the Mac restarts a second time, or until the Apple logo appears and disappears twice, then release.
Resetting SMC
Instructions. Start by shutting down your Mac, then press and hold the "Shift", "Control", and "Option (Alt)" keys, and the power button for about 10 seconds. After releasing all the keys, press the power button again to turn on your Mac.

4. Reinstall or Downgrade the Tahoe Update
Another crucial troubleshooting technique to use when a crash continues is to reinstall or downgrade the macOS tahoe update. Reinstallation is a process of updating the system software by reinstalling macOS Tahoe. Alternatively, this problem can also be solved by downgrading to an older version of macOS, say, macOS Sequoia. The following are the steps that you can follow to carry out the reinstallation and downgrading of the operating system:
Reinstall Tahoe Update
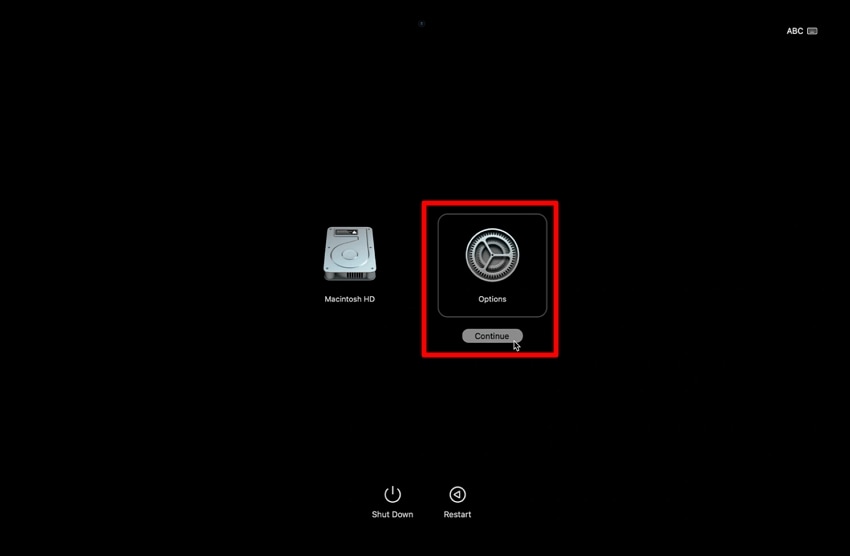
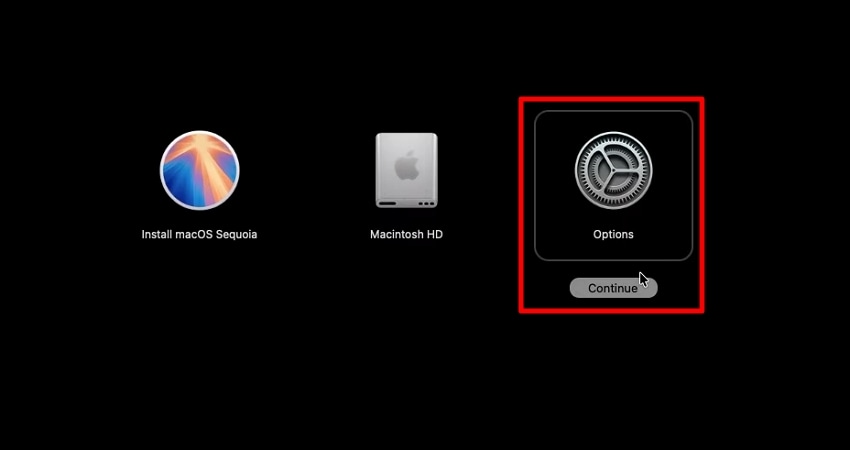
- Turn off your MacBook, then press and hold the "Power" button until you see the "Startup Options" screen. Here, pick the "Options" choice and hit the "Continue" button under it.
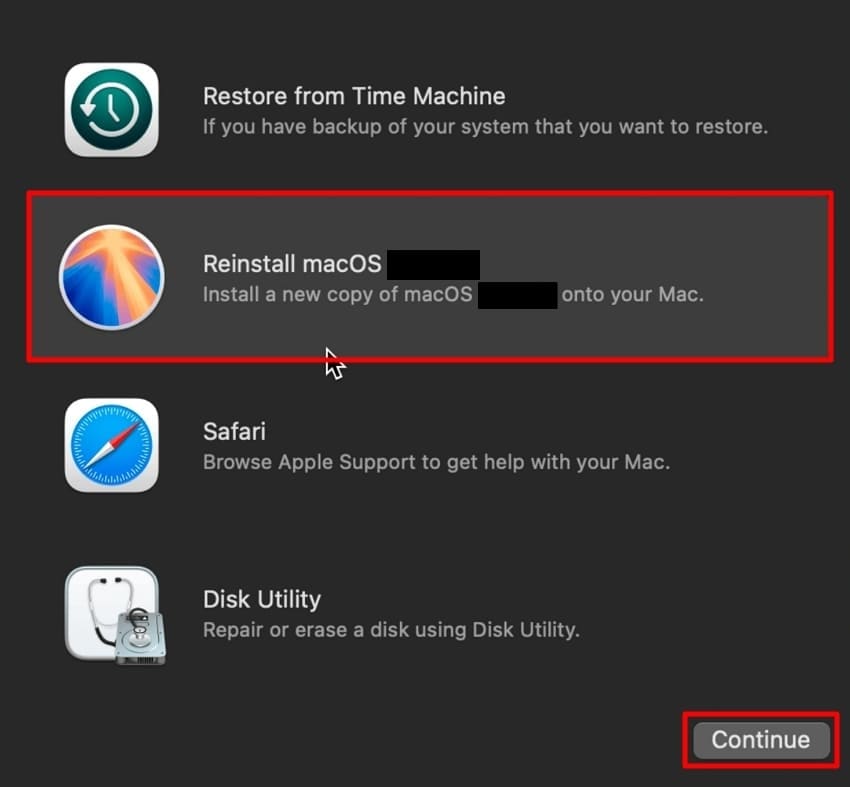
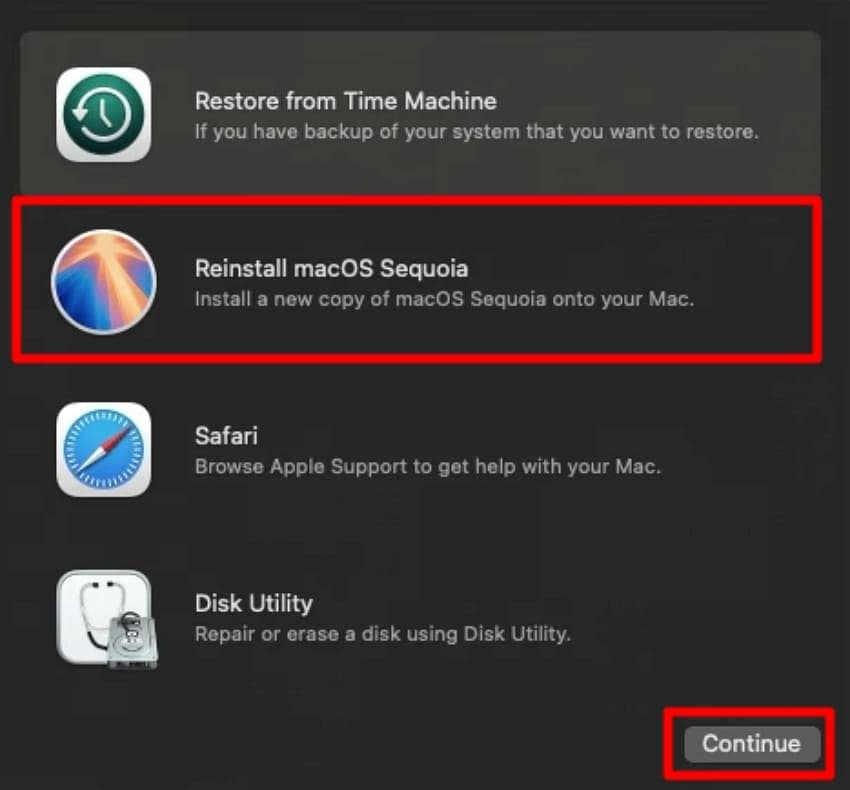
- Pick the "Reinstall macOS Tahoe" option and hit the "Continue" button.
Downgrade Tahoe Update to Sequoia
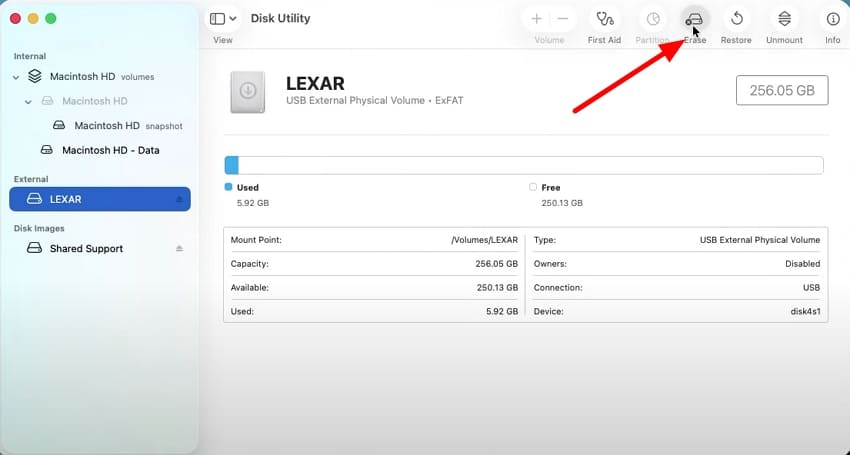
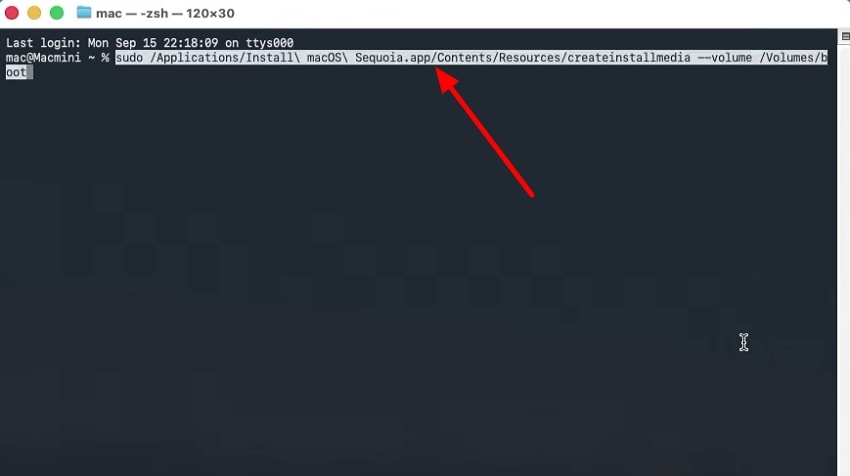
- Start the process by installing a new installer like Sequoia on your macOS device. Navigate to the Disk Utility and "Erase" the external USB Drive.
- Jump to the "Terminal" app on your Mac and type in the "sudo /Applications/Install\ macOS\ Sequoia.app/Contents/Resources/createinstallmedia --volume /Volumes/boot" command and press the "Enter" key. This will create a bootable installer for your Mac, after which, you should shut down your MacBook.
- Press and hold the power button and choose the "Options" choice from the Startup options.
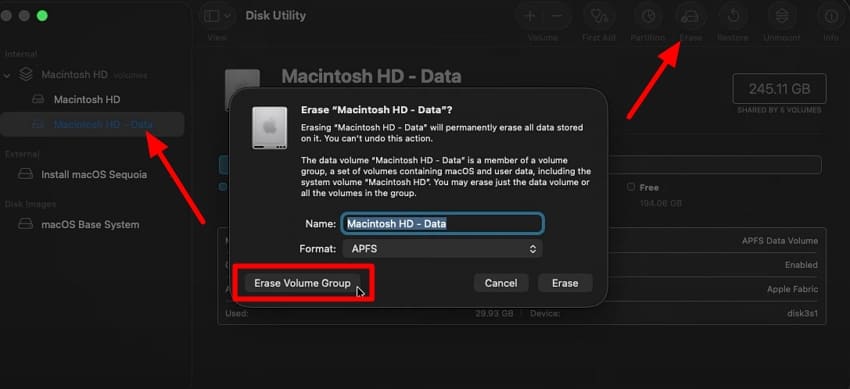
- Here, choose the "Disk Utility" option and hit the "Continue" button to move to the next step.

- Choose the Mac internal drive and click on the "Erase" option from the top bar. From the pop-up dialog box, click on the "Erase Volume Group" option and shut down the MacBook once this is done.
- Finally, press and hold the power button to pick the "Options" choice from the "Startup" options button to choose the "Reinstall macOS Sequoia" option and hit the "Continue" option.
5. Free Up Memory and Disk Space
A Mac that keeps crashing following the Tahoe update can be helped by clearing memory and disk space to make the operations steady. This enables us to remove massive files, clear up caches, and maintain heavy storage applications. Nevertheless, users need to make a backup before undertaking this process, as it will erase files. The following are the instructions for clearing space after the mac keeps crashing:
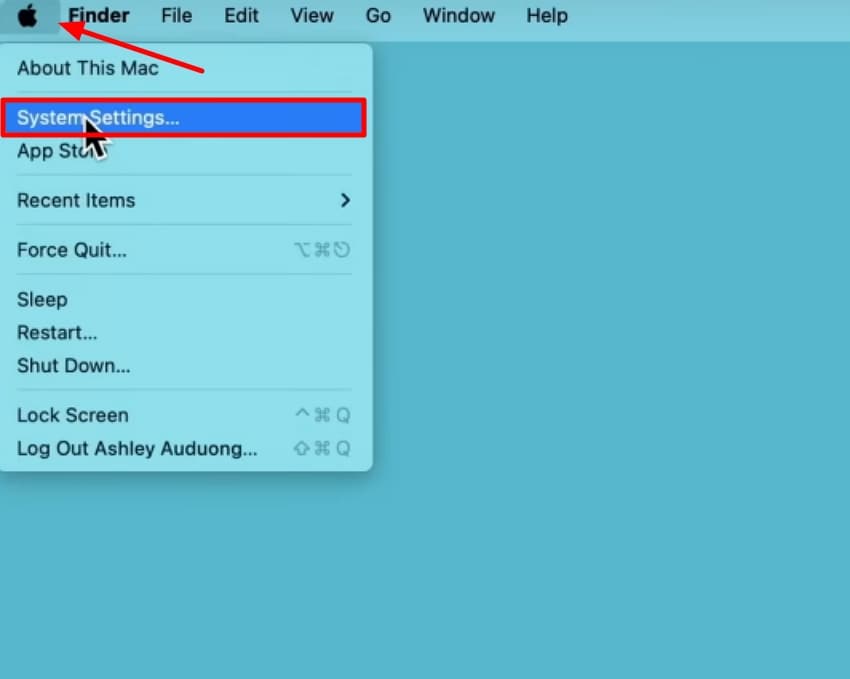
- Access the "System Settings" on your MacBook by locating the option from the drop-down menu under the "Apple" icon at the top left corner.
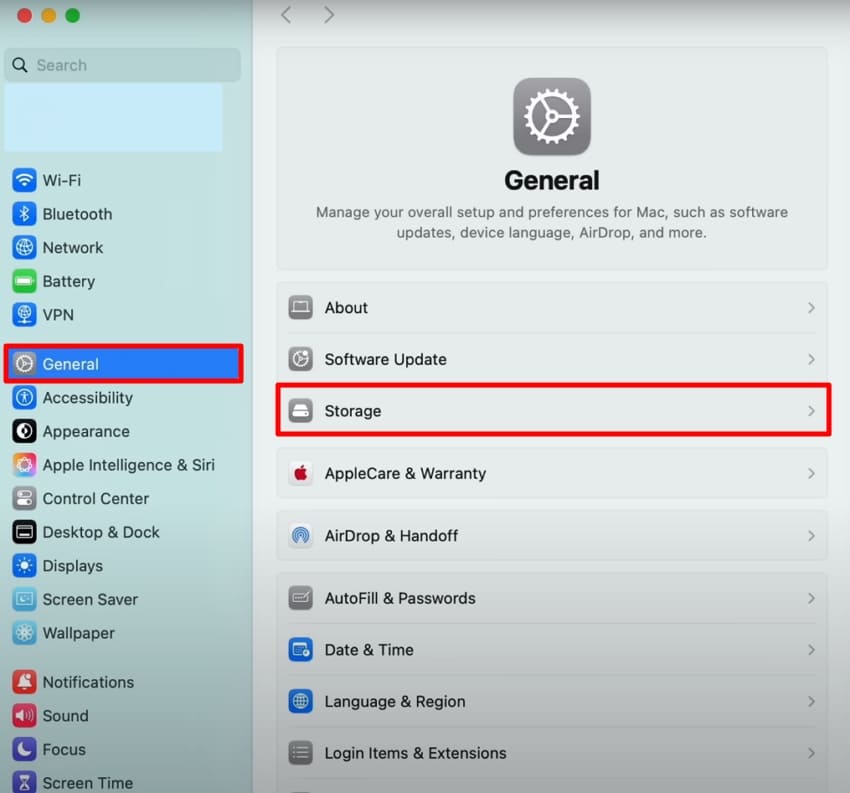
- Here, click on the "General" option in the left sidebar and navigate to the "Storage" option.
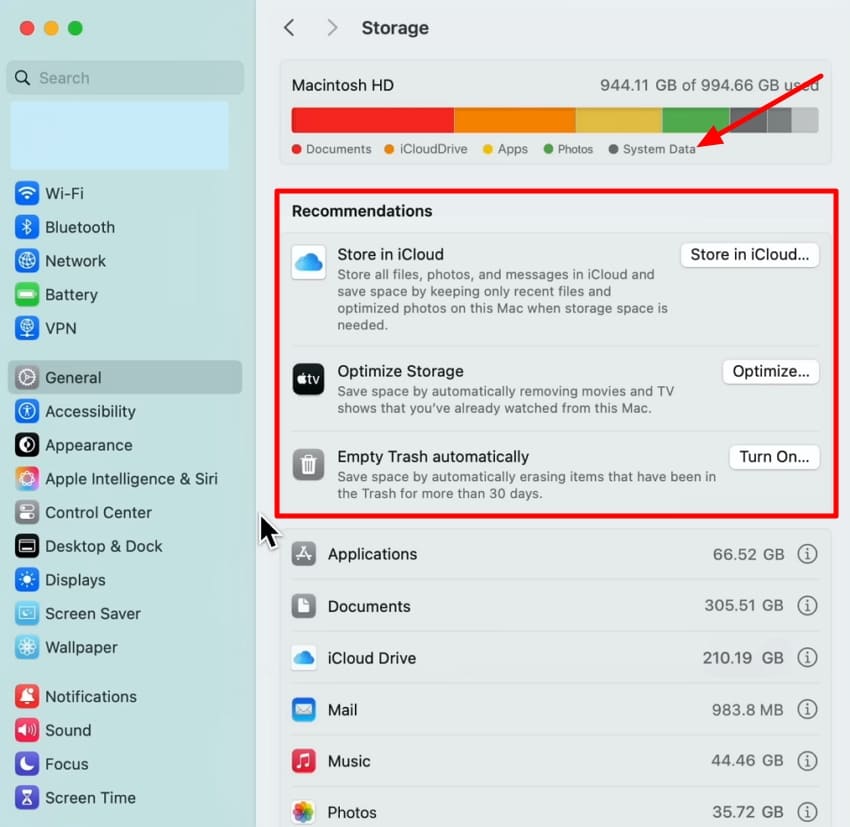
- Under the "Recommendations" section, optimize the storage and delete the unused large files to free up memory and disk space on your Mac.
6. Force Quit Problematic Apps and Uninstall
Following the tahoe update, there may be problematic applications that lead to the Mac crashing. The simplest way to work this out is to force-quit the problematic applications or uninstall the ones not in use. This will assist you in reducing the load of the system, removing the conflicts with macOS, and making it functional. Follow the guide below and figure out how to eliminate problematic apps:
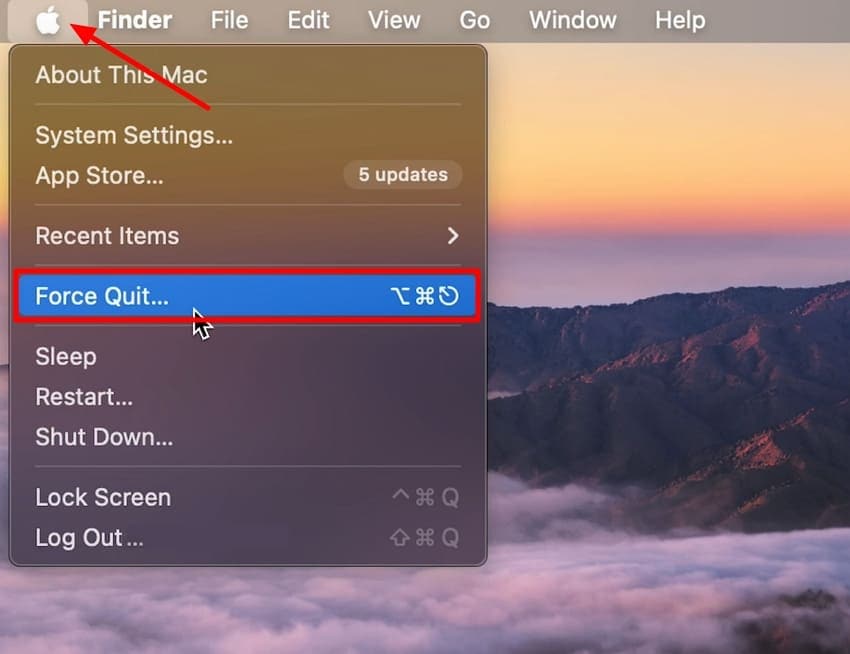
- Click on the "Apple" icon in the left corner of your screen and choose the "Force Quit" option from the list.
- Choose an app from the pop-up dialog box of "Force Quit Applications" and hit the "Force Quit" button.
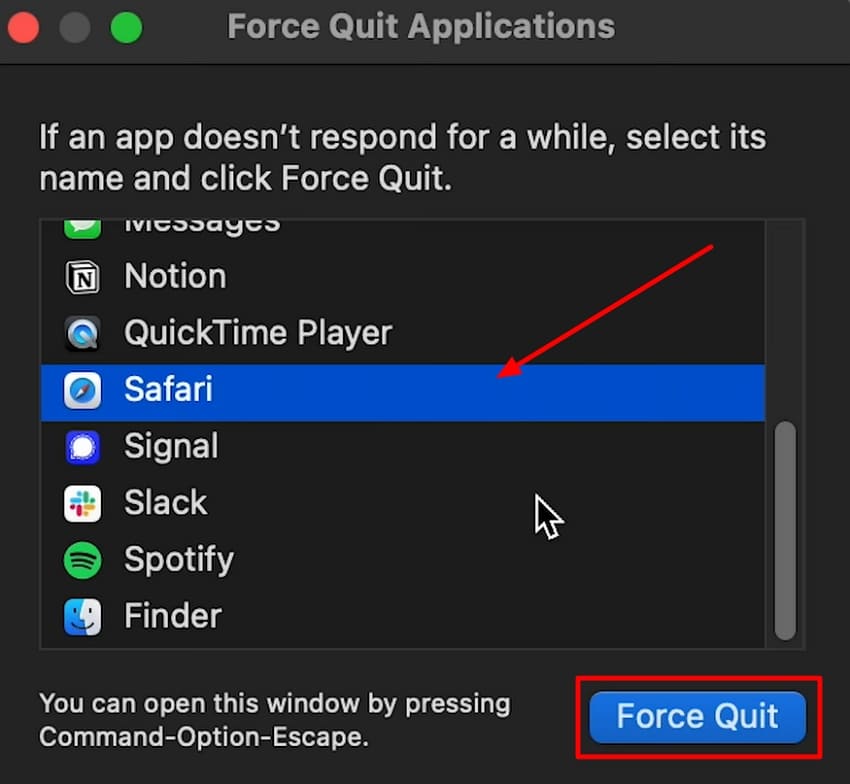
- Finally, confirm that you want to force the selected app to quit by clicking the "Force Quit" button.

7. Run In Safe Mode
Safe Mode is an effective troubleshooting tool that has the ability to load only the necessary system processes and turn off third-party extensions and caches. This will help you identify the software conflicts, balance macOS, and needle out the corrupt files. Once you boot into Safe Mode, you will be able to isolate the issue and avoid constant Mac crashes. Resolve the macos 26 update crashing through the steps below:
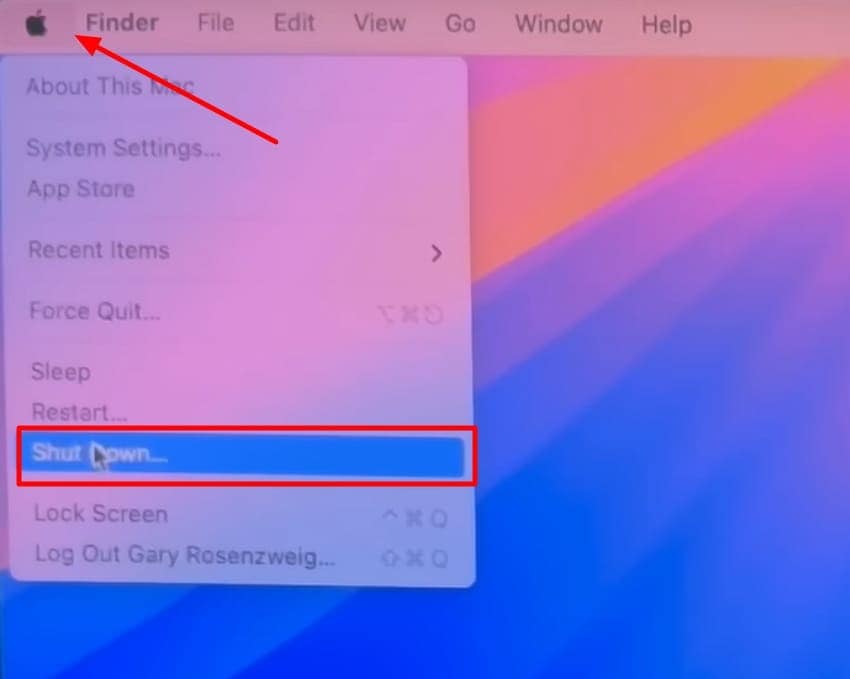
- On your MacBook, click on the "Apple" icon and click on the "Shut Down" button, and wait for the device to completely shut down.
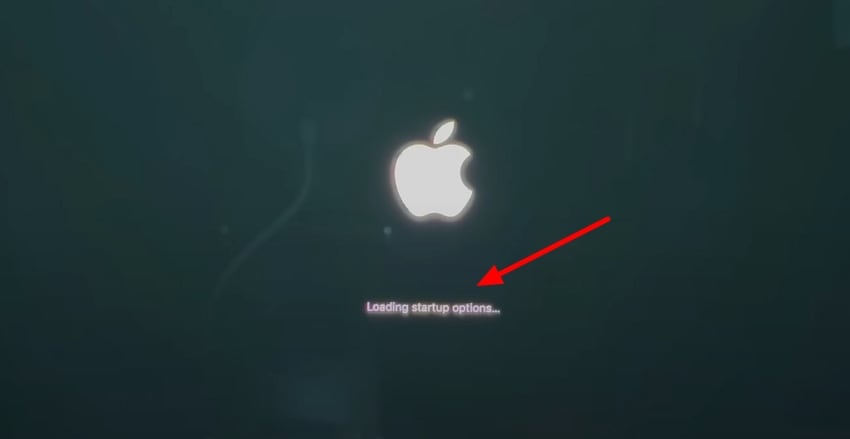
- Next, press and hold the "Power" button on your macOS until you see the message "Loading Startup Options" on the screen.
- Then, choose the "Macintosh HD" option and press and hold the "Shift" key on your keyboard to get the "Continue in Safe Mode" button to click.

8. Check for Malware & Viruses
It is also possible that the mac keeps crashing after tahoe update due to some malware or viruses wreaking havoc. The cure for this is to run a reputable antivirus or malware scanner. The critical aspect is to identify and eliminate malicious software that disrupts the stability of the system. Removing bad software can help you achieve good performance, avoid slowdowns, and prevent overheating of your Mac.
9. Use a Bootable macOS Installer (Advanced)
A more advanced fix to crashes after the tahoe update is to install a bootable macOS installer from the Mac App Store, like the macOS Sequoia. This process will reformat macOS using a clean source and will avoid damaged files or unsuccessful updates. It offers a new, stable operating system that does not depend on existing installations.

Pro Tip. Restore Lost Data and Repair Files with Recoverit - Your Crash-Proof Safety Net
If you have lost your important data while upgrading your operating system to Tahoe, you can use data recovery tools such as Recoverit. This advanced tool provides a 99.5% recovery rate of lost and damaged data on different devices. The tool runs a deep scan within your device’s storage to detect and retrieve all the recoverable files.
Moreover, you can search for a specific scanned file using the intuitive interface of the tool and recover it instantly. It allows applying various filters to narrow down your search and find the file instantly. This comprehensive tool also helps users to preview the recovered file within its interface before saving it to their device.
Coherent Features of Recoverit
- Batch Recovery: The tool enables you to retrieve more than one file at a time to save you time and avoid the hassle of going and finding each data file individually.
- Extensive Format Support: You can recover files that have over 1000 formats, whether these files are images, videos, or documents.
- Numerous Device Storage Support: Besides Mac and Windows, Recoverit offers data recovery for more than 10,000+ storage devices.
Guide to Recover Lost Files Using Recoverit on Mac
After learning about this efficient tool in detail, let us check out the guide on how to recover lost data files using this comprehensive tool:
Step 1. Locate the Storage Device Within Recoverit
Begin by identifying the storage device you want to recover from on Recoverit's main screen. The software will immediately start scanning the chosen device.

Step 2. Choose Files to Recover
After the scan completes, browse through the recovered files and select the ones you wish to restore by clicking on them. Then, press the "Recover" button to begin retrieving these files.

Step 3. Preview and Save Recovered Items
Once files are recovered, preview them directly within Recoverit. Finally, click "Recover" once more to save the restored files safely to your desired location on your Mac.

Conclusion
In conclusion, this article looks into the common reasons that the Mac keeps crashing after the tahoe update. We discussed the top quick fixes to apply and resolve the crashing issues, allowing you to resume your workflow. Along with each fix, there is a detailed guide that you can follow for your own ease.
Moreover, we have provided you with a bonus tip on what to do in case your Mac data is lost due to a crash. We have recommended Recoverit, one of the most widely used recovery tools, as a safe and reliable option.
FAQ
-
1. How to create a macOS Tahoe bootable USB?
To make a bootable macOS Tahoe USB, obtain the installer from the App Store and format a USB disk with Disk Utility as Mac Extended. Enter the command "createinstallmedia" in the command prompt using the path of the Tahoe installer. When this step is finished, you can restart your Mac from USB to install Tahoe. -
2. Why won't my Mac turn on after a software update?
Corrupted system, incompatible apps, or a shortage of storage can lead to the inability of your Mac to boot after updating. In others, the problem may be a power supply or hardware issue that leads to startup failure. Safe Mode or Recovery Mode also allows one to isolate and resolve the issue. -
3. How do I update to Tahoe macOS?
Select the Apple menu and choose the "System Settings" option to locate the "Software Update" option from the "General" section. Assuming that Tahoe is available, press the "Upgrade Now" button and continue with the installation following the prompts. Check the compatibility of your Mac, ensure that it has a sufficient amount of free space, and that it has backups before updating.


