
 TL;DR:
Pairing the Kodi media player with a Synology NAS creates a centralized, hardware-accelerated home media server that overcomes the organizational limitations of the native Synology DSM operating system.
● To establish the connection, you must first enable the Network File System in the Synology Control Panel and assign an NFS rule to your shared media folder with the Hostname set to *, Privilege set to Read/Write, Squash mapped to all users to admin, and Security set to sys.
● Once NAS permissions are active, link the library by navigating to Add Videos within the Kodi interface, selecting the Network File System to locate the NAS IP address, and defining the specific media content type.
● This configuration enables on-the-go transcoding and remote access across multiple devices, though utilizing open-source Kodi add-ons can expose the server to security risks and software vulnerabilities without native data recovery options.
Ask AI for a summary
 ChatGPT
 Perplexity
 Gemini
 Claude
 Grok
Grok
Accidentally deleted important files on Synology NAS?
No worries. Wondershare Recoverit can get back your lost files within 3 steps. The ultimate and professional NAS data recovery software is totally reliable and 100% safe.
If you’re looking for a way to connect Kodi to Synology NAS, you’re in the right place. On the one hand, Synology is one of the best network-attached storage (NAS) devices you can get; on the other, Kodi is a famous media player that allows playing and streaming media. Together, they’re a perfect combo but can be tricky to set up.
Below is a guide to installing and configuring Kodi for Synology. We’ll also discuss the benefits of media management software and Kodi for Synology and walk you through downloading, installing, and configuring Kodi to work with your Synology NAS.
Why Use Media Management Software on Synology NAS
Synology NAS devices make for some of the best home media servers, which people often use them for. However, Synology’s DSM operating system isn’t perfect for media servers. It lacks the organizational capabilities that media management software can offer you.
It’s precisely why many people use media management software, such as Kodi, on Synology NAS devices. These apps create an efficient organization system, allow easy access, sharing, and collaboration, help protect your media files with backup and protection capabilities, and streamline your workflow by automating tasks. They bring many other benefits, too.

Benefits of Using Kodi on Synology NAS
Kodi is a mighty open-source media player, and many people use it for its excellent performance and capabilities. It allows you to play or stream media, such as movies, TV shows, music, and photos. However, using it on Synology NAS brings even more significant benefits than its standard abilities. These include the following:
- Central media storage – Centralized files are a significant advantage. It makes accessing and sharing media files across multiple different devices relatively easy.
- It’s relatively easy to set up – You can find Kodi in Synology’s Package Center, which makes it easy to install. Configuring Kodi takes a few additional steps.
- Hardware acceleration – Synology NAS devices are robust. They include hardware acceleration for video playback with powerful CPUs. You can stream without a problem.
- Transcoding – Even if the device you’re using doesn’t support the media format, with Synology’s NAS transcoding on the go, you can enjoy media files on all devices.
- Remote access – If you have a Synology NAS as your home media server, you can remotely access all your files and enjoy your media library from anywhere.
Using Kodi on Synology is an excellent option for seamless media playback. Moreover, it can organize your media files and make them easily manageable in a centralized location.
Downsides of Using Kodi on Synology NAS
Although often an excellent combination for media playback, Kodi on Synology NAS also has disadvantages. There are some potential downsides to this setup that you should consider. For example:
- The complexity of the setup – Although you can install Kodi on Synology NAS incredibly easily, setting it up and configuring Kodi is a bit more complex. Nonetheless, you’ll find a guide to doing it below.
- Security risks – As Kodi is a free and open-source media player, certain security risks are worth considering. Namely, the different add-ons and plugins that people often use with Kodi might pose security risks.
- Lack of data recovery capabilities – Kodi lacks these features, and Synology devices are not immune to data loss.
You’re not helpless regarding this setup’s lack of data recovery capabilities. If data loss happens, there are ways to recover your files from Synology NAS. After all, all hardware can fail, and software is often vulnerable. Sometimes it’s even our fault. Fortunately, these steps are easy to follow and help you quickly recover your lost files.
Install Kodi and Synology NAS Before Doing Anything
Setting up Kodi for Synology devices is relatively simple. Still, it requires tweaking a few settings on your Synology device and the Kodi app. Of course, you must set up your NAS device to be compatible with Kodi. Even more important, you must download and install the Kodi application.
1. How To Install Kodi
Kodi is available for many devices, including Windows, Mac, Linux, Android, and iOS. Whatever device you’re using, to install Kodi, it’s best to visit the official Kodi website. On the website, find the latest version of Kodi, choose the appropriate file for your operating system and device, and download it.
2. How To Install Synology NAS
Make sure that your Synology NAS device is up and running. Ensure it’s connected to your home network and your files are on the NAS device. For example, to do that on a Windows machine, you can follow these steps:
- Open a web browser on your PC.
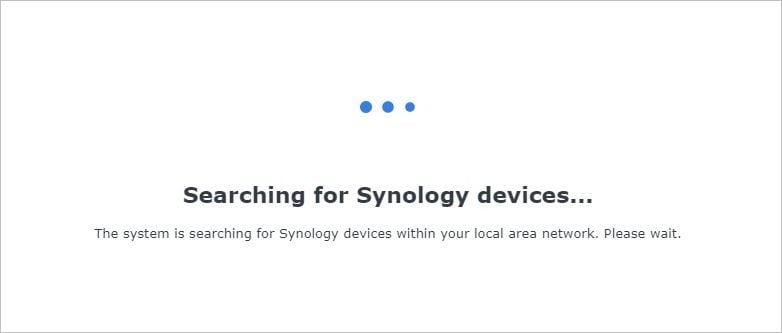
- Enter “find.synology.com” in your web browser’s address bar.
- Web Assistant will launch, searching for Synology devices on your home network, eventually displaying your NAS.
- The status will say “Not installed.” You should click the Connect button.
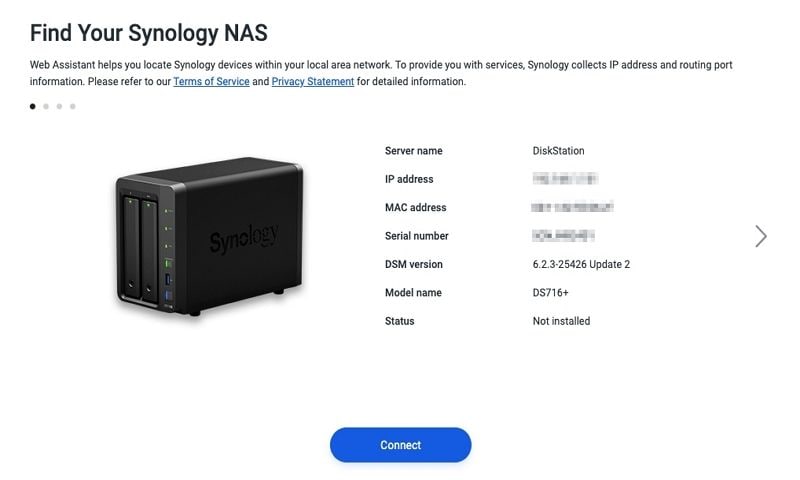
- After that, follow the instructions to set up the DSM.
How To Connect Kodi to Synology NAS
Using Kodi on your Synology NAS devices isn’t as simple as installing and using the app. Instead, there’s a particular process you must follow. However, it shouldn’t take long, and if you follow the next few steps below, you will set up and connect Kodi to your Synology NAS device in no time.
Step 1Go To Your Synology NAS and Activate NFS
The first thing you need to do to connect Kodi to your Synology NAS device is to enable NFS or Network File System. Doing that is pretty simple, and all you need to do is:
- Open the Control Panel on your NAS device.
- Click the File Sharing button on the left side.
- Click the File Services button under it.
- Scroll down and find NFS Service.
- Check the Enable NFS checkbox.

- Click the blue Apply button.
That’s it. That’s all it takes to enable the Network File System (NFS) on Synology NAS devices. To finish connecting Kodi, you need to follow the additional two steps below.
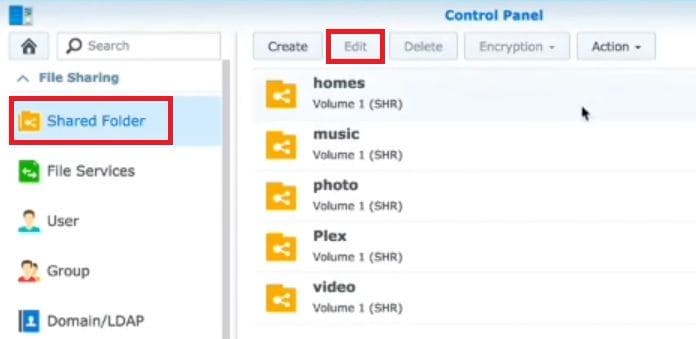
Step 2Add a New NFS Rule
After enabling the Network File System (NFS), you must create an NFS rule for Kodi to connect correctly to your Synology NAS device. It’s a relatively simple procedure, but a detailed step-by-step guide is below if you’re unfamiliar with NAS settings. Here’s what you need to do:
- Open the Control Panel.
- Click the File Sharing tab on the left.
- Select the Shared Folder tab.
- Choose the folder with your media files.
- Hit the Edit button on the top.
- Choose the Permissions tab first.
- Find the admin account and check the Read/Write checkbox.

- Now choose the NFS Permissions tab.
- Click the Create button.
- Enter “*” under Hostname or IP.
- Set Privilege to “Read/Write.”
- Set Squash to “Map all users to admin.”
- Set Security to “sys.”
- Check all three checkboxes.
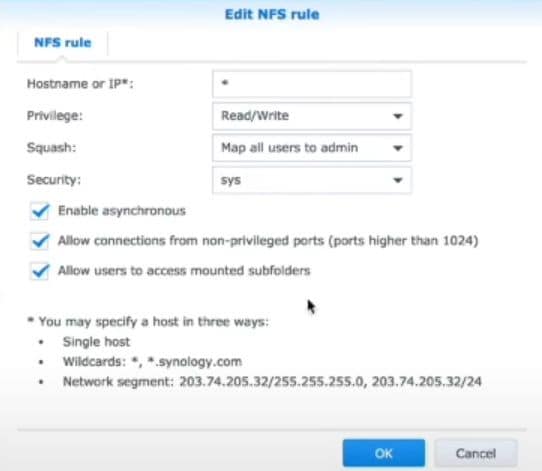
- Click the OK button, then click it again for the other window.
You’ve created the NFS rule. That’s everything you need to do regarding Synology’s settings. It might seem overwhelming, but it’s very straightforward, and you should have done it if you’ve followed the steps above. All that remains is connecting your NFS as a video source.
Step 3Connect Your NFS as a Video Source to Kodi
After meddling with Synology’s settings, you can finish setting up Kodi by adding a video source. Here’s everything you need to do:
- Open the Kodi application.
- Select the Movies, TV Shows, or Videos buttons on the left.
- Click the Add Videos button.
- Hit the Browse button.
- Select the Network File System (NFS).
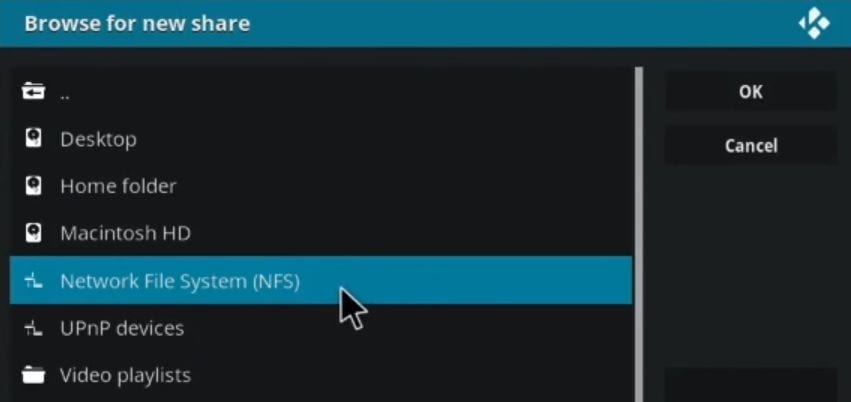
- Select the folder which will appear as an IP address. That’s your NAS device.
- Now select the shared folder.
- Add a folder you want and click the OK button.
- You can now name your media source and ensure you’ve chosen the correct folder.

- Under the “This directory contains” option, select Movies, Music videos, or TV Shows, to let Kodi know what type of files are in that folder.
- Leave the rest of the settings as is, press the OK button, and click Yes when Kodi asks you to change content.

- Give it a few minutes, as it can take a while to finish depending on the size of your media library.
Congratulations! You have successfully installed and set up Kodi on your Synology NAS device. Now you can enjoy movies, TV shows, and other types of videos and media. All of that is within a single, easily manageable, well-organized application.
Conclusion
Kodi is a powerful media management software for your Synology NAS devices. It helps organize media files such as photos, videos, and music. Managing digital assets like these is much easier with Kodi than with Synology’s DSM operating system.
The process of connecting Kodi is relatively straightforward. However, simply installing the app isn’t enough. You must go over several steps to connect Kodi to your Synology NAS device, but if you’ve followed our guide, you should have no problem running Kodi by now.
For Windows XP/Vista/7/8/10/11
For macOS X 10.10 or later


