
 TL;DR:
Recovering deleted iPhone 18 Pro photos requires targeting the exact storage location where the original was lost: use Apple's 30-day Recently Deleted album for device deletions, download Unmodified Originals from iCloud, or scan affected external drives.
● Device backups (both iCloud and computer) explicitly exclude media already synchronized via iCloud Photos, meaning an older backup only helps if it predates the loss and the photos were not cloud-synced.
● Wondershare Recoverit scans readable local storage like Windows PCs, Macs, or external recording SSDs for deleted files, but it cannot directly scan the iPhone 18 Pro's internal memory.
● Verify recovered files against their expected formats, as restoring a standard JPEG does not replace the full data of a 48MP ProRAW DNG, the motion components of a Live Photo, or Apple's signed Reference Image assets.
Ask AI for a summary
 ChatGPT
 Perplexity
 Gemini
 Claude
 Grok
Grok
iPhone 18 Pro photo recovery starts with finding where the missing original was stored. Check Apple's Recently Deleted album and any surviving iCloud or backup copies first. If photos were transferred to a Mac, Windows PC, or external drive and then deleted, recovery should target that storage - not the iPhone's internal memory.
Apple announced iPhone 18 Pro and iPhone 18 Pro Max on September 9, 2026, with availability beginning September 18. The new models introduce a 48MP Fusion Main camera with variable aperture; Apple's technical specifications list HEIF/JPEG/DNG capture and professional video options. For photographers and creators, the challenge is not simply getting a recognizable picture back: it is preserving the original file that remains useful for editing, printing, or delivery.
The recovery paths below apply to iPhone 18 Pro and iPhone 18 Pro Max media according to where the files were stored. They follow Apple's documented workflows; interface labels can differ by software version.
In This Article
Part 1. Find the Original Before Choosing a Recovery Method
Think of a photo as an asset that may have several copies: the capture original, a cloud-synced version, a computer import, and an edited export. The same subject appearing in two places does not prove that both files have the same resolution, format, or editing flexibility.
Use this decision table to identify the recovery source. Apple's photo recovery instructions, backup comparison, and Recoverit's supported photo-recovery scenarios describe different recovery routes, not interchangeable tools.
| What Happened? | Where to Look First | What the Result Depends On |
| A photo was deleted in the Photos app | Recently Deleted on the iPhone or in iCloud Photos | The item is still within the retention window and was not permanently deleted |
| Photos are missing after moving to the new iPhone | The correct Apple Account, library view, and sync status | Whether the originals still exist and the library has finished syncing |
| An imported folder disappeared from a computer | Trash or Recycle Bin, a computer backup, then the original computer drive | Whether the files remain in a backup or recoverable local storage |
| Clips were saved directly to an external drive | The actual recording drive and its backups | Whether that drive is readable and the recording data remains intact |
| An iPhone backup folder was deleted | The computer or backup disk that held the backup set | Whether a complete, usable backup can be recovered |
| The Mac Photos library exists but will not open | A library backup and Apple's Photos Repair Library tool | Whether the problem is the library database rather than missing originals |
Do not reset the iPhone to solve a deletion that happened on a computer. For example, if an exported shoot folder was erased from an external SSD, resetting the phone cannot restore the SSD's deleted files. Recovering the correct copy is the first decision; choosing software comes afterward.
Part 2. Recover Photos Still Available Through Apple
Before scanning a computer disk or restoring a device backup, check whether Apple already provides access to the missing items. These checks can avoid an unnecessary full-device restore.
2.1 Restore Recently Deleted Photos
Apple keeps deleted photos and videos in Recently Deleted for 30 days unless they are permanently removed sooner. Follow Apple's Recently Deleted recovery procedure:
Step 1. Open Photos and find "Recently Deleted" under "Utilities". Depending on your layout, open "Collections" first.
Step 2. Open the album and authenticate when prompted.
Step 3. Select the missing items, choose "Recover", and confirm. For multiple items, the command may appear in the "More" menu.

With iCloud Photos enabled, deletion is synchronized across connected devices. The browser is another way to access the library, not a separate extra 30-day recovery period. Apple's iCloud Photos guidance explains this synchronization behavior.
2.2 Check Missing Photos Before Treating Them as Deleted
A library that looks incomplete after migration does not automatically mean that files were erased. Apple's missing-photo checklist includes Hidden, the correct Apple Account, and the Personal/Shared Library views.
For an apparently incomplete migration, check Photos' library status and follow the message shown. Apple recommends power, Wi-Fi, and uninterrupted syncing; a large library can take overnight. It specifically advises against repeatedly turning iCloud Photos off to troubleshoot a sync problem. See Apple's current sync troubleshooting instructions.
There is also a different album called "Recovered". Apple says it appears only when Photos identifies items that are still on the device but outside the library. It is not an archive of every permanently deleted photo. When available, use "Restore to Library", not "Permanently Delete". The latter cannot be undone. See Apple's explanation of the Recovered album.
2.3 Download Available iCloud Originals
When the desired photo still exists in iCloud Photos, downloading it is preferable to searching a disk for a deleted duplicate. Use Apple's documented iCloud download workflow:
Step 1. Open iCloud Photos in a browser and sign in to the Apple Account that owns the library.
Step 2. Select the photos or videos you need.
Step 3. Open the "More" menu, choose "More Download Options", select "Unmodified Originals", and click "Download" to retrieve the format captured or imported.
Step 4. Save to a healthy destination with sufficient space. When another computer drive is the recovery source, do not download onto that affected drive.
"Highest Resolution" and "Most Compatible" serve different purposes. Most Compatible can provide JPEG or MP4/H.264 files; it should not be assumed to preserve a DNG original. For the separate question of whether photos are inside a device backup, see the Recoverit guide to recovering photos from iCloud Backup.
Part 3. Recover iPhone Photos Deleted After Transfer to a Computer
This is where Wondershare Recoverit fits naturally into an iPhone photography workflow: the iPhone captured the media, but the missing copy was stored on a computer or external drive. Recoverit is data recovery software for Windows and Mac. The desktop drive-recovery workflow below is not direct recovery from modern iPhone internal storage.
Examples include an imported HEIC folder deleted from a PC, exported photographs removed from a Mac, or footage lost from a connected editing SSD. Recoverit's photo recovery feature supports scanning readable local storage for recoverable image files. Recoverit's iPhone recovery guidance also distinguishes local copies from protected phone storage.
3.1 Preserve the Affected Drive First
Check whether the original still exists on the phone, in iCloud, or in an independent backup. If it does, copy that intact original instead of beginning with a recovery scan. Also check the computer's Trash or Recycle Bin.
For genuinely deleted local files, stop importing, editing, downloading, or installing software onto the affected storage. Microsoft's file recovery guidance explains why: normal computer use can overwrite the space formerly occupied by deleted files.
If the loss occurred on an external SSD, stop using it as a scratch disk or recording destination. If it occurred on the computer's system drive, avoid installing the recovery application onto that same physical drive where practical; seek a safer recovery setup for irreplaceable material.
Do not format or initialize a drive because the operating system asks you to. A physically damaged or repeatedly disconnecting drive needs assessment rather than repeated scanning.
3.2 Scan the Storage That Actually Held the Media
Prepare a separate healthy drive for recovered files. The Recoverit Mac guide and Windows guide describe the location-scan-preview workflow.
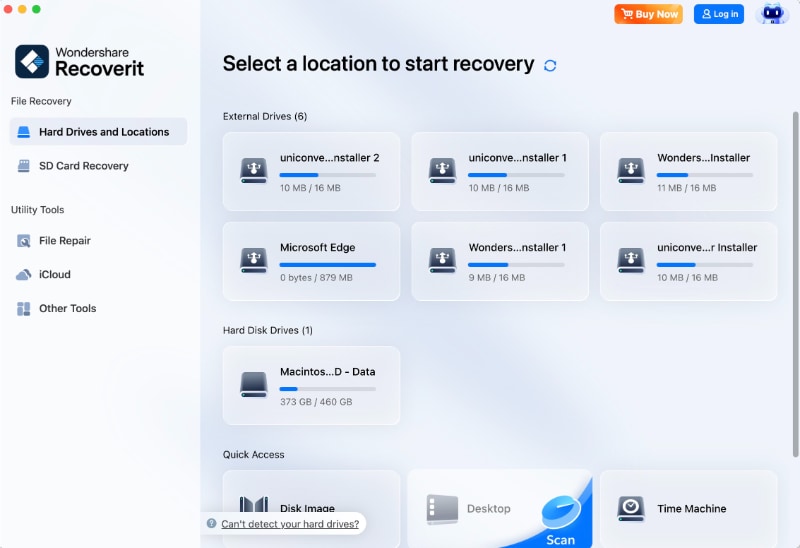
Step 1. Select the Original Location
Open Recoverit and select the disk or folder where the missing media was stored. For an external recording or editing drive, connect and select that drive. Do not select an unrelated computer disk or look for an iPhone internal-storage scan.
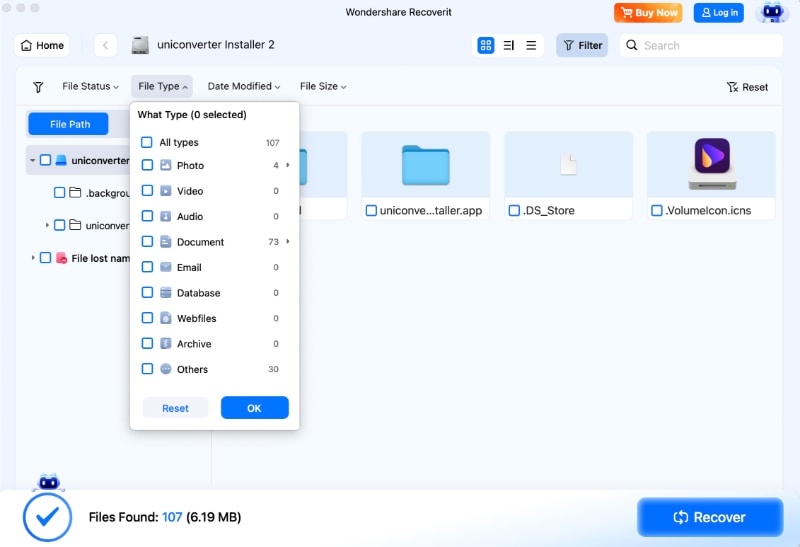
Step 2. Scan and Narrow the Results
Run the scan. Use the available file-type, date, name, or size filters to locate likely candidates. Avoid filtering only for JPEG if the shoot included HEIC or RAW originals.
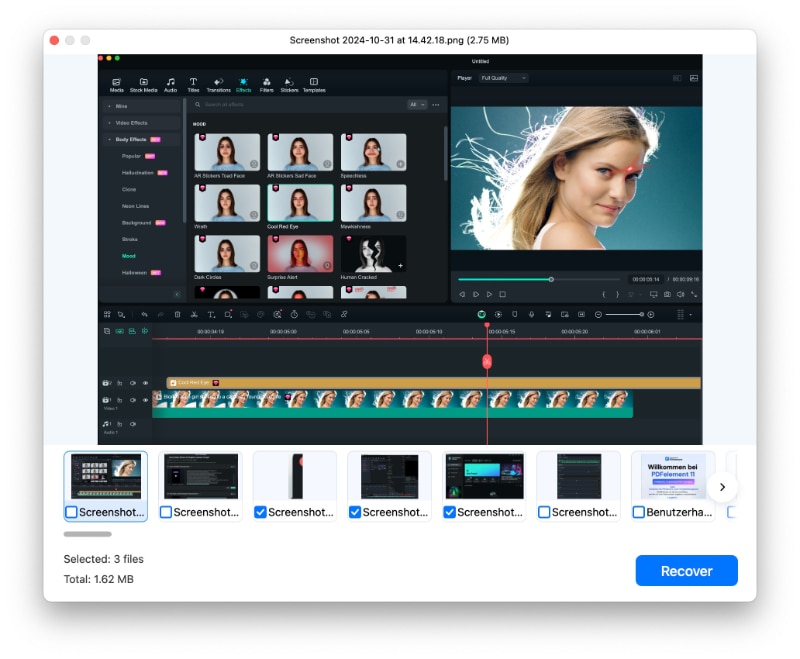
Step 3. Preview and Save Elsewhere
Preview supported files, select the required items, and recover them to the separate destination. Open the saved files in the intended photo or video application before declaring the recovery complete. Preview support and successful recovery are different questions.
For a Mac-based editing workflow, start with Recoverit for Mac. Check the current edition's recovery and licensing conditions before committing to a large restore; a scan result alone is not a promise that every file can be saved intact.
Recover iPhone Photos Deleted After Transfer to a Computer
 Security Verified. Over 7,302,189 people have downloaded it.
The practical limit is whether useful file data remains accessible. A scan cannot restore bytes that have already been overwritten. SSD TRIM and controller behavior can also make deleted files unavailable, including on some external SSD configurations. Recoverit's SSD deletion and TRIM guide explains these limits.
Do not assume that a supported filename extension guarantees recovery of every recording profile. This matters for professional video formats: verify the actual recovered clip in an application that supports it. A recovered MOV filename is not, by itself, proof of an intact video.
Part 4. Recover From an iPhone Backup Without Losing Newer Work
An older device backup is worth investigating only if it could contain the missing photos. Look for a backup made while those photos were still present; the date alone does not prove they were included.
4.1 Confirm Whether the Backup Contains Photos
Apple states that photos synchronized through iCloud Photos are not included again in the daily iCloud device backup. When iCloud Photos was disabled, the device backup may include the photo library. Apple's iCloud Backup explanation is the key distinction.
Computer backups also exclude information already synchronized and stored in iCloud, including iCloud Photos. Consequently, connecting an iPhone to Finder and making a backup does not automatically create an independent archive of every iCloud original. Check Apple's computer-versus-iCloud backup comparison.
Ask two questions before restoring: Did this backup predate the loss, and were these photos actually included? An old backup is not a time machine for content it never contained.
4.2 Locate a Computer Backup and Evaluate a Restore
In Finder on Mac or Apple Devices on Windows, select the connected device and open "General > Manage Backups". Review the available backups. On Mac, "Show in Finder" locates a selected backup; "Archive" helps preserve an existing backup. Apple's backup-location guide documents these controls.

Before restoring, separately preserve newer photos and other important current data. A device restore is not a selective photo download. Apple requires erasing an already-configured device before restoring it from an iCloud backup.
For an eligible computer backup, select "Restore Backup", choose the relevant backup by date, and provide its encryption password if requested. Follow Apple's restore-from-backup instructions, keeping the device connected until completion. Do not confuse "Restore Backup" with "Restore iPhone".

4.3 Handle a Deleted Backup Folder as a Separate Recovery Problem
If the backup itself was deleted from a computer, first look for a preserved copy in the computer's backup history. If none exists, a local disk scan may find backup files, but finding some files does not establish that the complete backup is usable.
Do not treat a recovered backup folder as a verified photo archive. Preserve the recovered set separately and confirm that Apple's software recognizes it before considering a restore. Recovering files from a disk does not bypass an encrypted backup's password or guarantee that all required components survived.
Part 5. Handle a Damaged Mac Photos Library Separately
A Mac Photos library that will not open needs a different diagnosis from an emptied photo folder. The library database may be inconsistent even when some originals still exist.
Apple's Photos Repair Library procedure starts with a backup. Preserve the existing library before making changes. Then quit Photos, hold "Option-Command" while opening it, and choose "Repair". This is a library-database repair procedure, not a guaranteed undelete operation for missing source files.
When a suitable library backup exists, Apple's Time Machine restoration workflow may be more appropriate. There is an important limitation: with Optimize Mac Storage enabled, Time Machine may not contain all full-resolution originals.
If the library itself was deleted, return to the computer-storage recovery route. If only an exported file is damaged, preserve it and distinguish file repair from file recovery. Do not delete the current library or manipulate its internal folders merely to make an error disappear.
Part 6. Verify That Recovery Preserved the Original Quality
A recognizable preview is not the same thing as a recovered original. Decide what the file must support: remembering the moment, making a print, adjusting a RAW exposure, or completing a client edit.
Apple documents ProRAW as a DNG-based format and explains that exported Live Photos have separate still-image and video components. Those differences should shape your checks.
| Media You Need | What to Verify | What Is Not an Equivalent Replacement |
| A high-resolution photo | Pixel dimensions, expected format, full-size opening, and visual integrity | A thumbnail, screenshot, or smaller sharing copy |
| A ProRAW capture | The original DNG and successful opening in a compatible editor | An edited JPEG showing the same subject |
| A Live Photo | Both the still and motion components, plus playback after import where supported | The still image alone |
| A professional video clip | Expected duration, resolution, playback, audio, and compatibility with the editing application | A poster frame, proxy, or truncated clip |
Compare against a known-good file from the same shoot when possible. Check more than filenames: inspect image dimensions and important metadata, play video sections throughout the clip, and verify that the intended editor can use it. Keep an untouched recovered copy before making repairs, conversions, or adjustments.
Shared Albums can provide a surviving picture, but not necessarily the original quality. Apple says shared photos are generally reduced to 2,048 pixels on the long edge and shared videos are delivered at up to 720p. These Shared Album limits are separate from iCloud Shared Photo Library.
Apple also introduces Reference Image on iPhone 18 Pro models: a separate reference asset intended to help establish image authenticity. Do not assume that finding an ordinary JPEG, HEIC, or DNG also restores that reference asset or its authenticity information. For work where provenance matters, verify those assets separately; this guide makes no claim that Recoverit reconstructs Apple's signed reference data.
An AI-enhanced version may be useful as a new creative output. It should not be labeled a recovered original when the original detail, RAW data, or video frames are no longer available.
Part 7. Build an iPhone 18 Pro Photo-Protection Workflow
The most useful backup plan is one you can verify before clearing the capture device. For a shoot that matters, use a simple handoff: capture, copy originals, verify, back up, then clear space.
7.1 Separate Capture Originals From Edited Deliverables
Create distinct project locations for originals, working edits, and delivery exports. For example, a project can contain originals, edits, and exports folders. This is an organizational recommendation, not a requirement imposed by the iPhone.
On Mac, Apple's Export Unmodified Original command is the appropriate route for exporting items in their original imported format. Keep both the original and the edited deliverable when both matter; one does not replace the other.
7.2 Make the Backup Independent of Sync
Use a separate backup destination and keep at least one copy outside the normal editing-and-deletion workflow. A useful target is three copies across two storage locations or media, with one off-site. The point is independence: a single mistaken deletion should not remove every useful copy.
Apple recommends local photo-library backups even when using iCloud Photos. It also warns that referenced files stored outside the library need separate backup coverage. Verify both the library and any externally stored originals.
7.3 Verify Before Erasing, Trading In, or Reusing Storage
Before wiping an old iPhone, deleting a capture folder, or reusing an external recording drive, open representative originals from each backup destination. Include RAW photos, Live Photos, and longer clips rather than checking only small JPEGs.
Apple's iPhone 18 Pro specifications include external ProRes recording. In a workflow that records directly to external storage, verify where the clip was actually saved and back up that drive; do not assume the iPhone's photo library contains another copy.
The practical completion rule is straightforward: do not clear the source because a transfer finished; clear it only after the destination files and a separate backup have been checked.
Conclusion
The right iPhone 18 Pro photo recovery method follows the missing original. Use Apple's recovery and sync tools for items still available in its photo ecosystem, evaluate backups before restoring a device, and use Recoverit for recoverable media lost from supported computer or external storage.
For creators, recovery is complete only when the returned file is useful for its intended purpose. Preserve originals, verify their quality, and maintain an independent backup so that a deleted folder does not become a lost shoot.
FAQ
-
Can Recoverit Recover Photos Directly From iPhone 18 Pro Internal Storage?
The desktop drive-scanning workflow in this guide is for Windows PCs, Macs, and supported connected storage. It is not direct internal-storage recovery from an iPhone. Use Apple's recovery options for phone-library items, and use Recoverit when the missing copy existed on readable computer or external storage. -
Can I Recover Permanently Deleted iPhone Photos After 30 Days?
Not through Apple's expired Recently Deleted window. Look for an independent backup, an original export, or a recoverable computer copy. Recoverit's guide to iPhone photos deleted more than 30 days ago explains how those remaining copies affect your options. -
Does an iCloud Backup Include All My iCloud Photos?
No. Apple says photos already synchronized through iCloud Photos are not duplicated in the daily device backup. A device backup and an independent archive of downloaded photo originals serve different purposes. -
Does Finding a JPEG Mean My ProRAW Photo Was Recovered?
No. A JPEG may be an edited or shared copy. To recover the RAW asset, locate and verify the original DNG. The JPEG may still be valuable, but it is not an equivalent replacement for the RAW file. -
Are Photos Missing After an Upgrade Necessarily Deleted?
No. Account selection, library views, hidden items, and unfinished syncing can explain an apparently incomplete library. Check Apple's missing-photo and sync guidance before erasing the device or replacing it with an older backup.


