How to Fix USB 3.0 Not Working?
Is your USB 3.0 port not working? Or your front panel USB 3.0 not working all of a sudden? You must be looking for a quick fix to solve this issue. Don't worry! This article will eliminate all of your confusion.
Here, 6 straightforward solutions to the USB 3.0 ports not working issue will be elaborately illustrated in this article. And these solutions are proved to be the most accessible ones to fix your problem. After you fix this problem, you can also see How to Fix Slow USB 3.0 Transfer Speed to speed up your USB 3.0 drive.
Meanwhile, this article has gathered the easiest tips for you to solve this problem without needing much computer expertise. Even if you are a computer beginner, you can still perform these methods well. Just make sure to go through the article and follow the simple steps.
Content Navigation
Part 1: Overview of USB 3.0
If you have encountered the error code 0x800703EE in Windows, and looking for its fix, make sure firstly you understand the meaning of this error code. To help you, in this section, you will learn it in easier terms.
1. What is USB 3.0?
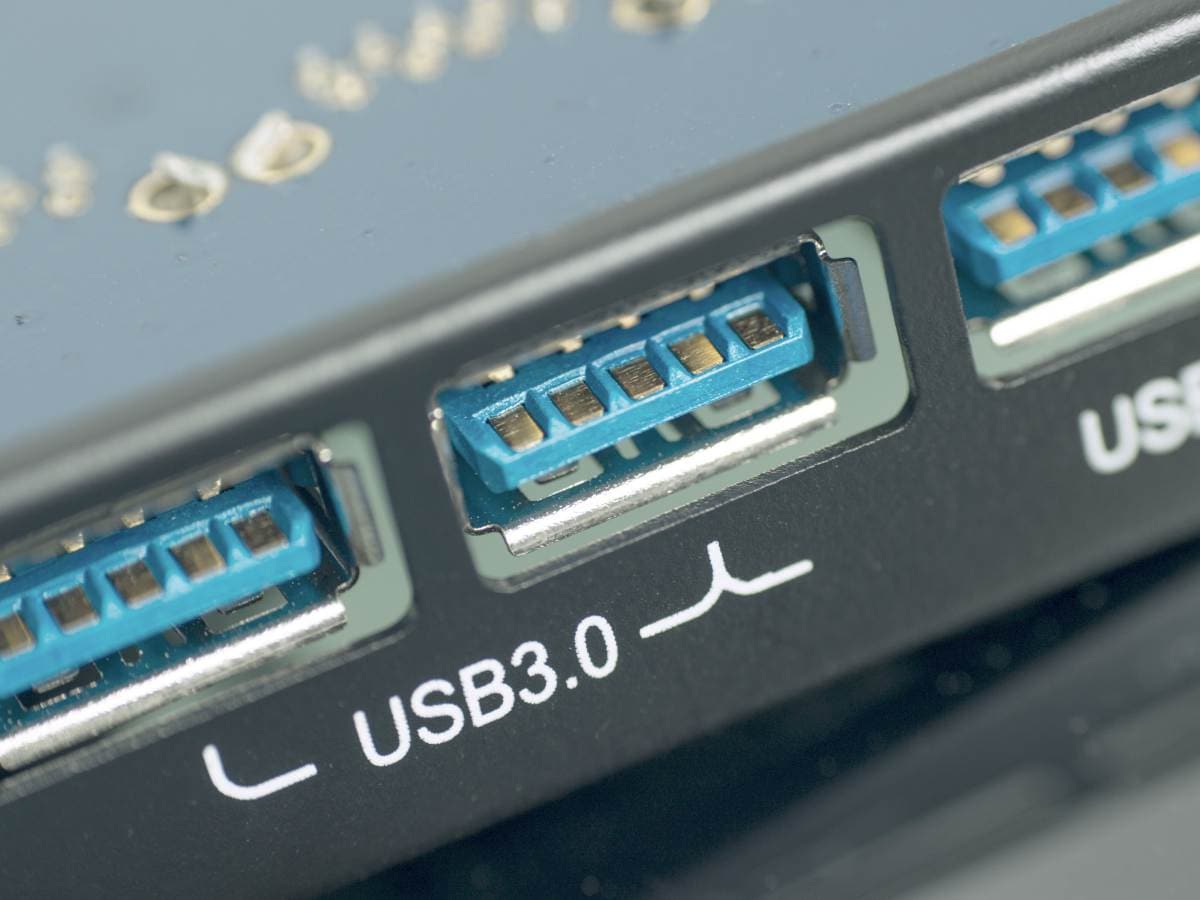
A Universal Serial Bus (USB) port provides an interface to connect electronic devices with your computer system. A USB 3.0 is a version of USB standards that a computer supports for connection.
USB 3.0 design supports faster transmission of data. A USB 3.0 port has a blue interface in the computers. Moreover, USB 3.0 supports up to 5 Gbit/s, which is much faster than its predecessor versions.
2. Difference Between USB 2.0 And 3.0:
USB 2.0 is the predecessor of USB 3.0 and slower than it. The key differences among them are:
- Architecture: USB 3.0 holds eight connector lines, while USB 2.0 has four connector lines.
- Transfer Rates: USB 3.0 provides 4800 Mbps, while USB 2.0 max transfer rate is 480 Mbps, making it slower.
- Data Transfer: USB 3.0 is advanced and supports Bi-directional data transfer. On the other hand, USB 2.0 supports 1-way data transfer.
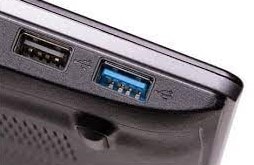
- Color: A USB 3.0 is built and represented with blue color, and USB 2.0 comes up with a black port.
3. Reasons Why USB 3.0 Port Doesn't Work:
It is a commonly occurring problem; however, few reasons for the USB 3.0 port not working are:
- Updating Windows: Sometimes, updating windows can change some default settings, resulting in this problem.
- BIOS Settings: If your BIOS settings have USB 3.0 Port disabled, it can also result in this issue.
- USB Drivers: Outdated or unsupported versions of USB drivers can also mess with your USB 3.0 port.
- Internal Cables: If your USB 3.0 port cables inside the motherboard are not correctly connected, they can also cause this error.
Now you know what a USB 3.0 is, how it is different from a USB 2.0, and the reasons that can cause this error in the first place. In the next section, you will get to know how to resolve this issue.
Part 2: How to Fix USB 3.0 Port Not Working Problem?
There are straightforward solutions listed below that can help you fix your USB 3.0 port:
Method 1: Install the Latest BIOS
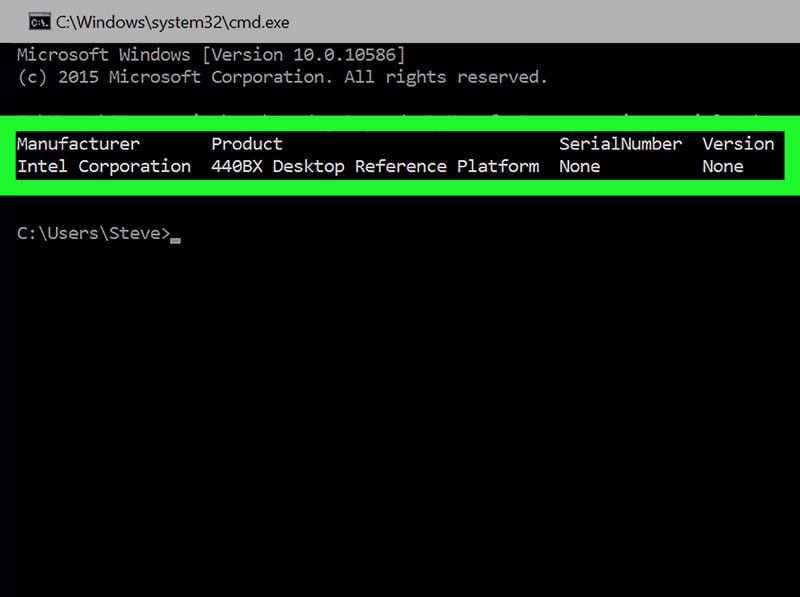
Sometimes, your motherboard can lead to USB 3.0 port issues. It can be solved by installing the latest BIOS drivers. To work with this solution, first, you need to find your motherboard name through CMD and then download its related BIOS drivers.
Follow the below steps:
Step 01: Open CMD
Find CMD in your computer and open it.
Step 02: Find Motherboard Name
Use command "wmic baseboard get product, manufacturer"
Step 03: Download Latest BIOS Drivers
After finding the manufacturer and motherboard name, download its BIOS drivers through the internet. If you're not familiar with BIOS, see from Methods of Accessing BIOS or CMOS Setup.
Step 04: Copy Downloaded BIOS Drivers
To install the latest BIOS, first copy all the files into a USB drive because you need to boot up your system to install the BIOS drivers.
Step 05: Install BIOS Drivers
Make sure the USB drive with BIOS drivers is connected to the computer. Restart your computer and enter your BIOS settings. After entering the settings, select the update BIOS option.
Following these simple steps, you can easily update your BIOS drivers and check if this fixes your USB 3.0 port issue.
Method 2: Download Drivers from Manufacturer
Outdated drivers can lead to a USB 3.0 port problem. To update your USB drivers, go to your system manufacturer's website. Usually, they provide a download section on the website to download the latest USB drivers easily.
At times, the USB drivers are listed as chipset drivers. If you find chipset drivers, that will do the job as well.
Method 3: Install the Newest Drivers
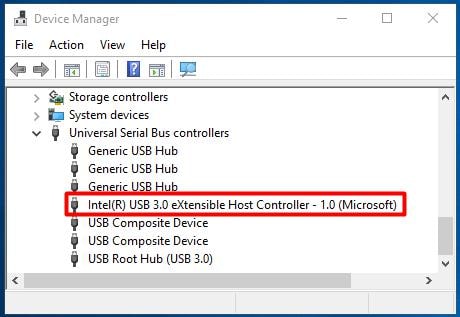
If the above two methods do not resolve the issue, you can fix USB 3.0 ports by installing the newest drivers. To see, which drivers you need to download, you need to know their names first.
Follow the steps below:
Step 01: Open Device Manager
Find Device Manager on your computer and open it.
Step 02: Expand Universal Series Bus Controllers
Expand the folder Universal Series Bus Controllers.
Step 03: Identify Driver Name of USB 3.0 Port
Step 04: Download the Drivers
After you know the driver's name, you can search for them on Google. From there, you can download the drivers for your USB 3.0 port.
Step 05: Install the Drivers
After installing the drivers, check and see if the issue persists or not.
Method 4: Make Sure Internal Cables Are Connected
If the front panel USB 3.0 is not working for you, you need to check the internal cable connection. You need to open your PC case and see the motherboard. Locate the cables that are connecting your USB 3.0 ports with the motherboard and check if they are correctly connected or not.
It will fix your USB 3.0 ports located on the front panel. If you have issues with rear panel USB 3.0 ports, then ignore this method.
Method 5: Use Windows Update
A window update feature is an easy and quick fix to the USB 3.0 ports not working problem. Just follow the below steps:
Step 01: Open Device Manager
Find Device Manager on your computer and open it.
Step 02: Find Unknown Drivers
Right-click on them and click on Update Driver Software.
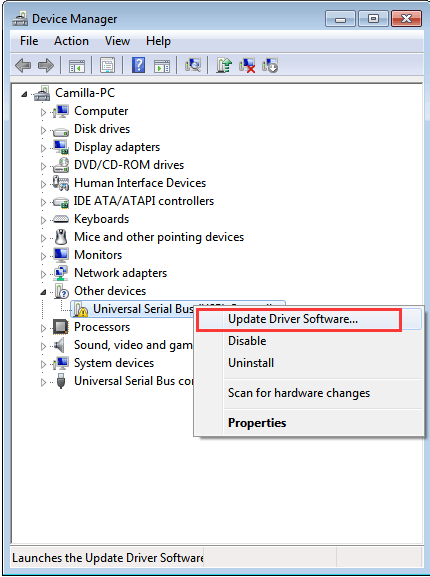
Step 03: Install Drivers Automatically
Click on the automatic search option, and the Windows update feature will search and install the driver for you.
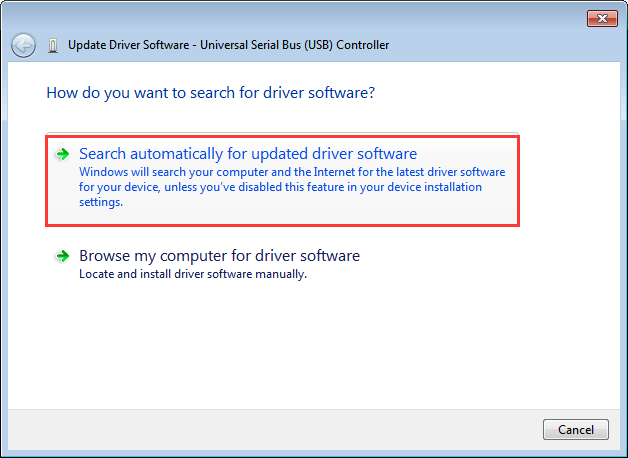
It will take a while, and Windows will find and install the drivers for you.
Method 6: Check If the Power Management Settings Override USB Controller
Windows provides a feature that switches your USB controllers off when they are not in use and turns them back on when needed.
Sometimes, Windows can malfunction and fails to switch them back on automatically. If this is the issue, you can disallow Windows from automatic management of USB ports.
Follow the steps below:
Step 01: Open Device Manager
Step 02: Expand Universal Series Bus Controllers
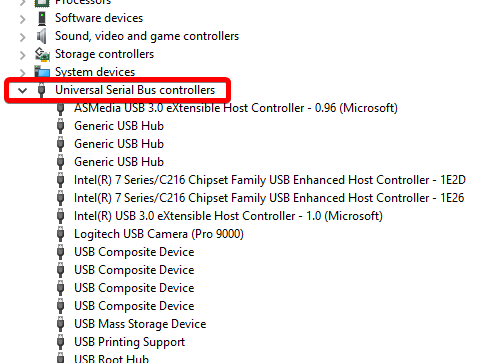
Step 03: Double-Click "USB Root Hub" from the List
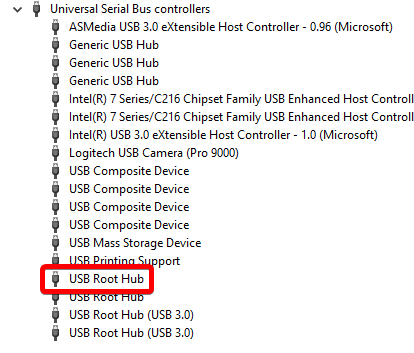
Step 04: Switch to Power Management Tab
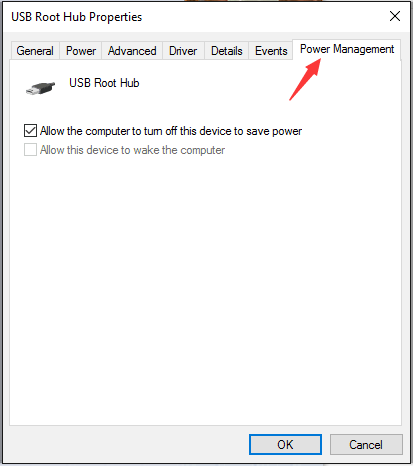
Step 05: Uncheck "Allow the computer to turn off the device to save power."
It will remove auto-management of Windows from one of your USB root hubs. Repeat the same steps for the rest of the USB Root Hubs in your device manager.
The above solutions require little to no computer expertise to apply and fix your USB 3.0 port not working issue. The broad range of solutions we have provided varies from automatic fixes to manual fixes. We prefer you try the automatic fixes first before jumping into manual solutions.
Extra Tips: How to Recover Data When USB Corrupted?
If you are still with us, this section covers a way to recover your lost data using Wondershare Recoverit Software.
Wondershare Recoverit - The Best USB Drive Data Recovery Software
The Wondershare Recoverit is a 3-step data recovery software. Using this software, you can retrieve data in Windows OS and MAC and external devices such as USB drive. See how excellent its functions are:
- Photos Recovery - If the lost data had photos of any format, e.g., PNG, JPEG, SVG, etc. Wondershare Recoverit supports all formats and can quickly help you recover them.
- Files Recovery - Wondershare Recoverit helps recover all your lost, formatted, deleted, and corrupted files.
- Videos Recovery - You can recover any format video from any device, no matter the format. Wondershare can also repair the corrupt fragments of your video.
- Advanced Recovery - Sometimes, after recovery, you might get the file back but in corrupted format. So Wondershare Advanced Recovery allows to fix the corrupted files and get them back to working condition.
Steps to Recover Data Through Wondershare Recoverit
Step 01 - Launch This Data Recovery Tool
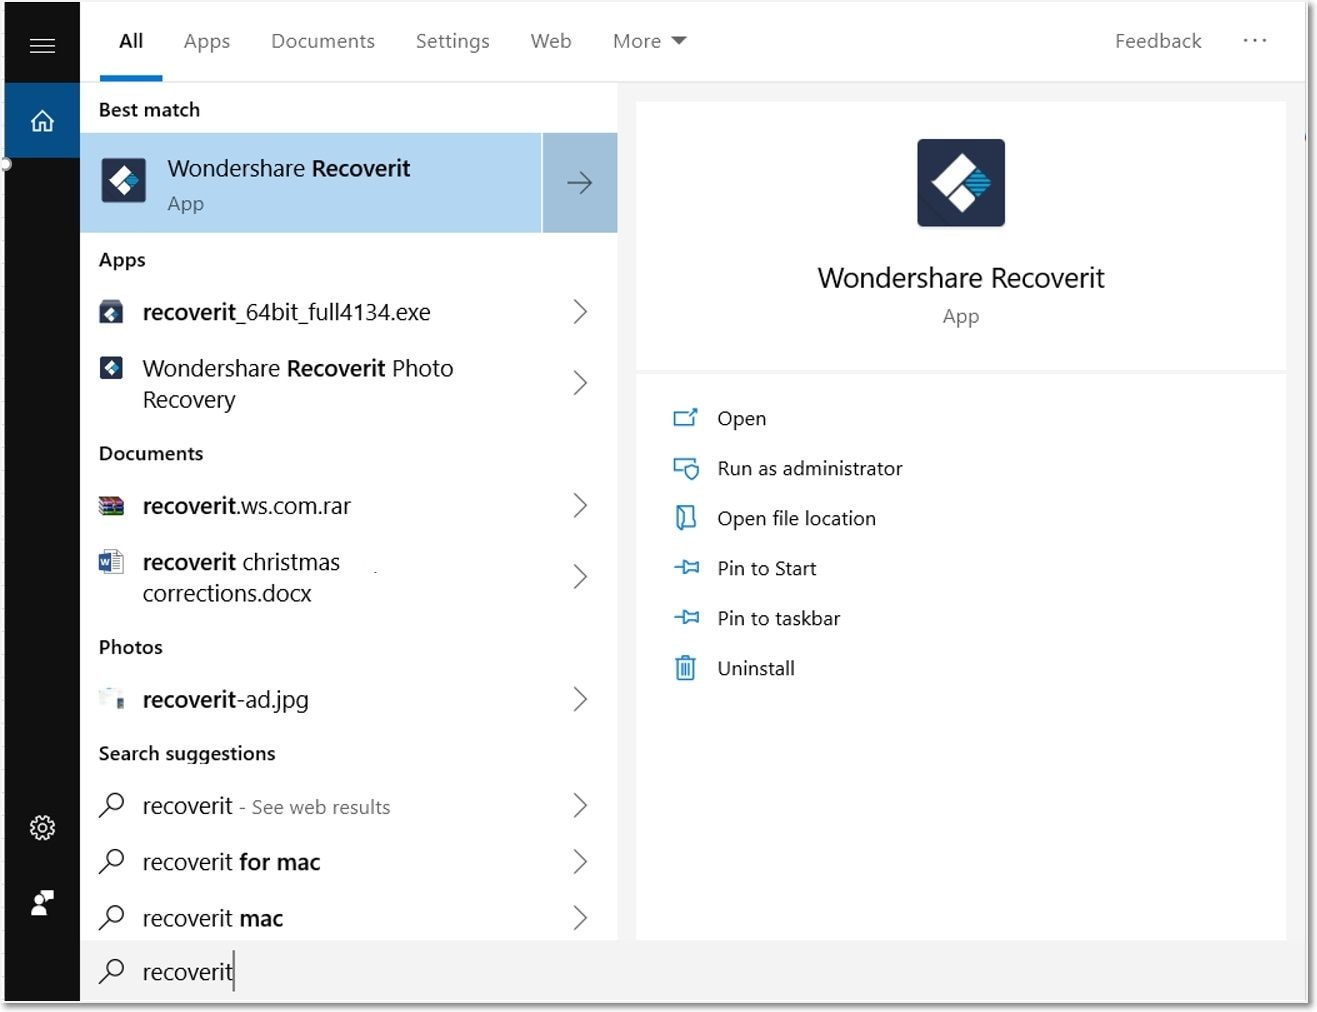
Step 02 - Select a Location
Select the device from which you have lost your data.

Step 03 - Begin Scanning Your USB Drive
After selecting, click on the Start button. The scan process will start and may take some time.

Step 04 - Preview and Recover Files
With the preview, you can select only those files you want to recover. You can now click on the Recover button, and the file recovery will start.

After finishing the scan process, you can see the files you deleted. Below is an example image showing a deleted PDF file preview.
Tips for Preventing Data Loss:
Recoverit data recovery software has made it easy to recover your lost data. But, there are few things you can do to avoid losing data in the future. Make sure:
- Creating Regular Backups - One essential step is to make regular backups of your data. You can use another external storage media or Cloud backup options such as Google Drive.
- Use Antivirus Software - Always scan your system before a virus causes any data loss. Antivirus software will help remove any malware or viruses that can cause data loss.
- Power Backup - Sudden computer shutdown can cause data loss. Make sure to have your laptop charged enough or support your computer with a power backup.
Winding Up:
If you have read this article completely, your confusion about the USB 3.0 port not working must be cleared.
A USB 3.0 port problem is common and can occur due to various reasons, as you can see from the first part of the article. However, no matter what caused the USB 3.0 port issue, the fix can be achieved by any of the six solutions compiled for you in the second part.
Also, occasionally, we have lost data ourselves while experimenting with different solutions. But Wondershare Recoverit software always got our back. That is why we highly recommend Wondershare Recoverit software!
USB Topic
- Recover USB Drive
- Format USB Drive
- Fix/Repair USB Drive
- Know USB Drive


Theo Lucia
chief Editor