Slow USB Transfer Speeds? You're Not Alone. Countless Windows 10 users run into this headache—plugging in a USB 3.0 drive expecting blazing-fast file transfers, only to be met with painfully sluggish speeds. It's a common problem that crops up more often than most people realize.
Slow USB copy speed can ruin your workflow. Moving large files takes forever. The USB drive slow issue affects productivity. The speed is very slow to copy files to USB drive. This wastes precious time daily.
USB 3.0 slow transfer speed issues have solutions. We'll show you how to speed up USB transfer speed. Our fixes work for most Windows 10 systems. Say goodbye to USB is slow problems forever.
In this article
-
- Fix 1: Check the USB 3.0 Port
- Fix 2: Update USB Drivers
- Fix 3: Disable USB Selective Suspend Setting
- Fix 4: Check for File System Compatibility (NTFS vs. FAT32)
- Fix 5: Format the USB Drive
- Fix 6: Scan for Malware or Close Background Processes
- Fix 7: Use High-Quality USB Flash Drives
- Fix 8: Connect the USB to Rear Port (Only for Desktop)
- Fix 9: Enable USB 3.0 Port
- Fix 10: Use Device Manager to Optimize the Performance of the USB
- Fix 11: Format USB 3.0 from FAT32 to exFAT or NTFS
1. Understanding USB 3.0 and Expected Transfer Speeds
USB 3.0 technology promises fast data transfers. This standard can theoretically reach 5 Gbps speeds. Real-world speeds differ from lab tests. Most users see 100-200 MB/s transfer rates. USB transfer speed slow issues occur when speeds drop below 50 MB/s.
Why Is Your USB 3.0 So Slow? USB 3.0 drives can be fast—but not always. A big reason is the type of drive you’re using. Cheap ones often work slowly, while better-quality drives are usually faster.
Your computer also matters. If it’s old, it might not handle USB 3.0 very well. That’s why your file transfers can take longer than expected.
2. Common Causes of Slow USB 3.0 Transfer Speed
Slow transfer speeds of USB 3.0 are without a doubt an annoying scenario especially when you have a big file to be transferred. The transfer speeds usually depend upon the reading speeds of the source device, transfer speed of the USB port, and the writing speed of the target device. But some other issues can be solved to attain maximum speed for file transfer.
2.1 Outdated drivers
A USB 3.0 on Windows 10 should be allowing the transfer of files at least 100 to 200 Mb per second, and if that is not the case, it may due to outdated drivers. The updates are automatically installed if you regularly update your OS and if that’s not the case we can check for updates manually and install them.
Open the device manager by pressing the Windows key and ‘X’ together. Now, click the Universal Serial Bus controllers option and from the expansion below right-click on the USB driver and select Update Driver. Follow the onscreen instructions until the update is complete.
2.2 Faulty hard drive
Another reason for the slow transfer speeds of USB 3 can be because of faulty hard drives. Hard drives can get accumulated with a lot of junk and unwanted files over time which may lead to its slowing down. Bad sectors and corrupted system files also contribute largely to slowing down.
To solve this problem a lot of software are available in the market which can be installed freely. These software scans the hard disk and delete all the junk files as well as fix the problems
Another easy way to fix the hard drive is to completely format it, in which case you will lose all the data stored in your PC.
2.3 USB connection not proper
Make sure that the USB drive is properly connected to the USB port and is held intact. Improper connections can lead to slow transfer speeds as well as the loss of data during transfer. Make sure that you have connected the USB device properly into the USB port.
2.4 The computer runs on an older version of windows
Another reason for slow transfer speeds is if the operating system is not updated. The first check for any Windows Updates through the desktop search bar. It will scan for a few minutes and let you know if any updates are available. If any updates pop up, install them and restart your computer to get the best possible speeds.
There are also some other causes as follows.
- Wrong USB Port Usage - Using USB 2.0 ports limits speed significantly
- Outdated USB Drivers - Old drivers can't handle USB 3.0 speeds properly
- Power Management Issues - Windows power saving modes slow USB performance
- File System Problems - FAT32 limits file sizes and transfer speeds
- Background Processes - Antivirus scans and updates consume USB bandwidth
- Poor Quality USB Drives - Cheap drives have slow internal components
- Hardware Conflicts - Multiple USB devices competing for bandwidth
- Malware Infections - Viruses can slow down all system operations
3. How to Fix Slow USB 3.0 Transfer Speed on Windows 10
Fix 1: Check the USB 3.0 Port
Many computers are equipped with both USB 2.0 and USB 3.0 ports. If you connect your USB drive to a 2.0 port instead of a 3.0 one, you might notice significantly slower data transfer speeds—sometimes topping out around 60 MB/s. To get faster speeds, look for USB 3.0 ports.
They’re usually blue inside and might have an “SS” label, which stands for “SuperSpeed.”
Slow USB copy speed problems often start here. Check your port colors first. Blue ports mean USB 3.0 capability. Black ports are usually USB 2.0. Speed up USB transfer speed by switching ports immediately.
Step 1: Look for blue-colored USB ports on your computer.
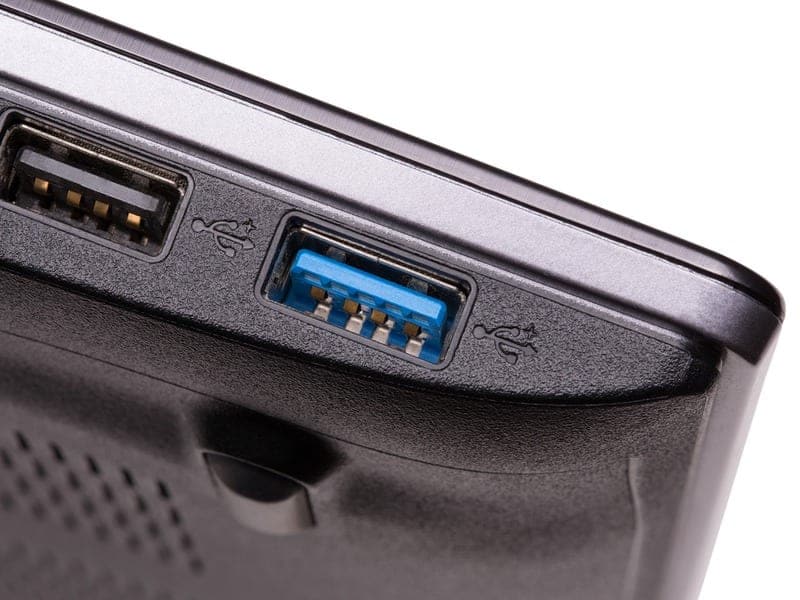
Step 2: Insert your USB drive into a blue-colored USB 3.0 port.
Fix 2: Update USB Drivers
Outdated Drivers Can Slow Down Your USB 3.0 Speed. Old or missing USB drivers are a common reason for slow performance. Windows 10 updates don’t always install the newest USB drivers. That’s why manually updating them can help. Once your drivers are up to date, USB 3.0 transfer speed problems usually go away.
Driver updates improve compatibility significantly. New drivers handle large file transfers better. USB 3.0 slow transfer speed problems have reduced dramatically. Updated drivers also fix stability issues.
Step 1: Right-click "This PC". Select "Properties", then Device Manager.
Step 2: Expand "Universal Serial Bus controllers". Now, right-click your USB 3.0 controller. Select "Update driver".
Fix 3: Disable USB Selective Suspend Setting
Power Settings Can Slow Down USB Speeds Windows uses power-saving features that can affect USB performance. One of these is called USB Selective Suspend—it helps save battery by putting USB ports to sleep when they’re not in use. But this feature can also cause slow transfer speeds, especially with USB 3.0 drives. Turning it off may help your files transfer faster.
Disabling this setting maintains consistent speeds. Your USB ports stay active always. Slow USB copy speed problems have reduced significantly. Battery life decreases slightly, but transfer speeds improve.
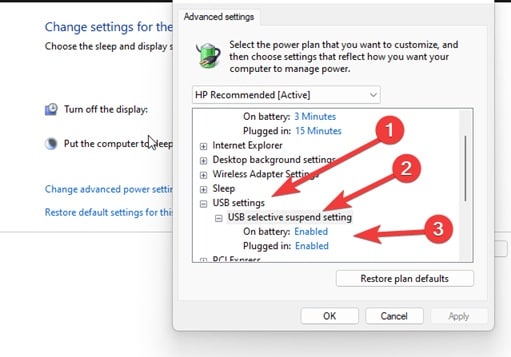
Step 1: Open Control Panel. Go to "Power Options”. Click "Change plan settings". Click "Change advanced power settings”.

Step 2: Expand "USB settings”. Disable "USB selective suspend setting".
Fix 4: Check for File System Compatibility (NTFS vs. FAT32)
File System Matters for USB Speed The file system on your USB drive affects how fast it works. FAT32 is older. It limits file size to 4GB and has slower speeds. NTFS is faster. It supports large files and handles them better.
Formatting your USB drive with the NTFS file system can speed up data transfers when using USB 3.0 ports. Plus, it offers better error handling during file copying, minimizing the chances of corrupted data or interruptions.
Step 1: Open File Explorer. Right-click your USB drive. Select "Properties".
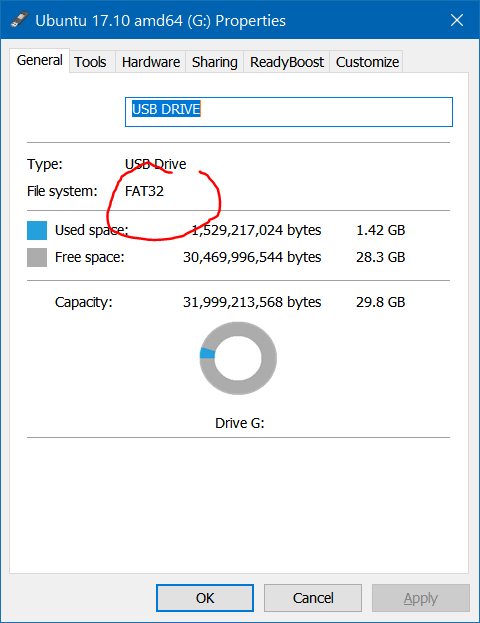
Step 2: Look at the file system—if it's FAT32, switch to NTFS for better speed.
Fix 5: Format the USB Drive
Regular formatting improves USB performance. Old files create fragmentation issues. USB drive slow problems increase over time. Formatting removes all data and resets the drive. USB transfer speed slow issues often disappear after formatting.
Fresh formatting optimizes file allocation. The drive organizes data more efficiently. You will notice that after trying this fix the Slow USB copy speed problems reduce dramatically. Choose quick format for speed or full format for thorough cleaning.
Step 1: Right-click your USB drive in File Explorer and select "Format".
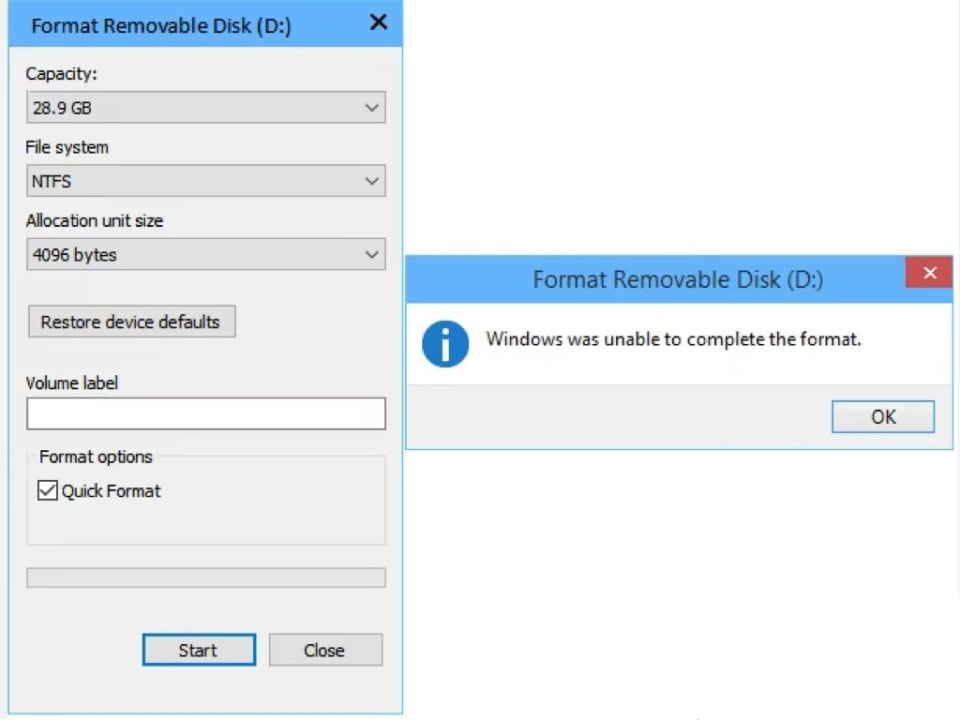
Step 2: Choose NTFS file system and check "Quick Format," then click "Start."
Fix 6: Scan for Malware or Close Background Processes
Malware consumes system resources constantly. USB is slow when viruses scan files during transfer. Background processes also steal bandwidth. USB 3.0 slow transfer speed worsens with multiple programs running.
Regular malware scans keep systems clean. Closing unnecessary programs frees resources. Speed up USB transfer speed by eliminating background interference. Task Manager shows resource usage clearly.
Step 1: Run a full antivirus scan on your system.
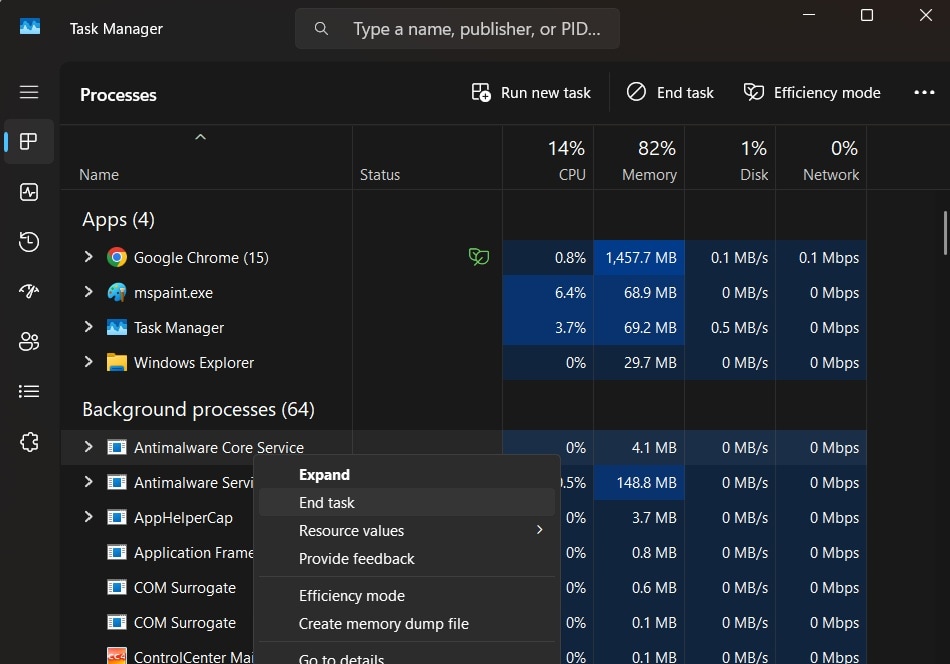
Step 2: Open Task Manager and close unnecessary programs consuming high CPU or disk usage
Fix 7: Use High-Quality USB Flash Drives
USB drive quality affects speed significantly. Cheap drives have slow internal components. Speed is very slow to copy files to a USB drive with poor-quality hardware. Premium drives maintain consistent transfer rates.
Investing in quality drives pays off. Brand-name manufacturers test their products thoroughly. Slow transfer speed USB 3.0 problems rarely occur with premium drives. Look for drives with good reviews and warranties.
Step 1: Research reputable USB drive brands with good speed ratings.
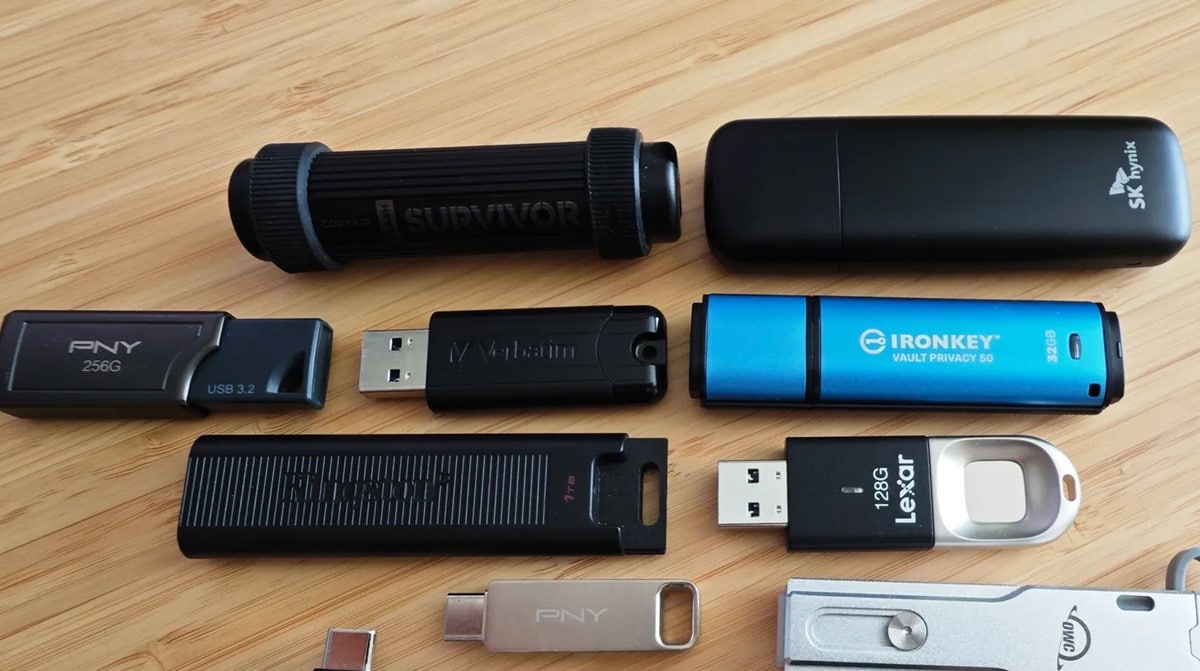
Step 2: Purchase a high-quality USB 3.0 drive from a trusted manufacturer
Fix 8: Connect the USB to Rear Port (Only for Desktop)
The desktop usually has more than 2 USB ports situated on the front and back of the CPU. Usually, the external drives are connected to the front as it is more convenient. However, they can get slower because they don’t have direct contact with the motherboard.
To ensure faster transfer speeds, try connecting to the ports at the back as they are directly soldered to the motherboard and run of the chipset. Also, the ports at the back have a more stable power supply
Fix 9: Enable USB 3.0 Port
Check whether you are using the 2.0 interface. If so, upgrade it to 3.0 and enjoy speed 10 times faster than 2.0.
Fix 10: Use Device Manager to Optimize the Performance of the USB
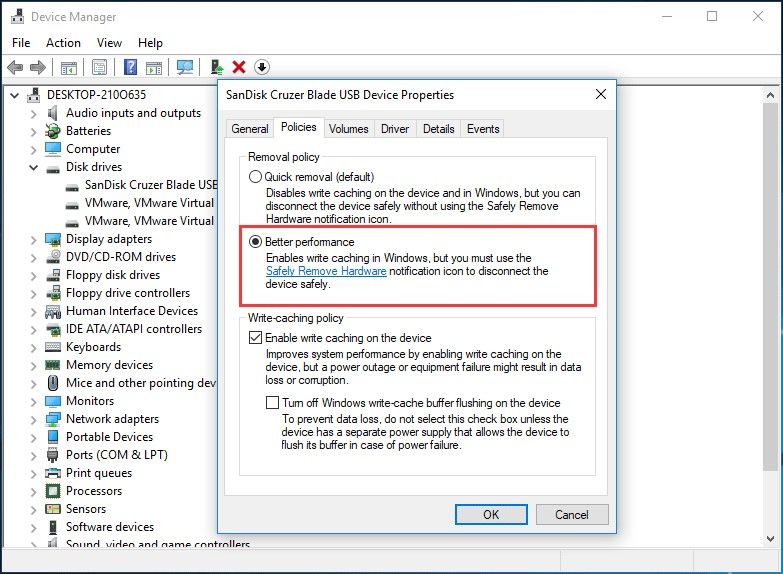
The Quick removal data transfer policy is used by Windows for USB drives by default. This can result in slow transfer speeds as it disables write caching on the device. This feature can be disabled for better performances.
Follow the steps below:
- Open Device Manager and find your USB drive from ‘Disk drives’. Right-click on the USB drive and choose Properties.
- Select the Policies tab and click Better performance. Tick the ‘Enable write caching on the device’.
Fix 11: Format USB 3.0 from FAT32 to exFAT or NTFS
The file system influences the performance of an external drive. Even though the USB drive comes with the FAT32 file system by default, it can be formatted to NTFS or exFAT. In windows 10, NTFS has proved to work much faster and more efficient for file transfer.
Let us see how you can format a USB drive from FAT32 to exFAT or NTFS
- Connect the USB device to the computer.
- Once it is detected by the computer, right-click on the USB drive icon.
- Click on Properties.
- Navigate to the File System option in the General Tab.
- You will see an option to change the file format here. Choose NTFS or exFAT based on your preference.
Once you have completed all these processes, you will be able to enjoy fast transfer speed on your USB 3.0 on Windows 10.
4. Lost Files Due to USB Transfer Issues? Use Recoverit Today
Transfer interruptions sometimes corrupt files. USB transfer speed slow problems can cause data loss. Sudden disconnections damage file structures. Power failures during transfers create corruption. Recoverit software recovers lost files effectively.
This powerful tool handles various file types. Photos, videos, and documents can be recovered successfully. USB drive slow transfers sometimes fail completely. Recoverit scans drives thoroughly for recoverable data. The software works with formatted and damaged drives.
Try Recoverit to Recover Lost Data
Security Verified. Over 7,302,189 people have downloaded it.
Recovery success rates reach 95% typically. Recoverit supports 1000+ file formats. USB is slow situations often lead to incomplete transfers. This tool finds and restores partial files, too. Preview features show recoverable content clearly.
Step 1: Download and install Recoverit on your computer. Hit the Start button.

Step 3: Wait for the scanning process.

Step 4: Preview recoverable files, then select files to restore.

5. Tips to Maintain Fast USB 3.0 Performance
Regular maintenance keeps USB speeds optimal. Speed up USB transfer speed with proper care habits. Simple practices prevent most speed issues. Consistent maintenance saves time and frustration.
- Use quality USB drives - Invest in reputable brands with good speed ratings
- Keep drivers updated - Check for USB driver updates monthly
- Avoid port switching - Use the same USB 3.0 port consistently
- Close background programs - End unnecessary processes during large transfers
- Regular malware scans - Keep your system clean from virus interference
- Format drives periodically - Remove fragmentation with occasional formatting
- Monitor drive health - Replace aging drives before they fail completely
- Use proper ejection - Always safely remove USB drives before unplugging
Conclusion
USB 3.0 slow transfer speed problems have solutions. We've covered seven effective fixes for USB transfer speed slow issues. Most problems stem from simple configuration errors. Proper ports, updated drivers, and quality drives solve most cases.
USB drive slow performance frustrates users unnecessarily. These solutions work for most Windows 10 systems. Speed is very slow to copy files to USB drive situations improve with proper troubleshooting. Start with basic fixes before trying advanced methods.
Regular maintenance prevents future speed issues. Slow USB copy speed problems decrease with proper care. Quality hardware and updated software ensure optimal performance. Your USB is slow problems should disappear with these solutions.
FAQs:
-
Why is my USB 3.0 transfer speed so slow on Windows 10?
USB transfer speed slow issues usually stem from using wrong ports, outdated drivers, or poor-quality drives. Check if you're using blue USB 3.0 ports instead of black USB 2.0 ports. Update your USB drivers through Device Manager. Slow transfer speed USB 3.0 problems often disappear with these simple fixes. -
How can I speed up my USB transfer speed?
Speed up USB transfer speed by using USB 3.0 ports, updating drivers, and disabling USB selective suspend. Format your drive with NTFS file system for better performance. Close background programs during transfers. USB 3.0 slow transfer speed improves significantly with these optimizations. -
What causes USB drives to become slow over time?
USB drive slow performance develops from file fragmentation, outdated drivers, and malware interference. Regular use creates scattered file storage patterns. Slow USB copy speed worsens when background processes consume system resources. Periodic formatting and driver updates restore optimal speeds.


 ChatGPT
 Perplexity
 Google AI Mode
 Grok
Grok


