

 TL;DR:
To resolve Windows 10 or 11 black screen issues during video playback, you must isolate whether the failure is caused by an unplayable corrupted video file or a system-level graphics and boot configuration conflict.
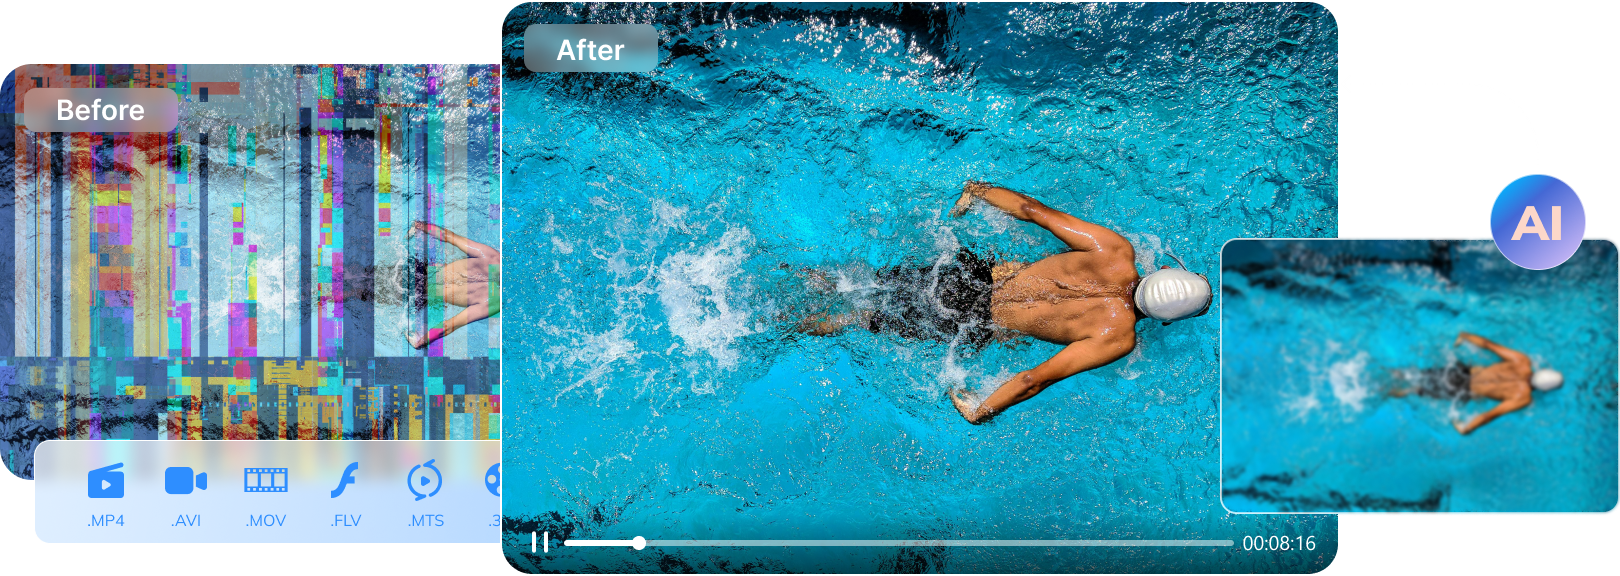
● If you can hear audio but the screen remains black, the video file is likely corrupted or lacks the correct codec, which can be fixed by processing the file through Wondershare Repairit using its Quick or Advanced repair modes.
● To resolve hardware-induced crashes and boot issues, launch your PC in Safe Mode, navigate to the Control Panel's Power Options, and completely disable the Fast Startup feature.
● For persistent system-wide display failures, use the Device Manager to update incompatible display adapter drivers and check the Registry Editor to ensure the Winlogon Shell Value Data is set exactly to explorer.exe.
Ask AI for a summary
 ChatGPT
 Perplexity
 Gemini
 Claude
 Grok
Grok
Whenever you try to play a video on Windows 10, does the screen turn black often? This is probably because of the black screen of death issue. The screen becoming black may be one of the most challenging issues that you'll ever fix. In fact, just rooting your system wouldn't help to correct the problem.
A new feature update, buggy update, hardware malfunction, software issue, and so many more can be the reasons for the black screen issues while playing videos on Windows 10. Irrespective of what the issue is, you must ensure that you fix the problem efficiently. This guide will help you explore some of the potential ways to fix the windows 10 black screen when playing videos.
In this article
-
- Fix 1: Use Wondershare Repairit

- Fix 2: Restart Windows PC
- Fix 3: Update Your Windows
- Fix 4: Switch The Fast Startup Option Off
- Fix 5: Uninstall/Re-Install Or Update Graphics Card
- Fix 6: Uninstall/Delete Problematic Software
- Fix 7: Make Slight Changes In The Registry
- Fix 8: Create A New User Account
- Fix 9: Clear Cache and Cookies
- Fix 10: Update Graphics Drivers
- Fix 1: Use Wondershare Repairit
What is the Black Screen Issue?
The video of black screen issue is a major problem in your computer system that will lead to the screen becoming black. It may be due to an error in your operating system or the video becoming corrupted. The black screen issue may be caused due to hardware and software issues.
Types of Black Screen Issues on Windows 10 When Playing Videos
This may be surprising to many, but you are likely to encounter different types of video black screen issues when playing on Windows 10. This will not be visible to the naked eye unless you're paying attention.
Here are some of the types of windows 10 black screen when playing videos that you will witness when playing videos:
- Systematic black screen: If your Windows 10 PC has a movable mouse pointer but you aren't able to access any features, it is a systematic black screen error. This is often referred to as the black screen of death.
- Audible but no video: When you play any video on your screen, you will be able to hear the audio, but there will be no video. This will be for both YouTube Videos and Windows Media Player.
- Incomplete Installation: Sometimes, you may experience a 1080p black screen of death because of an incomplete Windows 10 installation. This will lead to GPU errors and display issues. Furthermore, buggy updates and insufficient power are also likely to cause incomplete installation issues.
- Video-related: Sometimes, the video may not be playing because of corruption or video error. This will also lead to the screen becoming black. In fact, the wrong codec can also lead to video becoming black.
What May Cause Window 10/11 Black Screen?
When you're watching videos on your Windows 10/11 PC and the screen turns completely black, it might as well be one of the most challenging situations. You wouldn't understand how to troubleshoot the issue and fix it in complexity. You need to understand the main reason for the problem so that you can fix it. The Windows 10 black screen issue may either be due to the computer or the video itself.
The Windows 10 video black screen may turn black because of the following problems with your PC:
- Crashing Adobe Flash Player
- Corrupted Video player
- Damaged or faulty monitor
- Bug-filled Windows 10 update
- The issue with the graphic card driver
Following are the reasons why the screen would turn completely black because of the video here error:
- The video wasn't downloaded properly to your system.
- Incompletely copied videos.
- Missing or wrong codec of the video.
- Unplayable or corrupted video file.
Solutions to Fix Black Screen On Windows 10
When the video isn't playing on the Windows 10 screen, and it is turning completely 1080p black screen, you will need to analyze the different factors. Once you have identified the cause, it is important to look for potential ways through which you can fix it.
One of the best parts is that there are numerous methods that you can follow to fix the error. Some of the common solutions for how to fix a pc black screen are as follows:
Fix 1: Use Wondershare Repairit
A major reason why you may be experiencing black screen issues on Windows screen is because of corrupted videos. Therefore, it is advisable to repair corrupted videos. This will allow the videos to be loaded properly.
If the video isn't available and the screen is becoming black, it may be due to malicious software, incomplete codec, or corrupted video. Therefore, you can download Wondershare Repairit on your macOS and Windows OS. This is one of the best software to repair the damaged and corrupted videos. You can download the software and then install it in your system.
Wondershare Repairit will allow you to fix the videos in two modes- Quick Repair and Advanced Repair. Quick repair mode will help to fix minor video corruption, whereas the advanced ones will help to fix the majorly corrupted videos.
Here are the steps you must follow to repair the windows 10 black screen when playing videos issues using Wondershare Repairit:
Step 1: Launch the Wondershare Repairit on your screen. On the main screen, click on the Add button to upload the corrupted videos. You can also drag and drop the files.

Step 2: Select all the videos that you want to repair and click on the Repair button.

Step 3: Once the video is repaired, you will be notified. Click on the OK button.

Step 4: After the videos are repaired, you will get the preview button. Click on the Preview button to check all the results of the fixed video.

Step 5: Click on the Save option if the finally fixed videos are fine.

If the video wasn't fixed in Quick Repair mode, you may prefer to perform Advanced Video.
Fix 2: Restart Windows PC
If the black screen issue continues to persist despite numerous login attempts, you must try to restart the PC. This can be surprising, but a small reboot of your PC can help fix the entire problem. You can restart the PC by clicking on the Ctrl + Alt + Del option. It will bring a variety of options. Choose the shutdown option and restart it.
If this doesn't work, you will have to visit the start panel and restart the PC from there. Click on the Power option and hit Restart. Wait for a few minutes; your device should restart by now. Once the device is restarted, you can play the video again and check if it is working.
Fix 3: Update Your Windows
A major reason for the Windows 10 video black screen is the lack of updates. Your screen constantly crashing is a sign that you need to update your system soon. An outdated Windows version will fail to load the videos, thereby making it difficult to play them.
Some of the common steps that you need to update to fix windows 10 black screen when playing videos are as follows:
Step 1: As soon as you notice the black screen, restart the PC.
Step 2: Visit the Settings option from the Search bar panel.
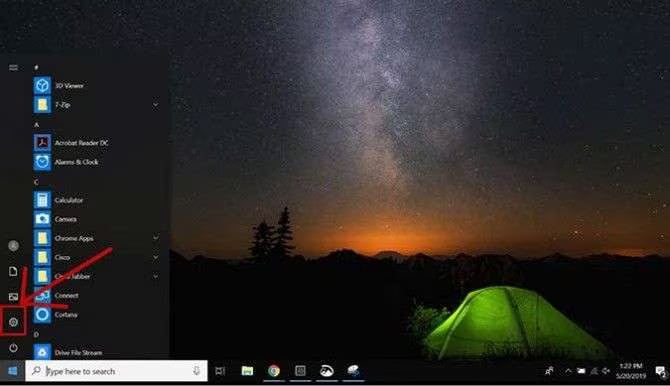
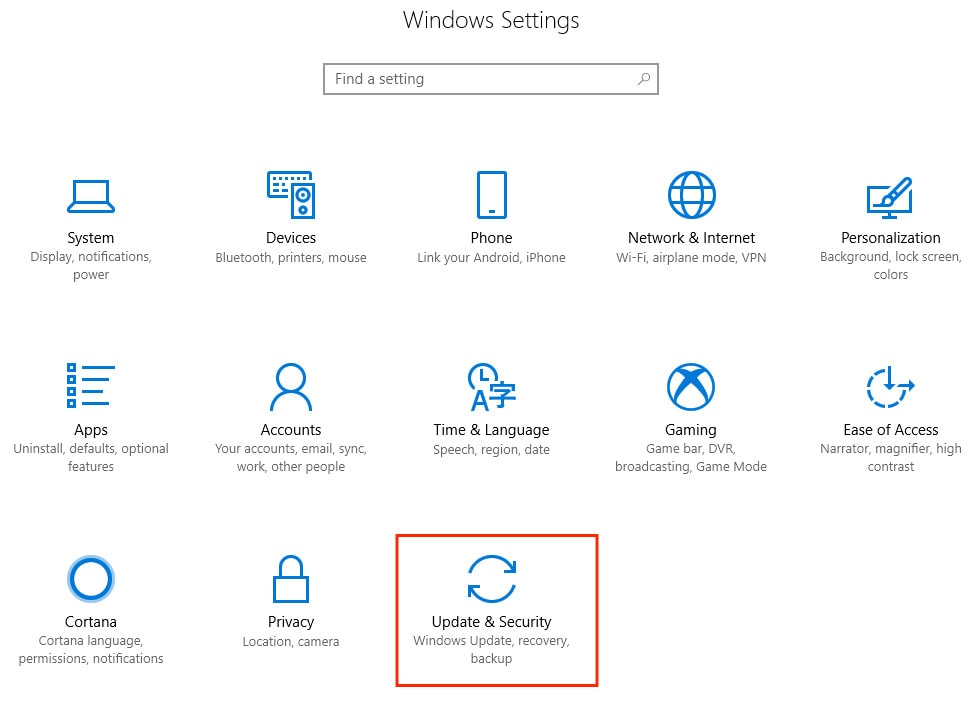
Step 3: Now, go to Update & Security.
Step 4: Click on Check for Updates under the Windows Update.
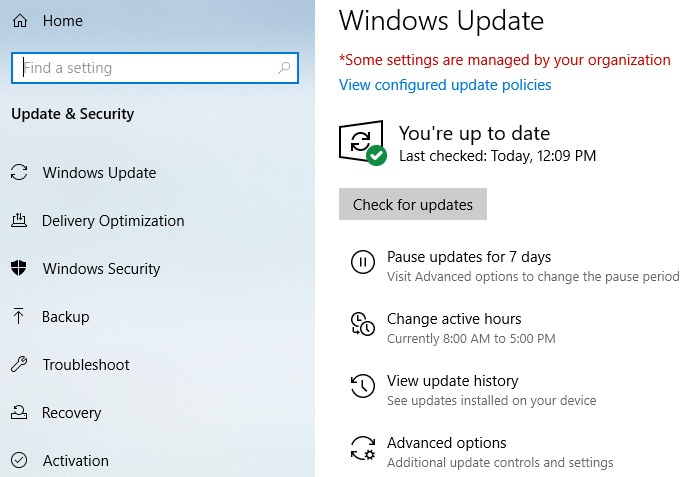
If there's a Windows 10 patch available, the system will initiate the download. Once the download is complete, it will be installed on your screen. Then, you can restart the system and try to play the video again to check if it is working.
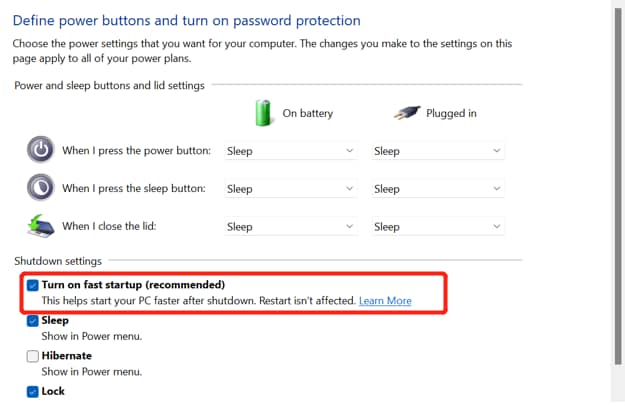
Fix 4: Switch The Fast Startup Option Off
The Fast Startup option is an ideal choice for the smooth functioning of your PC. However, there is a chance that this is the reason you may be experiencing the screen goes black when playing videos. In this case, you will have to switch the fast startup option off in Safe Mode. This is mostly a hardware issue causing the main trouble.
You can boot switch off the fast Startup option on your PC by following the steps given below:
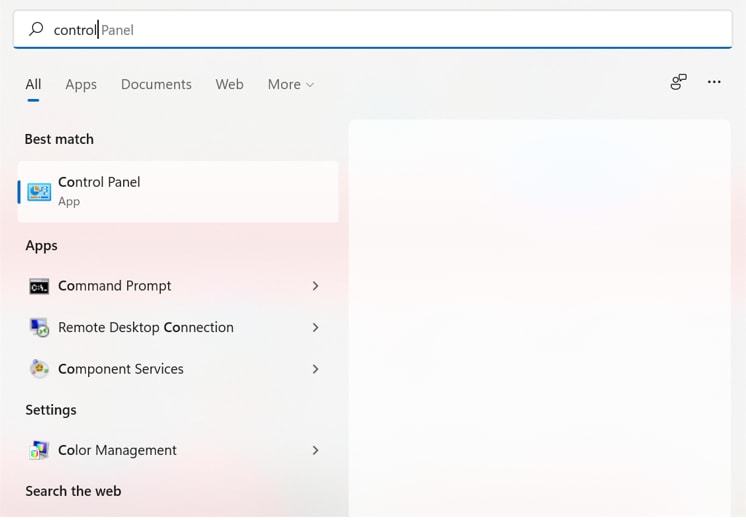
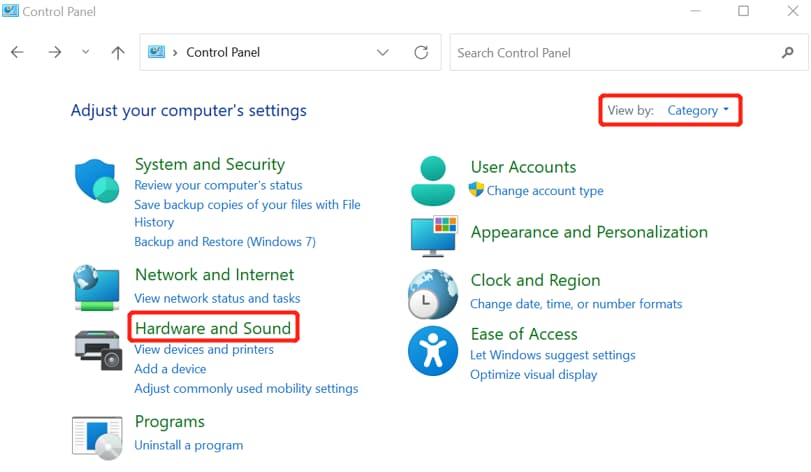
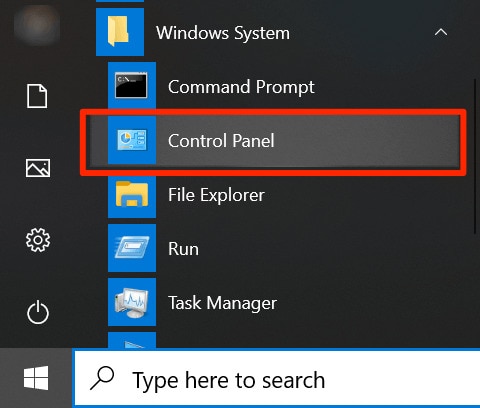
Step 1: On the Search panel, look for the Control Panel and open it.
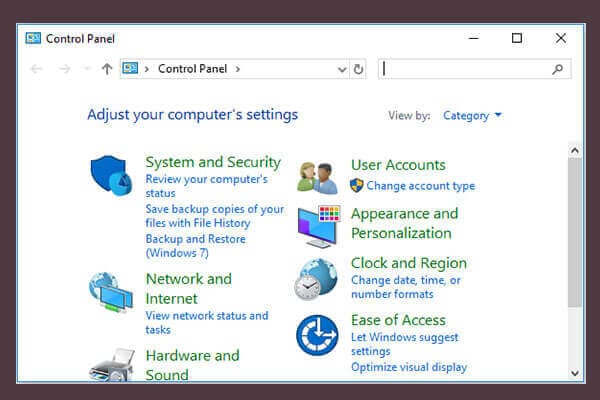
Step 2: From the drop-down menu of View by Category, click on Hardware and Sound option.
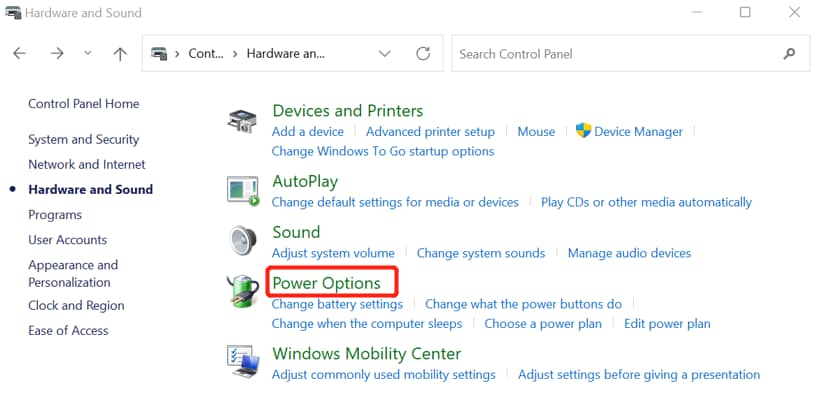
Step 3: Click on Power Options.
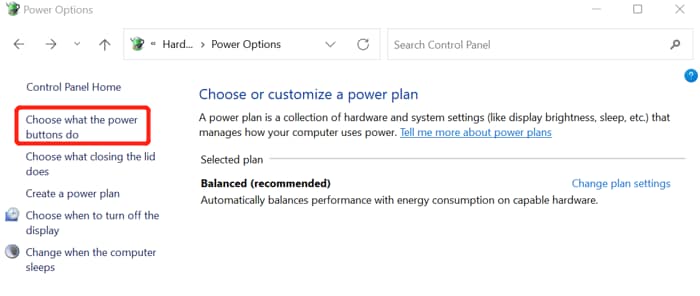
Step 4: Hit the Choose a hat the power buttons do.
Step 5: You have to select Change settings, which are currently unavailable.
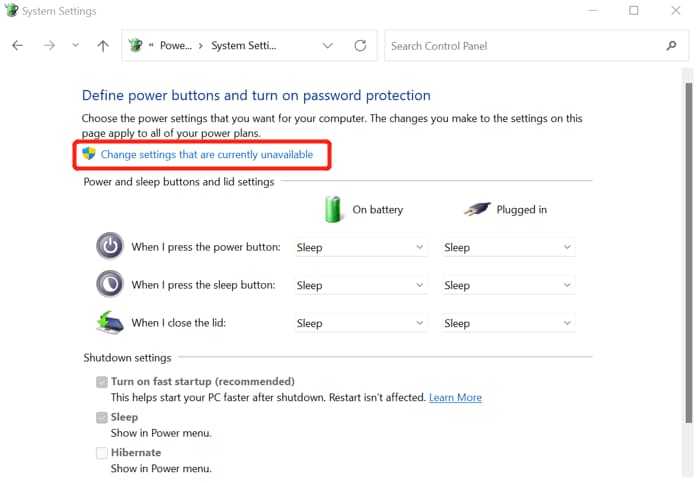
Step 6: Untick the turn-on fast startup option and disable the feature.
Fix 5: Uninstall/Re-Install Or Update Graphics Card
A better idea would be to update the graphics card. If the graphics card doesn't function properly, it is time for you to get a new graphics card. You must update all the graphics drivers in your system consistently. However, if it doesn't, you must upgrade it. This will potentially help to fix the video black screen.
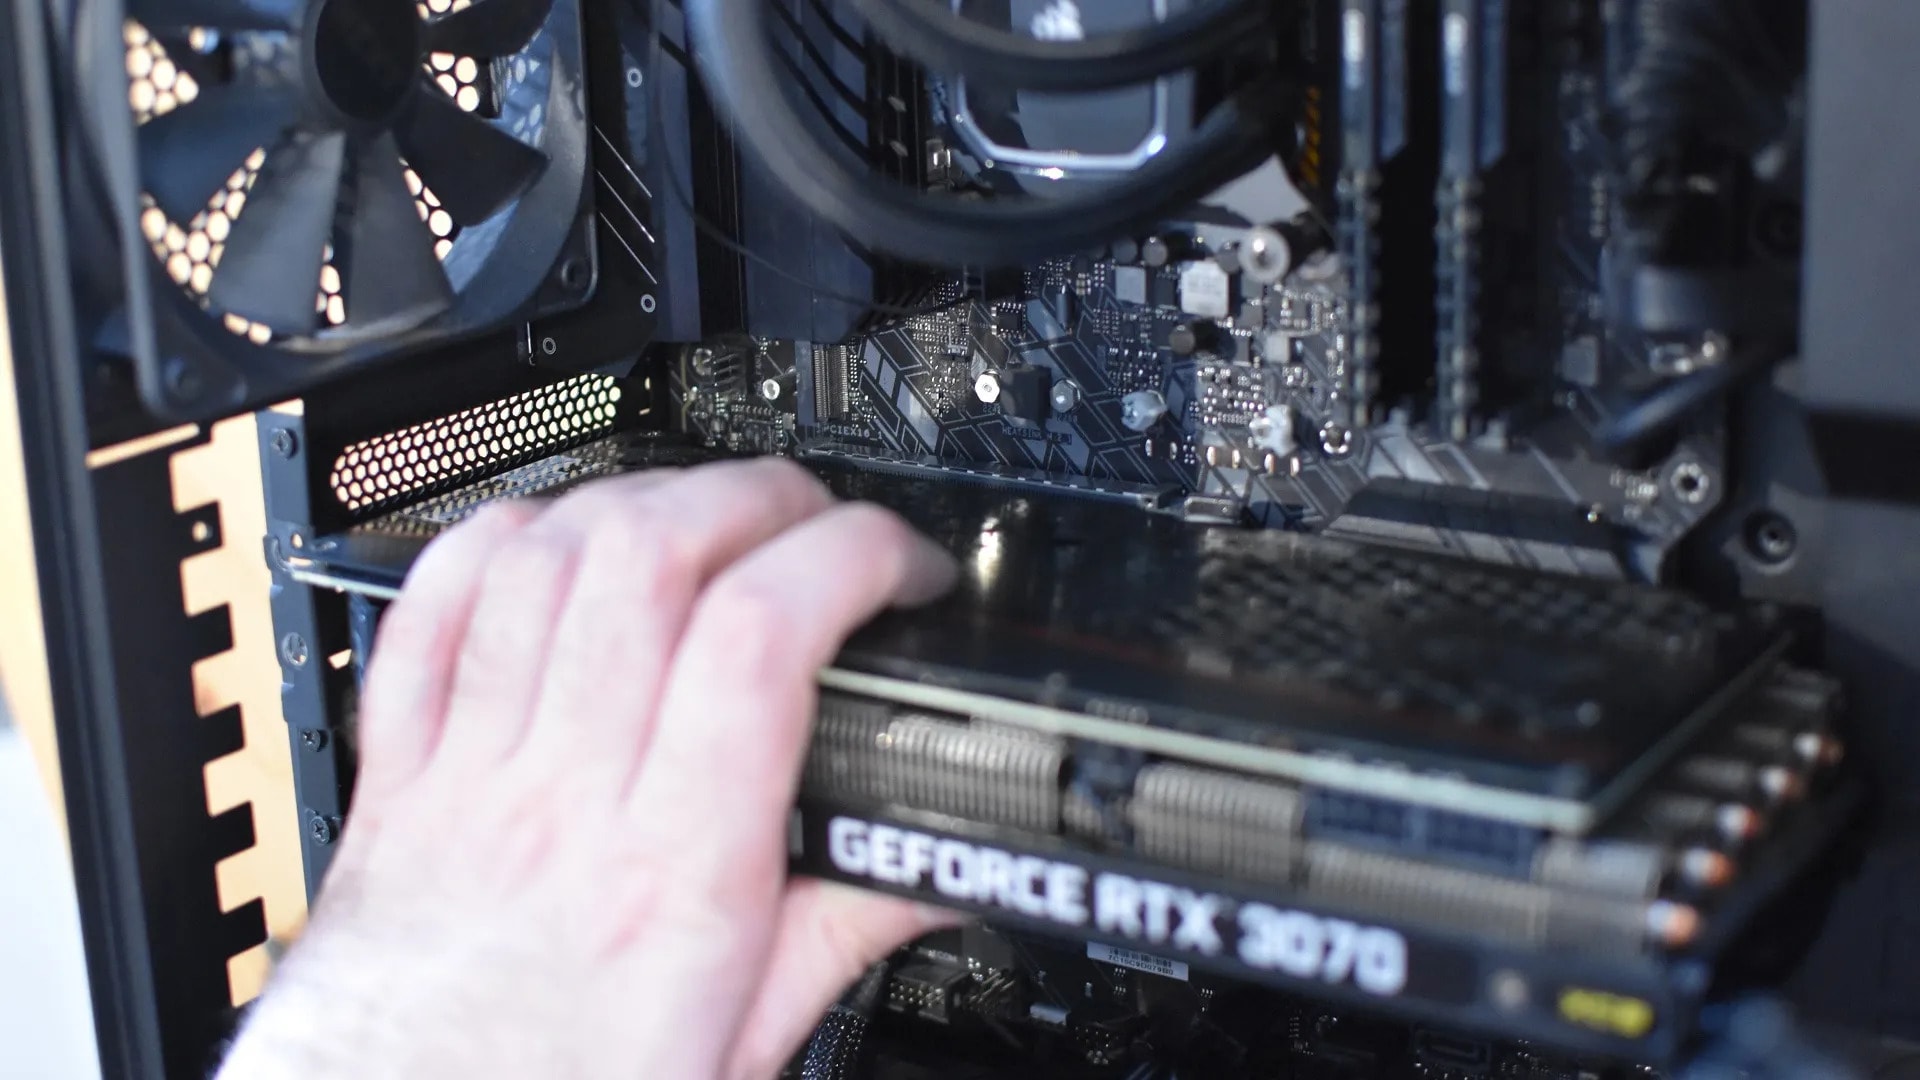
You can check for new Intel, NVIDIA, and AMD graphics cards around you. Most of the information is available on their website, which you can go through. Once you have updated the graphics card in your system based on the instructions that were given to you, go back and monitor the GPU performance. This must have fixed the graphics card error.
Fix 6: Uninstall/Delete Problematic Software
If you feel that the Windows 10 black screen while playing videos is because of software, uninstall it. Removing any unauthorized third-party software might help to resolve this issue. You can restart Windows Explorer and check all the potential software that you have installed recently.
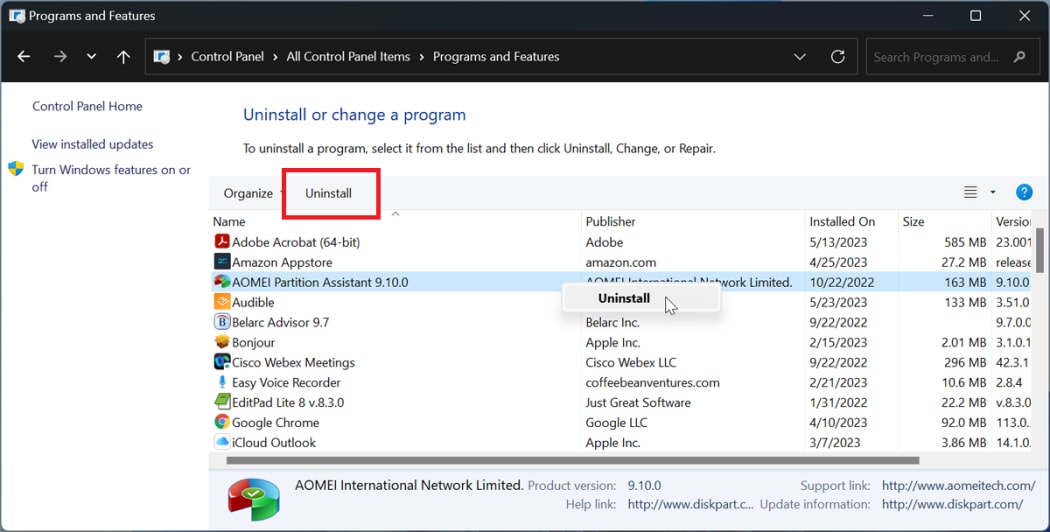
You can open the Task Manager and choose the Windows Explorer option. Click on the Restart option. You can also open explorer.exe in the Task Manager to delete the software. You must install the problematic or unauthorized software in safe mode. Launch Safe Mode on your device and visit the Apps & Features option. Hit the remove application button.
You could use the command prompt via WinRE so as to remove the problematic software. Furthermore, the Windows Management Instrumentation Command-line (WMIC) can also be a way through which you can remove, uninstall, and delete complicated software.
Fix 7: Make Slight Changes In The Registry
If you were not able to fix the problem using the above methods, you must consider bringing some changes to the registry. It would help if you made changes in the registry from the safe mode. You can open the Registry Editor on your device and visit the HKEY_LOCAL_MACHINE\SOFTWARE\Microsoft\Windows NT\CurrentVersion\Winlogon.
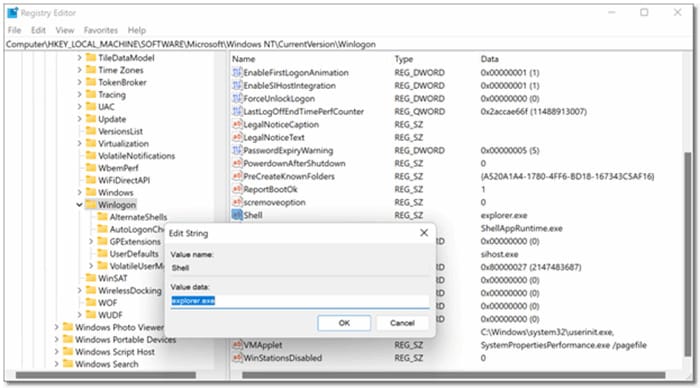
Now, you must check the Value Data available in the Shell Value. This option is usually available under the Winlogon subkey. It will be set to explorer.exe, so make sure to navigate to the main issue and try to get it fixed soon.
Fix 8: Create A New User Account
Sometimes, the Windows 10/11 screen may turn completely black because of the user account issues. In this case, it is advisable to create a new user account. Creating the user account will allow you to fix the windows 10 black screen when playing videos problem and help you play the video from the new account.
You need to follow the steps given below to create a new user account on Windows:
Step 1: Open the Settings app on your device and choose Accounts> Other User.
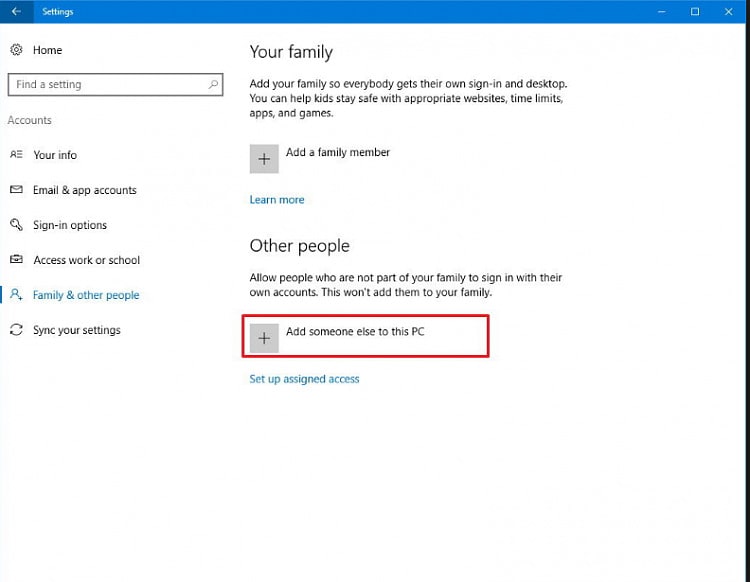
Step 2: Now, you must click on the Add account or Add other user option.
Step 3: Sign up to the platform by entering the password and email ID.
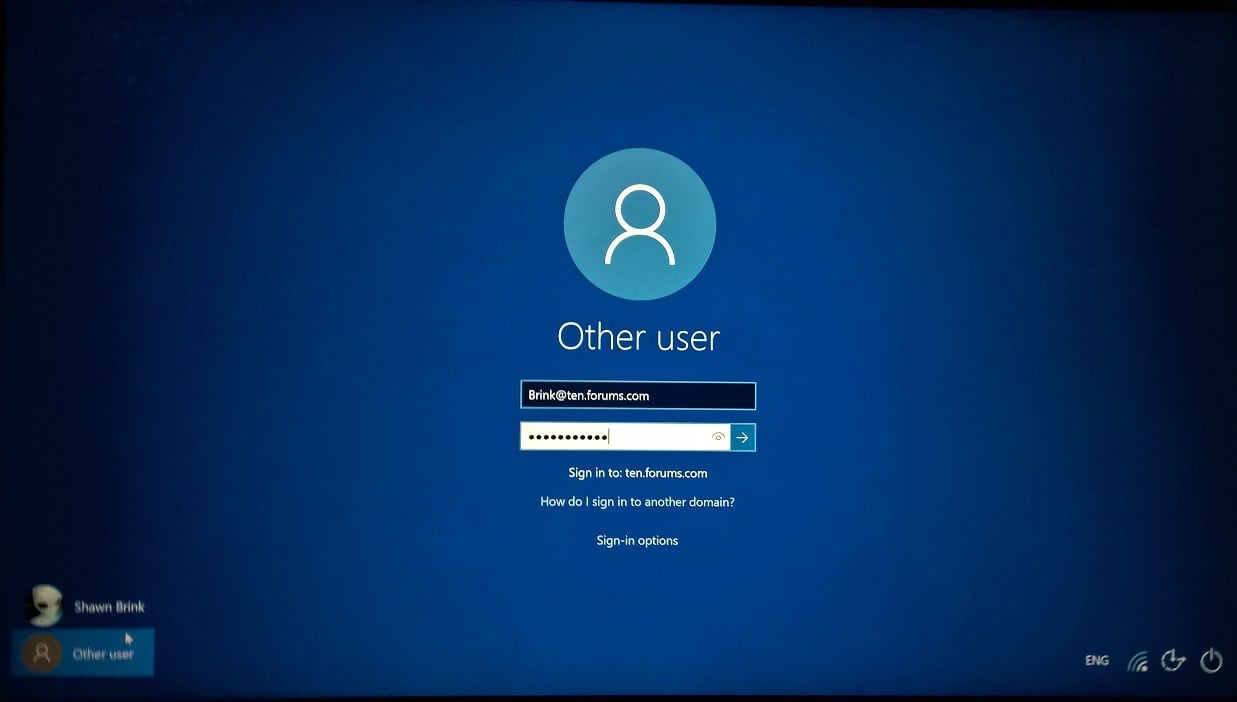
Step 4: Follow the instructions to finish setting up the account.
Fix 9: Clear Cache and Cookies
Accumulating caches and cookies and storing them offer a smooth online experience. However, it may not always be reliable. Piling up caches and cookies can take up a lot of space in your computer, thereby leading to black screen. As a result, you would often notice the screen goes black when playing videos.
You must ensure that you clear the caches and cookies often. Follow the steps given below to clear the caches and cookies:
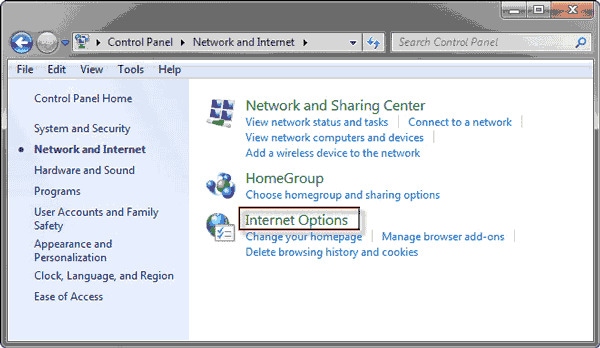
Step 1: Open the Control Panel on your Windows from the Search Panel.
Step 2: Visit the Network and Internet option from the Control Panel window.
Step 3: Within the Internet options, you will have to click on the Delete browsing history and cookies option.
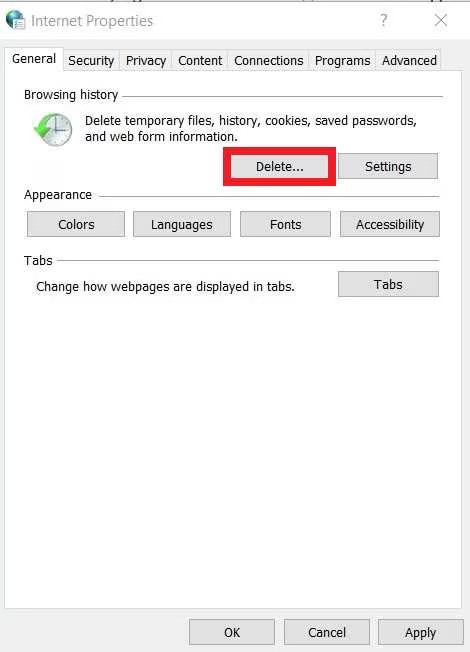
Step 4: A new window will open. Under the Browsing History option, click on Delete.
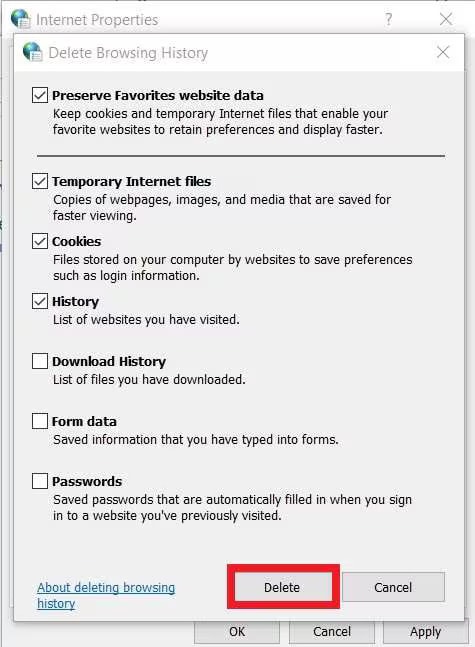
Step 5: Tick all the checkboxes for the cache and cookies that you want to remove. After selecting, click on Delete.
You can also clear caches and cookies from your browser. The option to clear caches and cookies is usually available under the Clear browsing data option.
Fix 10: Update Graphics Drivers
Sometimes, you may not be able to play the videos because of graphics driver issues. The main function of the software is to manage the graphics card of your PC and convert the digital codes into pixels.
A good graphics driver is extremely important for your system, especially for it to function smoothly. A major reason why you're constantly facing the black screen while playing video is because of the outdated graphics driver. So, it is advisable to update the graphics driver following the steps given below:
Step 1: From your system's Search Panel, look for Device Manager.
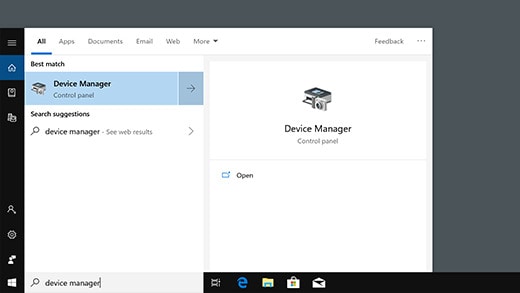
Step 2: Visit the Display Adapters section and right-click on the graphics card. Now, hit the Update Driver button.
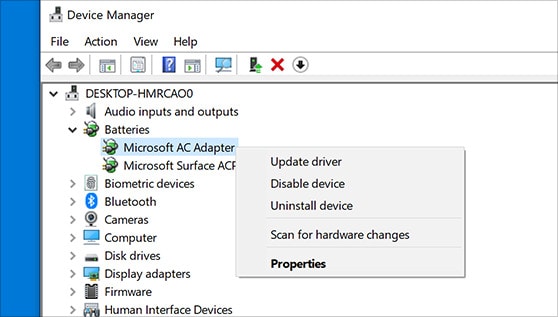
Step 3: Look for Search automatically for updated driver software options.
You have the option to download the graphics driver and manually update it. If you want to update the graphics driver manually, you will have to look for Browse My Computer for the driver software option on your PC.
Conclusion
You may experience windows 10 black screen when playing videos for a wide range of reasons. It is important to adopt the right solutions so that you can resolve this problem easily. There are several methods that you can try. After all, if one method doesn't work, you can always move ahead with the other ones. These methods will play an important role in securing the screen and preventing any unwanted disruptions while playing videos.
FAQs
-
1. Can outdated or incompatible display adapter drivers cause a black screen when playing videos?
Yes, if there's an incompatible or outdated display adapter driver installed in your system, it may lead to the screen becoming black while playing videos. Therefore, it is advisable to update the driver as soon as possible. -
2. Is it possible to repair a black screen issue caused by a hardware defect?
If you want to repair the black screen issue caused by the hardware defect, it is possible. However, in this case, you would need professional help or a replacement part so that it can fix the issue. -
3. If I can hear the audio, but the screen is black, is it still a black screen issue?
Yes, when you play the video, hear the audio, and can't see the video, it is a black screen issue. In this case, this is probably a video error that you will have to look into.


