Instagram is one of the best photo-sharing social media platforms. Many people are using this platform's power to become content creators and influencers. Do you want to become one too? Well, a common problem you’re likely to struggle with is the quality of videos.
When you try to become an Instagram content creator or influencer, you must upload high-quality videos to appear and attract attention. However, for a wide range of reasons, the quality of your video may be reduced significantly. As annoying as this sounds, now there are proper solutions for fixing Instagram video quality.
This blog covers all the methods on how to fix low quality instagram stories and offer great content to all your followers.
Try Wondershare Repairit to Perform Instagram Stories Videos Repair

In this article
Why Are Your Instagram Stories Videos in Low Quality?
Instagram Stories can have poor-quality videos for a wide range of reasons. Before understanding the steps for fixing the Instagram Stories issue, it is essential to understand the reasons behind it. Some of the common reasons why your Instagram Stories videos are of low quality are as follows:
1. Bad/Weak Internet Connection
Poor internet connection may be one of the main reasons your Instagram Stories videos could be better quality. When you upload Stories using mobile data instead of WiFi, the videos will become blurry. If the internet speed is slow, Instagram will, by default, lower the video quality, making the video appear blurry once uploaded.
2. Instagram Settings When Using Mobile Data
If the app is being used on a mobile network, Instagram has a data limit feature. So, if you are using a mobile network for the videos, know that the data will be hampered. As a result, the video quality will be reduced because Instagram does so to save data. Although it seems beneficial, it has drawbacks, as the quality of stories will be reduced.
3. Instagram App Is Outdated
It is advisable not to use an out not to Instagram app to upload. You can update Instagram from the App Store or Play Store. If you use an older app version, update it to the latest version. The older version has outdated programs, which will eventually lower the quality. However, the latest version uses an updated Instagram version to improve the uploading quality.
4. The Camera Settings of the Phone Are Unbalanced
Your camera settings can also have an impact on the overall video quality. It is advisable to check the settings to ensure that the video is being recorded in appropriate settings to determine the video quality isn’t hampered.
5. The Video Being Uploaded Is Not of the Required Standard Size
Instagram has restrictions about the size, so it is advisable to check that the video you’re uploading is of the recommended size. If not, the video will be compressed, reducing overall quality.
How to Fix Instagram Story Video Low-Quality Issues?
When uploading a video to Instagram, you must check its quality. However, sometimes it may happen that even if the video seems to be fine in your system or mobile for now, it will lose its quality upon being uploaded. If you have been struggling with this often, you must adopt the right methods to fix it.
Some of the common methods for how to fix low quality instagram stories are as follows:
Method 1. Check Network Connection
An unstable internet connection may be one of the reasons why the uploaded Instagram story video may get blurry. A bad internet connection will reduce the quality even after successfully uploading the video.
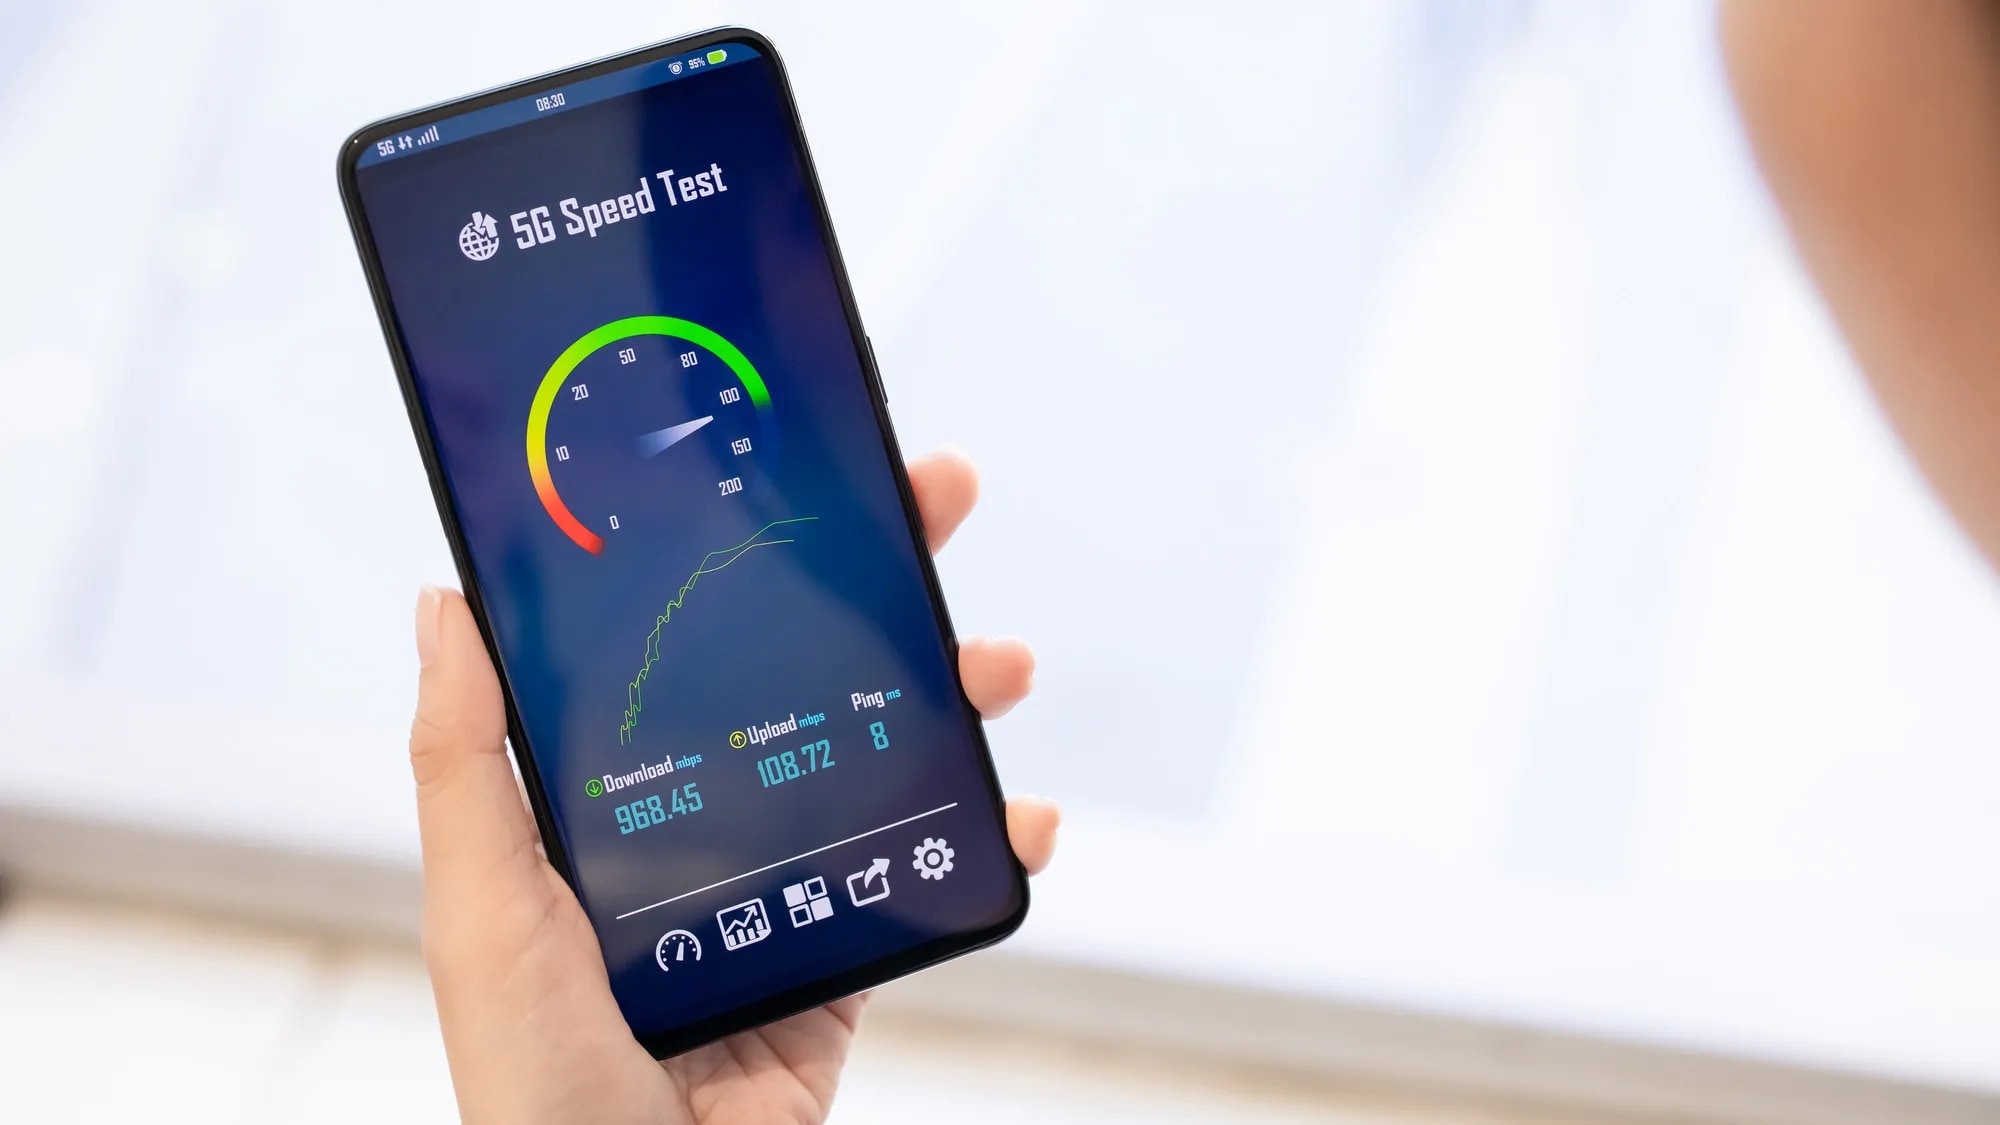
You can visit the other websites and check whether they are loading. After that, you can download the videos. You can connect to WiFi or vice versa if the mobile data is not working.
Method 2. Adjust Instagram Setting
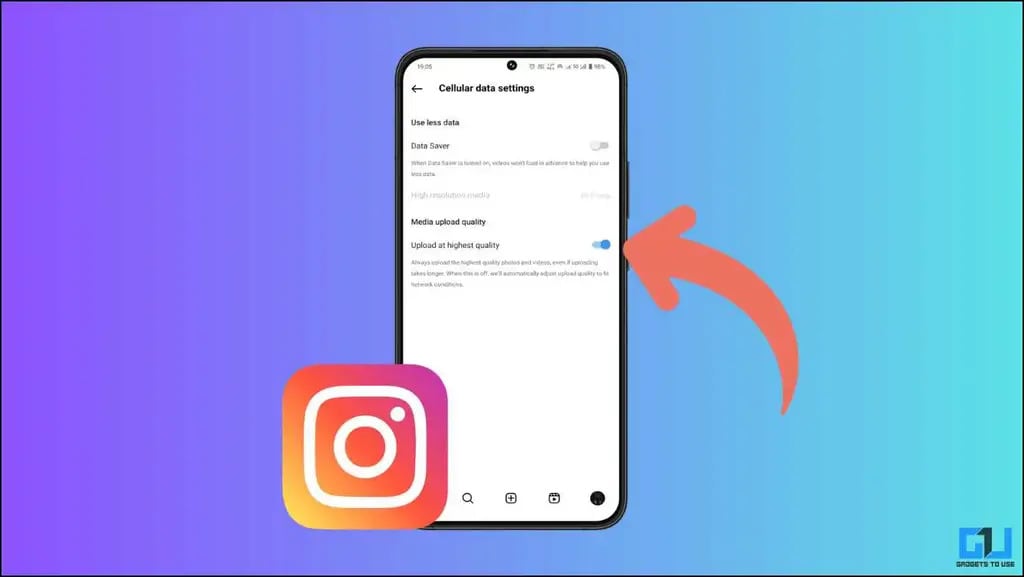
Instagram uses a lot of mobile data, especially when you’re not connected to WiFi. However, to ease this, Instagram offers settings options through which you can lower data usage. Once you enable the settings, you can turn off lower Instagram video quality.
You need to follow the steps given below to adjust the Instagram settings:
Step 1: Open the Instagram app on your phone and tap the profile icon.
Step 2: On the top right corner of the app, click on the three horizontal lines.
Step 3: A sliding menu will appear, click on Settings and choose Account.
Step 4: Once the settings are open, scroll to open ‘Cellular Data Use’.
Step 5: You will come across the Data Saver option. Toggle it off.
Method 3. Resize the Instagram Video
Instagram has stringent restrictions on uploaded videos, especially regarding quality and size limits. When you upload an oversized image or video on Instagram, it will speed up the uploading process, reducing the quality and making the video blurry, or reducing the quality.
Once the video is uploaded, you will have to check how the video is appearing on your feed. If the video is too big and upon being uploaded, the quality will be lowered. However, you may need to compress the video using a good-quality video compress. The compressor will ensure that the quality isn’t hampered. The specification recommendations are mentioned in the article below.
Method 4. Adjust Camera Settings
Sometimes, you may need help to upload high-quality videos to Instagram Story because of incorrect camera settings. When your Camera cannot capture the videos in the correct resolution and quality, uploading them can be difficult. As a result, if you want to improve video quality instagram stories, update your camera settings.
So, whether you’re using an Android device or iOS, it is advisable to adjust the camera settings. This will allow you to capture the video at appropriate quality.
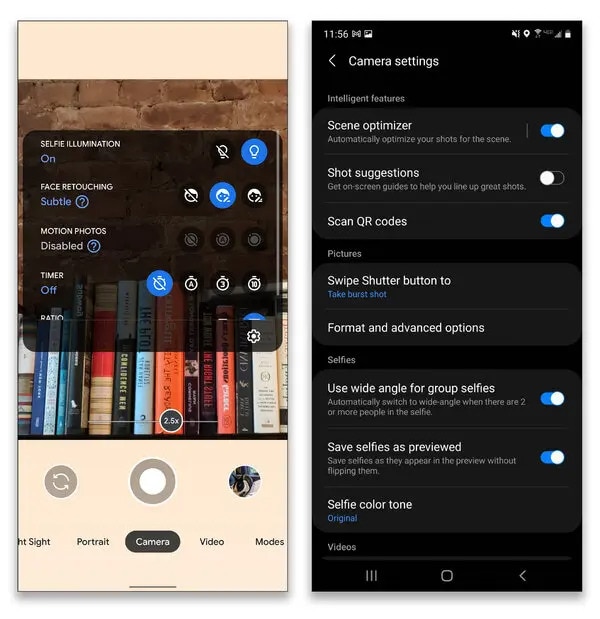
Here are the steps to adjust camera settings on your Android device:
Step 1: Open the default camera app on your phone.
Step 2: Click on the Settings icon.
Step 3: Adjust the size and video quality.
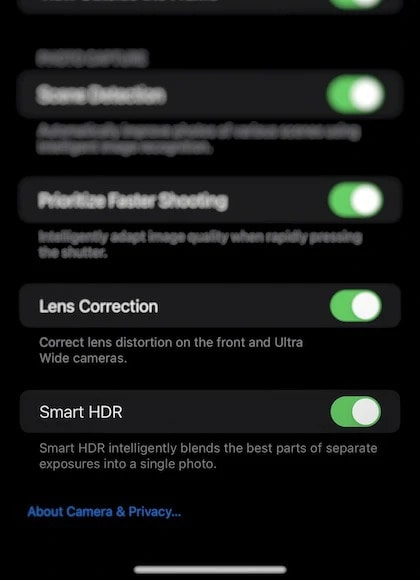
Here are the steps to adjust camera settings on your iOS device:
Step 1: Open Settings on your iOS device.
Step 2: Click on the Camera app option.
Step 3: Adjust the video quality and size per the accepted format.
Method 5. Mind the Video Size Limit
You must be mindful of the video size limit you’re uploading on Instagram Story. The accepted video size limit is up to 15 GB. So, if you want to maintain the Instagram video quality, make sure not to go beyond the size limit.
Using your phone to record and upload the video on Instagram directly can be helpful. While maintaining the video size limit, take care of the video bitrate, frames, and resolution to ensure that the story video quality isn’t lowered.
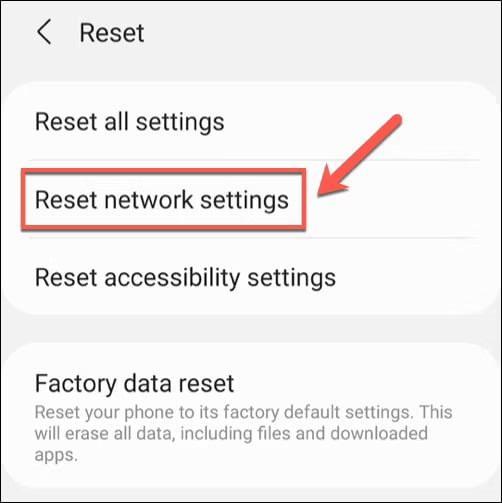
Method 6. Reset Network Settings
You may also struggle to upload the best quality videos on Instagram because of poor network settings. It is advisable to check network settings predominantly if the other phones on the same network are fine.
If you face frequent network issues, you need to reset the network sessions to get access to high-speed internet.
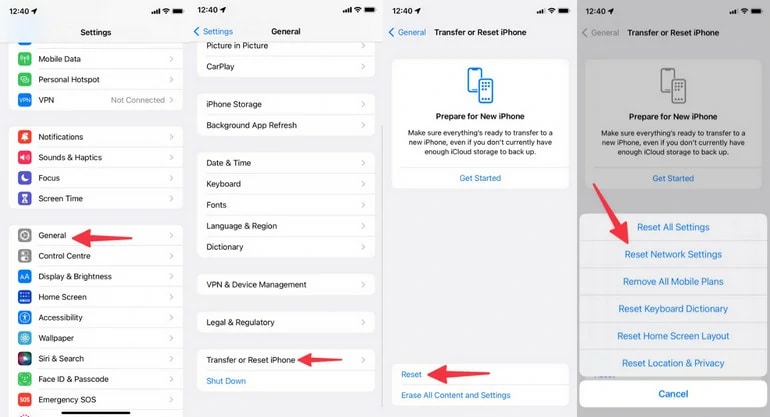
Here’s how to reset network settings for Android and iOS to fix Instagram video quality by following the methods below:
iOS: Settings > General > Reset > Reset Network Settings
Android: Settings >Backup and reset > Reset Network Settings
Method 7. Upload Videos Without Music, Stickers, GIFs
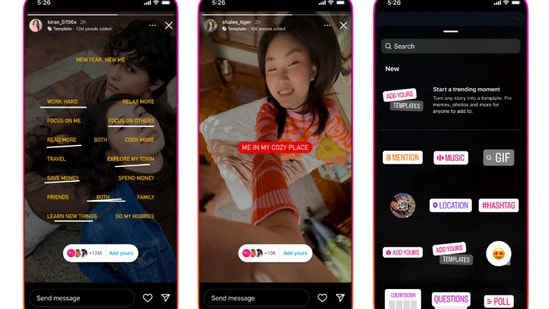
With Instagram's updating many features, everyone has become used to adding music, GIFs, and stickers when they upload stories. However, adding too many elements, especially dynamic ones, can lower the Story video quality to maintain the size. Extra elements would only translate to an oversized video.
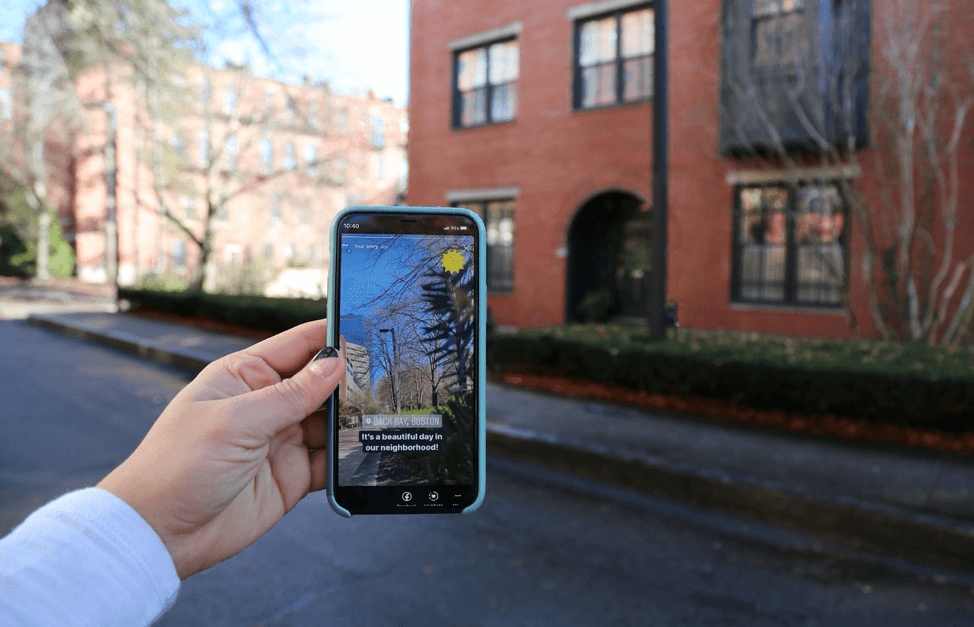
As a result, the video will appear blurry. Therefore, whenever you’re uploading a Video on Story, you must not add stickers, GIFs, or music, especially when connected to mobile data. Not adding these extra elements provides space for your videos to be uploaded correctly without being blurry or corrupted.
Method 8. Update the App
As mentioned above, using an outdated version of the Instagram app may be one of the reasons for poor-quality videos being uploaded. Therefore, you must consider updating the app to improve video quality Instagram stories. The app can be updated to its latest version from the Play Store or App Store, depending on your Android or iOS device.
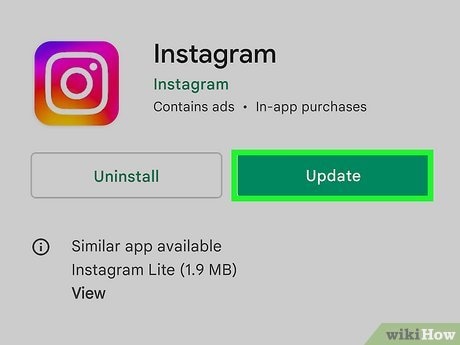
Follow the steps below to update the Instagram app:
Step 1: Open the Play Store or App Store on your device.
Step 2: Search for an Instagram app.
Step 3: Once the app screen appears, you will receive two options, ‘Uninstall’ and ‘Update.’ Click on Update.
The update will take a few minutes, and the app’s latest version will be available on your system.
Bonus Tip: Fix Low-Quality Download Instagram Videos with Video Repair Software – Repairit
When the video quality reduces, it becomes blurry. So, if you have problems with the blurry video, you need to choose high-quality video repair software. Wondershare Repairit is one of the most reliable tools for repairing the corrupted videos and improving video quality. This tool plays a vital role in improving the quality of the video, thereby removing the blurriness furthermore making it Instagram-worthy.
If the video is corrupted, it becomes blurry. Therefore, choosing video repair software like Wondershare Repairit can help to fix the corrupted video. Repairit supports various video formats, such as M4V, M2TS, MTS, MOV, AVI, FLV, and more. Furthermore, it can help to repair videos in multiple formats across different devices, such as Windows and macOS. You need to download and install the software on your device so that you can fix the video.
Below are the top steps that you can follow to fix Instagram video quality using Repairit:
Step 1: Install and Launch the Software
Launch the software on your device, and select the corrupted video you want to fix. The straightforward software interface allows two ways to upload the video on the platform.

First, you can see the ‘+Add’ where you can click and upload the video. You can also click on the available ‘white space’ at the center of the software. The video will be uploaded on the respective platform.
Step 2: Repair the Video
Once you select all the videos, you will come across the ‘Repair’ option available in the bottom right corner of the video. The repair process will initiate.

The repair process will take a few minutes, and after it is complete, the confirmation screen of the repaired video will appear on the screen.
Step 3: Check the Preview of the Video
You will see the ' Preview ' option once the videos are fixed and a confirmation window appears. Click the ‘Preview’ button to check if the recovered video is appropriate.

After checking the preview video, click the ‘Save’ button on the screen's bottom right corner. The video will get saved. You need to choose the location where you have to save the file. Ensure the location isn’t where the video was saved earlier on your device.
Step 4: Perform Advanced Repair (Additional Option Might Not be Necessary)
Upon checking the preview of the repaired file, you may come across the option that the video isn’t repaired correctly due to extreme corruption. In this case, you will have to perform an advanced video repair. To perform advanced repair on the video, click the ‘+’ folder option to add a sample video.
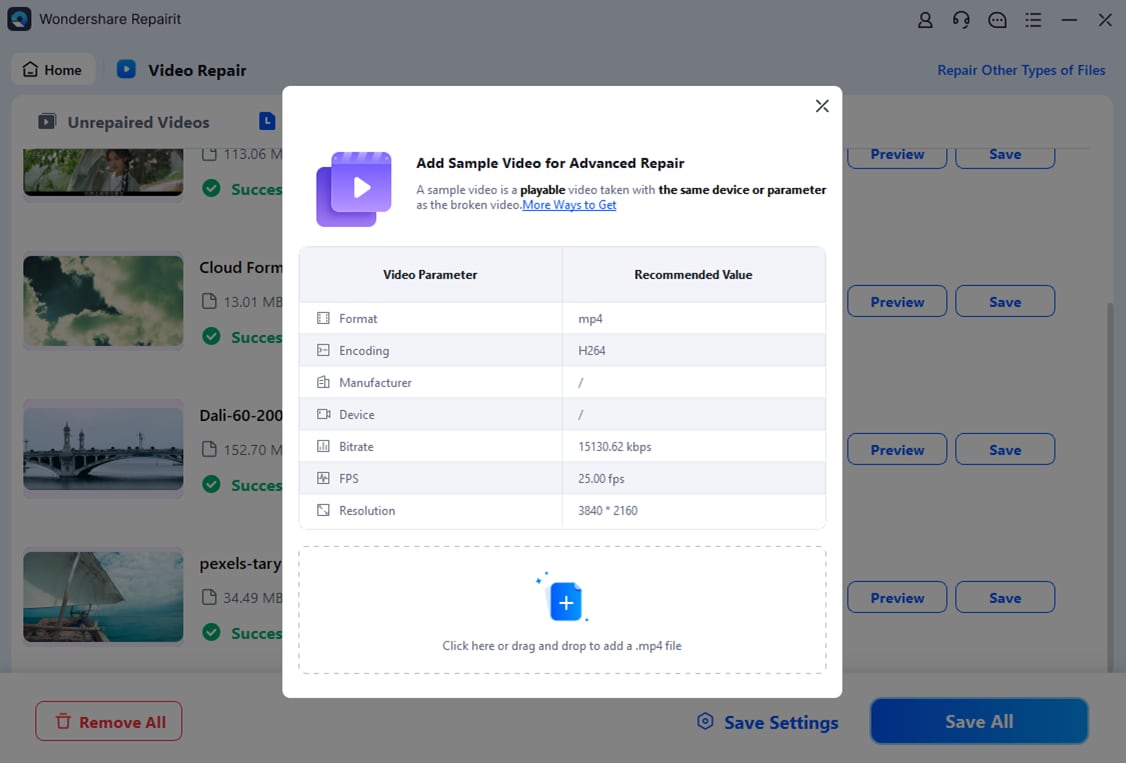
The sample file you upload should be in the same format as your corrupted file. The Advanced Repair option will extract information from the sample file. Deriving the information, they will work towards fixing the corrupted file. After selecting the video, click the ‘Repair’ option on the bottom right corner of the dialog box. This will take a few minutes before the process is completed.
Step 5: Save the Repaired File in The Desired Location
After the advanced repair of the video is done as per the sample file format, choose the location where you want to save the video. Click on the ‘Save’ option in the bottom right corner of the file.
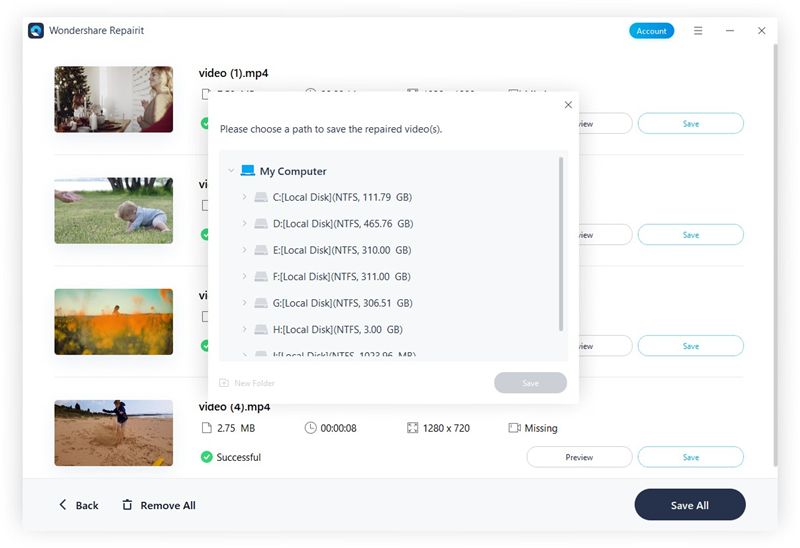
You need to save the video in a new location, not where the corrupted video was stored. It will take a few seconds to save the video.
Instagram Video Format Specifications Recommendation
To upload high-quality videos on Instagram, it is advisable to upload these videos via browser while staying connected via video. The thumbnail of the video should have a minimum width of 500 pixels. Moreover, if you want to avoid Instagram video low quality, it is advisable to maintain a video size of 15 GB.
As for the recommended specifications for Instagram videos, keep track of the following things:
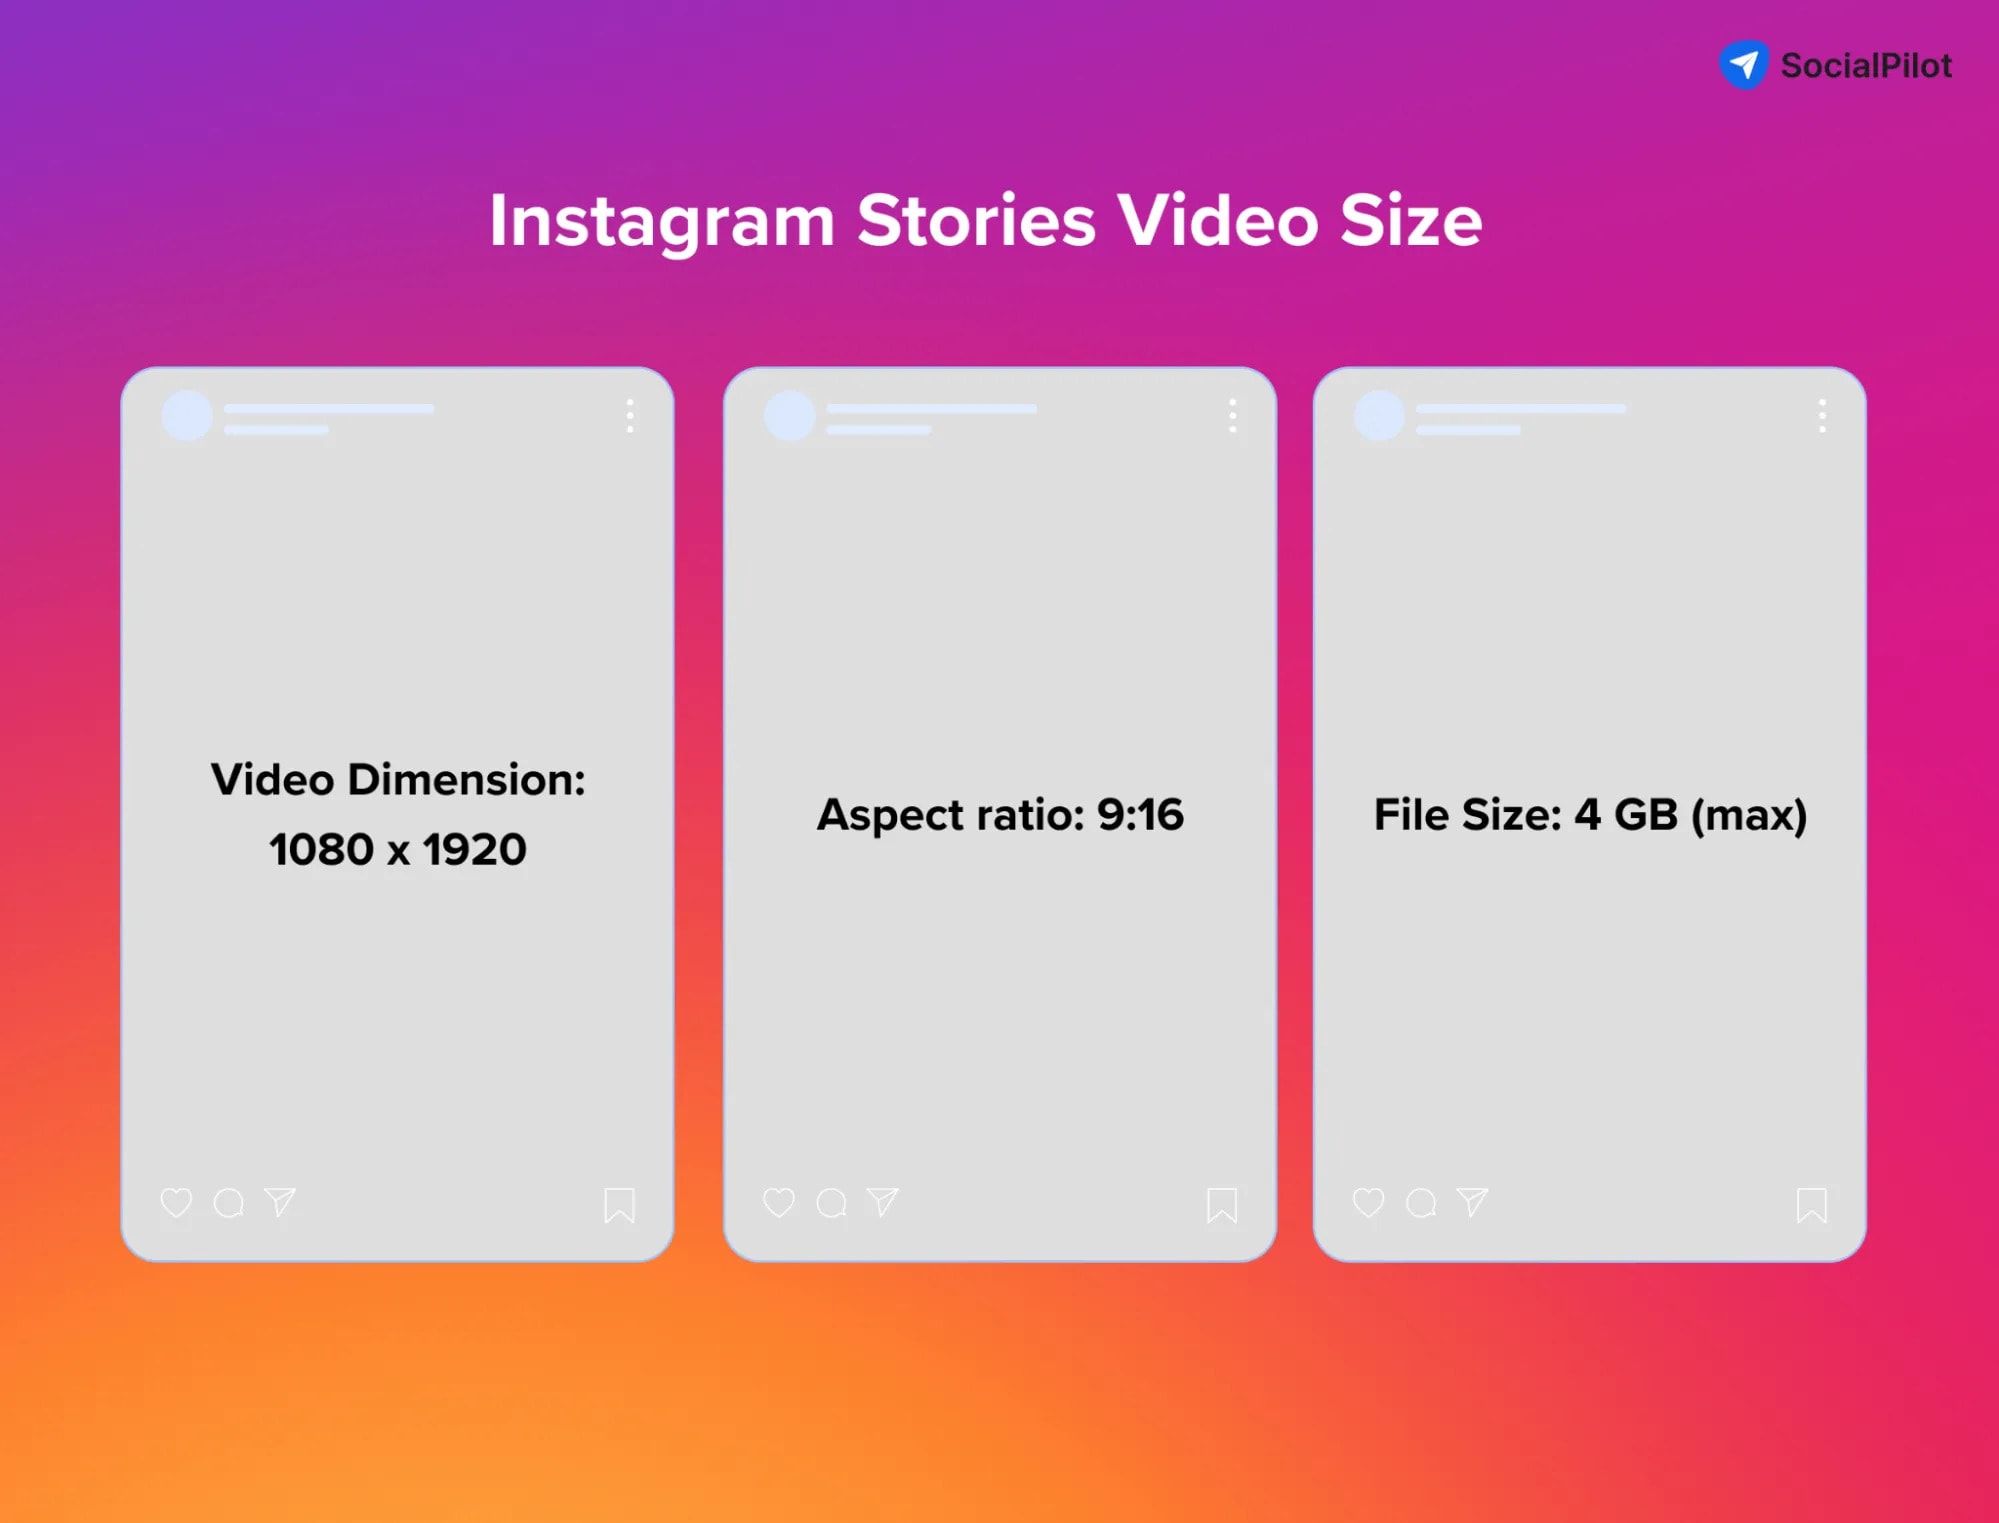
- Resolution: The recommended video resolution for Instagram should be 108.1920.
- Format: The ideal format for an Instagram video should be MP4. In that case, the video will have the best resolution and playability. The other recommended formats are GIF and MOV.
- Audio: For Instagram videos, the audio format should be AAC rather than MP3, considering the improved quality.
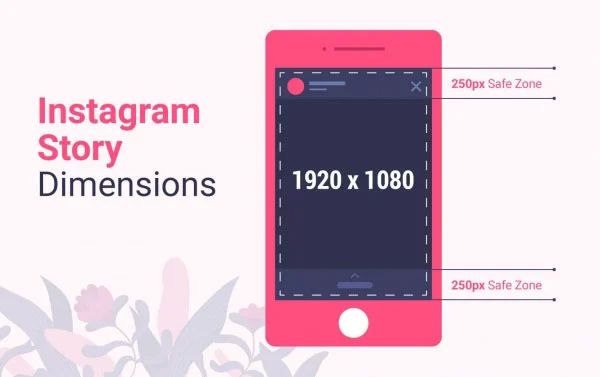
- Bitrate: The accepted bitrate for Instagram videos is 3500 kbps.
- Length: The video should be around 60 seconds long.
- Frame rate: The frame rate for Instagram video should be 30 frames per second (fps).
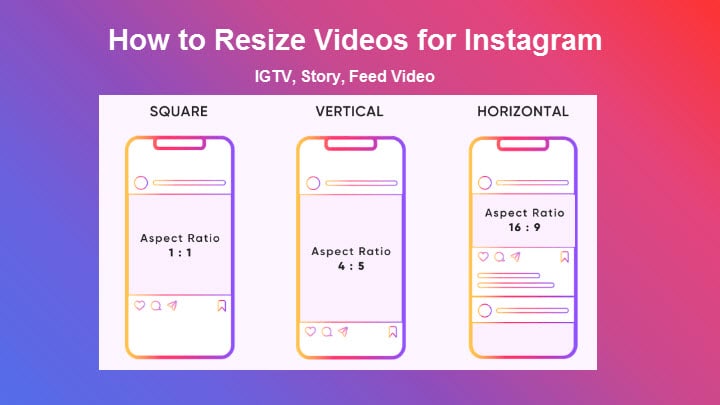
- Aspect ratio: For stories and reels, the aspect ratio is 9:16. However, for feed, the aspect ratio should be 1:1, 4:5, 16:9, and 9:16.
Tips to Prevent Instagram from Bad Quality
Instagram video bad quality can be highly damaging to the business. Whether you're a content creator or just want to fix the video randomly, you need to adopt tips that will help to prevent the bad quality of Instagram.
Adopting a few tips and tricks can play an essential role in fixing the lousy quality of videos for Instagram. Some of the prominent tips that can help to prevent Instagram's bad video quality are as follows:
- Shoot video in 4K: Shooting video in 4K can help to improve the video quality. Changing the video quality or getting a good camera to shoot 4K video is advisable. Good-quality equipment will be necessary to help you shoot videos in 4K.
- Video Compression: 4K videos can take up a lot of space, so it is essential to use a video compressor after shooting 4K video quality. Once the video is compressed, you can save the quality to 4K. So, even after you have uploaded the video on specific platforms, you need to use a compressor to retain its 4K quality. This compressor if not the best one can cause Instagram video low quality.
- File Transferring: Compressing the video and then transferring it can hamper the overall video quality, especially when doing it across compressors. Therefore, while initiating the file transfer process, it is advisable to adopt compressing and transferring the videos repeatedly. Initiate the transfer process only once to prevent hampering the Instagram video quality.
Conclusion
If you are an Instagram content creator or planning to become one, you must ensure that you upload the best quality videos. While 4K videos may seem the best option, using that video format does more harm than good. Therefore, repair the Instagram video quality and use a legitimate format so that you can upload them. Uploading high-quality videos to your profile will help attract more attention from the audience, thereby allowing you to grow on the platform.
FAQs
-
1. Why does my 4k video look bad on Instagram?
Instagram does not have a 4K video quality feature yet. Therefore, uploading a 4K video on Instagram will not look good on your profile. If you upload this video, the platform will either throttle the quality or compress it. -
2. Can I convert 4K to 1080p before uploading my Reels?
Yes, you can convert the 4K videos to 1080p before you upload the video on Reels. However, if you convert the video, Instagram will compress video quality, making it look better. You can use different tools to easily convert 4K videos to 1080P and upload them to Instagram Reels. -
3. What’s the best resolution for Instagram Reels?
Instagram Reels are mainly used on phones. Therefore, it is advisable to determine the best resolution for phones. The best resolution for Instagram Reels is for a 9:16 aspect ratio. Thus, a proper resolution of 1080 pixels wide by 1920 pixels long is followed.


 ChatGPT
 Perplexity
 Google AI Mode
 Grok
Grok


