
 TL;DR:
Resolving a video playback error depends on its source: troubleshoot network connections and browser extensions for streaming issues, verify player and codec compatibility for local files, and only use repair software for genuinely corrupted local media.
● Before assuming a local video is damaged, open a copy in an updated player like VLC to rule out unsupported codecs such as HEVC/H.265, since manually renaming an extension from .mov to .mp4 cannot change the underlying format.
● Use Recoverit File Repair exclusively on files that contain actual data but fail across multiple appropriate players, as the software cannot fix streaming errors, process zero-byte files, or rebuild overwritten information.
● If a recording is completely missing, visibly truncated, or shows zero bytes, immediately stop saving new content to the source drive and use Recoverit Video Recovery to scan the storage device instead of attempting file repair.
Ask AI for a summary
 ChatGPT
 Perplexity
 Gemini
 Claude
 Grok
When a video refuses to play, the fastest fix depends on where the failure happens. If a video on a website keeps buffering or shows a playback error, test the connection, browser, and streaming service first. If a video saved on your computer will not open, check the player and codec before deciding that the file is damaged. A repair tool is useful only when you actually have a corrupted local file.
Start with a simple comparison: try another video on the same website or app, then open the problem video in a different compatible player or on another device. The result will tell you which of the paths below is worth following.
In This Article
Part 1. What Does a Video Playback Error Mean?
A video playback error means a player could not start or continue showing a video. It describes the symptom, not one specific fault. The cause might be an interrupted online stream, unavailable content, an unsupported video codec, a player or graphics issue, or damage to a video file.
A filename ending in .mp4 is not proof that every player can decode it. MP4 is a container: the video and audio inside can use different codecs. Likewise, a buffering icon on a website does not prove the original video file is broken.
| What you see | More likely explanation | Best first action |
| One streaming website fails; other sites work | Site, account, browser extension, or stream issue | Test another video on that site and use a private browser window |
| All streaming sites buffer on the same network | Connection, bandwidth, or device performance | Try a different connection and a lower video quality |
| One downloaded video fails in your usual player but opens elsewhere | Player or codec compatibility | Keep the original and use another updated player |
| Many local videos show black screens or stutter after a system change | Player settings, graphics driver, or decoding path | Check system updates and repair the affected player |
| The same local file fails in multiple suitable players | Possible file damage or incomplete copy | Preserve the original, compare file details, then evaluate repair |
| The file is missing, zero bytes, or partly recovered | Missing source data, not simply a playback problem | Protect the source drive and consider file recovery |
Do not make system-wide changes based on a single failed stream. These comparisons can save you from resetting apps, installing unnecessary codecs, or editing a video that was never damaged.
Part 2. Fix Playback Errors in a Browser or Streaming App
If the video plays online rather than from a file you own, focus on the streaming service and the browser or app. Try the least disruptive checks first; the original online media usually is not available for a desktop file-repair program to modify.
Method 1. Check the Video, Service, and Connection
Use this when: a page shows "Playback error," "Couldn't play this video," continuous buffering, or an unavailable-video message.
Step 1. Reload the page once and play a different video on the same service. If other videos work but one does not, the original upload, permissions, region, or service-side availability may be the issue. Check whether you are signed in with the account that has access.

Step 2. If many streams fail, test a different website and switch temporarily between Wi-Fi and another connection where practical. Lower the streaming quality from 1080p or 4K to a lower setting to see whether playback becomes stable.
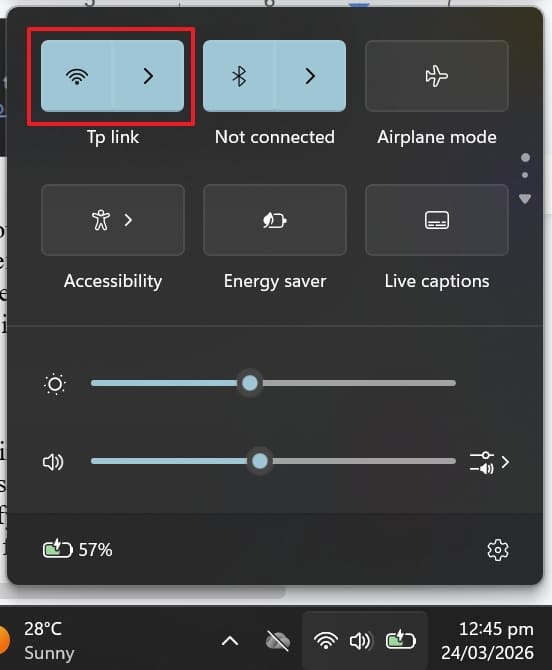
Step 3. Close unused tabs, restart the streaming app or browser, and retry the same video. On a phone or streaming stick, check for an update to the affected app and test the same account on another device; avoid clearing app data if you still need offline downloads.
Success check: playback starts and continues past the point where it previously failed. If not: proceed to the browser-specific test below; if only one service or purchased video fails across devices, contact its support team with the exact error message rather than downloading a file-repair tool.
For service-specific advice, see YouTube's official video-error troubleshooting guide.
Method 2. Isolate Browser Extensions, Cache, and Site Settings
Use this when: a website video fails in Chrome but works in another browser, or playback returns after disabling an extension.
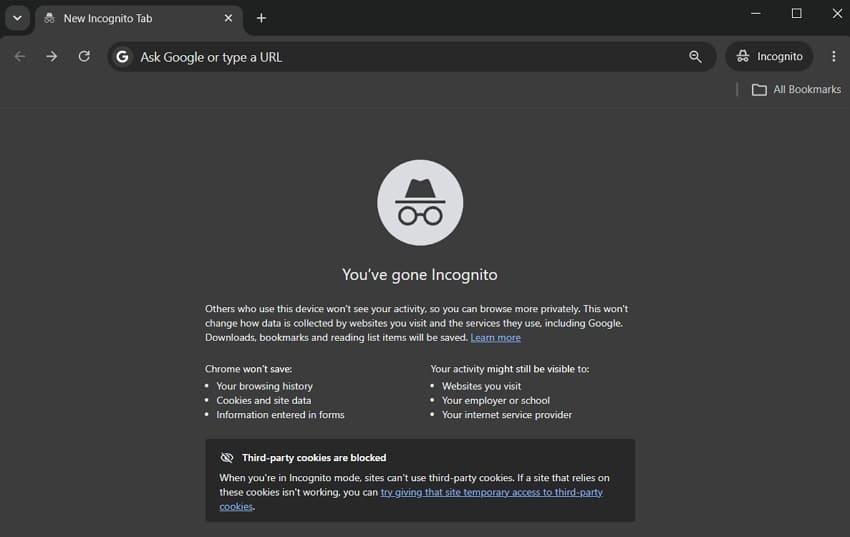
Step 1. In Chrome, select the three-dot menu and open New Incognito window. Visit the same video page and try playback. An incognito window normally starts without most installed extensions, although extensions allowed in incognito may still run.
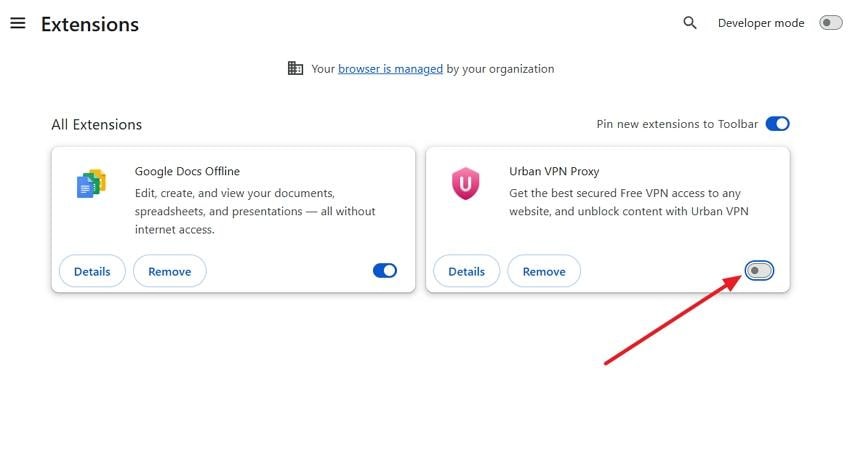
Step 2. If the video works there, open Extensions > Manage extensions in a regular window. Turn off extensions, especially content blockers or video download tools, and reload. Re-enable them one by one to identify the conflict.
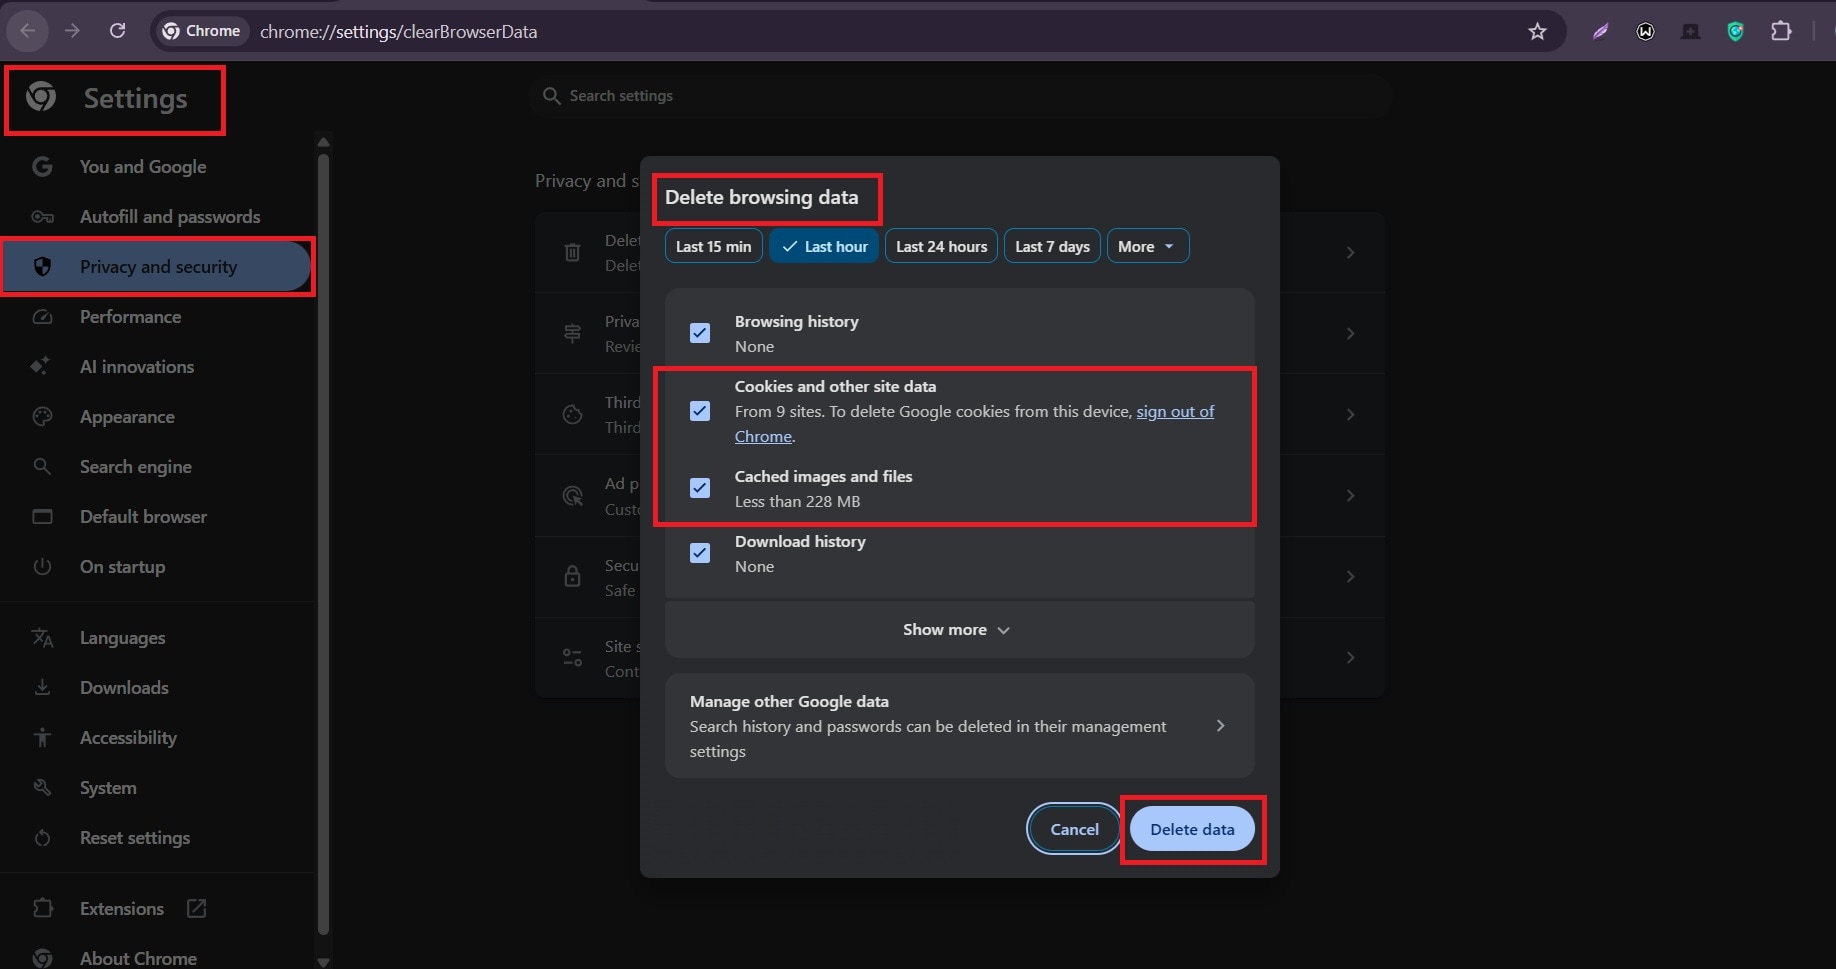
Step 3. If that does not help, open Delete browsing data, select a suitable time range and clear Cached images and files. Clear cookies and site data only when needed; doing so may sign you out of websites. Check that JavaScript is allowed for the affected site.
Step 4. Update Chrome from its menu if an update is offered, relaunch it, and test the video again.
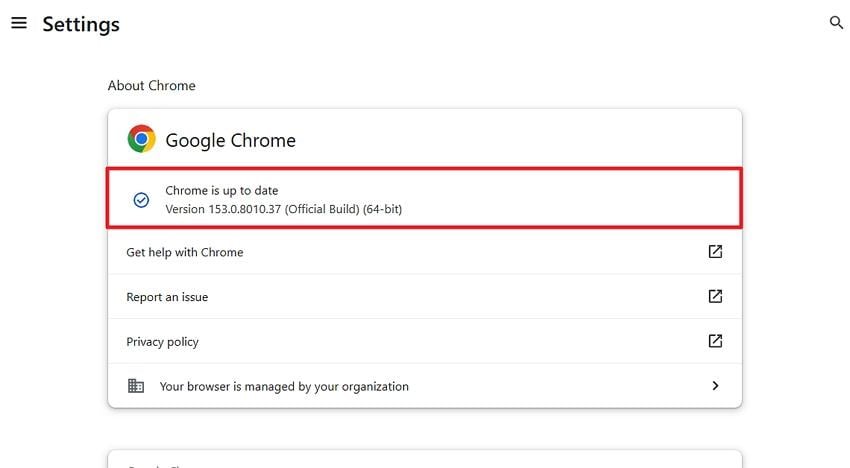
Success check: the same link works in a normal browser window without the original error. If not: test another browser or device. A failure limited to one provider may require the provider's help, not more browser resets.
These steps follow Google Chrome's official video playback guidance.
Part 3. Fix a Video File That Will Not Play on Windows or Mac
Local files call for a different diagnosis. Before transcoding, repairing, or editing anything, make a copy of the video onto a healthy drive if it is still accessible. Keep the original untouched and use the copy for tests.
Method 3. Open the File in Another Compatible Player
Use this when: a downloaded MP4, MOV, AVI, or MKV does not open in your default app or shows a format error.
Step 1. Find the video in File Explorer or Finder and confirm that it has a plausible file size. A zero-byte file has no video content for a player to decode.
Step 2. Make a copy and open that copy in a different, up-to-date player. VLC is a common option for testing compatibility with many multimedia formats. On Windows, select the file and use Open with; on Mac, control-click the file and choose Open With.

Success check: the file plays with picture and audio in the alternative player. If so, keep using a compatible player or convert a separate copy to a format your preferred device supports. If not: check codec support and whether the source file is complete; do not assume VLC itself repaired the file.
Method 4. Confirm the Codec Before Converting a Copy
Use this when: only videos from a certain camera or export setting fail, or Windows reports that the format or codec is unsupported.
Step 1. Look at the file extension and, if available, its video codec details in the player or file inspector. H.264, HEVC/H.265, AV1, and other codecs can require different decoding support; changing the filename from .mov to .mp4 does not change the actual codec.
Step 2. On Windows, check Microsoft's codec guidance and use the appropriate official extension when needed. On Mac, follow Apple's supported-format advice and try a compatible player.
Step 3. If your destination TV or app cannot play the original format, convert only a copied, intact video to a supported codec/container combination using a trusted converter. For example, in UniConverter, import the copied file and select the target format before converting. Preserve the original recording in case the conversion reduces quality.

Success check: the converted copy plays on the intended device from beginning to end. If not: compare another file exported with the same settings; if all files of that codec fail, the issue remains compatibility or software, not evidence of corruption.
Method 5. Repair the Player or Update Graphics Drivers
Use this when: multiple known-good local videos fail in one Windows player, show a black screen, or started stuttering after a graphics or app change. This is not the first step for a single broken MP4.
Step 1. In Windows 11, open Settings > Apps > Installed apps, find the affected media player, and open Advanced options if available. Choose Repair first. Not every player offers this button. Use Reset only after considering that it may remove app preferences.
Step 2. If playback fails in more than one app after a graphics change, check Windows Update for driver updates. You can also open Device Manager > Display adapters, right-click the graphics device, choose Update driver, and follow the prompts. Use the hardware manufacturer's official support site if Windows cannot locate a suitable update.

Step 3. Restart the player or computer if prompted and test one known-good video followed by the original problem video.
Success check: both videos play normally without the prior blank or frozen output. If not: note the exact player error code and contact the app or device vendor; avoid a System Restore merely because one file will not open.
Microsoft provides current steps for repairing Windows apps and updating device drivers.
Part 4. Use Recoverit File Repair Only for a Corrupted Local Video
If the video plays nowhere, is present on your computer, and contains real file data, damage to the video structure is one possibility. Recoverit File Repair is intended for that narrower case. It is not a fix for YouTube buffering, streaming-service restrictions, missing playback rights, or an unsupported codec.
When Is File Repair Worth Trying?
First preserve the original recording or recovered video. If it came from an SD card or USB drive, copy the file to a separate healthy drive before working on it. Compare the size and duration with another recording from the same camera, if available. A file that is zero bytes, incomplete because the source data was never captured, or missing entirely needs a different path.
If a nonzero file consistently refuses to open in multiple appropriate players, Recoverit File Repair may be worth testing on its copy. Repair cannot guarantee recovery of missing video frames or rebuild information that has already been overwritten.
Add, Repair, Preview, and Save a Video with Recoverit
These steps follow the official Recoverit File Repair guide. Button wording may differ slightly across installed interfaces.
Step 1. Launch Recoverit on your Windows or Mac computer. Open File Repair, select the video repair option, and choose Add Video or Add Files. Select the preserved copy of your damaged video.
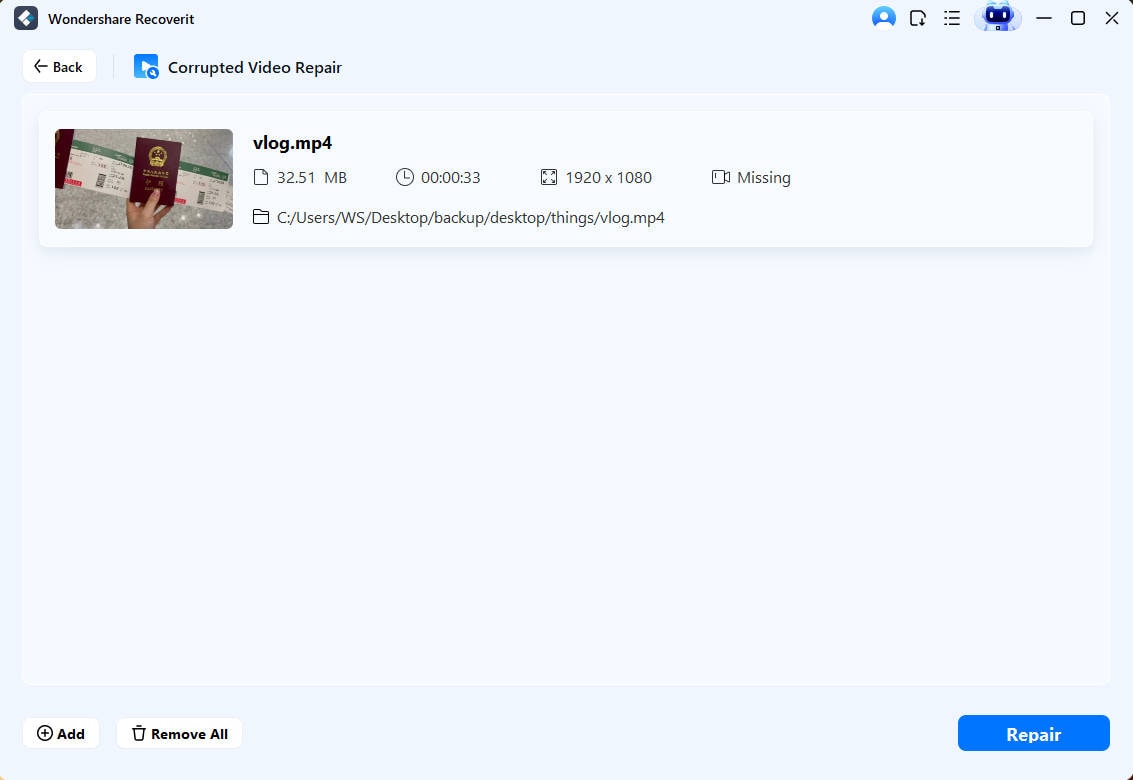
Step 2. Select Repair and allow processing to finish. When the program makes a preview available, play it. If standard repair is insufficient, Advanced Repair may request a healthy sample video of the same format, preferably recorded with the same device.
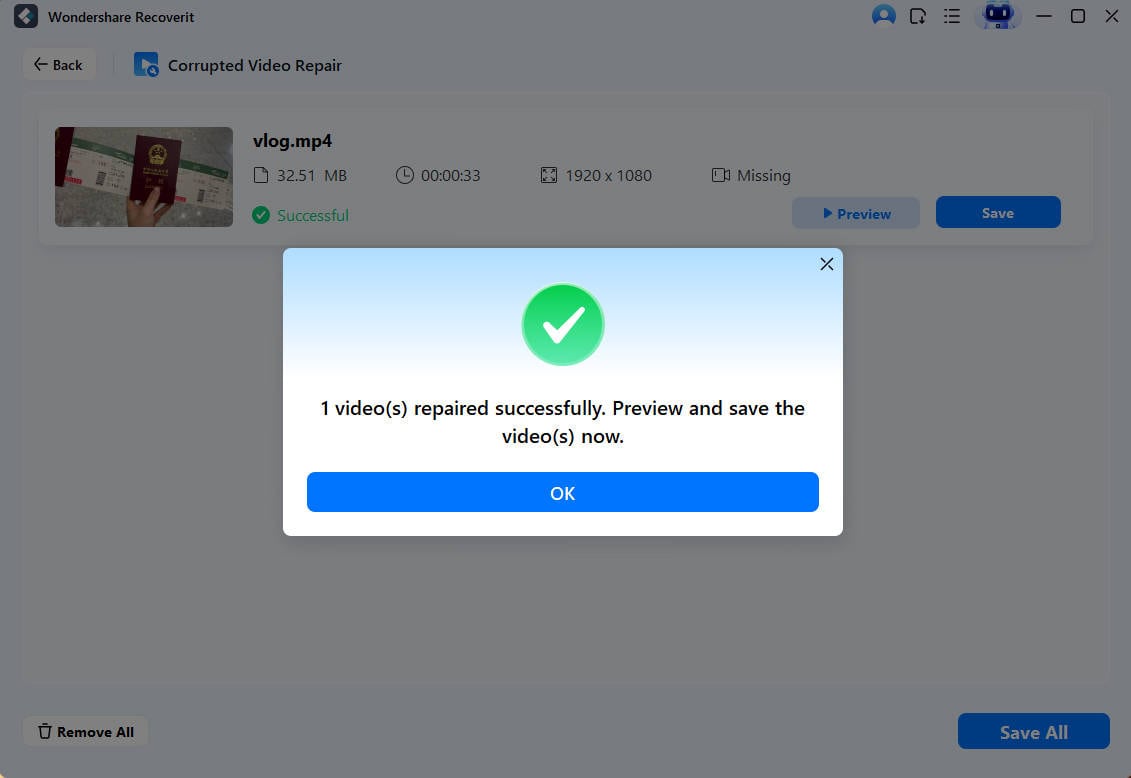
Step 3. If the preview looks correct, choose Save and select a different healthy destination. Open the saved result independently; watch the beginning, middle, and end and check the sound rather than relying only on a completion indicator.
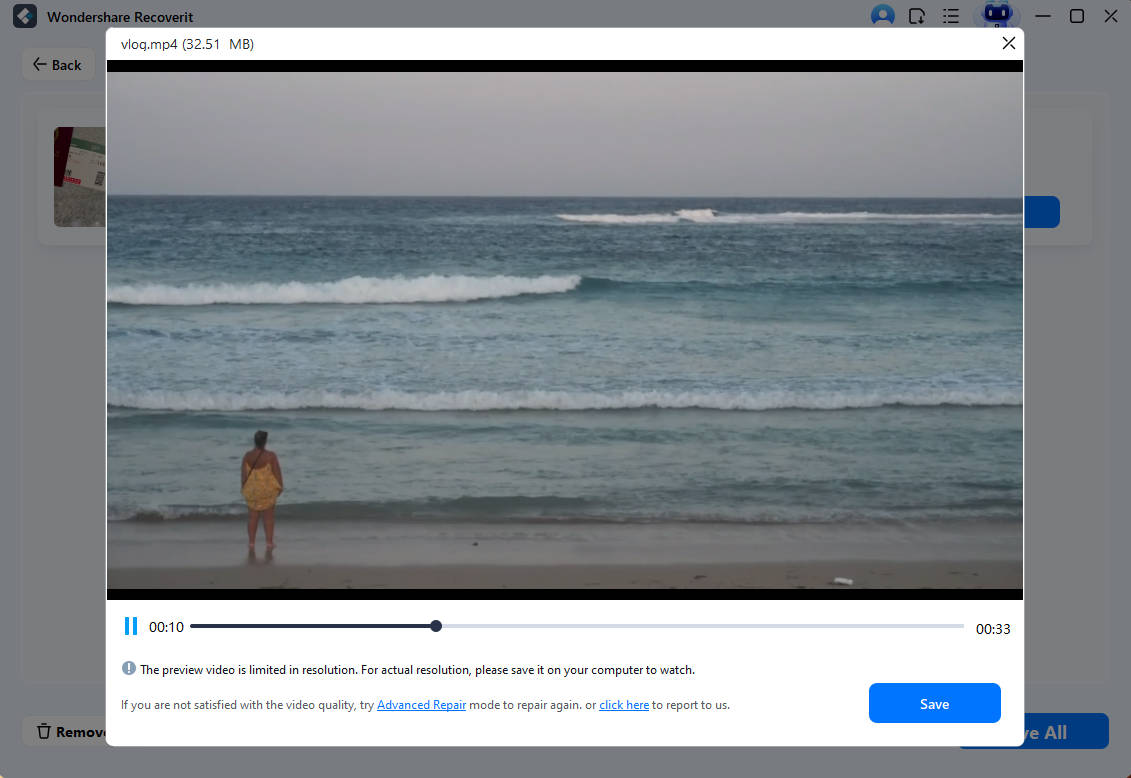
Success check: the saved video plays through the previously broken section with usable picture and audio. If not: keep the untouched original, consider an appropriate healthy sample for Advanced Repair, and stop if the underlying footage is absent. Further software attempts cannot recreate original data that is no longer present.
If you have an existing video with a plausible file size but broken playback, explore Recoverit File Repair and its current options before choosing a download or license. The installer is not proof that a particular file can be repaired.
Part 5. What If the Video Is Missing or the Recovered File Is Incomplete?
If your recording was deleted, lost during transfer, or recovered as an empty or visibly truncated file, do not begin with file repair. Recoverit Video Recovery addresses the different problem of searching a detectable storage device for recoverable video data.
Step 1. Stop saving or recording new content to the original drive or memory card. If the drive disconnects repeatedly or shows physical damage, avoid repeated scans and consider a qualified recovery service.
Step 2. On a stable computer, open Recoverit Video Recovery and select the detectable drive or memory card that previously held the missing recording. Confirm the device before proceeding.
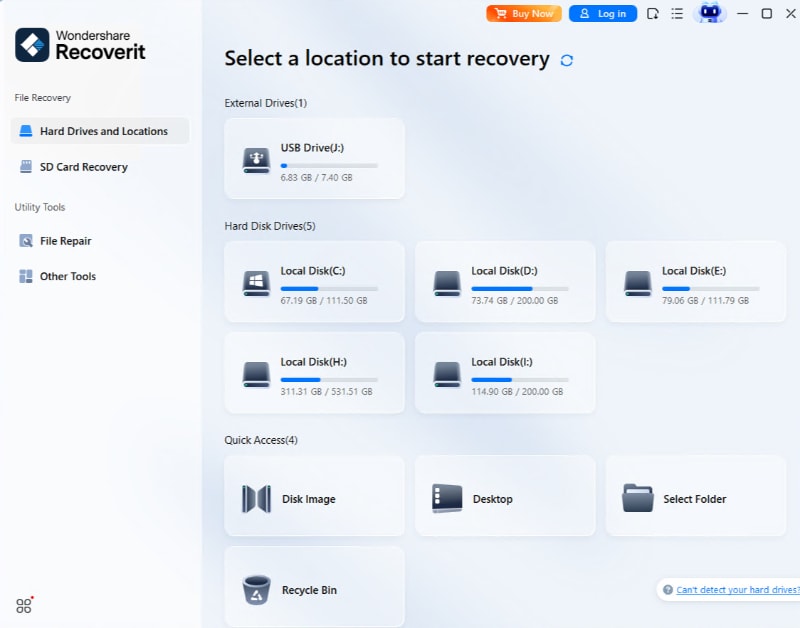
Step 3. Scan that source for videos. Where available, filter the results by video file type or name. Let the scan finish if the footage is still missing, and avoid saving new files onto the source drive.
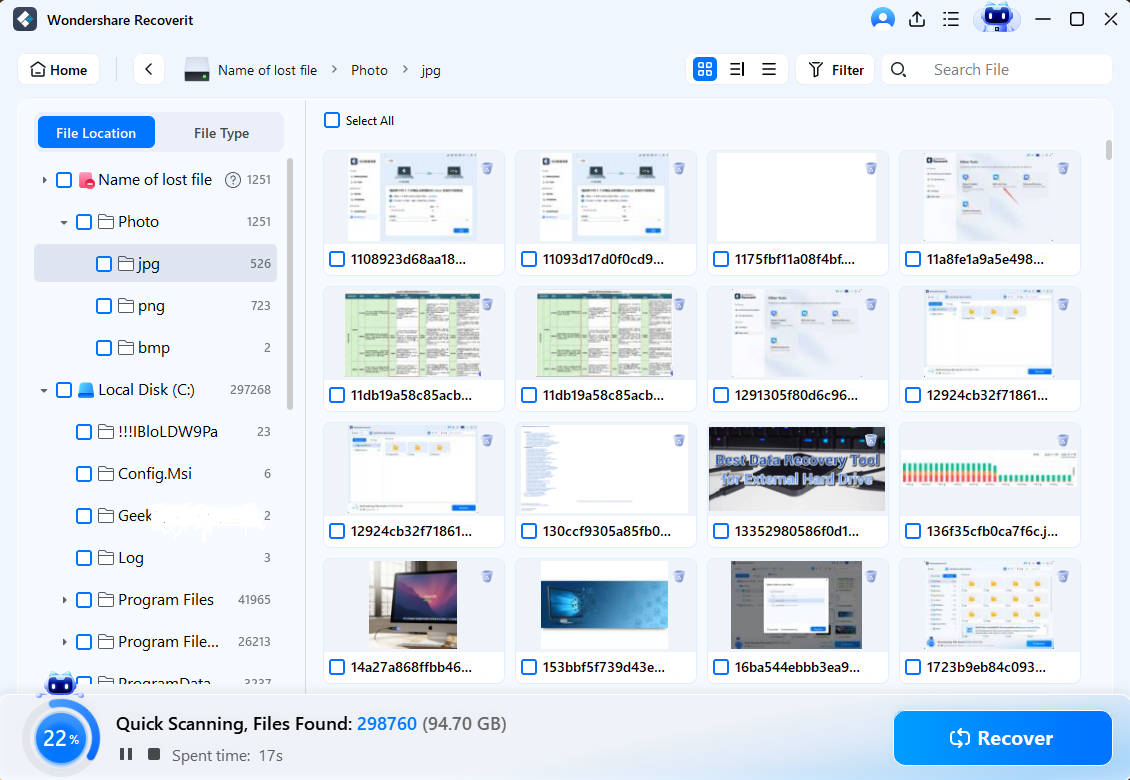
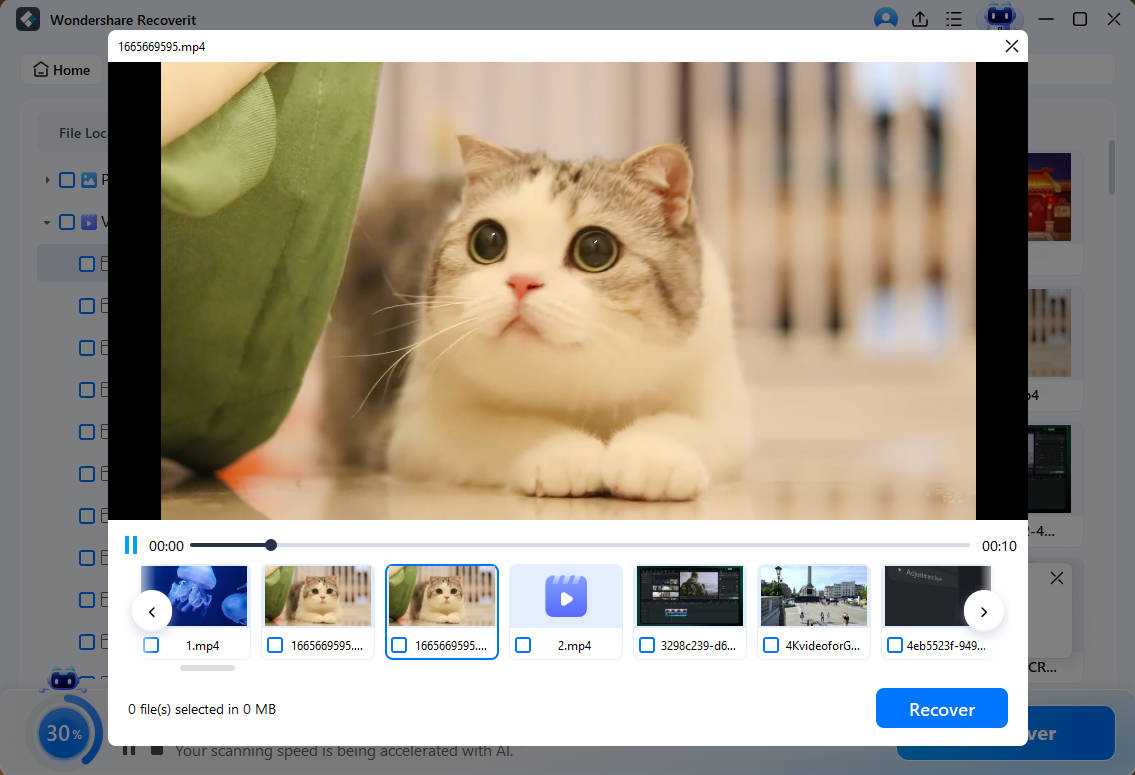
Step 4. Preview promising video results to check whether the missing content is present. Select the video files you want and choose Recover.
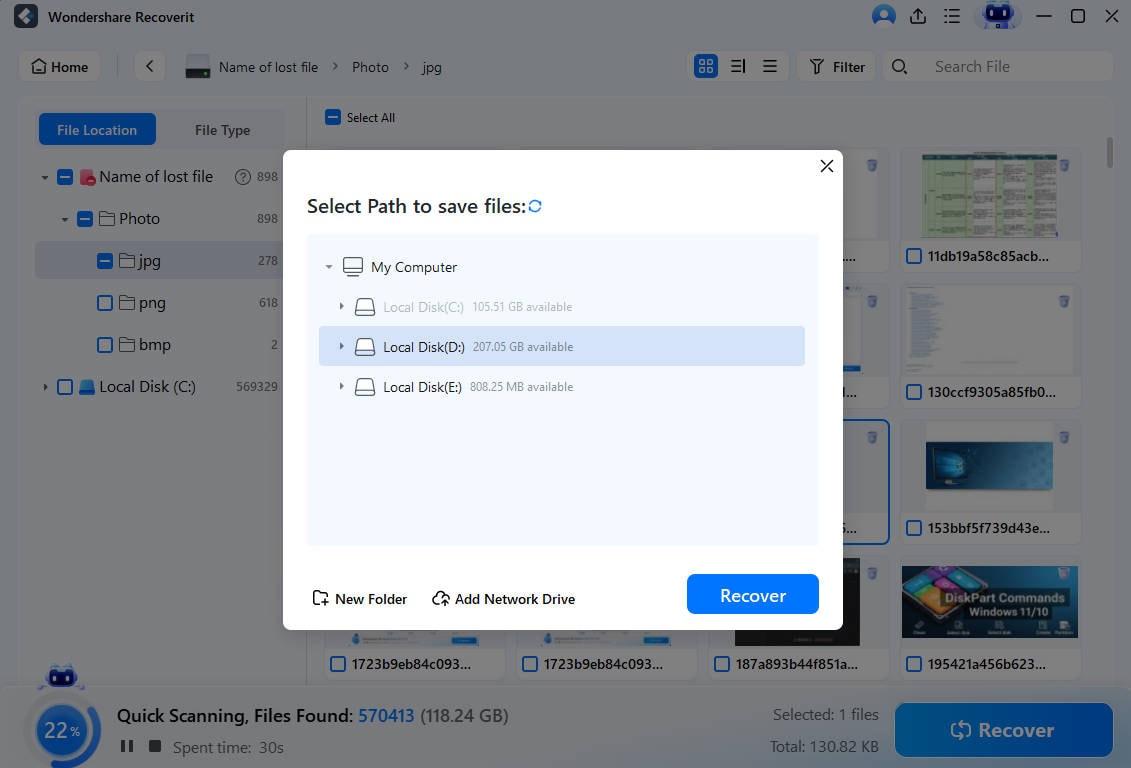
Step 5. Save recovered video files to another healthy drive, not the source device. Play the saved video from beginning to end and check both picture and sound. If it has real data but is structurally damaged, use the File Repair workflow on a separate copy.
Success check: the recovered output plays and contains the footage you need. If not: there may be unrecoverable gaps or overwritten data. File recovery cannot substitute for content never recorded or cloud media no longer accessible to the account.
For the general deleted-file process, see Recoverit File Recovery. Avoid running disk repair, formatting, or reinstalling onto a source drive before protecting the data you hope to recover.
Part 6. Stop Repeating Fixes That Do Not Match the Symptom
Once you know whether the issue is online playback, codec support, a broken player, or a damaged file, use the smallest change that solves it. You generally do not need to lower the processor's maximum power state or run System Restore for a single video error. Those actions affect the wider computer and are poor substitutes for checking the video itself.
- For streaming: keep the browser or app updated, use a stable connection, and report repeatable single-service errors with the exact message.
- For local recordings: preserve the source file, maintain a separate backup, and verify transfers before deleting camera or phone originals.
- For compatibility: record the codec and intended playback device before converting anything; keep an original-quality copy.
- For damaged media: distinguish a genuinely corrupted file from deleted or missing video before choosing File Repair or File Recovery.
Conclusion
A playback error does not automatically mean your video is ruined. Start by locating the fault: online service, browser, player, codec, or the file itself. Most online and compatibility problems call for settings or player checks, not file repair. If an actual local recording remains damaged across suitable players, test Recoverit File Repair on a copy and verify the saved result. If the recording is missing instead, protect the original storage and explore Recoverit Video Recovery.
FAQ
-
Why can I hear audio but see a black video screen?
The audio codec may be supported while the video decoder or rendering path is not, or the video stream may be damaged. Try a different updated player with a copied file. If other videos also show a black screen, examine your player and graphics settings before considering file repair. -
Does renaming .mov to .mp4 fix a playback error?
No. A filename extension does not change the container or codecs inside the file. Use a compatible player or properly convert an intact copy to a supported format. -
Why do videos from one camera fail while other videos work?
The camera may record in HEVC/H.265 or another codec not supported by your normal player or device. Check the camera's recording format and try a compatible player. If multiple recordings from the same device are incomplete or corrupted, preserve the originals before using repair software. -
Can Recoverit fix a playback error on YouTube or a streaming app?
No. A browser or streaming-service error should be diagnosed through the connection, account, app, browser, or service provider. Recoverit File Repair works with suitable local files you can access on your computer, not a remote stream. -
Can I repair a video that shows 0 bytes?
A zero-byte file contains no usable video payload for file repair. If it was deleted or copied incompletely, protect the original storage and consider recovery from that source, if it is still readable and has not been overwritten.


