

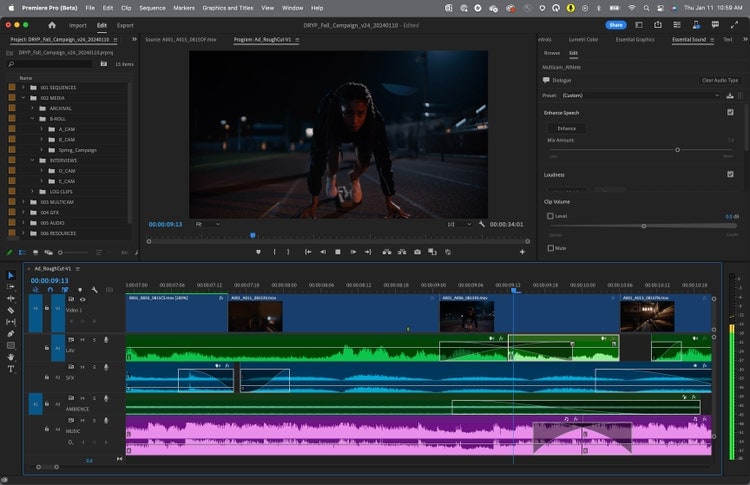
Adobe Premiere Pro is one of the most popular software for editing videos. People use this software to edit projects like short films, movies, etc. However, sometimes, the video may start to glitch. So, in this case, you will have to choose a top software or adopt methods that can help to fix it.
Adobe Premiere Pro won't play videos, which is a major issue that requires immediate action. If you're an editor and most of your work depends on the software, it can be unpleasant for it not to function. So, if you're facing this problem, let's explore the top ways through which you can fix Adobe Premiere Pro not playing video.
In this article
- Method 1. Fix Premiere Pro Not Playing Video Due to Damage with Wondershare Repairit

- Method 2. Reset Adobe Premiere Pro
- Method 3. Reboot the Computer
- Method 4. Use an Alternative Video Editor/Player
- Method 5. Erase the Media Cache
- Method 6. Edit the Audio Hardware Settings
- Method 7. Update the Card Driver
- Method 1. Fix Premiere Pro Not Playing Video Due to Damage with Wondershare Repairit
Why is Adobe Premiere Pro Not Playing Videos?
In certain cases, Adobe Premiere Pro may not be able to play the video. Before understanding the methods to fix it, you must identify the reasons behind it. There are several ways that you can adopt to fix the error.
Some of the common reasons why Adobe Premiere Pro not playing videos or working properly include the following:
- Corrupted video cards
- Unfinished installation
- Hardware glitches
- Overheating
- Incomplete Updates
A wide range of other factors also prevent the video from playing in Adobe Premiere Pro. Some of the key reasons include the following:
Insufficient System Requirements
Sometimes, Premier Pro won't update or crash because the system needs to meet the software requirements. Premiere Pro requires proper processing power with great virtual memory, allowing the software to run smoothly.
If the system doesn't meet the minimum requirements, it will lead to severe performance issues.
| Device | Operating System | Processor | System Memory | GPU Memory |
| Windows | Windows 10 (64-bit) V20H2 or later | Intel® 6th Gen or newer; AMD Ryzen™ 1000 Series or newer | 8 GB of RAM | 2 GB |
| Mac | macOS 11 Big Sur or later | Intel® 6th Gen or newer | 8 GB of RAM | Apple Silicon: 8 GB of unified memory; Intel: 2 GB |

Premiere Pro Doesn't Support Media File
It isn't compatible if the media file isn't playing on Premiere Pro. Premier Pro supports a wide range of codecs, such as H.264 and HEVC, which can make editing in these formats difficult.
Decoding and re-encoding the videos can, however, be complicated, leading to your system needing to be more manageable. As a result, Premiere Pro will freeze or become unresponsive. Thus, when the media player doesn't support the files, it will not play.
Methods to Fix Premiere Pro Not Playing Videos Issue
Premiere Pro is one of the best platforms to edit videos. However, it is essential to ensure that the videos play correctly. If not, it would be really difficult to edit the video files.
Some of the common methods through which you can fix Premiere Pro not playing video issues are as follows:
Method 1. Fix Premiere Pro Not Playing Video Due to Damage with Wondershare Repairit
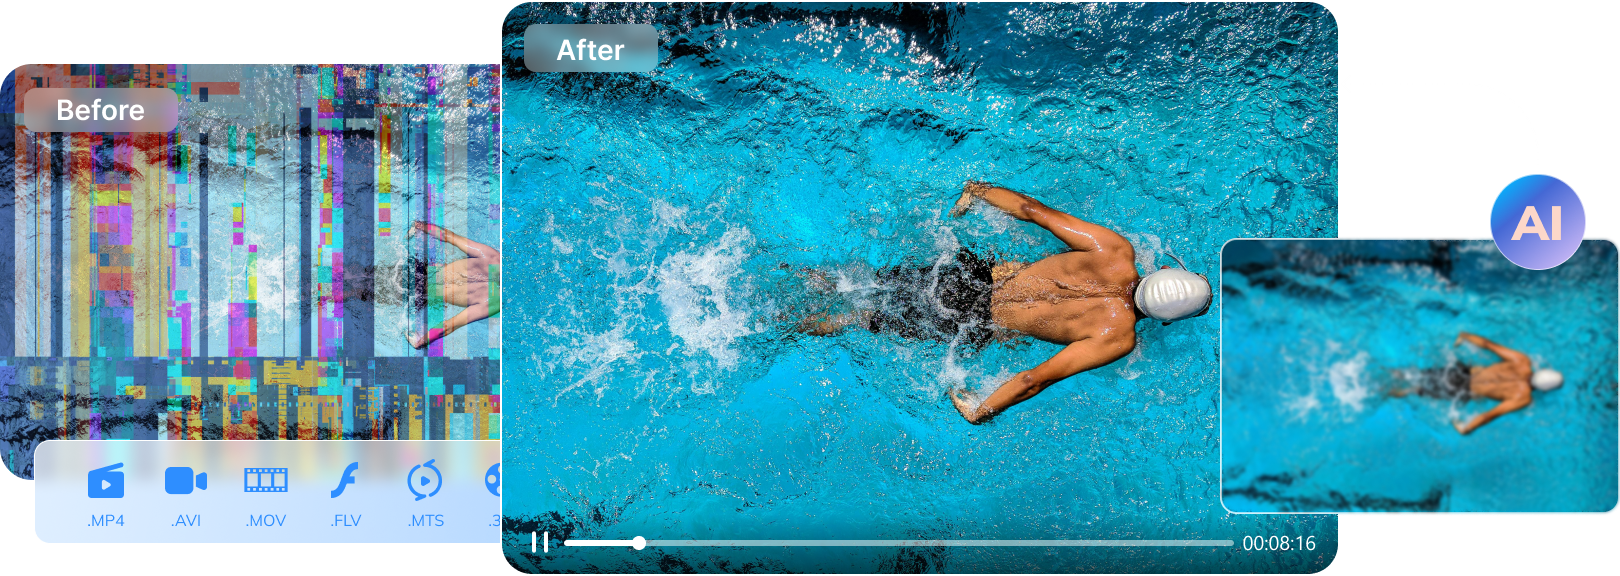
If the Adobe Premiere Pro software isn't frequently playing the videos and is causing the issues, it is advisable to adopt the right methods. This will play an important role in overcoming the issues. Video repair software is one of the easiest ways to fix the problem of Adobe Premiere Pro not playing video. Therefore, you can use Adobe Repairit.
Wondershare Repairit is one of the popular tools that can fix all types of issues, such as audio not working, playback errors, video corruption, video not playing, and more. It supports 15+ formats that can easily fix the issues. Moreover, the size of repairable videos is also an important factor to consider. You must download and install it on your device for it to work properly.So, if the video isn't working properly on Adobe Premiere Pro, you may follow the steps given below:
Step 1: Launch the Software and Add Corrupted Video
Once the installation of Repairit is complete, you must launch it in your system. Next, you must click on the ‘+ ADD’ button to add the corrupted video for repair.

Step 2: Initiate the Repair Process
Now that the video has been uploaded click on the app software interface to see the Repair option at the bottom of the page. Verify that the corrupted videos are uploaded and click the Repair button to begin the repair process.

Step 3: Preview the Repaired Videos
You can get a preview of the repaired videos. If the videos appear to be fixed, click on the Save button to fix it.

Step 4: Conduct Advanced Repair (Optional)
If the video is severely corrupted, then you can perform an Advanced Repair of the video. Wondershare Repairit offers the option to perform advanced repair with a sample video. You can upload a sample video with the same specifications as the corrupted video.

Step 5: Save the Video
After the advanced repair, preview the files and click the Save button.
Method 2. Reset Adobe Premiere Pro
If you are in the middle of editing/working on Adobe Premiere Pro and the software automatically stops playing video, it is advisable to reset the software. Resetting the software can be one of the main ways to fix the problem without any risk of losing the data.
Resetting the Adobe Premiere Pro software will not affect the current ongoing projects but will surely affect the program directories. Although you will not completely lose the data, some recent changes or customizations you made to the project may be lost. The lost information can include colors, labels, transitions and interface brightness.
You can follow the steps given below to reset the Adobe Premiere Pro:
Step 1: Launch the Premiere Pro while simultaneously holding the key Alt (Windows OS) and Option (macOS)
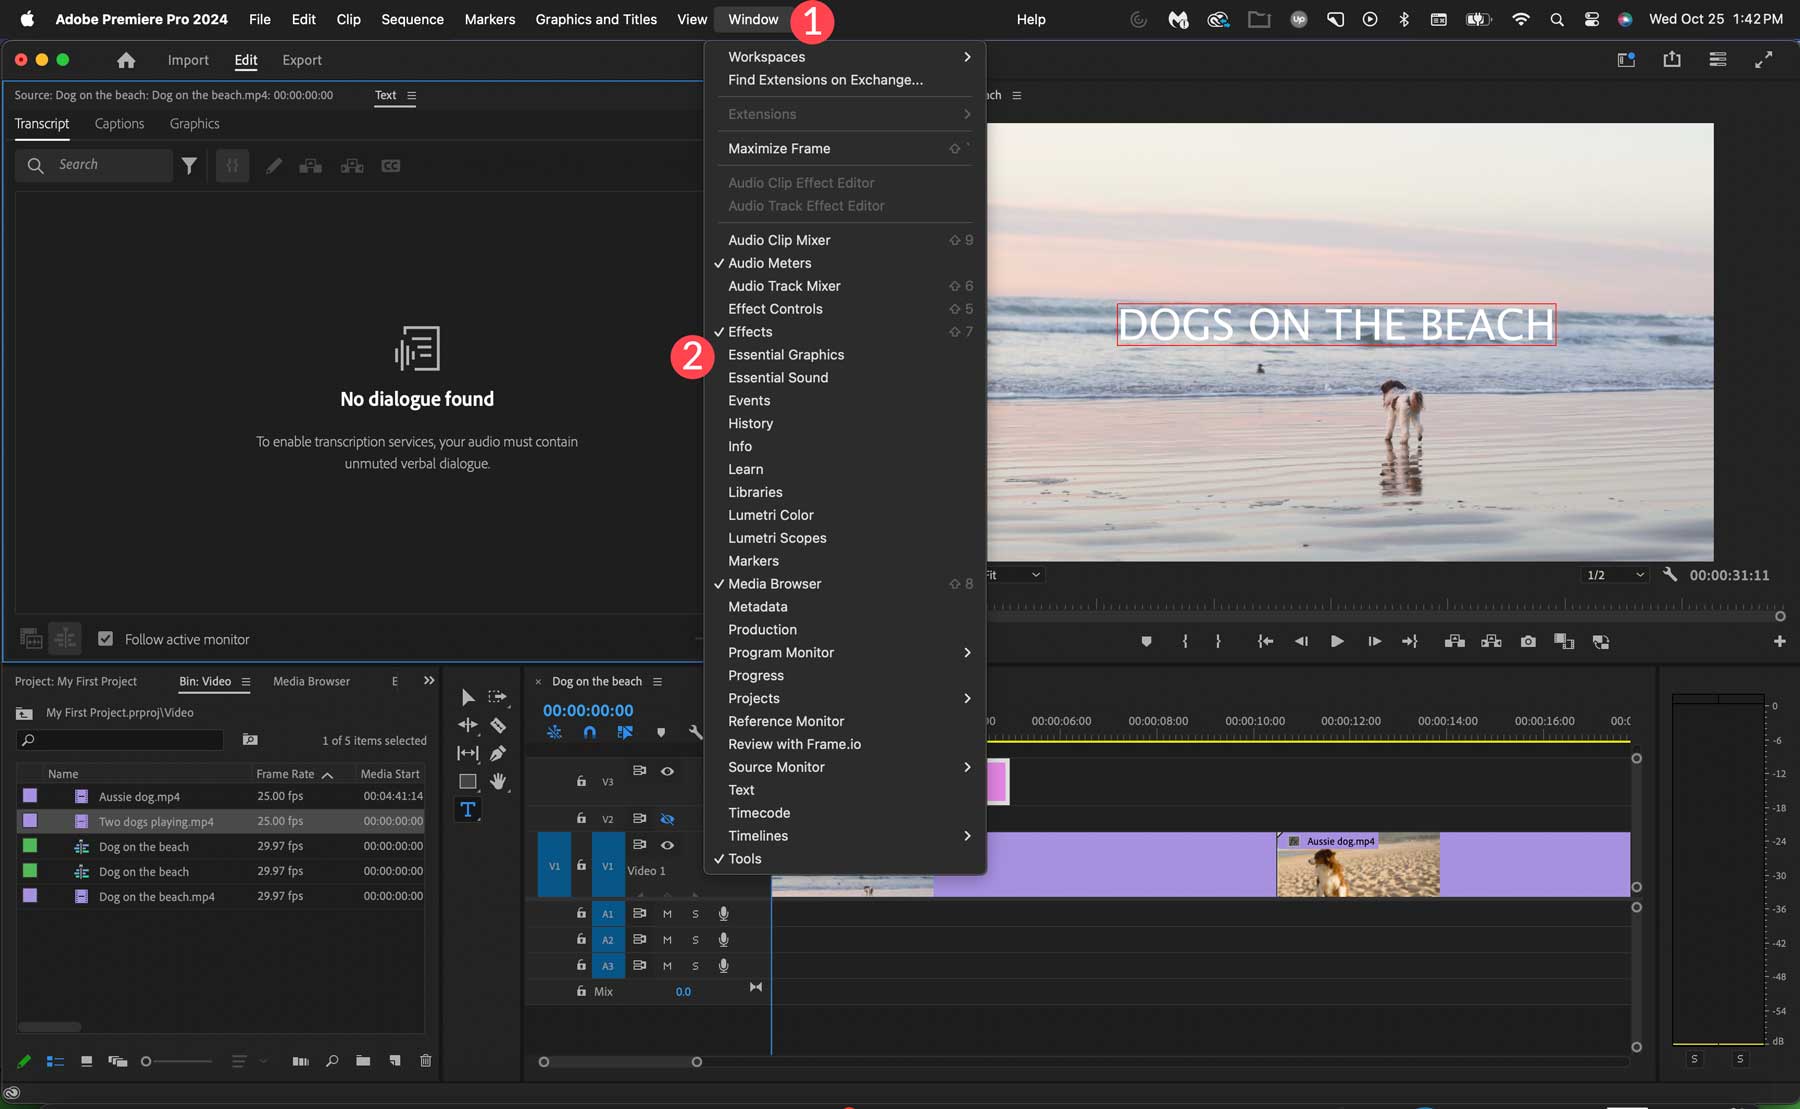
Step 2: Soon, you will get a splash screen and release the keys you are pressing on the keyboard.
Step 3: You will get a Reset dialog box; click on Reset app preferences. Now, select the Continue option.
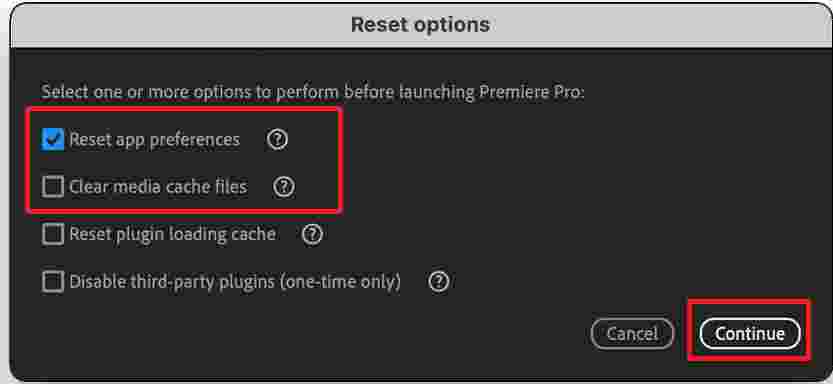
You must wait a few minutes until the Premiere Pro preferences are reset. Once the reset is done, you must close Premiere Pro and relaunch it. If the recent projects, the ones that you were working on, do not appear on the Welcome Screen, check thoroughly to see if the preferences were reset. Next, move to the video project location and click on it. Check thoroughly to determine if the playback issue was resolved.
Method 3. Reboot the Computer
You must restart your computer if it isn't functioning correctly. Restarting the system seems to be one of the easiest ways to fix the Adobe Premiere Pro not playing video. Sometimes, the videos won't function properly because of hardware glitches or overheating.
It is advisable to adopt ways to fix the issues easily. Restarting the system may play an important role in overcoming incomplete installation issues. Furthermore, it can also help to fix hardware system glitches.
Method 4. Use an Alternative Video Editor/Player
If the video isn't playing in Adobe Premiere Pro, check it on another program. This is to ensure that the video itself isn't corrupted and can't work. You may open it on another computer or in a program.
If the video is working fine in other systems and editors, it is an indication that your video isn't corrupt. However, your video will probably be corrupted if it doesn't play in other systems or players. Therefore, consider repairing the video before you use it in Adobe Premiere Pro again.
Method 5. Erase the Media Cache
Excessive media cache can be one of the main reasons why Adobe Premiere not playing video. This can make the software extremely difficult to run, causing several other complications. As all the video and audio files get imported, the storage space due to the media cache increases.
If the storage becomes full and the media file becomes too large, there's a chance of media files being corrupted. Therefore, the next set of videos that you upload will constantly be glitching. This can seem to be a big danger. Here are the steps you may adopt to clear the media cache:
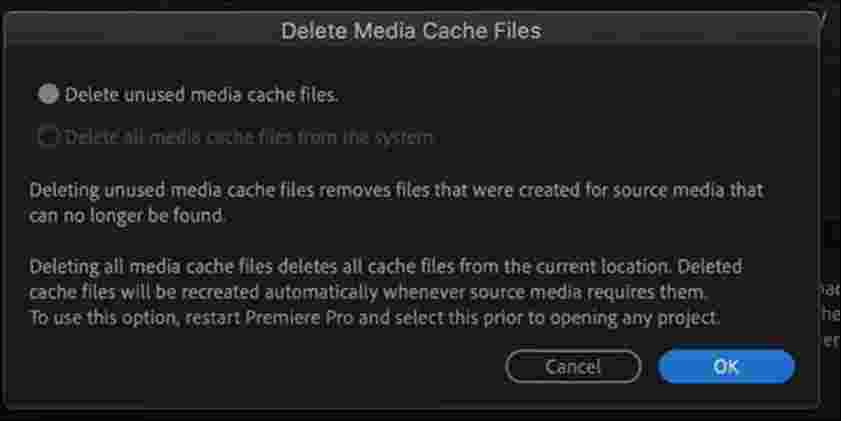
Step 1: Close all the active or running projects on the system.
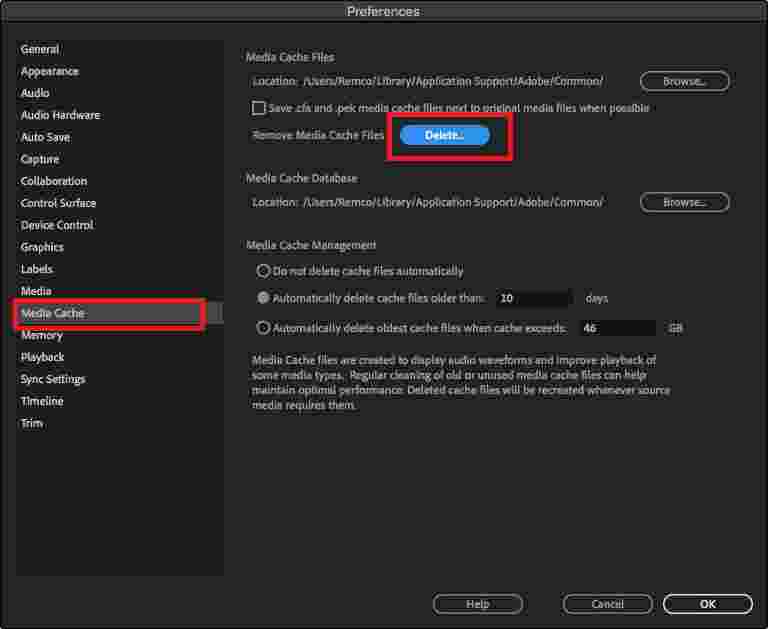
Step 2: Scroll to the location (for Android and Mac) of the devices given below. From there, you must clear all the cache.
Step 3: Visit the ‘Trash’ section and delete the files if you are a Mac user. However, if you are a Windows user, you must click on the Recycle Bin option.
Windows Location: \Users\\AppData\Roaming\Adobe\Common
iOS Location: /Users//Library/Application Support/Adobe/Common
Method 6. Edit the Audio Hardware Settings
Whether you're a Mac user or a Windows user, there are several instances where Adobe premiere pro video not playing normally on your system. If that happens, one of the main things you must check is your audio hardware settings. Disrupted audio hardware settings can often be the root cause of the problem, thereby making it difficult to function normally.
Follow the steps below to edit your system's audio hardware settings, whether you use Android or Mac.
Windows User:
If you're a Windows user, you must look into the aspects carefully. All you need to do is make some changes in the settings, and the video and the audio will start playing. You must follow the below steps to fix Adobe Premiere Pro not playing video due to audio hardware settings:
Step 1: Open the Adobe Premiere Pro software in your system and click on Edit.
Step 2: In the menu bar, you will come across different options; choose Preferences.
Step 3: Now, from the drop-down menu, click on the Audio Hardware option and edit to the Device Class option. Set it to CoreAudio.

macOS User:
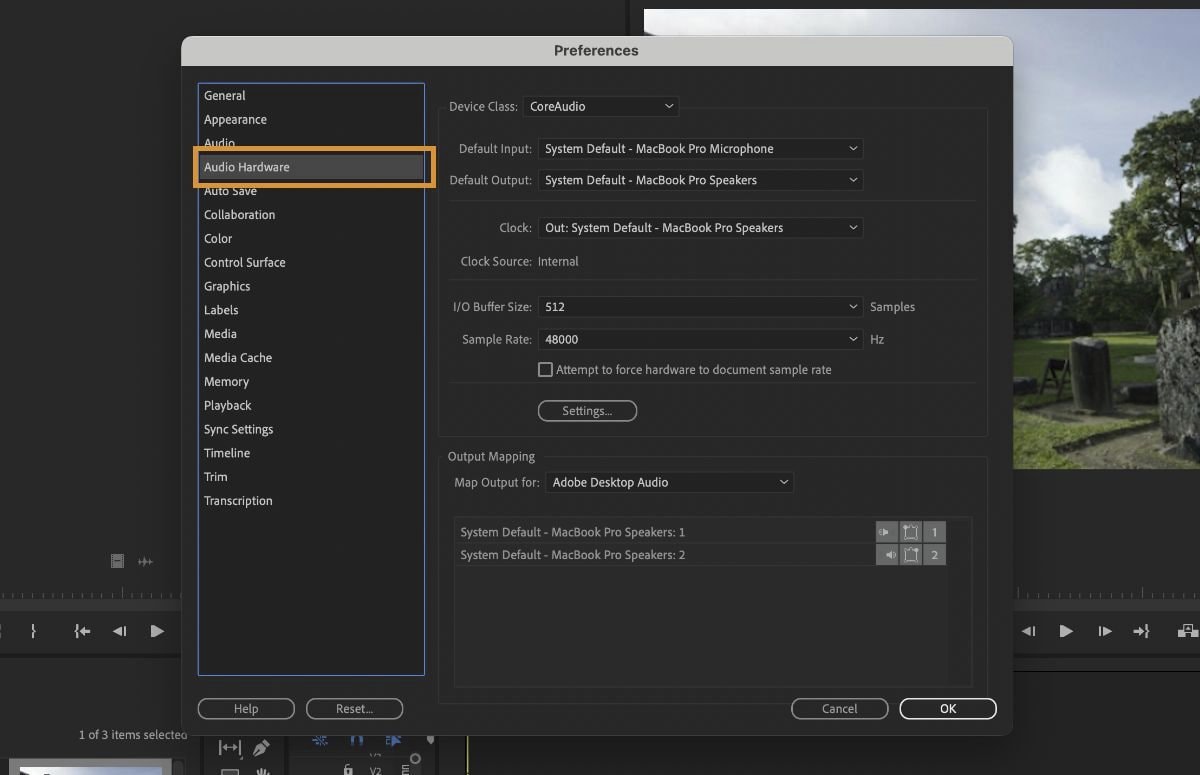
If you are a MacOS user, you must adopt the proper steps to fix the Adobe software without playing audio. Fixing the audio hardware settings can be one of the easiest ways to bring complete change, enabling edits to the platform. You can follow the steps given below to edit the audio hardware settings if you're a Mac user to fix premiere pro doesn’t play video:
Step 1: Launch Adobe Premiere Pro software in your system and select the Preferences option.
Step 2: Now, click the Audio Hardware option in the new dialogue box.
Step 3: In the settings, the Device Class settings may exist; convert it to CoreAudio.
Method 7. Update the Card Driver
The old card driver is a significant reason you may be struggling with video issues. The projects won't run updated if the video driver is outdated or old. Therefore, in this case, you may need to find solutions to help fix the premiere pro not playing video.
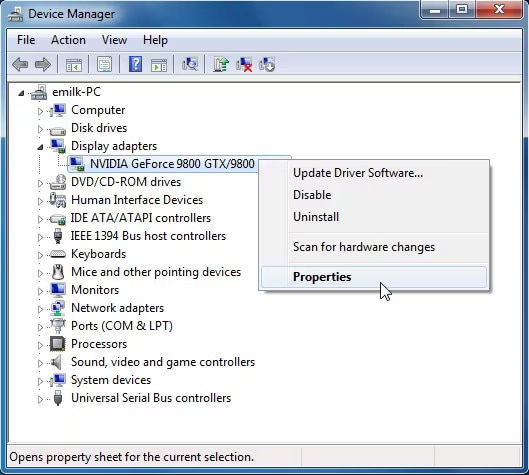
If Premiere Pro is not functioning smoothly in your system because of the old card driver, you must update that. Outdated video cards are at a higher risk of becoming corrupted. Therefore, these won't allow the videos to function normally. So, get an updated video card driver from reliable companies such as AMD, Intel, Nvidia and more. You may check out the specifications of each of these cards from the manufacturer’s website and choose the one that seems to be fit for your system.
Tips to Prevent Such Issues from Happened Again
If you continue to face the issue of Premiere Pro not playing video, you need to identify how you can fix it. However, once that is fixed, you need to look for ways to fix the premiere pro won’t play video issues.
Some of the common ways via which you can prevent the premiere pro won’t play from happening again are as follows:
- Update your video card driver: It is essential to use an updated video card driver. Using outdated ones can often hamper Premier Pro's ability to play textures and motion videos. Connect with the video card manufacturer to get an updated driver would be advisable.
- Update the System: Outdated and old systems may be one of the biggest issues. It is important to update the system from time to time. You must ensure that Premiere Pro matches the system requirements.
- Update Premiere Pro: A major reason why Premiere Pro may need to be playing videos properly is that it is outdated. You can check if the latest updates are available. The newer versions of Premiere Pro are more stable and can offer better clarity. Therefore, it will quickly resolve video not playing issues.
- Lower Playback Resolution: If the Premiere Pro tool is having some problems playing the video. It is advisable to lower the video playback resolution. Lowering it from the Preview Window will give you an actual idea of how the video appears. Furthermore, it will help in better editing.
- Disable auto-save: Frequently, auto-saving the files can cause severe problems, leading to system lags. Turning off the Auto Save feature and manually saving all the files is advisable.
Conclusion
Adobe Premiere Pro not playing video is a common issue. It is essential to adopt the right ways to fix this problem. Adobe Premiere Pro is a top software used for video editing. Therefore, if you notice it is lagging or not working properly, you must fix it. Adopting the right methods will play an important role in fixing the problem and ensuring you avoid facing the same in the long run.
FAQs
1. How do I fix Premiere Pro not opening?
If your Premiere Pro is not opening, it is advisable to check the system cache and clear it. You can reset the entire system. Too much cache in the system can have a negative impact, thereby preventing the file from opening.2. Why can't I change sequence settings in Premiere?
Permission issues may be one of the main reasons why you can't change sequence settings in Premiere. At the same time, software glitches or the sequence having clips may be a reason why you're unable to change sequence settings in Premiere Pro.3. How do I recover a Premiere Pro video?
You can use a video recovery tool to recover Premiere Pro video. If you have accidentally deleted the video, you must ensure that you install the recovery tool and eventually fix all the videos.


