
 TL;DR:
To obtain and configure a Let’s Encrypt SSL certificate on your Synology NAS, you must have a valid domain name or Synology DDNS and ensure network ports 80 and 443 are open.
● Generate a new certificate for an existing domain by navigating to the DSM Control Panel, accessing the Security and Certificate menus, and submitting your domain and email details.
● Enable automatic certificate generation for a DDNS domain by checking the Let’s Encrypt box during the initial DDNS setup in the External Access menu.
● Assign specific SSL certificates to individual NAS services or change your default certificate through the Settings option within the Certificate menu.
Ask AI for a summary
 ChatGPT
 Perplexity
 Gemini
 Claude
 Grok
Grok
SSL and TLS, aka secure socket layer and transport layer security, are essential protocols that encrypt communication between servers and clients and ensure greater online security. Anyone visiting your website will first and foremost check whether you’re using safe encryption. If not, you can say goodbye to most of your traffic.
To assure all website visitors of your site’s security and thus improve your website traffic, you need an SSL or a TLS certificate from a certificate authority. That’s precisely what you’re getting with Synology Let’s Encrypt.

Take a look below to learn how to use Synology Encrypt and obtain your SSL certification.
In this article
Part 1. Basic Requirements for Using Synology Let’s Encrypt
HTTPS is the preferred internet protocol as it prevents data theft and leaks. It’s vital for any websites that need their visitors’ private data, such as names, addresses, and emails used in lead generation forms, for instance. Additionally, it’s critical on ecommerce sites where visitors might leave sensitive information such as credit card numbers.
An SSL/TLS certificate proves to your visitors that your site is secured and that any information they share with you stays between you and them only.
Of course, to obtain the SSL/TLS certificate, you and your site need to meet certain conditions.
Primarily, you need to have a valid domain name. If you don’t have one, you shouldn’t worry as they’re easy to obtain. You can visit any domain name registrar, input the domain you want, and pay a small fee. Alternatively, you could use a dynamic DNS (DDNS) for free with Synology.
With the domain name handled, the only other things you need are opened ports 80 and 443. If you have issues with port forwarding, contact your Internet Service Provider (ISP) for a solution.
Part 2. How To Install Let’s Encrypt on Synology NAS
Synology NAS is all about simplicity. Whether trying to recover deleted files from Synology NAS or install Let’s Encrypt certificates, you just need to follow a few simple steps.
- If you have Shell access (SSH), you can use any ACME client to completely automate installation and get your certificate issued and renewed without much hassle;
- If you use shared hosting and have no Shell access, you can use your hosting provider’s built-in Let’s Encrypt support. Most popular hosting providers support Let’s Encrypt and can provide you with a free certificate immediately.
Depending on your provider, you might receive your certificates automatically, or you might have to set them up manually.
Part 3. How To Use Let’s Encrypt for a Domain Name
You have to go to your Synology DiskStation Manager (DSM) control panel to start using Let’s Encrypt with an existing domain name. Then, just follow a few steps:
- Log into your Synology NAS DSM;
- Go to the Control Panel, click on Security, then the Certificate button;
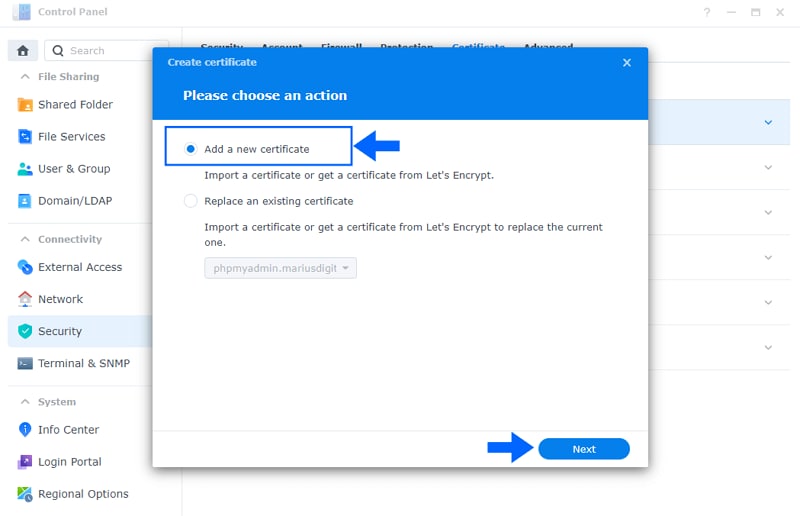
- Tap on the Add button, and you’ll see a popup asking you to choose an action;
- Select the Add a new certificate option, then click Next;
- You’ll then see the option to Get a certificate from Let’s Encrypt – select it, then click Next.
Once you’ve completed these steps, you’ll need to provide additional information. Input your domain name or Synology DDNS hostname and provide the email address you used for registering your certification.
Optionally, you could also provide your subject alternative name – aka other subdomains covered by your certificate.
Once you’ve provided all the necessary information, click Apply and start enjoying your new certificate.
Part 4. How To Use Let’s Encrypt for a DDNS Domain
Using Let’s Encrypt for a Synology DDNS domain is similar to using it for your domain name:
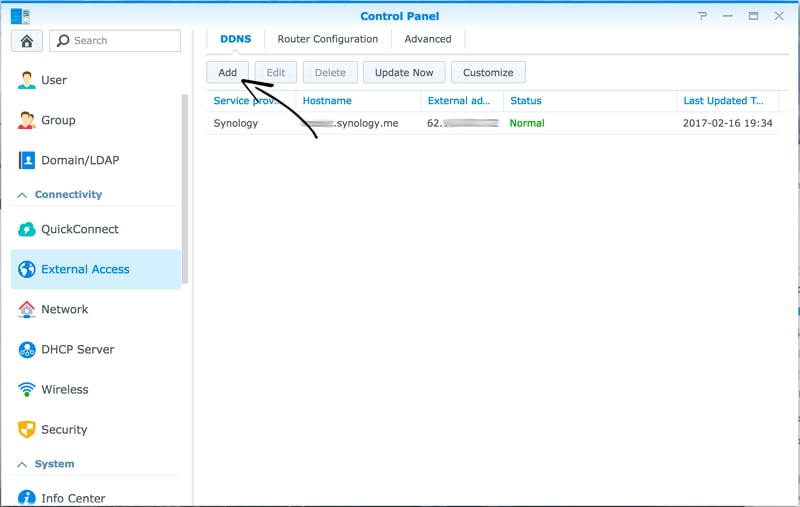
- Access Synology’s Control Panel on DSM, then click on the External access button;
- Go to the DDNS tab and click on the Add button. A drop-down menu will appear, and you can select your chosen DDNS provider;
- Input your preferred hostname and DNS name;
- Sign in to your Synology account;
- Check the box Get a certificate from Let’s Encrypt and set it as default.
Once you’re ready, click OK. You’ll see a popup notifying you that you’re setting your default certificate. Click OK again and let the DDNS set up.
Synology NAS: Choosing a Default Certification
Synology NAS makes it easy for you to choose your default certification from Let’s Encrypt. From the Control Panel, you’ll want to:
- Go to Security;
- Click Certificate;
- Right-click on your preferred certificate;
- Select Edit.
A popup box will appear, with Set as default certificate at the bottom. Check the box, then click OK.
Part 6. Choosing Services for Using SSL Certificates
Synology allows you to use different SSL certificates on specific services. To enable this option, you must:
- Go to the Control Panel;
- Click on Security;
- Click on Certificate;
- Select Settings from the menu.
You’ll see the complete list of services you’re using on your Synology account. Click on the dropdown menu to select the preferred certificate you’d like to use for a specific service. Once you’ve selected the certificate, click OK.
Conclusion
Using Let’s Encrypt with Synology is a simple process that allows you to install and renew your SSL certificates with the utmost ease. In just a few steps, you can set up Let’s Encrypt, improve the security of your website, and inspire trust among your site visitors.
For Windows XP/Vista/7/8/10/11
For macOS X 10.10 or later


