

 TL;DR:
You can recover unsaved Excel files directly from the Document Recovery pane upon reopening the application, or by manually navigating to the default AutoSave directories located at C:\Users\[YourUserName]\AppData\Roaming\Microsoft\Excel\ on Windows and ~/Library/Containers/com.microsoft.Excel/Data/Library/Preferences/AutoRecovery on Mac.
● Hidden temporary workbooks (.asd, .xlsb, or .xlsx) can be retrieved from C:\Users\[YourUserName]\AppData\Local\Microsoft\Office\Unsaved-Files\ or accessed through the File > Info > Manage Workbook menu within Excel.
● AutoRecover is enabled by default to save progress every 10 minutes, but this automated backup only functions if the document has been manually saved at least once prior to the disruption.
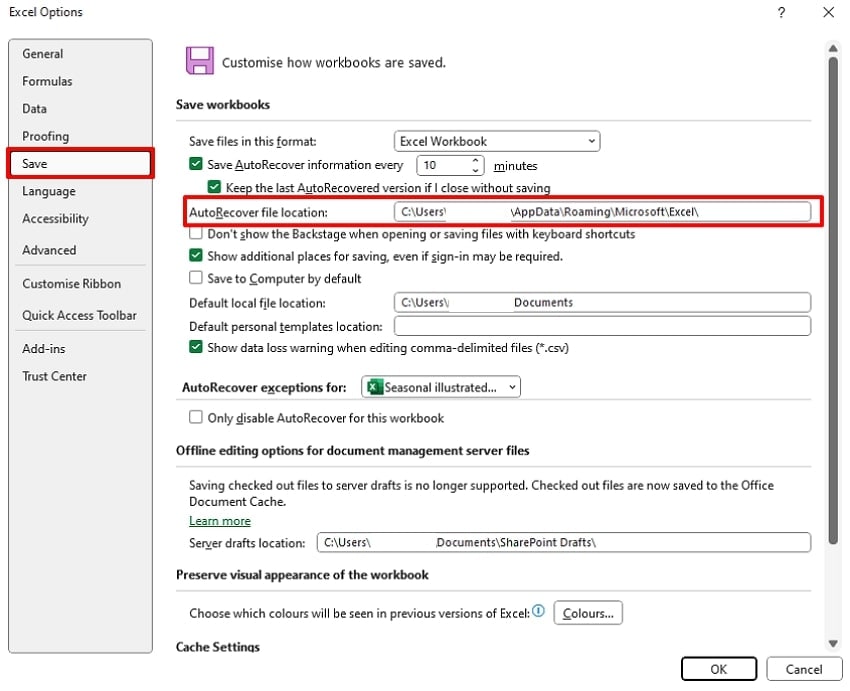
● Backup intervals and custom recovery folders can be adjusted by navigating to File > Options > Save on Windows or Excel > Preferences on Mac.
Ask AI for a summary
 ChatGPT
 Perplexity
 Gemini
 Claude
 Grok
Grok
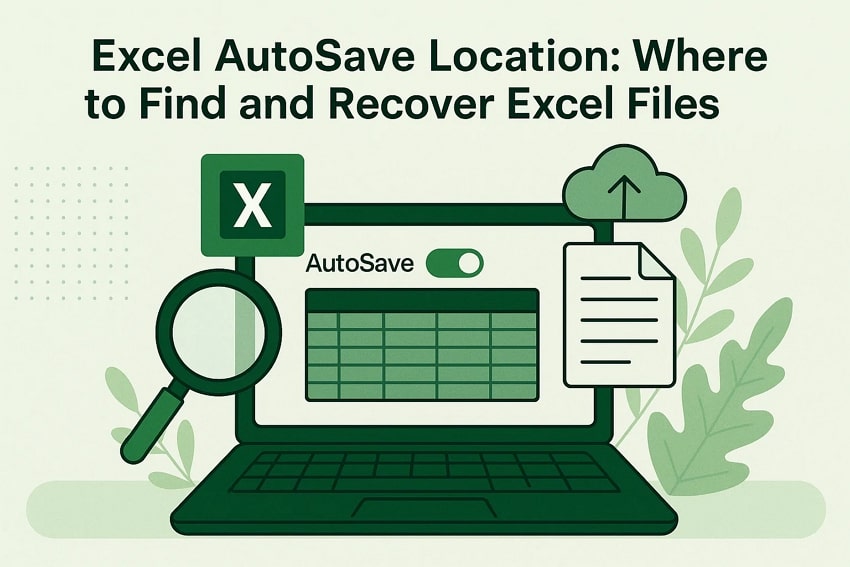
Excel AutoSave is an essential feature for users who frequently work on spreadsheets, primarily when an unexpected error occurs. If you have enabled the AutoSave feature, it automatically saves the changes to lessen the risk of losing essential data. However, many people are still unaware of Where are Excel autosave files stored.
In this article, we will walk through the exact steps to find Excel autosave location and recover your Excel files, so you never lose them. Furthermore, you will also be introduced to a third-party recovery tool to retrieve lost data in complex scenarios.
Try Recoverit to Perform Excel File Recovery
 Security Verified. 3,591,664 people have downloaded it.
In this article

Part 1. Understanding Excel AutoSave Location: Where to Find and Recover Excel Files
The “Excel Autosave” is a life-saving feature within the modern version of Microsoft Excel, especially for Microsoft 365 subscribers. Unlike manual saving, it automatically saves updates more frequently in your cloud drives. The foremost point is that you don't lose data anymore, reducing frustration and extra manual work.
Typical Usage Scenarios for Using the Excel Auto Save Feature
To know more deeply about Excel autosave location, let's explore its common usage scenarios:

- Unexpected Computer Crashes: During unexpected crashes, it ensures that most of your recent changes are preserved, so you don't lose hours of work.
- Accidental Closure: When you mistakenly shut down the computer without saving files, this feature recovers unsaved versions when you reopen the program.
- Power Outage: In case of data loss due to a power outage, it ensures that the data is automatically recovered when the PC is rebooted.
- Unresponsive Windows: Sometimes your Windows or Excel itself becomes unresponsive due to a larger file size; this feature provides an auto-recovery pane when opened again.
- Collaborative Projects: For streaming group projects, cloud drives automatically save the edited version, preserving the edits.
Part 2. Default Excel AutoSave Location: Where to Find and Recover Excel Files
Are you exploring Where to find autosave Excel files? Users can easily navigate the Excel file saved to the default location "C:\Users$$YourUserName]\AppData\Roaming\Microsoft\Excel\" on Windows.
Whereas, the default location for AutoSave on Mac is "~/Library/Containers/com.microsoft.Excel/Data/Library/Preferences/AutoRecovery" You can easily access them by opening the "File Explorer" in Windows or the "Finder" app on Mac.
How to Check and Customize the AutoSave Folder in Windows
Before you start managing your AutoSave files more efficiently, here’s how to check and customize the AutoSave folder in Windows:
- Open the desired Excel file and hit the “File” menu at the top-left of this interface.
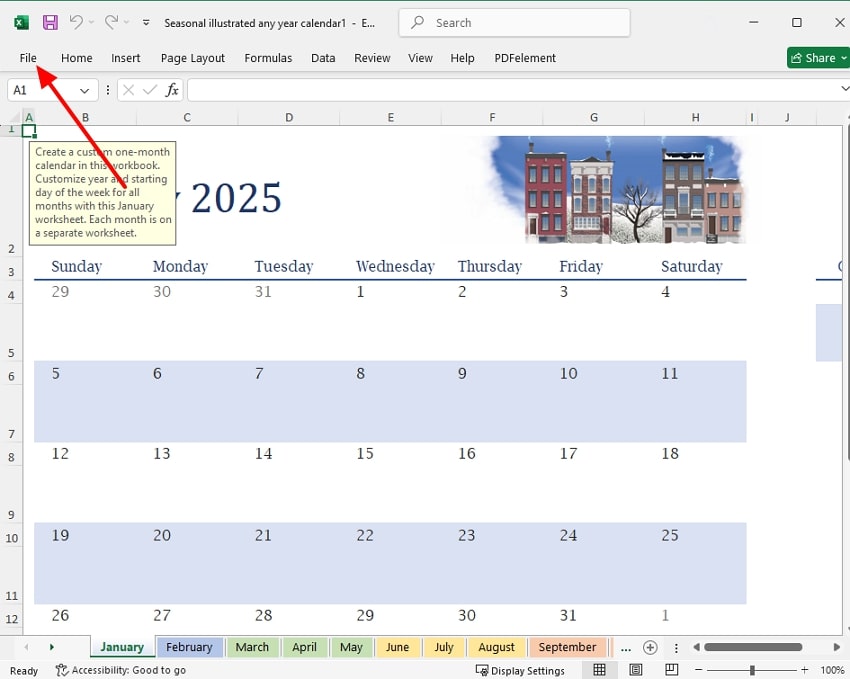
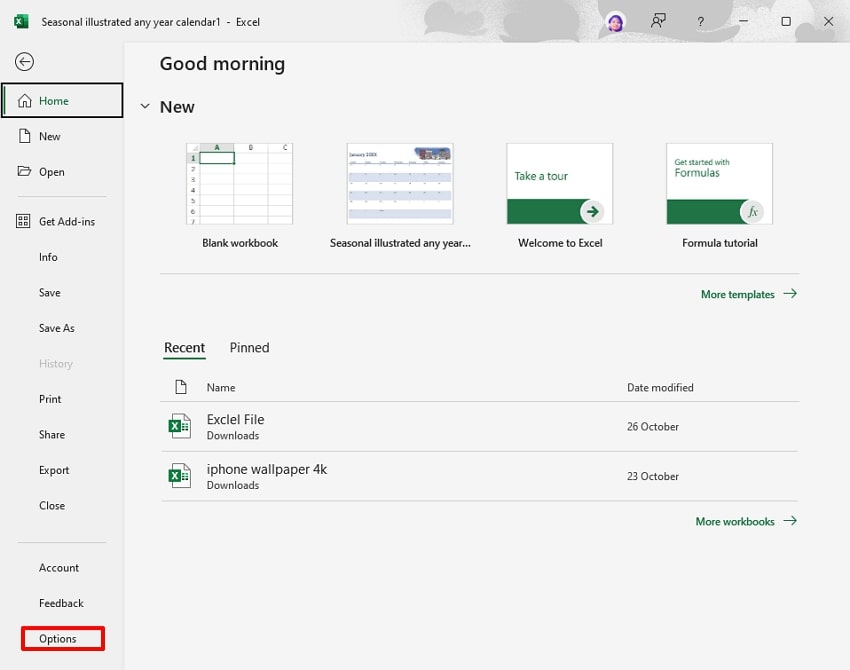
- Following this, choose the “Options” button in the bottom left of this screen to access the settings.
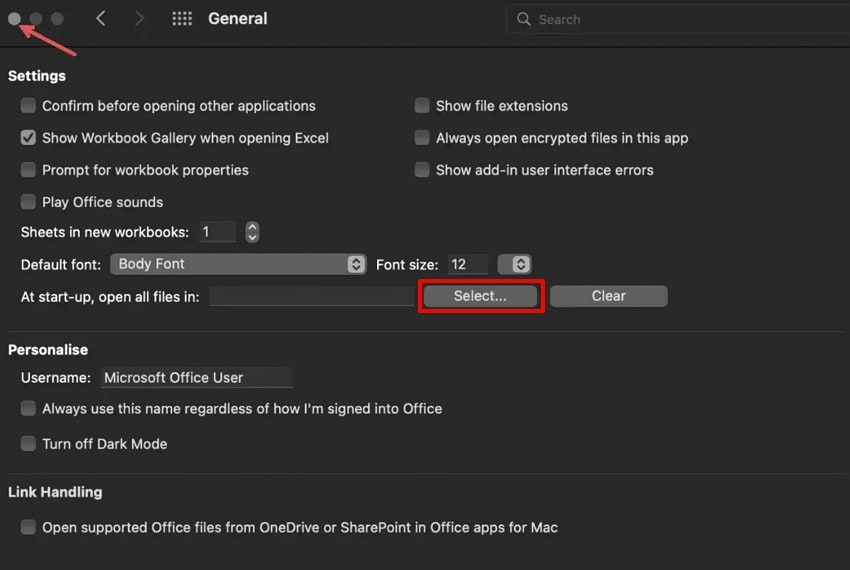
- Here, tap the "Save" menu on the left tab, then navigate to the auto recovery settings. Click the "AutoRecover File Location" tab to change the default save folder.
Detailed Guide to Customize the AutoSave Folder in Mac
Once you've seen how AutoSave works on Windows, let's move to a detailed guide on customizing the AutoSave folder on Mac:
- Open the Excel spreadsheet and hit the “Excel” menu from the top left. Afterwards, choose the “Preferences” option to access settings.
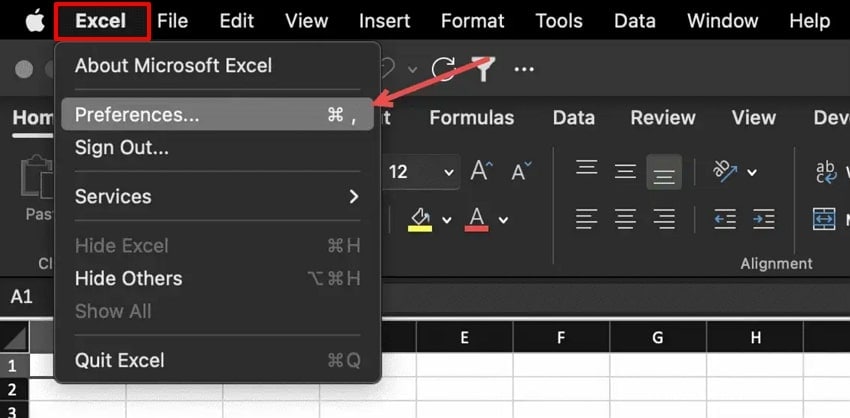
- Here, choose the desired location of the Excel file you want to save further on your device.
Part 3. How to Recover Excel Files from AutoSave Location
Once you understand the basics of file recovery, the next step is learning how to restore your work directly from Excel autosave location:
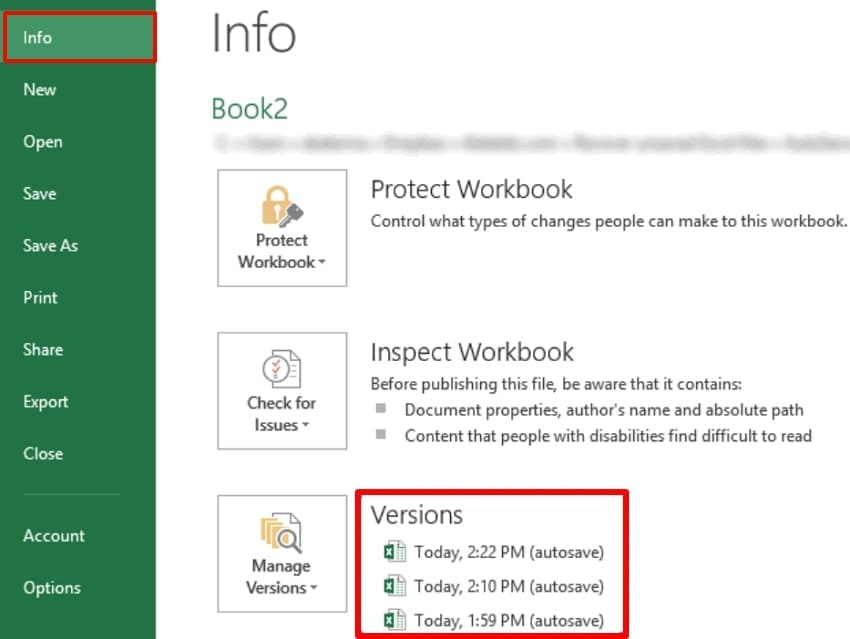
1. Recover Unsaved Excel Files Using Excel’s Built-In Options
To find unsaved files, start by using Excel's built-in AutoRecovery tool, a beginner-friendly method. Without accessing the third-party tools, users access their info settings to look for recovered files. Furthermore, it displays only genuine unsaved workbooks, avoiding confusion with other system files. So if you want to use this method, go through the following detailed guide:
Instructions. Go to the "File" menu in the Excel sheet, then click the "Info" tab. Here, tap "Manage Workbook," then look for the saved file if available.
2. Find AutoSave or AutoRecover Files Manually
In case you are unable to find auto-saved files within the Excel app, try manually finding the file. This method is beneficial to uncover hidden backup copies that may persist after abrupt shutdowns and complex errors. Moreover, this approach is ideal for professional users, ensuring that every possible file version is checked for recovery. Upon hearing its features, let's explore the following guide for finding the Excel auto recovery file location:
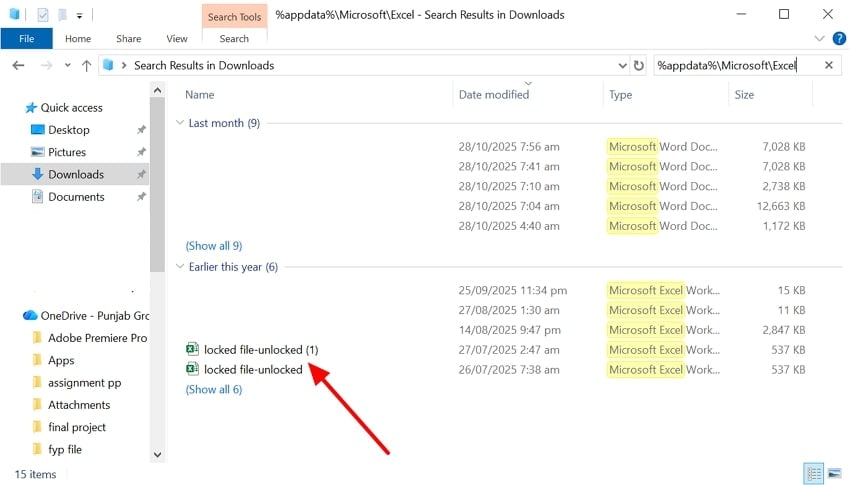
- Go to the File Manager app and write "%appdata%\Microsoft\Excel" in the search bar available at the top right corner.

- Here, all versions of Excel files are available, which you can access by tapping the required file. After opening the file, click the "File" menu to save it to avoid further loss.
3. Direct File Path for Unsaved or Temporary Files
Using the direct file path method to recover unsaved or temporary Excel files is valuable when standard Excel recovery tools don't work. This method helps get access to hidden or system-created backup files that are automatically stored in default directories. By navigating directly to these paths, users can find and restore workbooks, ensuring file safety. So, let’s explore the following detailed guide to explore its guide:
Instructions. Go to the File manager and write a prompt and navigate to the "C:\Users$$YourUserName] \AppData\Local\Microsoft\Office\Unsaved-Files\" folder. Here, all the unsaved files will appear with .asd, .xlsb, or .xlsx.

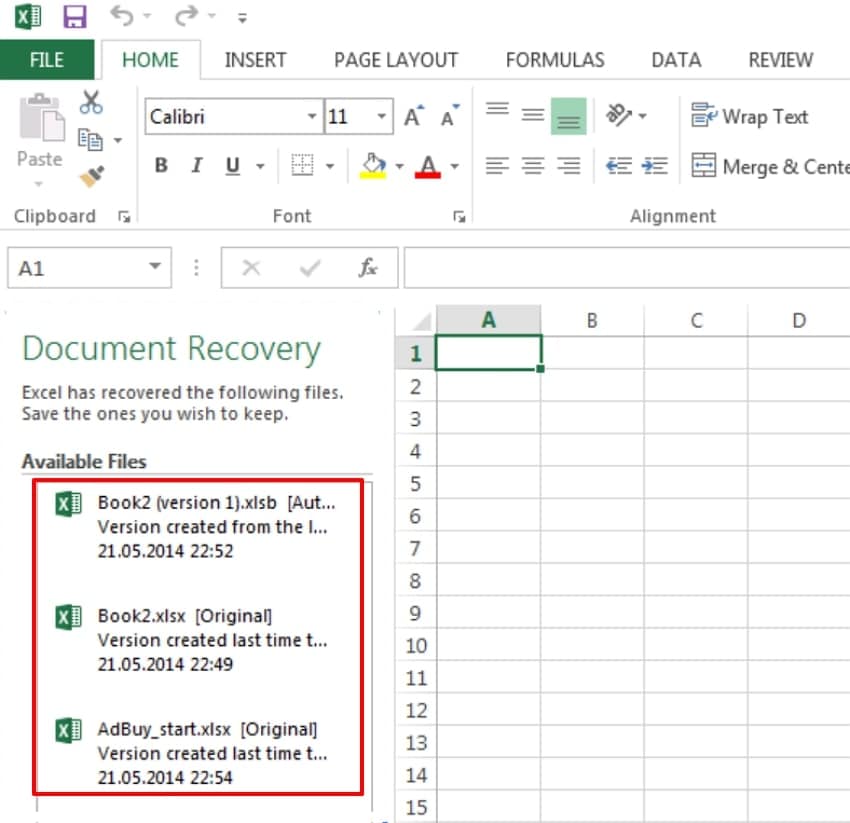
4. Check the Document Recovery Pane on Launch
Being one of the quickest methods, it lets you restore the unsaved version from the auto-recovery pane. This pane instantly shows all the available files you lost due to sudden power outages. Furthermore, it is considered an ideal solution as you don't need to manually find the files. Mostly users keep relying on this method, so have a look at the following guide to explore Where to find autosave files:
Instructions. As soon as your file is lost, restart the computer and open the Excel file again. Upon opening, you will find a recovery pane opened, from which you can select the desired file.
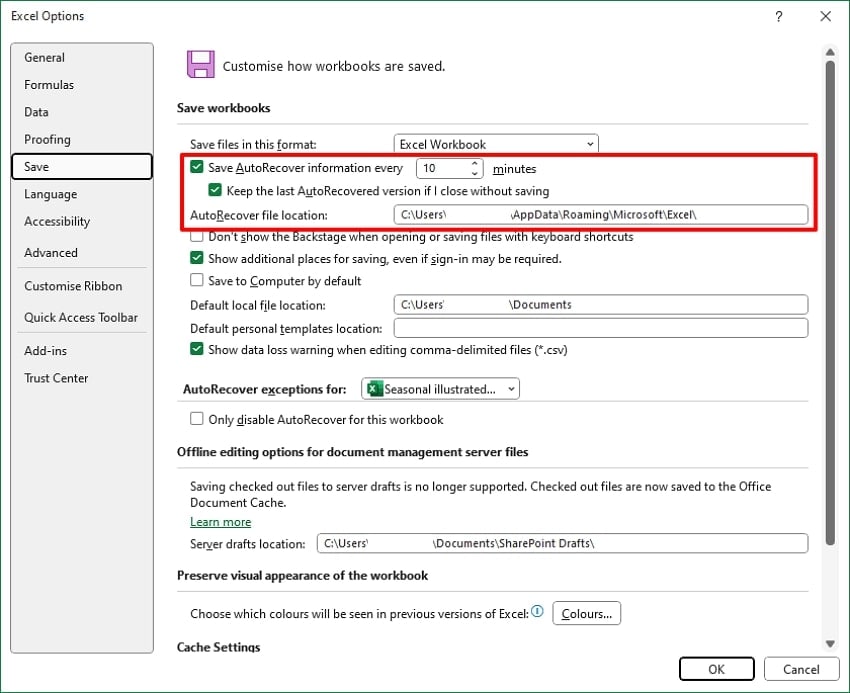
5. Enable and Adjust Auto Recover/AutoSave Settings
Enabling and adjusting Auto Recover or AutoSave settings in Excel is essential because it provides continuous, automated backup of your work. By specifying backup intervals and custom file locations, you make sure to avoid any faults that occur due to unexpected errors. Moreover, it gives you control over how often backups occur and where they're stored, so have a look at the following detailed guide:
- Open the Excel app and click on the “File” menu to open settings. Following this, click on the “Options” button to access the settings.

- Now, hit the “Save” option from the left tab and set the desired minute within the “Save AutoRecover information every” tab. Furthermore, choose the desired location for the AutoRecover file for easier access.
Part 4. Excel AutoSave Location: Where to Find and Recover Excel Files Using Recovery Software
Suppose you are working on an important project for hours, which you want to submit to the client. However, while working, it automatically vanished, and you panicked. In this situation, we recommend using Recoverit, which lets you easily retrieve data. This tool lets you provide both "Quick and Deep" scanning modes, which let you restore data from both simple and complex scenarios.
This tool provides wide support for various file formats, including images, audio, and videos. Users can simply scan the desired location, and it will restore it in minutes. Furthermore, you can easily recover your lost data from storage devices, including SD cards, USB drives, and memory cards. This tool lets you preview the recovered outcome to examine the accuracy.
Key Features
- Batch Processing: Recoverit provides you with an efficient batch processing system to let you restore numerous essential files simultaneously.
- Broader Compatibility: This tool can be easily accessed on all major operating systems, including Windows, Mac, and Linux.
- Search: Users can even search their files by their File names, File type, and File types, making it easier and quicker to navigate to the desired data.
Detailed Guide to Use Recoverit For Recovering Lost Excel Files
If you are unable to find the Excel autosave location and want to recover files using Recoverit, then go ahead:
- Select Hard Drives and Locations and Choose Location
Upon accessing the tool, click on the "Hard Drives and Location" option from the left tab. Now, choose the desired location from the "Quick Access" tab.

- Scan the Location for Retrieving Lost Files
After choosing the location, it will automatically start the scanning procedure with the "Quick Scanning" process. However, if you are unable to find the recovered file, you can access the Deep scanning procedure to efficiently recover lost data instantly.

- Preview and Save the Result to the Device
Now your file is recovered, click on the "Preview" button to ensure the file is accurate and complete. After examining the outcome, hit the "Recover All" button to get it saved to the device.

Part 5. Excel AutoSave Location: Tips to Prevent Losing Excel Files Again
After retrieving your file from the AutoSave folder, it’s equally important to focus on prevention. Here are key tips to ensure you don’t lose Excel files again:

- Enable AutoSave Feature: Make sure you have enabled the AutoSave and AutoRecover in Excel settings and set the back-up interval to 1-5 minutes.
- Regularly Save Files: Always save your file at least once to activate AutoRecover features, as it only gets saved if it was saved initially.
- Regularly Update AutoSave: Ensure you check the AutoSave feature update frequently to ensure backups are stored in an accessible and secure folder.
- Periodic Manual Save: Users should manually save the file by using CRL+S keys, so that in case AutoSave doesn’t work, it gets saved easily.
- Use Cloud Storage: One should consider using cloud storage like OneDrive, Google Drive, and SharePoint, which maintain version history and allow file recovery.
Conclusion
Summing up, users can now recover their essential files by accessing the auto-save feature within the Excel app. In this article, we have provided the essential methods to know Where are Excel autosave files stored. Upon failing to get hold of the files, we recommend using Recoverit, which lets you retrieve your essential data with 99.5% accuracy.
FAQ
1. Where does Excel save Auto-Recovered or AutoSaved files by default?
On Windows, you can access the files from its default location "C:\Users$$YourUserName] \AppData\Roaming\Microsoft\Excel\."Whereas, on Mac, you can locate a file in "~/Library/Containers/com.microsoft.Excel/Data/Library/Preferences/AutoRecovery" location.2. How can I recover an unsaved Excel file using Excel’s built-in options?
Users can access the file saved through the Auto Recovery pane tab. Furthermore, users can access the saved files through the Auto-recovery option in the “Options” tab.3. What should I do if the Document Recovery Pane does not appear after a crash?
You can search for AutoRecover files manually in the default folders of the device. However, you can also use the "Recover Unsaved Workbooks" feature in Excel's interface to retrieve spreadsheets.4. Is AutoRecover enabled by default, and how often does it save?
AutoRecover is usually enabled by default and set to save every 10 minutes. Furthermore, you can customize the intervals of the recovery option to get more accurate file recoveries.


