How to Fix NTFS.sys Missing or Corrupted Errors
Part 1. NTFS.sys missing or NTFS.sys corrupted error
This problem occurred when I was installing the Service Pack 2 and it froze, so I reboot and got the error telling me:
Windows could not start because the following file is missing or corrupt: System32DriversNtfs.sys You can attempt to repair this file by starting Windows Setup using the original Setup CD-ROM. Select 'R' at the first screen to start the repair
So I followed the tutorial as I said in the beginning. I run through it all, except at the end the "quit" command doesn't work, and the CD-Rom doesn't eject. So I use "exit" and eject the CD-Rom after I reboot. Then it goes back to the same stupid screen about starting windows. Please is there a way to fix this without cleaning my hard drive and reinstalling windows? I did that 2 days ago because of accidentally messing up the boot file.
HELP PLEASE!!
If the NTFS.sys file is missing or corrupted, your computer will encounter an NTFS.sys blue screen error and this happens usually. Thus, knowing how to fix NTFS.sys blue screen error becomes important. In addition, boot.ini file missing is also a common similar issue.
Part 2. How to Fix NTFS.sys Blue Screen Error?
Following are all ways you can try to fix NTFS.sys blue screen error on your system.
Method 1. Repair Your Windows Vista or Windows 7 System
What you need for this method is Windows Vista or Windows 7 disk.
Step 1. Insert your Windows Vista or Windows 7 disk into the DVD player and restart the computer.
Step 2. You'll see the boxes of Language, Time and Currency and Keyboard on the next screen.
Step 3. There are two options on the lower left side. One is Repair your computer, and the other one is What to know before installing Windows.
Step 4. Click on the first one: Repair your computer.
Step 5. Windows will then try to find the installation directory for Vista or Windows 7, depending on what you have.
Step 6. Next up is a screen with a box called Recovery Options. Click the first option, Startup Repair.
You'll see a Startup Repair box with the message Startup Repair is checking your system for problems….
Step 7. When it's done, it will prompt you to reboot. If there is more than one problem, it may reboot again to continue repairing.
Step 8. At this time, you can plug out the DVD, restart your computer, and everything should be working normally.
Method 2. Updating All Your Drivers
The ntfs.sys Blue Screen error is usually caused by inappropriate, outdated, or missing drivers on your computer. It can be challenging to pinpoint who is directly responsible for the issue. As a result, we recommend that you update all of your drivers to resolve the problem.
You can update the drivers manually or automatically. It is good to note that the former can be complex and time-consuming. You'll have to update the drivers one by one before figuring out which one is at fault. Furthermore, you must go to the manufacturer's website and download the most recent update for each device. You must also check that it is compliant with your setup. Otherwise, you risk triggering your system instability. Also, it is recommended to use the reliable driver updater tool so that your data is safe and fixes this error.
To update drivers automatically, follow the below steps:
Step 1. Right-tap on This PC> Manage> Device Manager.
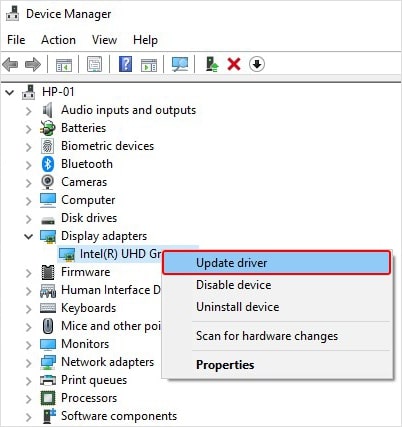
Step 2. Expand Display Adapters, right-tap on the graphics card drive, and select Update Driver.

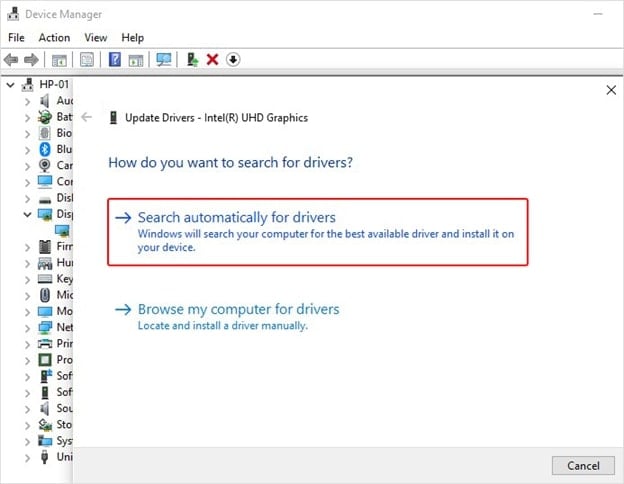
Step 3. Tap on the Search automatically for drivers.

Method 3. Removing Your Third-party Antivirus or Webroot
Before you begin, keep in mind that this method only works with Windows 10. In some cases, third-party antivirus software can interfere with system files, resulting in various Blue Screen of Death errors. If you believe you did not install an anti-malware tool, it is possible that you unknowingly downloaded it as bloatware. As a consequence, you should check to see if you have one installed and uninstall it.
Here are the steps.
Step 1. On your keyboard, press Windows Key + S.
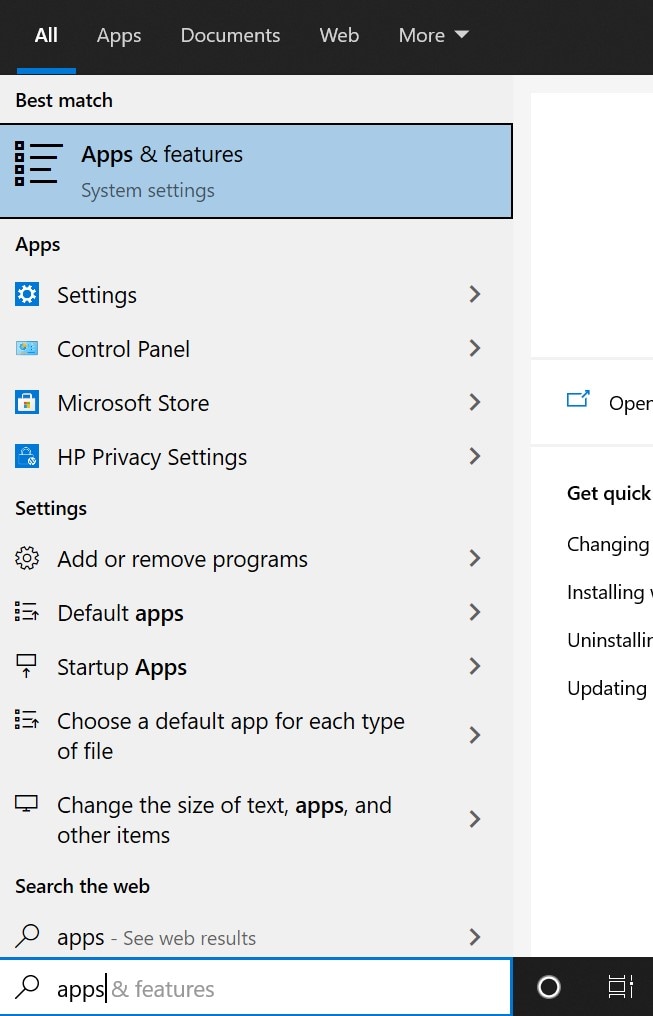
Step 2. Type apps (no quotes), then select Apps & Features from the results.

Step 3. Look through the apps for third-party antivirus software. If you find any, make sure to uninstall it.
Step 4. Reboot your PC and see if the issue persists.
Method 3. Run CHKDSK Command
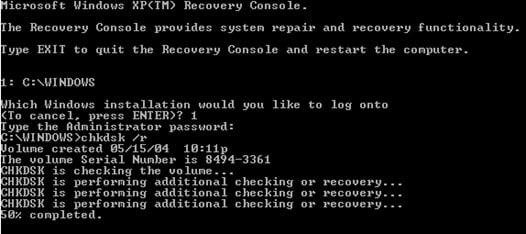
The hard disk can be one of the primary reasons that may lead to ntfs.sys file corruption. Therefore, you can perform a disk check by running the CHKDSK command.
Step 1. Type cmd in the search bar and right-click on the command prompt, and then choose run as administrator.
Step 2. Enter CHKDSK /R and then hit Enter.

Step 3. After fixing all hard drive errors, reboot your system.
Method 4. Checking RAM Issues
It's possible that the ntfs.sys file is crashing due to an incorrect or faulty RAM configuration. As a result, we recommend that you double-check that everything on your hardware is in working order. You can give it a try at some of the solutions listed below.
A. Check your Hardware
Step 1. Switch off your computer and unplug it from the socket
Step 2. Next, you have to remove the RAM sticks.
Step 3. Connect one stick, then power on your monitor. If it does not boot properly, remove the RAM stick and try again by connecting the other one.
Step 4. Power on your PC. If it boots up correctly, you know it's the other sticks at fault.
B. Check your RAM’s Timing and Frequency
Step 1. Look for your RAM model's recommended and default timing and frequency values on the manufacturer's website.
Step 2. If the values do not match, you will most likely need to underclock/overclock your RAM. If you are unfamiliar with the method of configuring elements in the BIOS, we suggest that you seek the help of an experienced professional.
Part 3. How to Recover Lost Data Caused by NTFS.sys Blue Screen Error
Sometimes, important files get lost when you fix NTFS.sys blue screen error, and it's also possible that some files/data on pc are accidentally deleted or formatted during the process of fixing this issue, under these circumstances, you'll probably need a powerful data recovery tool to get both your OS and your files on the PC back to normal.
- Recover lost or deleted files, photos, audio, music, emails from any storage device effectively, safely and completely.
- Supports data recovery from recycle bin, hard drive, memory card, flash drive, digital camera, and camcorders.
- Supports to recover data for sudden deletion, formatting, hard drive corruption, virus attack, system crash under different situations.
Recoverit data recovery software is capable of restoring deleted/lost files or formatted partition from hard drive (HDD and SSD), external hard drive, USB flash drive, memory card, digital camera, camcorder, iPod, Music Player and many kinds of mobile devices (Nokia, Blackberry phones and Phones with older Android OS than ICS). It's pretty easy to use. You can follow the simple steps below to learn how to recover lost data with Recoverit data recovery software.
Step 1: After the installation of Recoverit, launch it, and choose a recovery mode. Here you can choose the "Deleted Files Recovery" mode to start.

Step 2: Then you can select the location to start looking for your lost data. And then you can click the "Start" icon to start the scanning process.

Step 3: It will start a quick scan to find your data. You can turn to try the "All-Around Recovery" option to start a deep scan to search more files If you can't find your lost files after the quick scan.

Step 4: After the "Scan" process, it will display the result on the screen, where you can easily preview the recovered files. Select the target files and click "Recover" button to get them back.

Please do not save the files in the hard disk where you deleted or lost the data.
Computer Troubleshooting
- Win System Crash
- Windows Tips
- Computer Problems
- Blue Screen Errors


 ChatGPT
 Perplexity
 Google AI Mode
 Grok
Grok


David Darlington
staff Editor