How to Fix Windows Cannot Be Installed to This Disk MBR

Jun 05, 2026 • Filed to: Answer Hard Drive Problems • Proven solutions
 TL;DR:
To resolve the Windows cannot be installed to this MBR disk error, you must either convert the storage drive to the GPT partition style to support UEFI boot mode or change your motherboard BIOS settings to boot in Legacy mode.
● Converting the disk from MBR to GPT using Windows Disk Management or the Command Prompt DISKPART utility requires deleting all existing volumes, resulting in complete data loss on the target drive.
● You can bypass the conversion process and install the operating system on the existing MBR drive by temporarily disabling EFI boot sources in the BIOS or utilizing a USB 2.0 flash drive to force a Legacy boot.
● MBR is strictly restricted to older Legacy systems, a maximum storage capacity of 2 TB, and 4 primary partitions, making a GPT conversion mandatory for modern Windows installations on drives exceeding these hardware limits.
Ask AI for a summary
 ChatGPT
 Perplexity
 Gemini
 Claude
 Grok
Grok
“A while back, while installing a fresh copy of Windows 10 on my HP computer, I got the error: Windows cannot be installed to this MBR disk. Can someone tell me how to fix it?”
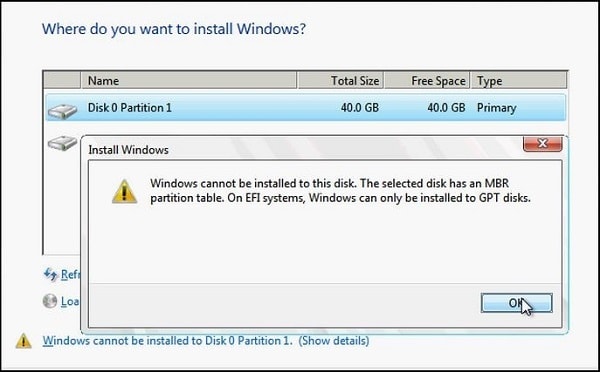
As surprising as it might sound, getting the MBR/GPT compatibility errors on Windows is pretty common. For instance, if you are trying to install a newer version of Windows on an MBR disk, then you can get an error stating: Windows cannot be installed to this MBR disk. On the EFI system, Windows can only be installed on GPT disks. Don’t worry, in this post, I will help you diagnose this issue and fix it by formatting the disk in the GPT partition style.
What is the difference between MBR and GPT Partition Styles?
Before we discuss how to resolve the “The selected disk is of GPT partition style” error, let’s quickly understand the difference between MBR and GTP.
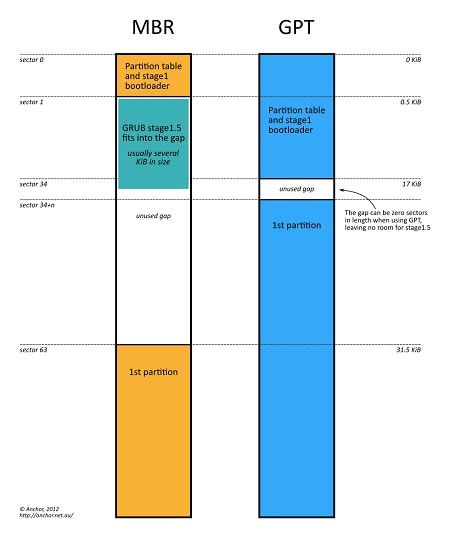
MBR: MBR, which stands for Master Boot Record, is a dedicated boot sector that is located at the beginning of the storage unit. Therefore, it is the first sector in the media that stores information about the operating system and booting sequence. The only issue is that the MBR style can only hold up to 4 partitions and manage a maximum of 2 TB disk storage. Learn more about what is MBR.
GPT: GPT (Global Unique Identifier Partition Table) is also a partitioning style, but it is considered more advanced than MBR. While it also stores the booting data and sequence, it can surpass the storage and partition limitations of MBR and is mostly used to install the latest operating systems. Learn more about what is GPT.
How to Install Windows to the Selected Disk and Fix the MBR Issue?
As you can see, the “Windows cannot be installed on this MBR disk” can happen due to different reasons. Ideally, you can fix it in two ways – you can either format the disk in the GPT partition style or choose to install a legacy system instead.
Fix 1: Change the Boot Mode in Windows to Legacy
Since the MBR partitioning style does not support the UEFI boot mode, you can manually change it to the Legacy option. Here’s how you can fix the “Windows cannot be installed to this disk” issue by changing the boot mode.
- At first, you can just restart your computer and press the BIOS key, which can be F2, F8, F10, DEL, ESC, or any other designated key.
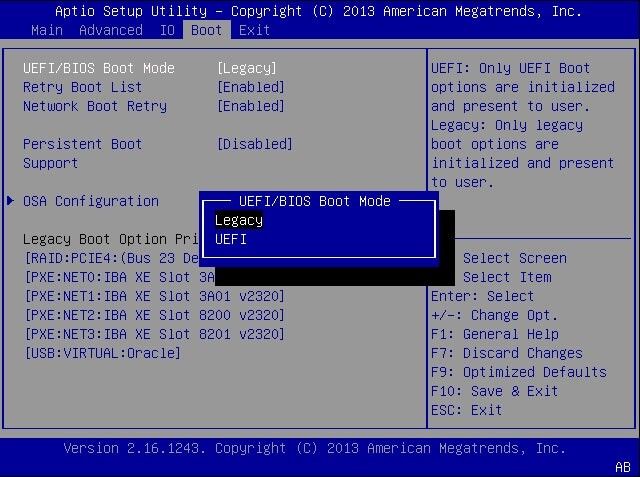
- As Windows would load its BIOS settings, you can use the arrow keys to navigate to the “Boot” tab.
- Now, you can navigate to the Boot Mode and change the option to “Legacy”. You can later restart your system and try reinstalling the firmware.
Fix 2: Format the Disk to the GPT Partition Style via Disk Management
If you want to continue with the UEFI boot mode on your computer, then you can simply format the drive in the GPT partition style. For this, you can take the assistance of Disk Management, which is an inbuilt utility tool in Windows. To learn how you can fix the “The selected disk is of GPT partition style” on your computer, follow these steps:
- At first, you can just launch the Disk Management application on your computer. For this, you can navigate to Control Panel > Computer Management > Disk Management. Alternatively, you can also load the Run prompt and enter the “diskmgmt.msc” command.

- As the Disk Management application would be launched, you can navigate the interface and select the existing MBR drive. Simply right-click the MBR drive, select the “Delete Volume” button, and confirm your choice.

- Simply go through a click-through process so that the existing MBR drive on the system would be removed.
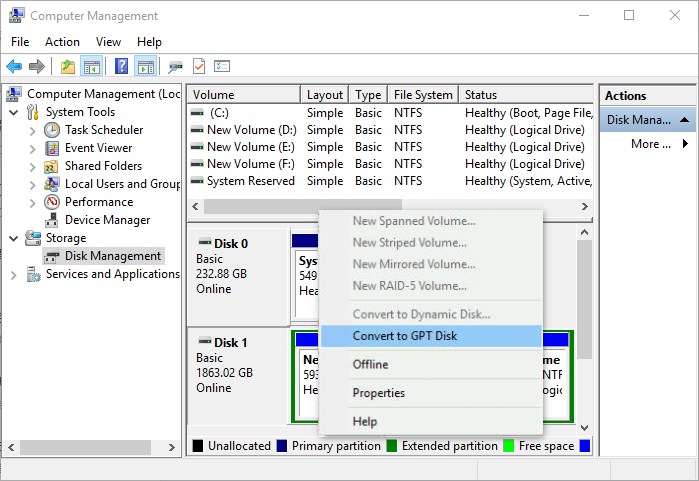
- Afterward, you can choose the same drive, right-click, and select the “Convert to GPT disk” button. You can now confirm your choice and wait as the disk would be converted to the GPT partition style.
Fix 3: Convert the MBR Disk to GPT via DISKPART Utility
If you want, you can also take the assistance of Command Prompt and the Disk Partition command to change the partitioning scheme of the disk. At first, this will remove the existing data on the disk and can later change its partitioning style. To fix the issue and change the scheme to the GPT partition style on your system, follow these instructions:
- To begin with, just go to the Start prompt on your computer and launch the Command Prompt as an administrator.
- Once the Command Prompt window is launched, just enter the “DISKPART” command to load the Disk Partition Utility module.
- Afterward, just enter the “list disk” command to get a list of the available disks and note the identifier of the MBR disk.
- Now, you can use the select command with the identifier to choose the disk (like select disk 2). Subsequently, enter the “clean” command that would automatically wipe all the saved data on the disk.
- That’s it! Once the disk’s saved content has been removed, you can just enter the “convert gpt” command that would convert its partitioning style from MBR to GPT instantly.

Fix 4: Jump Into BIOS & Disable EFI Boot Sources
If you are avoiding converting the disk and looking for a simpler technique to get through this troubling situation. You need to disable EFI boot sources and your problem will be solved. Here are the steps you can follow to implement this method
- First of all, you need to reboot your computer.
- Moving on, press the corresponding BIOS key again and again. To find the key, you can read the system’s motherboard manual. In many laptops and computers, it is F2.
- Find out the Boot Order Section and try to disable EFI boot sources. After this, save the changes you have made.
- Once EFI boot sources are disabled, try installing the windows again.
- Once the Windows is installed successfully, you need to go back into the BIOS and re-enable EFI boot sources.
Fix 5: During Installation, Delete Partition & Reformat
Before conducting this method, make sure you’ve made a backup of your important files. All your files will be deleted in this process.
While you are installing Windows, you will witness a dialog on your screen that will ask you about the hard drive on which you want to install the operating system. Now, choose the partition you want to reformat and later select the delete option. Moving on, create a new partition in the GPT style. After completing this procedure, your Windows will be installed successfully.
Fix 6: Use a 2.0 Flash Drive for Installation
Suppose you are in favor of utilizing an external hard drive to install Windows in the system’s hard drive, it is advised that you use a 2.0 USB flash drive. Wondering why we’ve suggested a 2.0 USB but not a 3.0 USB flash drive? 2.0 USB flash drive will allow you to boot using MBR or Legacy. Users around the world prefer using a 2.0 USB flash drive as it’s much efficient when it comes to Windows installation.
Modern motherboards are capable of supporting both the UEFI and Legacy Boot modes turned on. If you still have any doubts, you can confirm them in the BIOS. In case you are installing from a disk, a message may pop up on your screen stating “Press any key to boot from disk.” Don’t press any of the keys and calmly wait. When the message pops up for the second time, press any key to select the designated device from which you want to boot.
More Related: Copy and Backup Files without Admin Rights
Why Does Windows Cannot Be Installed on an MBR disk?
Ideally, Windows installation can be divided into two categories: Legacy or UEFI. The legacy installation is done for older versions of Windows (like Windows XP or Vista) and it supports MBR partitioning style. Therefore, if you are trying to install a legacy system on the GPT drive, then you would get the Windows cannot be installed to this disk GPT error.
Similarly, if you are trying to install the UEFI system to an MBR disk, then you would be asked to format it in the GPT partition style instead. Besides that, if the disk storage is greater than 2 TB or you want to create more than 4 partitions, then MBR would not be able to support that. In these cases, users get the“Windows cannot be installed to this MBR disk. The selected disk is of GPT partition style” error.
Pro Tip: Restore Your Lost Data with Wondershare Recoverit Data Recovery
As you can see, while fixing the “The selected disk is of GPT partition style”, you might end up losing some data. To get it back, you can use Wondershare Recoverit Data Recovery, which is one of the best data recovery tools. It can help you recover lost, deleted, or inaccessible files under every possible scenario.

- Recoverit Data Recovery supports the recovery of data under different scenarios like formatted drive, accidental deletion, Recycle Bin recovery, etc.
- It supports the recovery of all the major data types such as photos, audio, videos, documents, compressed files, and more.
- You can easily preview all kinds of data on the native interface of Recoverit and select what you wish to get back.
- Recoverit Data Recovery also has inbuilt search options and several filters to pick files based on their date, size, type, and so on.
- Using Recoverit Data Recovery is extremely simple and it supports all kinds of file types, partition styles, and hard disk types.

There you go! I’m sure that after reading this post, you would be able to fix the “Windows cannot be installed to this MBR disk” issue pretty easily. I have provided solutions to change the Boot Mode or format the disk to the GPT partition style. Though, if you have formatted the drive in the process, then Recoverit Data Recovery would be an ideal solution. A user-friendly DIY application, it can get back all kinds of lost and deleted data from your system like a pro.
Step 1. Download and Install Recoverit
Install Recoverit on your computer as per the installation instructions, then open the program and navigate to the Hard Drives and Locations section.

Step 2. Scanning the Drive
Choose the disk where the data was lost and initiate the search for the lost files, which may take some time.

Step 3. Recover the Files
Once the scanning process is finished, select the desired files by checking the box next to them. Then, click on the Recover button to save and download the data to a different disk. Your files have now been successfully recovered.

Relative Guides:
Fix Windows Installation Failed in Safe OS Phase With an Error
Fix Windows 10 Sync Center Not Working
People Also Ask
-
How do I change MBR to GPT?
If you want to change MBR layout to GPT there are several methods. One of the most common and simple is to do it through Disk Management. You just have to run the application; right click on the disk you want to change the layout and select "Convert to GPT Disk". -
What is an EFI system partition and do I need it?
EFI system partition is a space that is present on a storage device and is created automatically when an operating system is installed, it contains bootloaders, device drivers, and key files for Windows to start. Although the EFI system partition can be removed, it is not suggested to do so, as the boot of the computer would have severe problems. -
Does Windows 10 use GPT or MBR?
Windows 10 supports both partition layouts. What a user should take into account is knowing the hardware to determine which one to use. In ordinary circumstances, GPT is better for new computers, so it is more common to use it in Windows 10. On the other hand, if you have an old computer with a disk with a short storage capacity, MBR may be a better option. -
Can I use MBR with UEFI?
UEFI needs to use GPT partitions to manage system boot. However, you can go into UEFI and change some settings to start Windows through Legacy. On the other hand, if you don't want to use the MBR partition as a boot partition then you should be able to use it without any problem on EFI systems. -
Is UEFI better than legacy?
Under normal circumstances yes. Unless you have an old computer, UEFI is a better option not only because it is a newer and updated boot mode, but it is faster, and thanks to GPT layout, supports an infinite number of partitions, supports disks larger than 2TB and has more advanced features of safety that protect your information and devices.
What's Wrong with Drive
- Recover Your Drive
- Restore formatted drive
- Recover undetected drive
- Retrieve WD drive data
- Get files from external drive
- Wiped data can be recovered
- Recover data from dropped hard drive
- Fix Your Drive
- What if drive not showing up?
- Hard drive won't boot? Fix it
- What if a disk unallocated?
- Deal with hard drive crash
- Repair disk & recover data
- Fix Toshiba external drive not working
- Fix a broken hard drive
- Format/Wipe Drive
- Know Your Drive


Theo Lucia
chief Editor