

 TL;DR:
To fix Windows 10 Sync Center syncing failures, you must first manually enable the "Offline Files" feature in the Control Panel and ensure the background Offline Files service is actively running via `services.msc`.
● If sync options are greyed out or the cache is corrupted, you can force a database wipe by opening the Registry Editor, navigating to `HKEY_LOCAL_MACHINE\System\CurrentControlSet\Services\CSC\Parameters`, creating a `FormatDatabase` DWORD value set to `1`, and restarting your computer.
● Network synchronization will natively fail if your corporate Group Policy restricts offline files, if continuous availability is enabled on the network share, or if you are using unsupported network storage hardware like D-Link.
● Because Windows standard "Undo" commands cannot reverse file overwrites caused by sync conflict collisions, you must use a specialized sector data recovery utility like Wondershare Recoverit to salvage unsynced file blocks before the system completely overwrites them.
Ask AI for a summary
 ChatGPT
 Perplexity
 Gemini
 Claude
 Grok
Grok
Sync Center in Windows 10 is designed to keep your files synchronized across multiple devices. However, users often encounter issues where Sync Center fails to work properly, which can be especially frustrating when consistent file updates are needed across systems. These problems are common and affect many users on a daily basis.
When Sync Center in Windows 10 stops functioning correctly, file synchronization breaks down. This can lead to the loss of important data or force you to rely on outdated files. Identifying the root cause of Sync Center issues is key to resolving them quickly and restoring seamless syncing.
This guide shows you the best fixes to Windows 10 sync center not working. The good news is that most Sync Center Not Working issues have simple solutions. We'll cover all the common causes and fixes.
🛠️ Windows Sync Center Troubleshooting & Structural Index
| Optimization Phase | Core Error Symptom | Technical Subsystem Target | Fix Complexity Layer |
| Part 1: Subsystem Overview | Sync loops, offline file mismatch | Control Panel Sync Center Engine | Baseline Concept |
| Part 2: Root Cause Analysis | Broken network links, stale cache | Client-Side Caching (CSC) Driver | Diagnostic Audit |
| Part 3: Primary GUI Repairs | Greyed-out options, hung status | Control Panel & Services.msc | Low to Moderate |
| Part 4: Advanced Registry Fixes | "Always available offline" missing | Regedit (LanmanServer / CSC paths) | Advanced Administrator |
| Part 5: Data Rescue Track | Lost un-synchronized file blocks | Raw Sector Data Carving (Recoverit) | Critical Recovery |
Part 1: What is Windows Sync Center and Its Function?
Windows Sync Center is a built-in feature in Windows 10 that helps keep your files up to date between your computer and network folders. It also works with offline files and mobile devices. If Sync Center stops working, your files may not stay synced properly.
Sync Center manages partnerships between your PC and other locations. It shows sync status and lets you control when syncing happens. The tool also handles conflicts when the same file changes in two places. But when Sync Center Not Working issues occur, these functions fail to work as expected.
Part 2: Common Causes of Sync Center Not Working
Several factors can cause Sync Center Windows 10 not working problems. Understanding what causes Windows Sync Center not to work helps you pick the right fix. Here are the most common reasons:
- Disabled offline files feature - This is the main cause of Sync Center Not Working. The first common reason is that enabled online files are greyed out. Do check them out properly.
- Full cache storage - Too much cached data blocks new sync operations
- Outdated drivers - Old device drivers cause sync failures
- Windows updates - Some updates break sync functionality
- Group policy restrictions - Company policies may disable sync features
- Service failures - Background sync services may stop running
- Network connectivity issues - Poor connections interrupt sync processes
Part 3: How to Fix Windows 10 Sync Center Not Working
Now we'll explore the best fixes to Windows 10 sync center not working. Each solution targets different causes of Sync Center Not Working.
These fixes to Windows 10 sync center not working are tested and proven. They work for most common sync problems. Follow each step carefully to resolve your Sync Center Windows 10 not working issues.
🖥️ Windows Registry Optimization Matrix for Offline Files
If Windows administrative controls lock your sync capabilities, apply these precise registry values to override policy flags and force-reinitialize the Client-Side Caching database:
| Targeted Registry Path | Value Name to Create | Data Type | Value Data | Intended System Result |
| ...\Services\LanmanServer\Parameters | EnableOplocks | REG_DWORD | 1 | Activates opportunistic network file locking |
| ...\Services\MRXsmb\Parameters | OplocksDisabled | REG_DWORD | 0 | Forces SMB client to accept network locks |
| ...\Services\CSC | Parameters (Key) | Key Node | N/A | Opens directory tree for cache overrides |
| ...\Services\CSC\Parameters | FormatDatabase | REG_DWORD | 1 | Wipes and rebuilds a corrupted sync cache |
Fix 1: Enable Offline Files in Control Panel
This fix targets the most common cause of Sync Center Not Working. Many users don't realize offline files need to be enabled first. This setting controls whether Sync Center can function properly. Without this feature enabled, your computer can't sync files at all.
Offline Files is turned off by default in Windows 10, which often leads to confusion when Sync Center isn’t working. Many users miss this step and wonder why their files aren’t syncing. Turning on this feature is the first step to getting Sync Center to work properly.
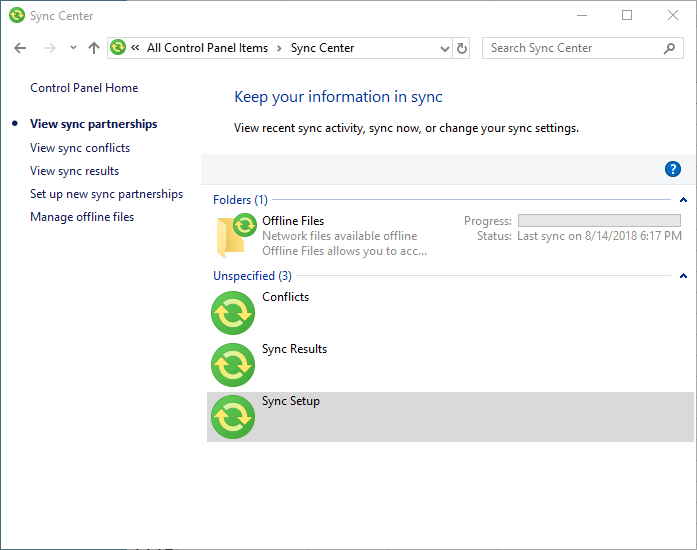
Step 1: Open Control Panel. Go to "Sync Center." Click on "Manage offline files" on the left side.
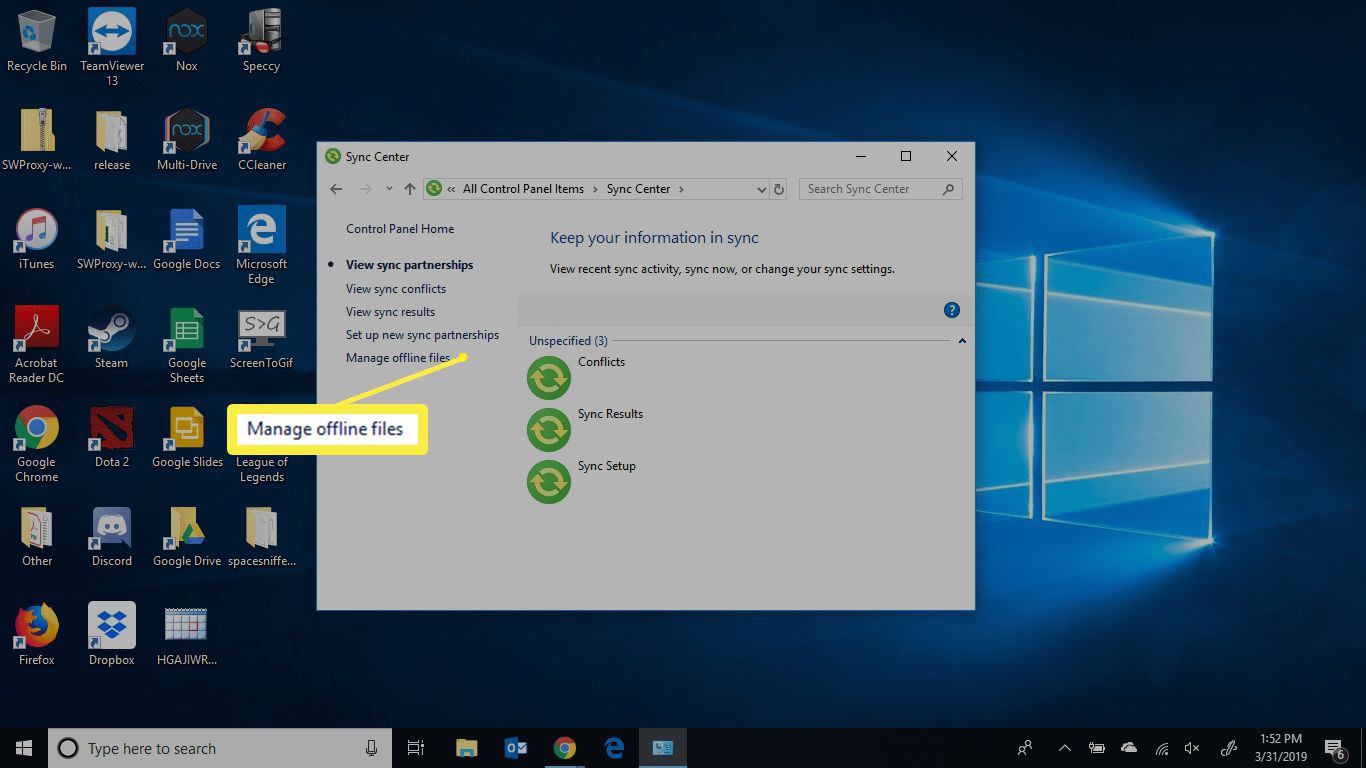
Step 2: Click "Enable offline files". Restart your computer. This activates the sync functionality.
Fix 2: Restart Sync Center Services
Windows services sometimes stop running and cause Sync Center Windows 10 not working. Restarting these services often fixes the problem quickly. This method works for service-related sync issues. Services can crash or stop responding without warning.
Background services handle all sync operations in Windows 10. When these services fail, you get Sync Center Not Working problems. The Offline Files service is especially important for sync functionality. Restarting services refreshes their operation and clears temporary glitches.
Step 1: Press Windows + R. Type "services.msc". Hit Enter. Find the "Offline Files" service in the list.
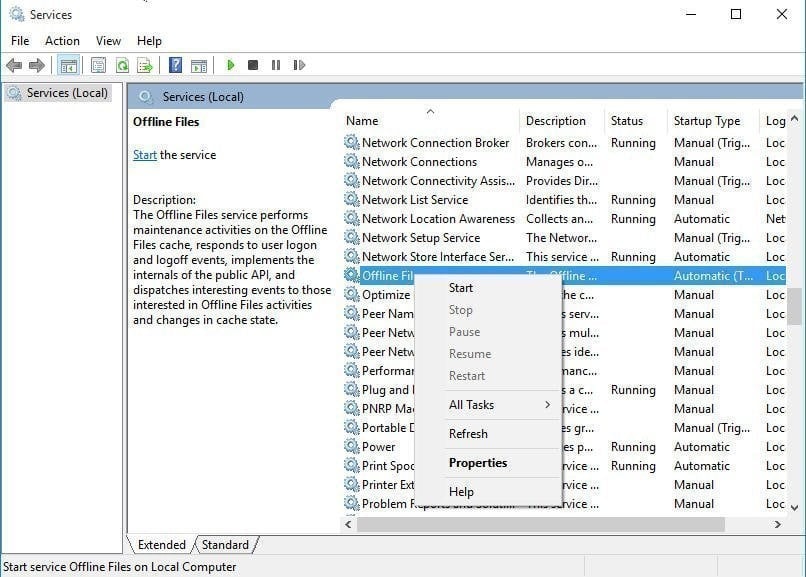
Step 2: Right-click the service and select "Restart."
Fix 3: Clear Offline Files Cache
A corrupted cache is another reason why Windows Sync Center might stop working. When old cache files get damaged, they can interfere with file syncing. Clearing the cache helps remove this faulty data and often resolves stubborn syncing issues.
The offline files cache stores temporary data for sync operations. When this cache gets corrupted, sync operations fail completely. You might see error messages or files that won't update. When you clear the cache, Windows automatically rebuilds it using fresh data, which can help restore proper syncing.
Step 1: Open Control Panel. Go to "Sync Center." Click the "Manage offline files”.
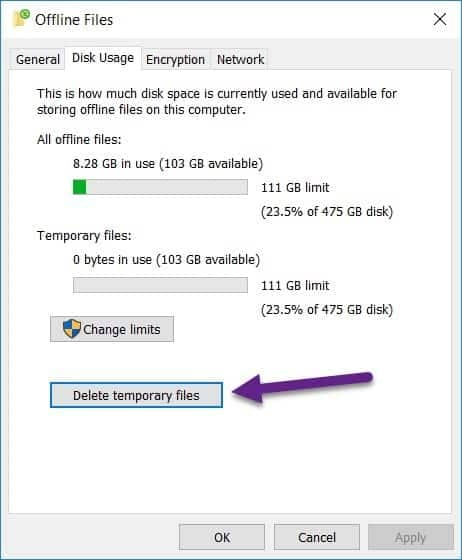
Step 2: Click the "Delete temporary files" button. Then click "OK". Restart your computer.
Fix 4: Check Group Policy Settings
Group policies can disable sync features and cause Sync Center Not Working. This happens often in business environments. Checking these settings helps identify policy-related issues. Company IT departments sometimes disable sync for security reasons.
Group Policy Editor controls many Windows features, including sync capabilities. Wrong policy settings can completely block Sync Center Windows 10 not working. These policies override user settings and cause mysterious sync failures. Checking policies helps identify permission-based problems.
Step 1: Press Windows + R. Type "gpedit.msc". Press Enter. Navigate to Computer Configuration > Administrative Templates.
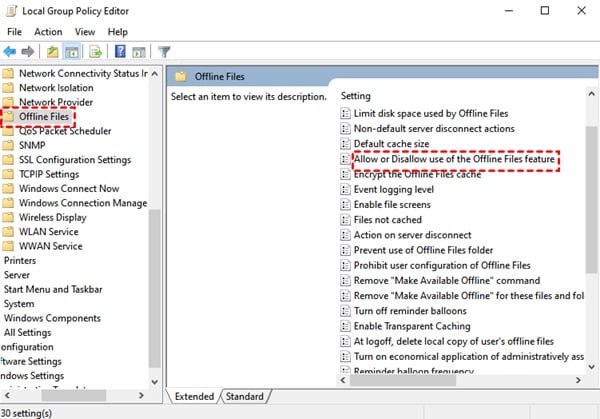
Step 2: Find the "Network > Offline Files" section. Make sure "Allow or Disallow use of Offline Files" is set to "Enabled."
Fix 5: Update Windows and Device Drivers
Outdated software often causes Sync Center Windows 10 not working problems. Updates fix bugs and improve compatibility. This solution addresses driver and system-related sync issues. Microsoft regularly releases fixes for sync problems.
Old drivers can conflict with sync operations and cause failures. Windows updates often include sync improvements and bug fixes. Device drivers need to stay current for proper hardware communication. Outdated software creates compatibility problems that break sync functionality.
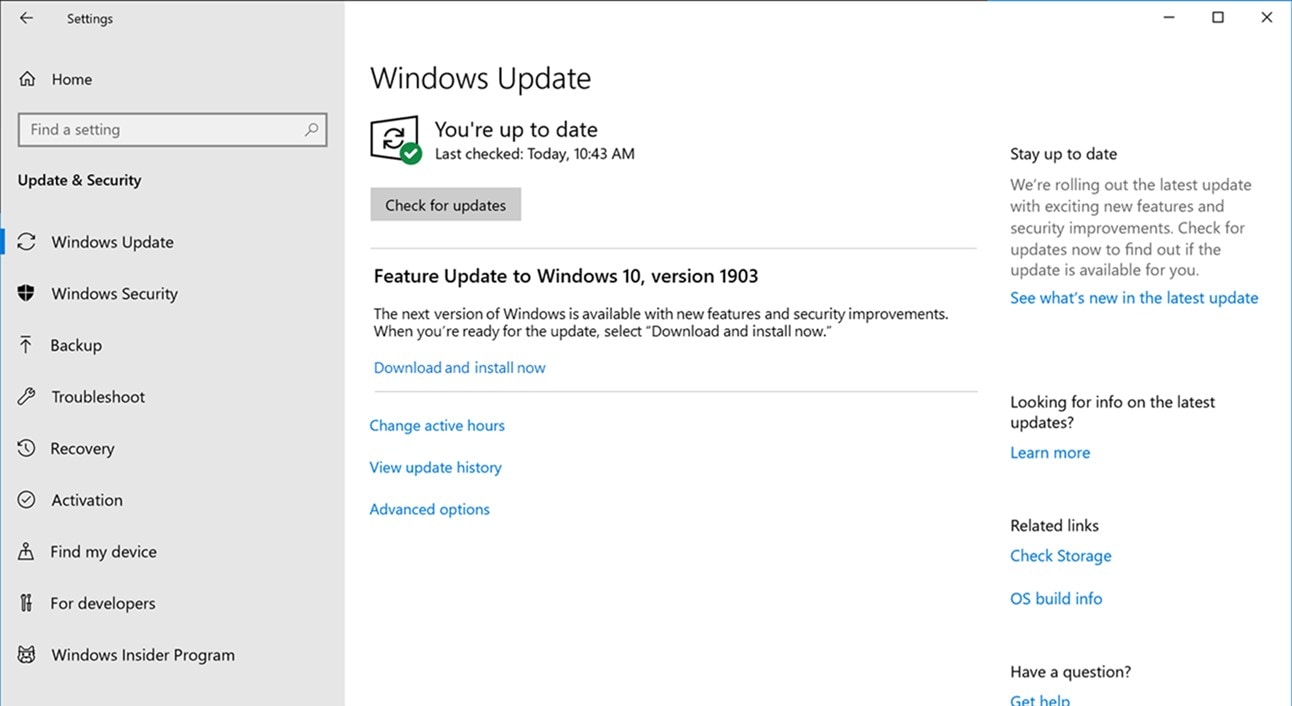
Step 1: Go to Settings > Update & Security > Windows Update. Click "Check for updates" and install any available updates.
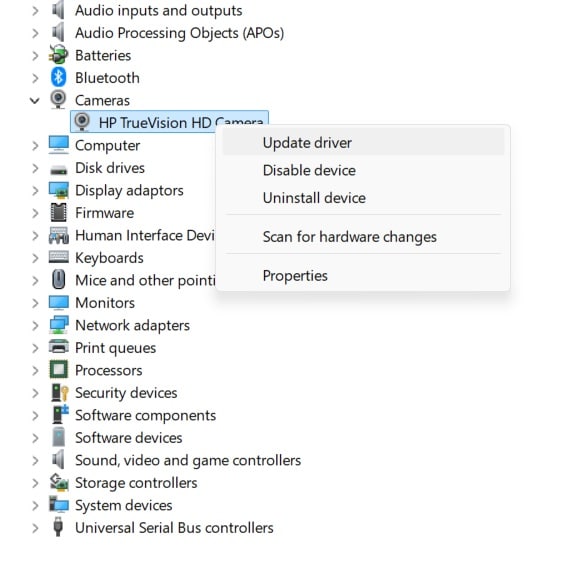
Step 2: Open Device Manager and look for devices with yellow warning signs. Right-click and select "Update driver."
Fix 6: Reconfigure Sync Partnerships
Broken partnerships are a common reason for what causes Windows Sync Center not working. Recreating these connections often solves sync problems. This fix works when specific folders won't sync. Partnerships can become corrupted or outdated over time.
Sync partnerships link your computer to network locations or devices. These connections can break due to network changes or system updates. When partnerships fail, only specific folders stop syncing properly. Recreating partnerships establishes fresh, working connections.
Step 1: Open Sync Center and click "View sync partnerships." Select the problematic partnership and click "Delete."
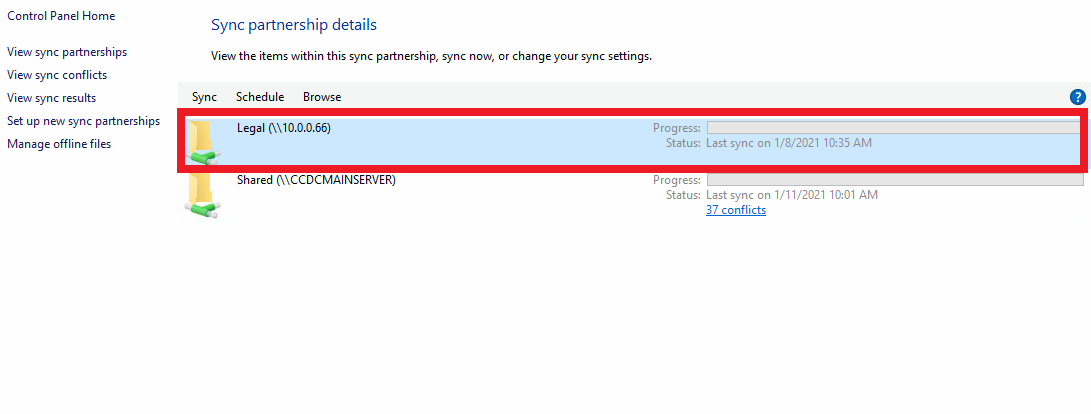
Step 2: Set up the partnership again by making the folder available offline. Right-click the network folder and choose "Always available offline."
Bonus Fixes to Windows 10 Sync Center Not Working
All the above reasons are usually reported by the users. Detect the cause in your situation. Once you have done that, there are multiple methods to solve the issue. All you need to do is apply them step by step. Different situations are followed by methods, mention in the guide. Recognize your situation and apply the method properly;
1 Enable files greyed out
If your windows 10 sync center is not working and you recognize enable files greyed out, you can use these two methods to solve your problem;
Method 1: Enable opportunistic locking
The first simple method is to enable opportunistic locking to solve your issue caused by enable files greyed out, follow the steps to solve your issue properly;
Step 1: First of all, you need to press Win + R to open the run window, and then you need to type regedit.exe in the search box and then press enter.
Step 2: Navigate to the following registry subkey and create a new REG_DWORD with the title EnableOplocks and set it to number 1. Subkey; HKEY_Local_Machine\SYSTEM\CurrentControlSet\Services\LanmanServer\Parameters\

Step 3: After that, you need this registry subkey to create a new REG_DWORD with the title Oplocksdisabled and set it to number 0. Subkey; HKEY_Local_Machine\SYSTEM\CurrentControlSet\Services\MRXsmb\Parameters\
Step 4: You need to create new key titled parameters if you can't find it under the MRXsmb tab and then exit the registry and restart your computer.

Method 2: Reinitialize the offline files cache
If the first method didn't come in handy, you can use this method to reinitialize the offline files cache, follow the steps;
Step 1: Firstly, you need to click the "Start button" and then type registry in the search box. If you are prompted for an administrator password, type the password and move on.
Step 2: Now, you need to navigate to the given registry subkey and then right-click. Select, New, and key from the context menu and type parameters in the key box.

Step 3: Right-click on the parameters and choose the "New" and DWORD (32-bit) valve. After that, you need to type the format database in the box.
HKEY_LOCAL_MACHINE\System\CurrentControlSet\Services\CSC
Step 4: Furthermore, you are required to right-click on the FormatDataBase and choose to modify and type 1 in the valve data box.
Step 5: Exist registry and restart your computer.
2 Windows 10 always available offline missing
If you are facing the same situation, you need to follow the methods;
Method 1: Do not use D-link network storage
If you are using network storage with doesn't support offline files, you will have this trouble. D-link is one of the network storages which does not support offline files, you don't need to choose it.
Method 2: Remove credential on your computer
In case, you check the option remember my credentials then you can easily tackle this issue;
Step 1: In the search box, you need to type the credential manager and select it.
Step 2: Now, click windows credential and select credential for your host and choose to remove the option to delete the credential.

3 windows 10 folders redirection offline files not syncing
In case, your network share enabled continuous availability then no one can share folders available offline. You can make files available offline by unchecking the "Enable Continuous availability" option.

4 offline files service cannot be activated windows
You can easily get rid of the trouble using these steps;
Step 1: You need to type the control panel in the search box and choose it.
Step 2: Choose the drop-down menu and choose the view by option and choose small icons. After that, select administrative tools and options of services.
Step 3: Locate the Offline files service and choose start by right-clicking it.

5 Files do not sync
If some of the files are unable to sync by default, you can use these steps to sync these files properly by disabling offline files not cached with GPO. Follow the steps;
Step 1: In the search box, you need to type a group policy and choose the edit group policy.
Step 2: You need to find the following group policy setting in the local group policy editor, right-click, and select edit from its context menu and you can disable the file extension.
Computer Configuration\Administrative Templates\Network\Offline Files\Files not cached

Part 5: Lost Files Due to Sync Issues? Use Recoverit
"I lost important work files when Sync Center stopped working. The files weren't syncing to my backup location, and I didn't realize it until my hard drive crashed. Now I need to recover those lost unsynced files urgently."
When Windows Sync Center fails or hangs, it creates "Sync Conflicts." If a user tries to force synchronization over a broken cache connection, Windows can easily replace newer local changes with old, outdated versions from the network share.
Because this file overwrite happens automatically at the operating system level, standard "Undo" commands will not work. To recover these lost, overwritten file blocks, you must use a specialized data rescue utility like Wondershare Recoverit to search the underlying storage sectors before the system writes over them completely.
When Sync Center Windows 10is not working and causes data loss, Recoverit can help. This powerful recovery tool finds and restores lost files from various situations. It works even when sync failures cause file loss or corruption.
Recoverit specializes in recovering files that sync problems delete or corrupt. The software uses advanced scanning to find lost data. It can recover files from failed sync operations and system crashes. Learning how to sync files with UBackit is also important, but first, you need to recover your lost data.
Try Recoverit to Retrieve Lost Data
![]() Security Verified. Over 7,302,189 people have downloaded it.
Security Verified. Over 7,302,189 people have downloaded it.
The tool handles many file loss scenarios that happen with Sync Center Not Working issues. It recovers from damaged hard drives, deleted partitions, and system crashes. Professional users trust Recoverit to handle critical data recovery needs.
How to Recover Lost Unsynced Files with Recoverit:
Step 1: Download and install Recoverit on your computer. Launch the program and select the drive where you lost files. Click "Start" to begin scanning for lost files.

Step 2. The deep scan will find files that sync issues deleted or corrupted.

Step 3: Preview the found files to make sure they're what you need. Check file quality and content before recovery. Select the files you want to recover and click "Recover." Save them to a different location than where they were lost.

Part 6: Tips to Keep Sync Center Running Smoothly
Prevention is better than dealing with Sync Center Not Working problems later. These tips help avoid sync issues before they start. Regular maintenance keeps your sync system healthy and reliable.
- Enable automatic updates - Keep Windows and drivers current to prevent compatibility issues
- Monitor sync status regularly - Check Sync Center weekly for any error messages or warnings
- Limit offline file usage - Don't make too many files available offline to avoid cache problems
- Keep adequate disk space - Sync operations need free space to work properly
- Use reliable network connections - Unstable networks cause sync failures and data corruption
- Back up important files separately - Don't rely only on sync for data protection
- Clear cache monthly - Regular cache cleaning prevents corruption and performance issues
- Restart sync services periodically - Monthly service restarts prevent service-related problems
🏁 Post-Repair Checklist: Maintain Flawless Windows File Syncing
To ensure that your Windows Sync Center engine remains functional, prevents database corruption, and keeps network files fully aligned, follow this validation checklist:
- Verify Service Startup Behavior: Open `services.msc`, locate the Offline Files service, right-click Properties, and confirm that its Startup type is configured to Automatic.
- Audit Client-Side Storage Quotas: Open the Offline Files control window, click the Disk Usage tab, and select Change limits to ensure the cache allocation has at least 20-30% free storage space.
- Test Offline Network Drops: Disconnect your PC from the local network or Wi-Fi while working on a sync folder. Verify that Windows switches smoothly to offline mode and allows you to save edits without crashing.
- Verify Group Policy Compliance: Run `gpedit.msc` and navigate to `Computer Configuration \ Administrative Templates \ Network \ Offline Files`. Confirm that corporate policies are not actively blocking your user credentials.
- Deploy a Redundant Backup Engine: Do not rely on Windows Sync Center as a true data backup strategy. Supplement your setup with an automated tool like Wondershare UBackit to schedule regular, independent image snapshots to an external hard drive or an offline storage volume.
Conclusion
Sync Center Not Working issues don't have to ruin your productivity. Most problems have simple solutions you can try yourself. Understanding what causes Windows Sync Center not working helps you fix issues faster. The seven fixes to Windows 10 sync center not working in this guide solve most common problems.
Remember that prevention works better than repairs. Keep your system updated and monitor sync status regularly. When sync problems cause data loss, tools like Recoverit help you recover lost unsynced files. Learning how to sync file with UBackit also gives you alternative sync options.
With proper maintenance and the right tools, you can keep your files synchronized across all devices without problems.
Try Recoverit to Retrieve Lost Data
![]() Security Verified. Over 7,302,189 people have downloaded it.
Security Verified. Over 7,302,189 people have downloaded it.
FAQs
-
Q1: Why is my Sync Center Windows 10 not working suddenly?
The most common cause is disabled offline files or stopped sync services. Windows updates sometimes change sync settings or break partnerships. Check if offline files are enabled in Control Panel first. Then restart the Offline Files service in Services console. Network connectivity problems can also cause sudden sync failures. -
Q2: How do I know if Sync Center Not Working is affecting my files?
Open Sync Center from Control Panel and check for error messages or warnings. Look for red X marks or yellow warning signs next to sync partnerships. Files that should sync but show old timestamps indicate sync problems. You can also check if offline files are accessible when disconnected from the network. -
Q3: Can I recover files lost due to sync failures?
Yes, you can recover lost unsynced files using data recovery software like Recoverit. The tool finds files that sync problems deleted or corrupted. Act quickly because new data can overwrite lost files. Stop using the affected drive and run recovery software immediately for best results.


