
Sep 29, 2026 • Filed to: Windows Computer Solutions • Proven solutions
iCloud is Apple’s cloud storage service for backing up relevant data and syncing it between devices. While it is provided as a built-in app on all the Apple-based devices.
You can also use Apple-designed apps like the iWork suite (Apple Pages, Keynote Presentation, and Apple Numbers) with the help of iCloud. You’ll need an iCloud account for this to work. You do not have to own a Mac or any Apple device to use iCloud and Pages as it is also accessible on Windows PCs. If you are using a separate windows PC or using Windows OS on a Macintosh with the help of Bootcamp, iCloud will work in all these scenarios.
Part 1. Where to Download iCloud for Windows?
- What is Cloud storage technology?
Cloud storage is a model in which data is maintained, managed, backed up, and made available to users over the internet within a specific capacity. It is helpful not only specific to data back-up, but It also allows you to share your files and information with other users. This technology also offers access to the user from anywhere and from whatever device they use. Some of the well-known cloud storage providers are listed below:
- Google Drive: Offer up to 15GB of free storage space.
- Apple iCloud: Allows 5GB of storage space to share and save files.
- Dropbox: One of the first storage space providers in the world. It only offers up to 2GB of data storage.
- Microsoft Onedrive: It is built-in in Windows operating system. It gives 5GB of storage space to its user, much like Apple’s iCloud.
In this section, we will discuss how to download and sync data with iCloud on a Windows PC. There are two possible ways to use iCloud with Windows.
The first method is pretty straightforward; it is to access your iCloud account using your Apple ID from the web browser. The other way is to download and install Apple’s iCloud app for Windows software on your computer.
The difference between these two methods of using iCloud is that you can only access your iCloud data via a browser, but you can not gain access to your files on your Windows system. It will not sync with cloud storage. If you want to automatically update your files, photos, documents, and bookmarks from your PC to all of your Apple devices, you’ll want to use the iCloud tool for Windows.
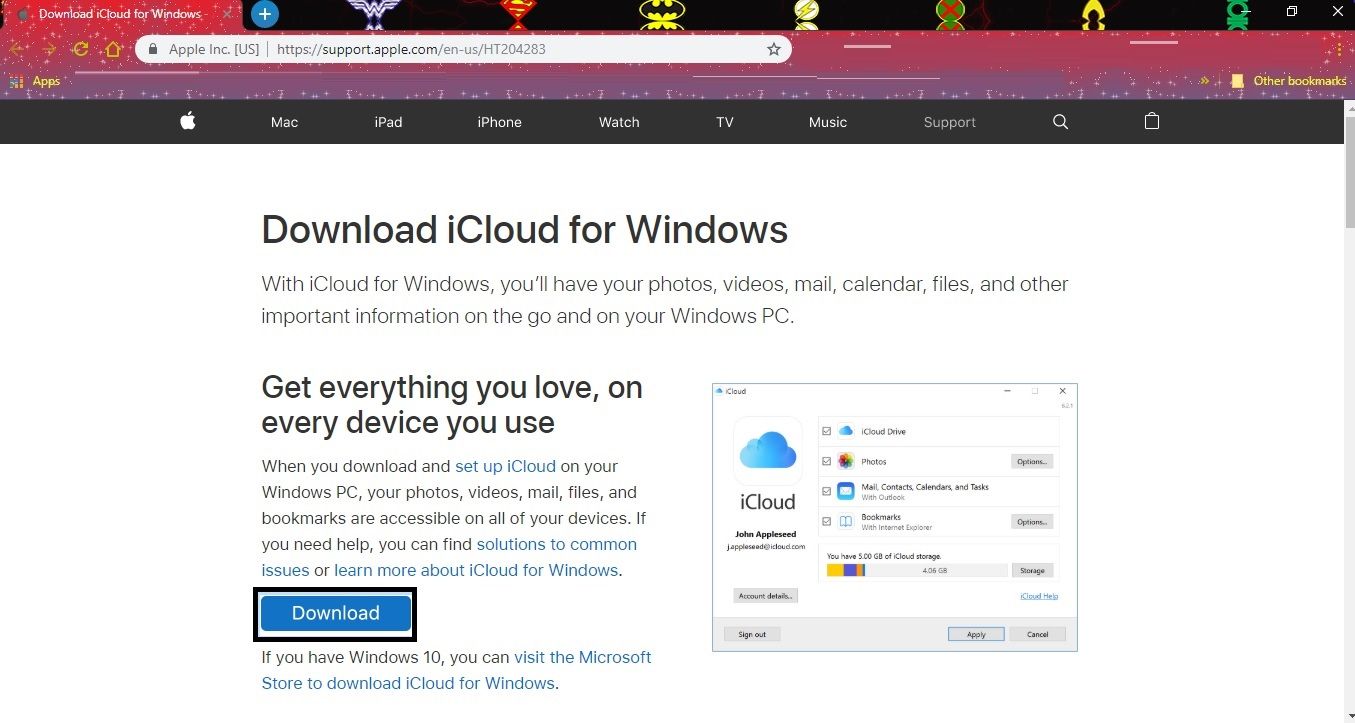
The iCloud for Windows operating system can be downloaded from the official website of Apple. It's also often available alongside the iTunes app. You can check to see if it's installed by opening the Start Menu and by scrolling through the app list. Please follow the step-by-step guide to download iCloud for your Windows PC:
- Visit the official Website of Apple.
- Click on Download.
- Open the executable file that you have downloaded.
- Accept the terms of services and check the option of Automatically update iCloud for Windows and other Apple Software.
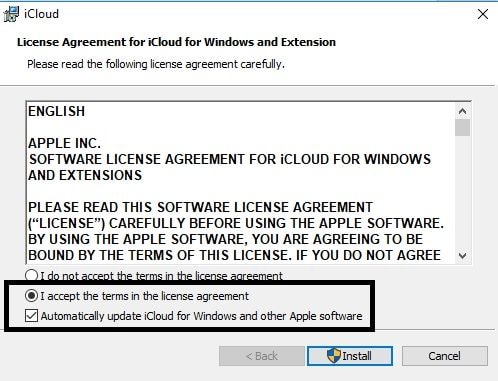
- Click on Install.
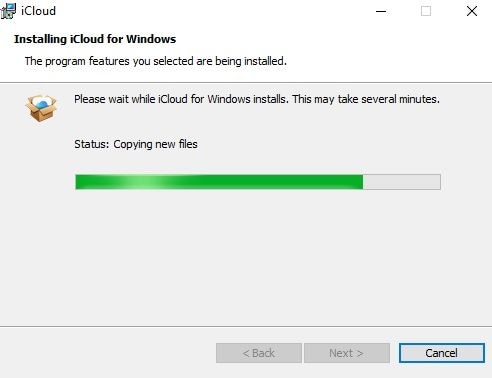
- The installation process will begin.
- Click on Finish.
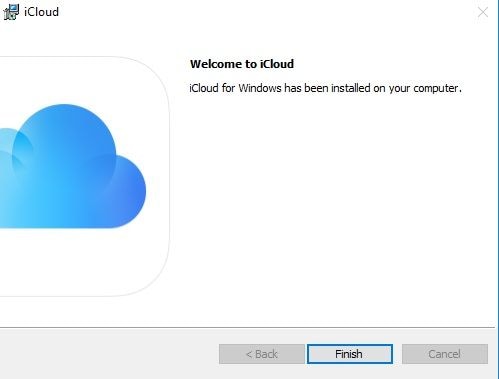
- Click on Yes to Restart your Windows PC.
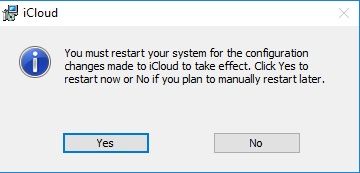
- Sign in with your Apple ID and password, create a new account if you do not have one already.
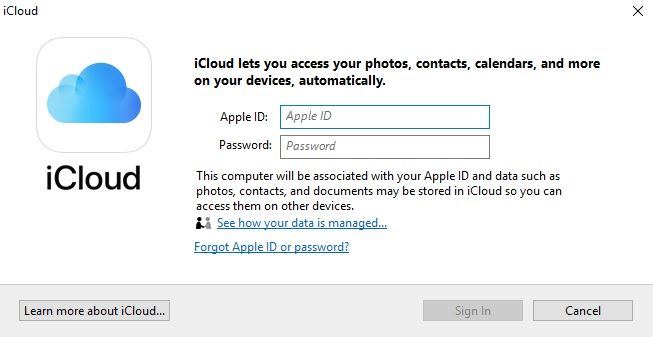
- You must have access to an Apple device before creating a new Apple ID.
- You will be asked to verify your account; a text message will be sent to your cell phone number.
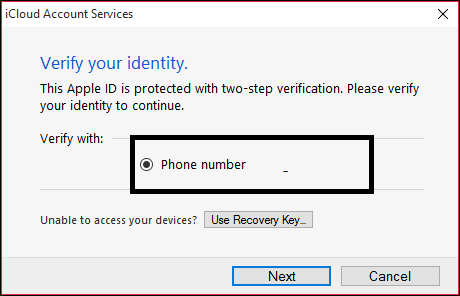
Starting in late 2024 and standard in 2026, Apple introduced Advanced Data Protection for iCloud. If you have enabled this on your iPhone, you will need to authorize your Windows PC as a "Trusted Device" before your end-to-end encrypted data (like Photos and Notes) will sync. When you sign in on Windows, check your Apple device for a prompt. Without this authorization, your Windows iCloud app may show "Syncing..." indefinitely without transferring data.
- Once you have logged into your account, you will be asked to confirm if you want to sync your data for iCloud Drive, Photos, and Bookmarks.
- Check the option if you want to sync the data or uncheck them to prevent the files from syncing with your Windows PC.
- Click on Apply.
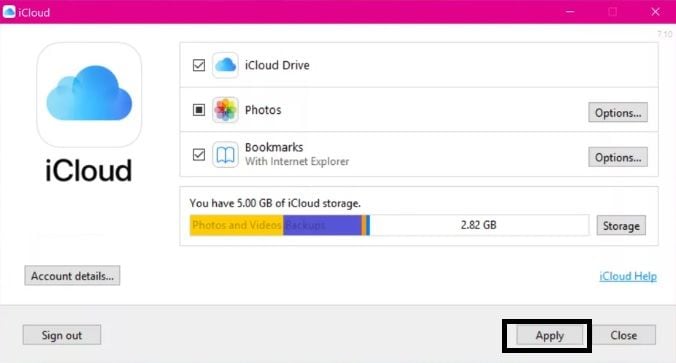
- You can set-up and login to the iCloud at any moment. You can gain access to the app from the Start menu in the taskbar. You can also pin the app to the taskbar of Windows.
| Feature | Microsoft Store Version | Apple Website Installer |
| Best For | Windows 10 (18362.0) & Windows 11 | Windows 7 / 8 (Legacy) |
| Update Method | Automatic (via Microsoft Store) | Manual (via Apple Software Update) |
| System Integration | Native File Explorer/Photos Integration | Basic Folder Sync |
| Reliability | High (Optimized for Win 11) | Moderate (Compatibility Mode) |
Part 2. How to Find the New iCloud Folders in File Explorer?
When you install iCloud storage on your computer, and iCloud Drive folder is created in the File Explorer. Any documents that you've stored or backed up in the drive will automatically download to the iCloud folder in Windows File Explorer.
Files that you create on your PC, mainly on the primary volume drive, and save to the iCloud folder automatically appear on your other Apple devices.
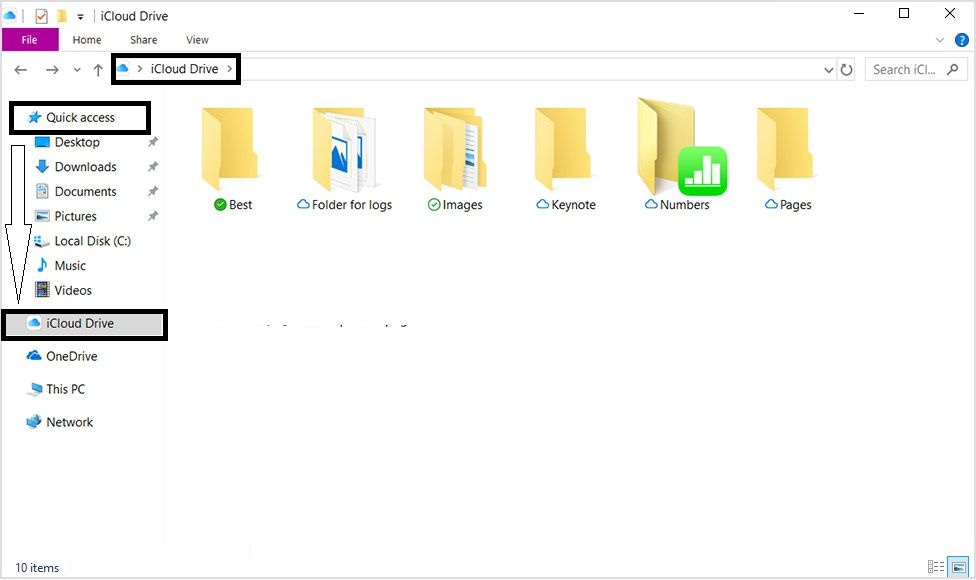
By following the procedure mentioned above, you can use iCloud like any other folder on your Windows PC. It is as easy as Dragging and dropping files and other folders to different folders. iCloud establishes its own set of folders by default. If you have a pre-existing data on your iCloud storage drive, then it will also automatically appear as part of the syncing process. The data will continue to sync on your computer as long as it is connected to some network. It will allow you on the go access to essential files at any time of the given day.
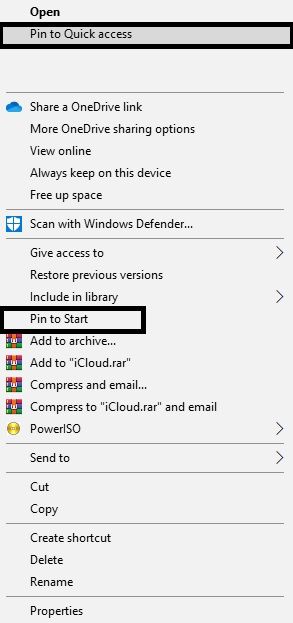
Do remember to pin the iCloud folder to the Start menu and the quick access drop-down menu. All you have to do is right-click on the folder and select pin to start menu and pin to Quick Access.
Part 3. How to Use iCloud's Photos On Windows 10?
By default, there is a certain number of folders created whenever you download and install iCloud on your Windows PC. You can find those folders in the windows explorer. One of those folders is the iCloud photos folder. You can easily view all the files and photos by opening that folder. It is an excellent way to keep your photos in check. The iCloud drive on your system can be used to create the iCloud images back up to the PC as well and sync other images saved on different devices.
After launching the iCloud on your PC, you can gain access to the photos and manage them by only clicking on Options next to Photos. It will let you decide how you want to manage your photos on the cloud.
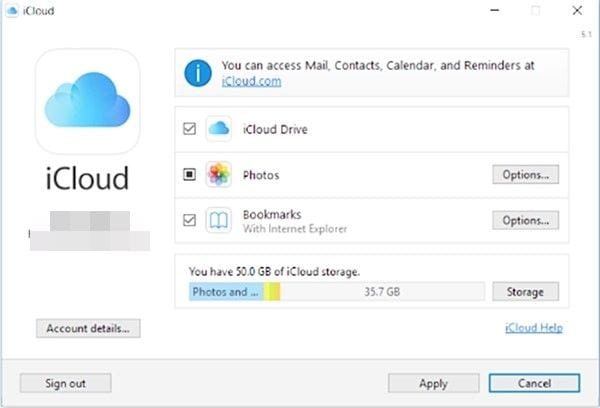
- iCloud Photo Library:
Any sort media will be saved to the iCloud Photos folder on your Windows 10 device automatically when you check this option. You will be able to view these files on your Apple devices and other Windows PC. It will also let you manage your photos accordingly.

- My Photo Stream:
This option offers you to download your recent pictures from your other linked iCloud devices on your Windows PC. It will also upload the latest photos from the iCloud Photos folder on Windows to iCloud to view other synced devices.

Download new media to my PC:
You can download the latest videos and pictures by enabling this specific option. It will automatically download relevant media from the iCloud service to your PC’S Photos folder. It is particularly useful when you want to view the media of your iPhone on your Windows PC. You can also enable the Upload the media option, which will allow storing data on the computer. You can pick a different folder for iCloud photo and video syncing by clicking Change to the right of the Download and Upload option.

Your files will be integrated into three categories inside the iCloud folder: Upload, Download, and Shared.
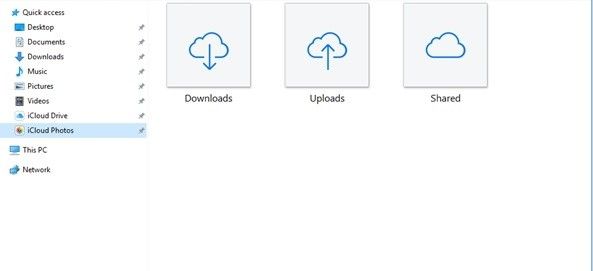
By default, iCloud for Windows may use "Space Saving" mode, which only downloads low-resolution thumbnails until you open the file. If you are using iCloud to create a permanent local backup on your PC, right-click the iCloud Photos folder in File Explorer and select "Always keep on this device." This forces Windows to download the full-resolution RAW or HEIC files from the cloud to your hard drive, ensuring your media is safe even if you go offline.
Part 4. How to Uninstall iCloud from a Windows PC?
If by chance you have stopped using an Apple device, then there is no point in having iCloud on your Windows PC. It is recommended that you opt for another cloud storage provider. Other circumstances include the scarcity of space on your computer. The reasons mentioned above are why users would choose to uninstall or turn off iCloud on Windows.
Follow our step by step guide to To turn off iCloud on your computer:
- Launch the iCloud app on your Windows PC.
- You can disable the syncing of the services that you wish to turn off.
- You can click on "Sign out" to stop using iCloud on your system.
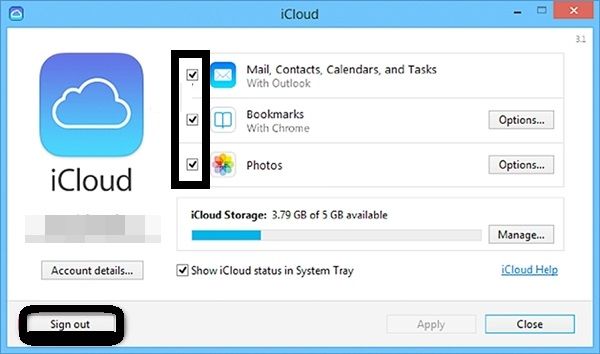
You can also completely uninstall iCloud from your Windows PC. All the files and folders will be completely wiped out of your computer if you choose to opt for this option. Follow the steps below to uninstall iCloud:
- Click on Control Panel from the Start menu.
- Beneath the Programs icon, click on Uninstall a program.
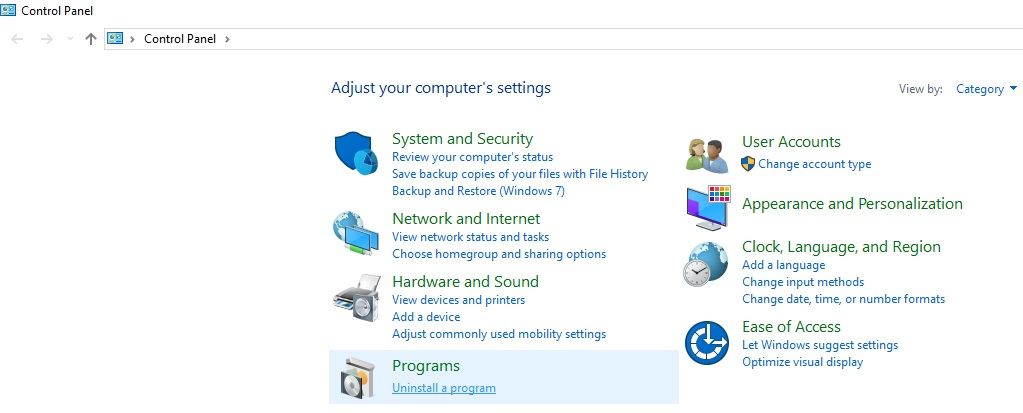
- Find iCloud from the list.
- Double-click on the iCloud icon.

- Confirm the uninstallation.
- All the components of iCloud will be removed from the system.
Part 5. How to Recover Data lost in the procedure:
iCloud is one of the most popular online cloud service providers many people use for their data syncing, transferring, and backup purposes. It ensures the safety of the files you upload there. It also saves data inside the folder of the local computer host. But sometimes, due to some misfortune, the data can get deleted. What to do if you have deleted your important files. Don't worry; there are many ways to recover permanently deleted files from iCloud.
Method 1: Data Recovery through Recoverit by Wondershare:
If an iCloud sync error occurs during installation, or if files are accidentally deleted while choosing "Remove from PC" during uninstallation, Wondershare Recoverit is the best tool to retrieve those local cache fragments.
| Recovery Scenario | Success Rate | Recoverit Advantage |
| Accidental Deletion | 98% | Scans for permanent delete signatures. |
| Sync Conflict Overwrite | 95% | Recovers previous file versions from local cache. |
| Formatted Drive | 92% | Deep Scan reconstructs iCloud folder structure. |
How to Recover iCloud Data with Recoverit:
Step 1. Select Location: Launch Recoverit and select the drive where your C:\Users\[User]\iCloudDrive folder was located.

Step 2. Scan: Click "Start" to perform a deep scan of the local Apple metadata and file fragments.

Step 3. Preview & Save: Filter results by "File Type" (e.g., Photos/Documents), preview the files, and click "Recover" to save them to an external drive.

Method 2: Data Recovery through iCloud Recover all:
If you have deleted any data from your iCloud account, then you can recover files deleted from the iCloud Drive. Apple offers to recover the deleted files from iCloud Drive in the last 30 days, whether you deleted them on iCloud.com, your iOS device, your Mac, or your Windows PC. But it does not offer a solution if you have permanently deleted the files from the cloud. Follow the steps to recover data through the iCloud interface.
- Go to the official site of iCloud.
- Enter your Apple ID to gain access to your cloud account.
- Click on Recently Deleted in the bottom-right corner of the window.
- Click on Recover All.
- Select the files that you want to retrieve.
- If you want to select a single file, click on Recover.
- The files will be restored to the place they were in when you deleted them.
Closing Words:
If you own an iPhone and a Windows PC, you should emphasize on using Apple’s iCloud storage to sync the data. Some Mac-based apps won’t work or perform on a Windows PC. You can use apps like Apple Pages on the PC with the help of iCloud; using this app is a good and secure option. You can also sync, download, and upload your relevant data from your computer to iCloud and create a back-up too. If you lose valuable data in the process, you can quickly recover those files by using the Recoverit recovery software, which guarantees instant data recovery.
Download & Install iCloud for Windows FAQ
-
How do I download and install iCloud for Windows?
You can download iCloud for Windows from Apple’s official website or the Microsoft Store. After downloading, run the installer and follow the on-screen instructions to complete the installation process. -
Why can't I find the iCloud Drive folder after installation?
If the iCloud Drive folder is missing in File Explorer, ensure you are signed in with your Apple ID within the app. Try restarting your PC to refresh the shell integration and folder sync. -
How do I sync photos and files using iCloud on Windows?
Open the iCloud app and check the boxes for Photos, iCloud Drive, and Bookmarks. Click Apply to enable automatic synchronization between your PC and the cloud storage. -
What should I do if iCloud installation fails on Windows?
Check for Windows Updates, ensure you have Administrator rights, and temporarily disable third-party antivirus software. If the error persists, re-download the latest installer directly from Apple.
Computer Troubleshooting
- Win System Crash
- Crack Bios Password
- Fix Run Dll Errors
- Fix Taskbar Disappeared Error
- Fix BootMGR Image Corrupt
- MBR Errors Fixed
- Windows Tips
- How to Edit DLL Files
- How to Test Hard Drive Speed
- Bootcamp Windows 10 No Sound Issue
- Download iCloud on PC
- Difference between File Systems
- Fix Computer Overheat
- Computer Problems
- Best Bad Sector Repair Tools
- Audio Not Working in Windows 10
- Fix Windows 10/11 Error Code 0xc000014c
- Fix Windows 10 Error Code 0xc0000034
- SMART Status Bad Error
- Fix Grub Loading Error
- Remove Admin Password
- Blue Screen Errors
 > Resources > Windows Computer Solutions > Download & Install iCloud for Windows: Step-by-Step Guide


David Darlington
staff Editor