Top 3 Ways to Secure Delete Files on Mac
To permanently erase files on a Mac without leaving residual traces for data recovery, you must bypass the standard Trash bin by utilizing Terminal commands, enabling SSD TRIM functionality, or creating an encrypted disk image.
● Because macOS Sierra removed the srm tool, you must enable the New Terminal at Folder service in your Keyboard Shortcuts and execute the rm -P command followed by the filename to securely overwrite individual files.
● Mac computers equipped with Solid State Drives can automatically wipe unallocated space by manually executing the sudo trimforce enable command in Terminal, a process that does not apply to older Hard Disk Drives and requires a Time Machine backup due to data loss risks.
● For a graphical method, you can use Disk Utility to create a blank 128-bit AES encrypted .dmg file, move your sensitive files into it, eject the image to lock it, and delete the .dmg file to render the contents permanently unreadable.
Ask AI for a summary
By now, you probably know of the many ways to delete files on your Mac, but do you know how to securely delete those files? Probably not. Do you even know what it is meant by the "secure deletion of files?" Probably not.
Securely deleting files means you delete them and make sure they have been completely removed from your system with no traces or residual files left behind.
You might not be aware of this little but necessary piece of info, but emptying Trash doesn't mean your files are gone. Your Mac just makes them invisible, so to speak.
The one way you can be sure they're not in your Mac is when you securely delete them. You will be instructed on the top 3 ways to do that in this post.
Part 1: Why to Securely Delete Files on Mac
There is often an advantage and disadvantage to everything and securely deleting files is certainly no exception. It might seem counterintuitive to permanently delete files because there is a chance you might want them back, but look at this simple example: What if you are in dire need of space in your drive but you don't know what's taking it up? Secure deletion comes into play here. Below are more reasons why you should employ this feature.
- Reliability - It doesn't just delete files' entries from directories, it also deletes the files multiple times until none of it can be recovered. What this means is, the usual tricks of recovering data won't work here. It matters little even if you're a programmer; once the files are securely deleted, no one can't get them back.
- Security - The utter deletion of the files means you don't have to worry about nosey individuals being able to recover your personal files, regardless of how tech-savvy they are. E.g. If you wanted to sell your drive, you can rest assured that none of the sensitive data you once had in it will be recoverable.
- Versatility - It negates the need for you to purchase third-party software to securely delete files.
- Prevents Hard Driver Errors – It's been proven that sometimes, formatting your drive manually can lead to errors that pile up to damage your drive. It is thus better to follow a simple procedure to securely delete the files you don't need, all of them, if necessary, then to format the drive. This ensures a drive that will perform better and last longer.
Part 2: Top 3 Ways to Securely Delete Files on Mac
What's better than one way to securely delete files? THREE ways to securely delete files. As you would expect, Mac gives you several options on making sure that embarrassing photo you took during summer vacation will never be seen by prying eyes.
You can easily make use of any of the three options, but you are advised to settle with the one which appeals to you the most. You don't have to worry about how effective each is because they all get the job done.
Solution 1: Secure Delete Files with Mac Terminal
For the sake of brevity, Mac Terminal can simply be defined as a powerful tool that allows you to control your Mac via command prompt. To securely delete files, you only have to type in certain commands in the Terminal window and hit the "Enter/Return" key.
Initially, the same command was used to get rid of files and folders but Apple removed this feature from their operating systems beginning with macOS Sierra.
But since people and developers alike love tinkering and tweaking with computers, a means to bypass the srm command was found: Using the rm command.
1. Click the "Apple Menu."
2. Click "System Preferences."
3. Click "Keyboard."
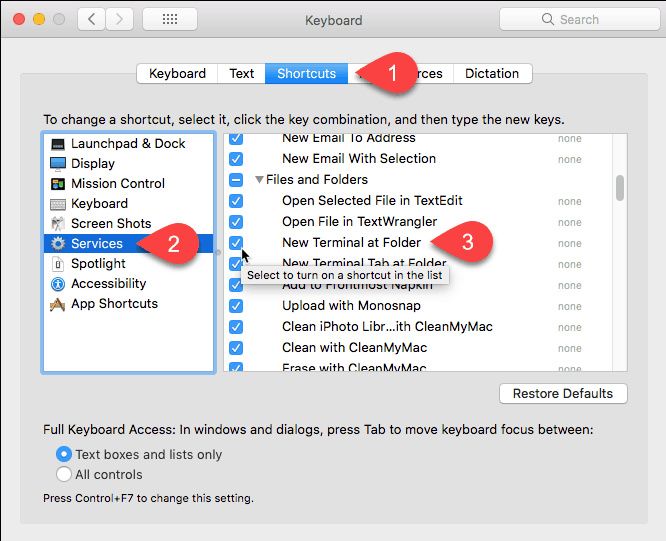
4. Click "Shortcuts" located at the top of the dialogue window.
5. Look to the left and click on the "Services" you see in the small window.
6. If "New Terminal at Folder" within the "Services" category is unchecked, check it.
7. Open "Finder."
8. Navigate to the folder where the files to be securely deleted are.
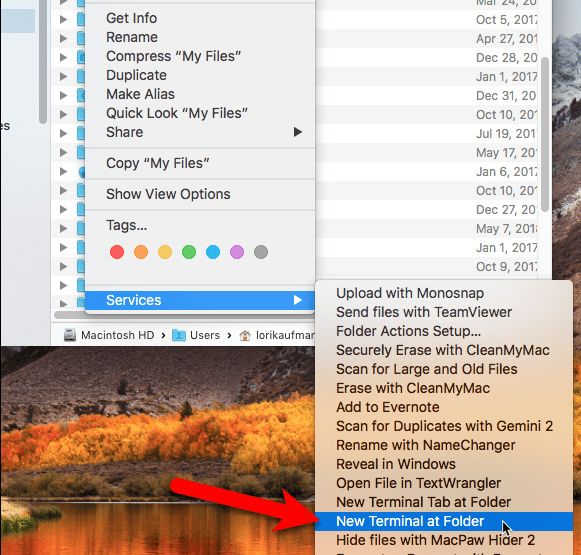
9. Right-click on the folder but don't open it.
10. Click on "Services" found at the bottom of the drop-down menu you see.
11. In the second drop-down menu, click on "New Terminal at Folder."
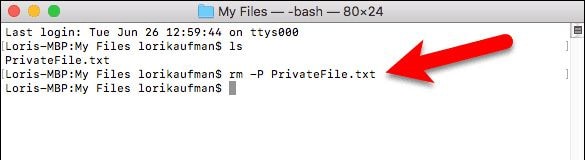
12. The Terminal window will open up. Type this command into it and press "Enter/Return" to securely delete files: rm -P PrivateFile.txt (In the example you see up there, the file to be deleted is named "PrivateFile." When using Terminal to delete this file, type in the corresponding command then the name of the file (PrivateFile) in front of it.
Solution 2: Securely Delete Files Using TRIM
Not all Macs come HDDs (Hard Disk Drives). Some of them come with the more powerful and faster SDDs (Solid State Drives). It's considerably more difficult to securely delete files on the latter than the former, but it's not impossible.
Macs that come with SSD also come with a tool called TRIM. Anytime you delete a file on any type of drive (SSD or HDD), your macOS designates the space as "not in use."
TRIM automatically clears the data in the allocated "not in use" space, making it possible for new data to be written in the said space. The older HDDs don't have this luxury though. Yes, TRIM can delete the "not in use" space, but you have to manually enable this feature using the trimforce command in Terminal.
It would be prudent for you to back up your files using Time Machine before you attempt to use TRIM to curtail any risk of accidental data loss. This risk is made all the more glaring since Apple warns of using TRIM "at your own risk". And if you're a newb in using command prompt, then this post is all but indispensable to you.
1. Launch "Terminal."
2. To enable TRIM, type in this command: sudo trimforce enable
3. You will see a prompt asking for your permission to initiate the process (the image below). Type y in Terminal.
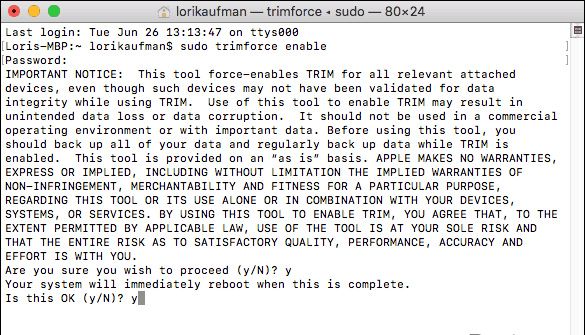
4. Click on "Enter."
5. Type y once more.
6. Press "Enter" again. This tells Terminal it can reboot your Mac after it enables TRIM. That's it. You have now enabled TRIM and it will carry out the duty of wiping empty spaces in your drive.
Solution 3: Securely Delete Files via Disk Image
Mac software primarily comes in disk images (.dmg file extension). Dmg files are great because they give you the leeway to pack up and share your files on the web very conveniently.
The possibilities with disk images are many. You can even create and encrypt them utilizing Disk Utility. Do you know what is meant by encrypted disks, though? Think of them as extremely secure and safe vaults that protect any sensitive data you store in them.
One of a disk image's many functions is to securely delete your files and folders. The process might be somewhat new to you though because have to move the data to be deleted into the disk image. Then you lock and delete it.
The purpose of doing all this is because when the disk image encrypts the files, they become irrecoverable. And make sure the disk image is closed before you delete the files. Deleting them while it's still open will only move them to your Trash. Here's what you have to do to make an encrypted disk image:
1. Open "Applications."
2. Click the "Utilities" folder.
3. Click on "File."
4. In the drop-down menu, click on "New Image."
5. In the next menu, click on "Blank Image."

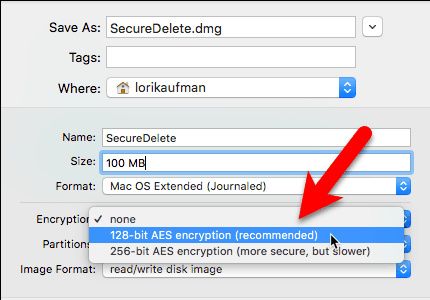
6. A new dialogue box will open up. In the "Save As" box, type in any name for the disk image. And be sure to add the ".dmg" file extension at the end of the name.
7. Choose "Where" and select a directory to save the image file.
8. Type in a "Name" for the file.
9. Specify a "Size" for the image file (a number), then leave a space and type KB, MB, GB, or TB.
10. Choose "Encryption". You have to do this if you want to encrypt the disk image so having a password is necessary to open it. You are advised to go with "128-bit AES encryption" because it has proven very effective in making the disk image exceptionally secure. And it doesn't trade this security for speed.
11. Selecting the "Encryption" method will bring up a window prompting you for a password. Type in the password twice.
12. Click on "Choose."
13. Click on 'Save."
14. Once the operation completes successfully, click on "Done."
15. The new disk image you just created will appear in the "Disk Images" category in Disk Utility. Double-click on it.

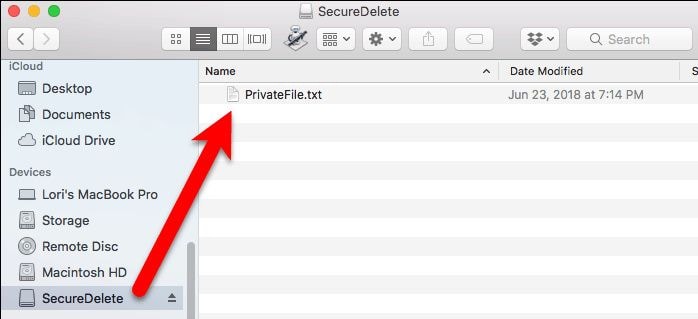
16. Any files or folders that are to be deleted should be moved to your newly-created image file.
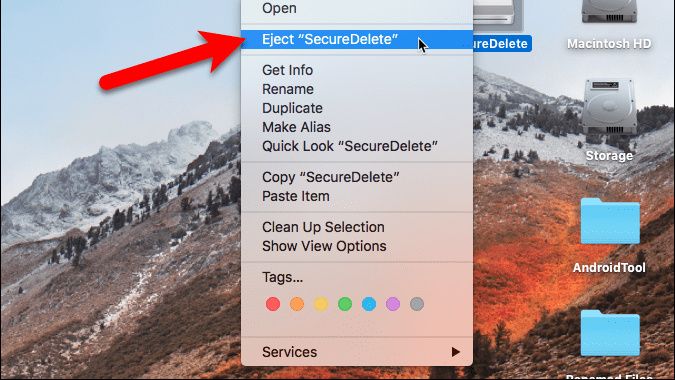
17. Right-click on the image file's icon.
18. Choose "Eject." This will close the disk image as well as lock it.
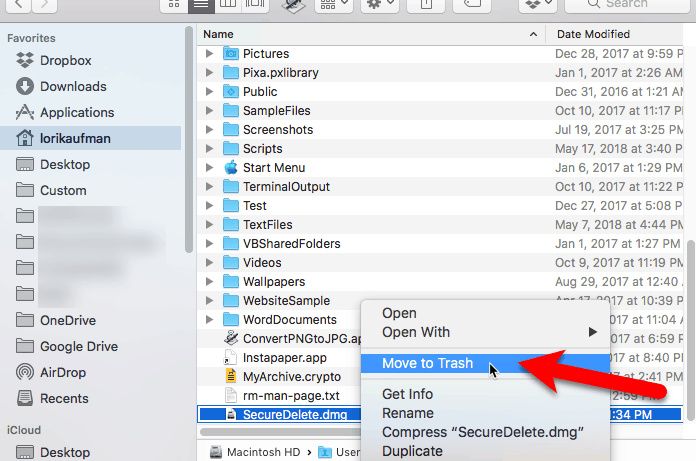
19. All the files you copied to the image file have thus been encrypted. You only need to delete the .dmg file to Trash and all the files within it will be securely deleted and gone for good.
Even if some curious individual does manage to recover the files, none of them will be readable, so you can rest easy knowing your files won't be seen by the wrong eyes or fall into the wrong hands.
Part 3 How to Retrieve Deleted Files on Mac
The whole point of deleting files is so they can never be recovered, so wouldn't you be in a pretty right pickle if you delete something that's so important you use it daily?
That would be a very unsavory situation to be in. Incredibly, there is one software out there that can bypass even the powerful algorithm used to delete files, meaning the software can easily recover them once more. It's called Recoverit Mac Data Recovery. Follow the steps below to retrieve your deleted data
Step 1: Choose a Location
- Once you start Recoverit, select one hard disk from "Hard Disk Drives". Select the one where the files were deleted from.
- Click "Start."

Step 2: Scan the Location
- Since Recoverit gives you the option to use filters like "File Type" and "File Path" during the scan, it just means the process will be carried out much faster. You're allowed to stop or pause the scan if any need arises for this to be done.
- At the completion of the scan, Recoverit will list out the deleted files via a preview window.

Step 3: Preview & Recover Deleted Files
- Tick all the files to be recovered.
- Click on "Recover". In minutes, your securely deleted files will be recovered back to your drive. Don't save the recovered files in the same location they once occupied in your Mac.
The fact that Recoverit Mac Data Recovery can retrieve any type of deleted file speaks volumes. If the software can have so much data-recovery power, do you honestly think it has any real competition or substitutes?
Your files may be audio, video, or documents, but that won't be an issue because none of them will prove difficult in getting back. Recoverit will always be your answer to recovering deleted files.

Part 4: Tips for Securely Erasing Files on Mac
- Always have it at the back of your mind that file removal on Mac doesn't end with moving your files to Trash. Tools can be used to recover them unless you securely delete them.
- Even after files are deleted, you can securely erase the "free disk space" left behind.
- If for any reason, you are not comfortable with Mac's native tools capable of secure file deletion, third-party options are available for you to try and perform the same functions.
- Secure deletion is particularly important if you're running a business and need to remove confidential or sensitive information
- Thoroughly check the files to be securely deleted before you perform the action lest you delete something important.
Closing Words
Security is never a topic that should be taken lightly. In the wrong hands, the information you possess could prove disastrous, and that's no exaggeration.
Many businesses rely on sensitive information to stay afloat, so anything that jeopardizes this information is a great risk.
Stolen systems and malware attacks are potent avenues for unauthorized access to your Mac and sensitive information. Securely delete your files to make sure no one can ever gain access to them.
However, as long as your Mac remains with you, you'll need a way to recover deleted files because accidents are inevitable. Recoverit Mac Data Recovery rectifies the errors you made and gets your files back, so it should be a necessary component of your Mac.
What's Wrong with Mac
- Recover Your Mac
- Fix Your Mac
- Delete Your Mac
- Learn Mac Hacks


 ChatGPT
 Perplexity
 Gemini
 Claude
 Grok
Grok


Sue Wayne
staff Editor