


 TL;DR:
You can restore deleted or corrupted JPG files by checking local OS trash bins, utilizing built-in system recovery utilities, or deploying Wondershare Recoverit for severe corruption and permanent data loss.
● For immediate recovery of non-permanently deleted files, Windows users can select "Restore" in the Recycle Bin, while Mac users can use the "Put Back" option in the Trash.
● To retrieve lost files natively, Windows users can access the "Restore Personal Files" feature within File History, whereas Mac users can run "First Aid" in Disk Utility to fix file system errors and unreadable drives.
● Wondershare Recoverit (compatible with Windows Vista/7/8/10/11 and macOS X 10.10 or later) is required for complex scenarios, utilizing an AI-assisted File Repair module to fix visual glitches and recovering data from external drives or Linux file systems.
Ask AI for a summary
 ChatGPT
 Perplexity
 Gemini
 Claude
 Grok
Grok
Photos hold priceless memories and important details, ranging from family photos to work documents. They can face accidental deletion or hardware failure, making it difficult to recover or restore them. However, this is not impossible, as there are certain recovery methods which can help you bring back the cherished memories.
Therefore, reliable tools are needed to preserve your memories and hard work while giving you a sense of relief when things go wrong. For this purpose, read the following article and enhance your knowledge of how to recover JPG images with sophisticated tools.
Try Wondershare Recoverit to Perform Data Recovery
 Security Verified. Over 7,302,189 people have downloaded it.
In this article

What Made You Lose Your JPG Files From the Computer?
Before you learn how to recover JPG files, it is important for you to know the reasons why you can lose files on your computer. Following are a few reasons that could cause a loss of JPG files.
- Accidental Deletion: Accidental file deletion can be the first and main reason, as anyone can mistakenly press the wrong button, which can cause data loss. Moreover, one can unintentionally empty the recycle bin without checking it before, which can also lead them to lose their JPG files.
- Unexpected System Shutdown: A shutdown caused by a power outage or system crash can disrupt the file-saving process. Files that were being worked on or saved may become corrupted or lost entirely.
- Software Crash: In addition to that, software crashes can also sometimes happen when you are using a heavy tool or software. If the crash occurs while downloading, it can result in corrupted files, which makes it impossible to recover the original file.
- Faulty File Transfer: Failed or faulty file transfer because of an interruption in the internet connection or between two devices can cause JPG files to transfer incompletely or incorrectly. This can result in missing or damaged parts, which can result in a corrupted file.
Directed Solutions To Recover Deleted/Corrupted JPG Files
It can be frustrating when you lose essential photos due to file corruption or accidental deletion, but it's not the end of the road. Fortunately, with the help of the following tools, you can recover your corrupted JPG files and return your valuable memories.
Method 1. Recover and Repair Corrupted JPG Files Using Wondershare Recoverit
With the help of a trusted tool like Wondershare Recoverit, you can recover corrupted JPG files with a recovery rate of 99.5%. It also supports recovering images in multiple formats while ensuring they are retrieved with the same quality. Moreover, this platform also assists users in recovering files from SD cards and other external devices.
Using this tool, individuals can restore their essential data from computer crashes in the system by creating a bootable USB drive. Simply install the tool, scan your device, and then let it guide you through restoring your valuable pictures in just a few clicks. Furthermore, you can also remotely recover your lost data from corrupted NAS servers, including Synology and Thecus.
Key Features
- Linux Data Recovery: This tool supports EXTA and XFS file systems and scans Linux devices to ensure the data files are recovered precisely.
- Hard Drives and Location Recovery: It facilitates users by scanning and recovering data from hard drives, USB flash, and other external devices.
- Excel Recovery: You can utilize Wondershare Recoverit to retrieve your unsaved or lost Excel files with only a few steps.
1. Guide to Recover JPG Files Using Wondershare Recoverit
If you’ve lost your crucial photos or dealing with a damaged file, Wondershare Recoverit is here to help. Hence, following the easy steps guide below, you can retrieve your deleted JPG files in no time.
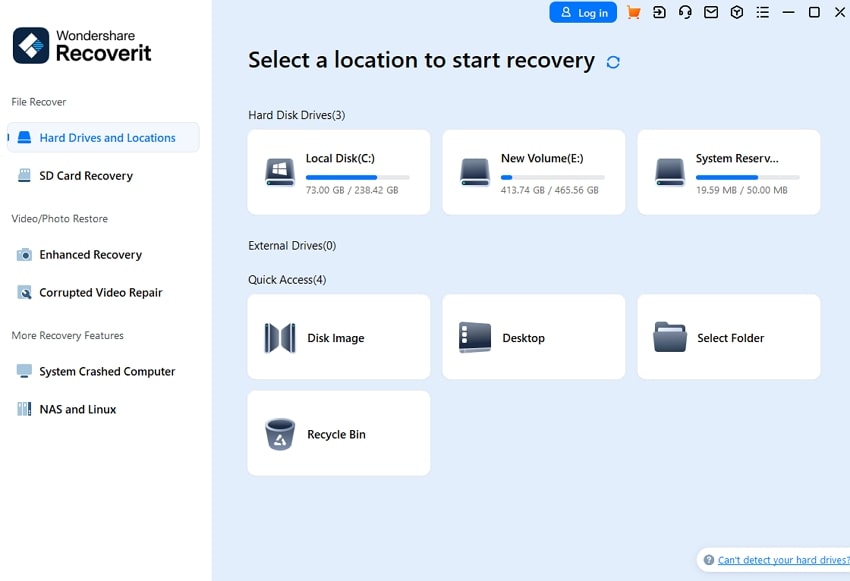
Step 1. Select the Drive to Recover the Data
Upon launching the tool on your device, access the “Hard Drives and Locations” tab. From here, you have to select the disk from which you require to recover the photos using this tool.
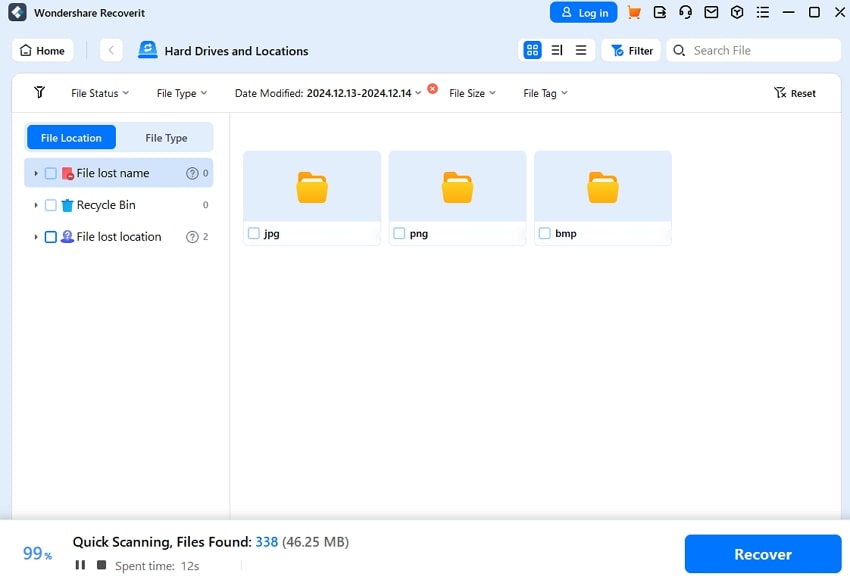
Step 2. Restore Photos on Completion of Scanning
Once you start the scanning process, the tool will automatically begin an all-around scan. However, if the files are more extensive, scanning them might take a few hours. After the scan is completed, simply select the photos you want to restore and tap the “Recover” button.
2. Steps to Repair Corrupted JPG Files
When your favorite photos become inaccessible due to corruption, it can be stressful. If your JPG files are not just deleted but also corrupted, showing errors or visual glitches, you'll need a specialized tool. For this task, you can use the File Repair feature in Wondershare Recoverit, which is designed specifically to repair corrupted JPG images. With the help of the AI assistance, it can repair corrupted JPG files to their ideal state within a few minutes.
Apart from this, you can also regain lost photo content like faces, objects, and other elements using its AI assistance. Furthermore, it enables individuals to restore lost fragments in pixelated images to their pristine glory. Plus, the tool is capable of resolving incomplete data issues, which makes the image unveiling on the devices.
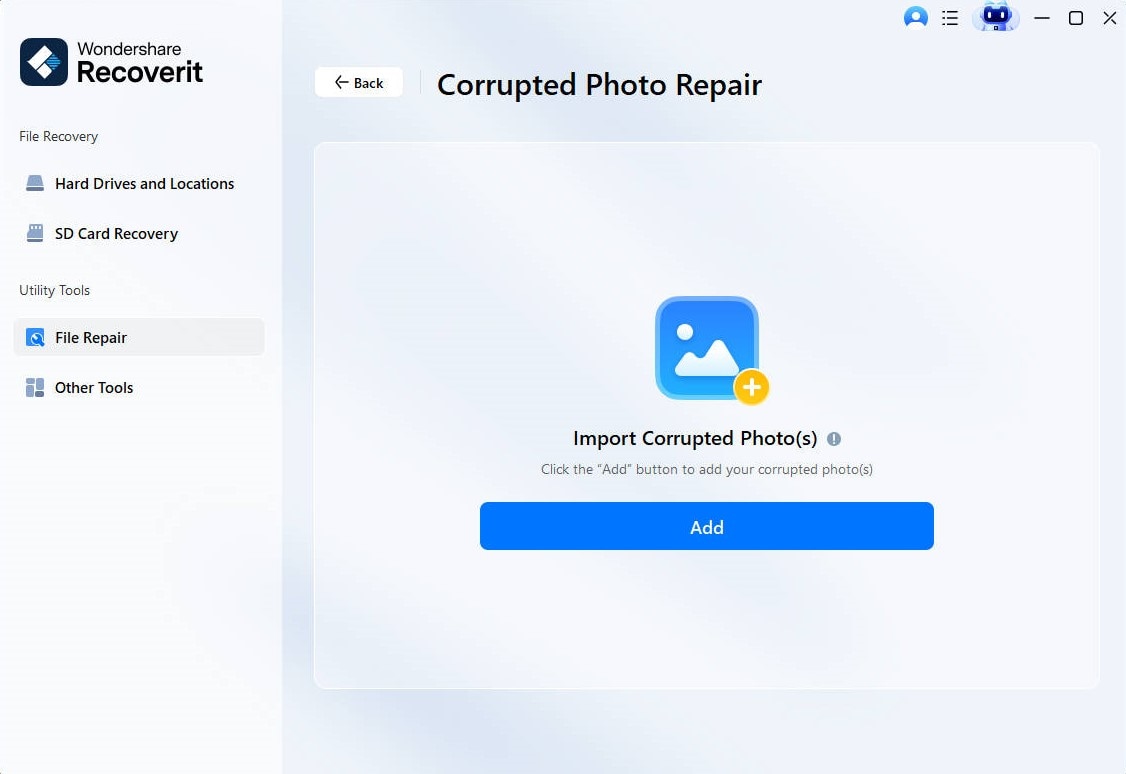
Step 1. Go to File Repair Section
Launch Recoverit and go to the File Repair section. Click Corrupted Photo Repair option to start the image restoration process.

Step 2. Add Corrupted Photos
Now, hit the “Add” button in the center of your screen to open the browser window. Later, go to the location where your corrupted photos are saved and upload them to the tool for repair.
Step 3. Repair Your Damaged Photos
Once your damaged images are uploaded to the tool, other details like file size and photo resolution will be displayed. Now, press the “Repair” button at the right corner of your screen to begin the repair process.

Step 4. Preview and Save Your Repaired Files
When the repair process is completed, the tool will inform you about the results by pressing the “Preview” button. Lastly, if you’re satisfied with the results, click the “Save” button and later choose the target for saving the repaired files.

Method 2: Perform Deleted JPEG Recovery from the Recycle Bin
After deleting any photos or images from your device, there is no need to worry, as recovering them from the recycle bin is often quick and straightforward. Mac and Windows operating systems have a built-in tool that facilitates retrieving files that haven’t been permanently removed. Therefore, you must follow the instructions below to recover deleted JPG files directly from the recycle bin for Mac and Windows:
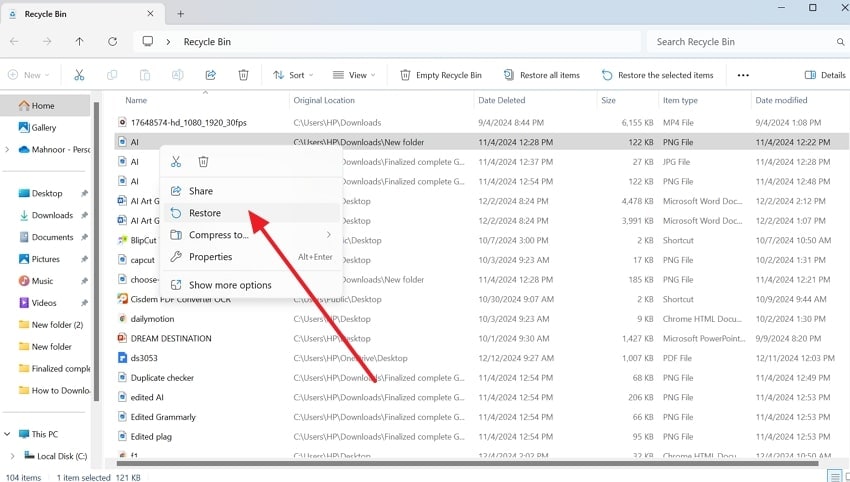
For Windows
Instructions: First, visit the recycle bin on your computer to restore deleted images. Afterward, find the picture you want to recover among the deleted photos and folders. Later, right-click the chosen picture and press “Restore” to retrieve your image to your computer.
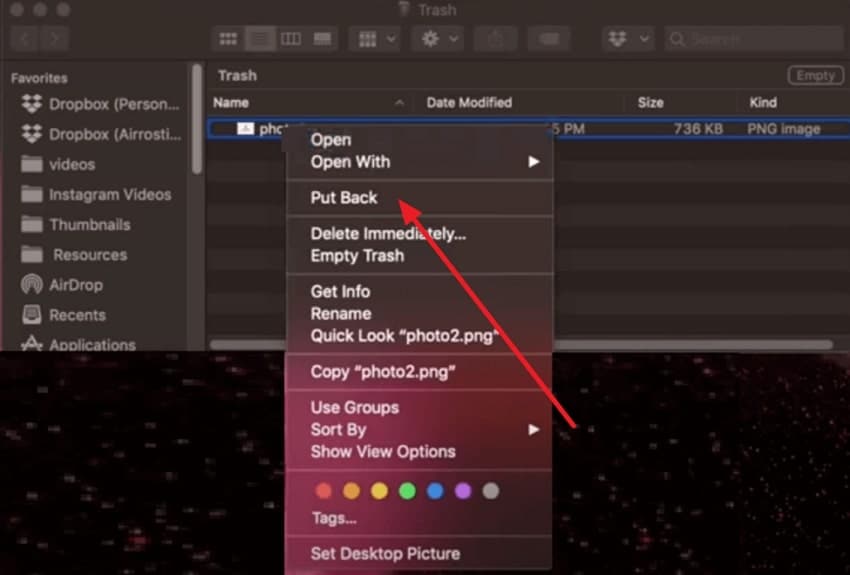
For Mac
Instructions: Like you restored your images on Windows, similarly, open the “Trash” on your Mac. Next, look for your desired deleted image and right-click on it to reveal further options. Finally, from the drop-down menu, press the “Put Back” option to recover your selected image on the device again.
Method 3: Restore JPG Files Using File History
Other than the recycle bin, you can access file history to recover JPG files, as it helps to locate and retrieve lost files without any technical knowledge. Moreover, it saves time and ensures users can easily fetch files without manual effort. So, follow the steps mentioned below to see how you can restore JPG files from your file history.
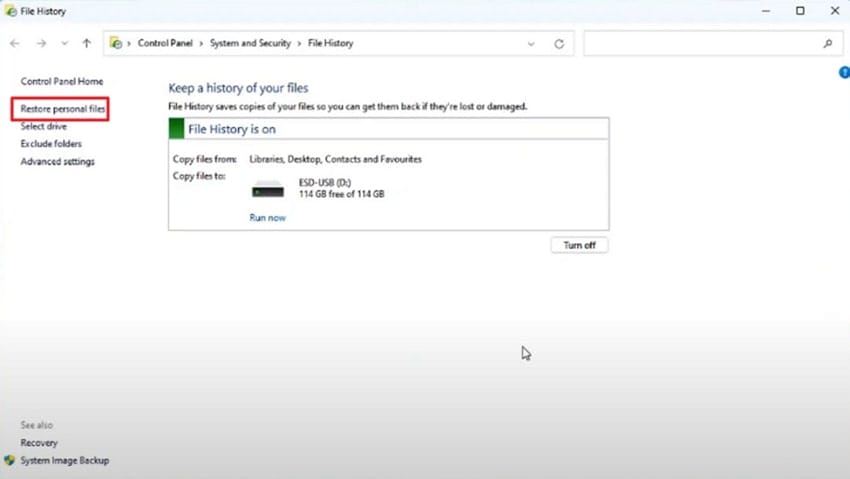
- On Windows, search for the “File History” and tap on the “Restore Personal Files” option from the left side of the screen.
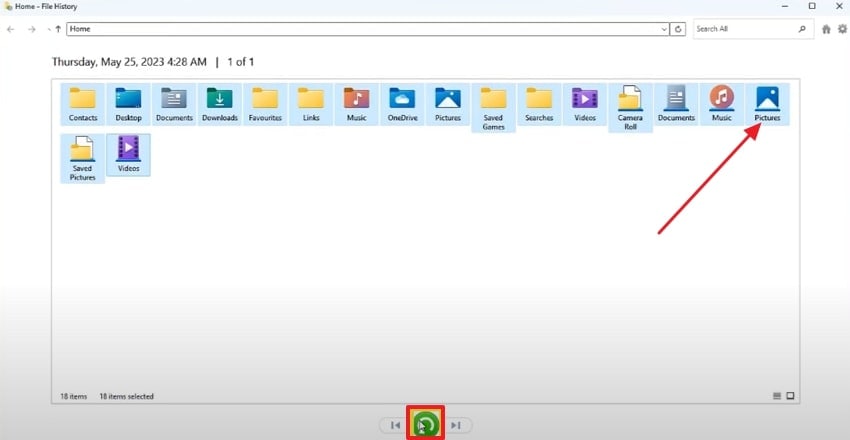
- Upon tapping, the system will ask you to choose the type of data you seek to restore. There, tap on “Pictures” and hit the “Restore” icon to start the process.
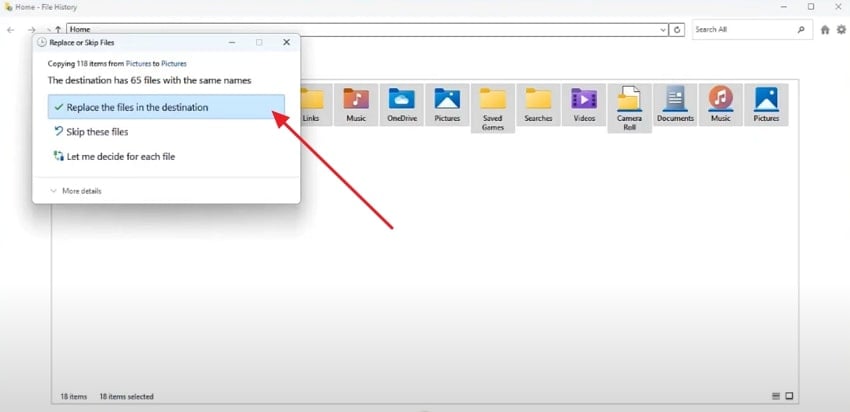
- After choosing the data, a popup menu will appear on the screen where you have to select the “Replace the Files in the Destination” option. This will start the image restoration process, and you will be able to access the lost JPG images in no time.
Method 4. Performing First Aid
If you are a Mac user and want to retrieve your lost JPG images, try using Disk Utility. This solution has the ability to solve common issues like file system errors, corruption, and unreadable drive accessibility. Hence, to recover corrupted JPG pictures, adhere to the steps given below and regain access to your precious memories.
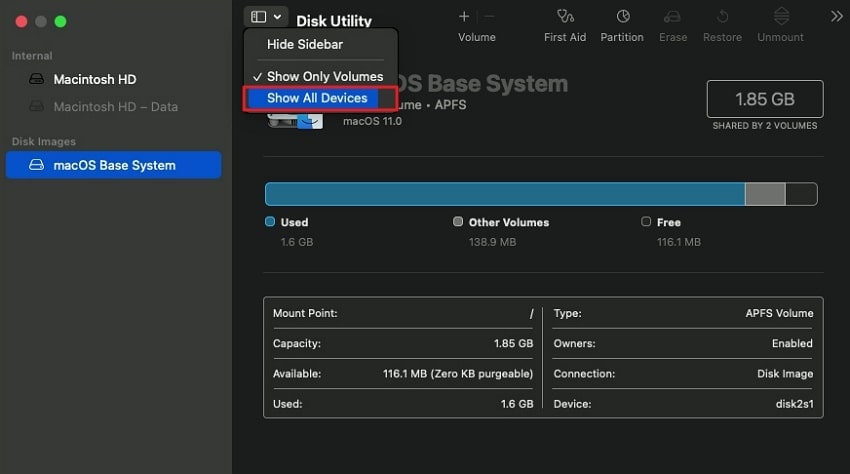
- To begin with, launch the Disk Utility from the Launchpad to start the process of JPG image restoration. As it is there, tap on the tap sidebar to pick the "Show All Devices" option from the drop-down menu.
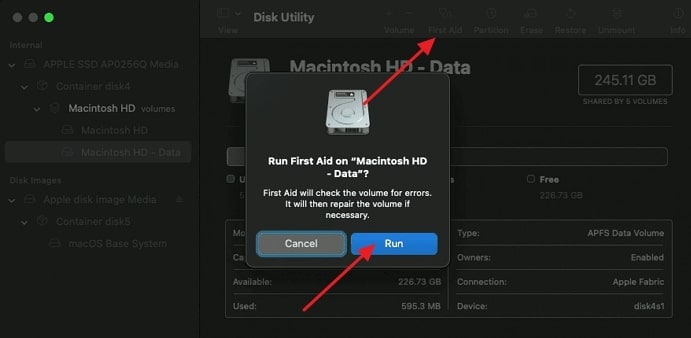
- There, choose the desired device that is used to contain the images and then press on the "First Aid" option from the top toolbar. This will fetch a popup where you must pick the "Run" option to access the lost JPG images.
Conclusion
In summary, recovering and repairing corrupted or deleted JPGs is no longer difficult when you have the right tools. Therefore, you should use Wondershare Recoverit to recover JPG files and bring them back to their original position with intact quality. To repair it, try Wondershare Repairit, as it excels in enhancing the quality of visuals at ultra-HD levels.
FAQs
-
Can I repair JPG files without specialized tools?
While specialized tools like Wondershare Repairit are the most effective for repairing JPG files, you can also attempt a manual method using built-in utilities like File History on Windows. However, these methods may not be reliable and may not address severe file corruption. -
Can I prevent JPG files from getting lost or corrupted in the future?
It is difficult to reduce the risk of losing files, but you can lower the chances by regularly backing up your images. Moreover, tools like Wondershare Recoverit and Wondershare Repairit can help recover and repair files if you ever lose them. -
Is it safe to use Wondershare Repairit to repair JPG files?
Yes, Wondershare Repairit is a safe, trusted tool to repair JPG files; its features ensure that the original data is preserved when they are fixing corruption. Moreover, the tool is created to preserve data, which ensures that repair files are secure and free from further damage.


