

Are you having issues with your Chromebook? Chromebook offers simple options for troubleshooting and fixing problems, but in some cases, your Chrome OS is simply beyond repair, and you have to reinstall your whole system. That's where tools like Chromebook Recovery Utility come into play.
In this post, we'll explain Chromebook Recovery Utility, how it works, and how to use it. So, without further ado, let's get to the main topic and explain what this tool is.
In this article
What Is Chromebook Recovery Utility?
The Chromebook Recovery Utility is a recovery tool created by Google. This tool is designed to help Chromebook users recover their Chrome OS. This tool lets you create a recovery media like a bootable SD card or USB drive with a fresh Chrome OS version.
It's the equivalent of reinstalling any other operating system like Linux, Windows, or macOS. You can use the Chromebook Recovery Utility on Chromebooks, Mac, and Windows to create recovery storage. With this new Chrome OS bootable media, you can recover and reinstall your old Chrome OS on your Chromebook.
For example, you can create a Chromebook Recovery USB with Chromebook Recovery Utility.
When to Use Chromebook Recovery Utility to Recover Your Device
Here are some of the typical scenarios when you should consider using Chromebook Recovery Utility to recover your Chrome OS:
| When to use: | Why use: |
| 💻OS system corruption | When your Chrome OS is corrupted, it won't boot properly, offer the right performance, or perform normal tasks. |
| 🚨System errors | If your Chromebook has many persistent errors that can't be resolved and make it impossible to perform specific actions, you will want to restore your system to its normal state. |
| 👾Virus or malware | Viruses and malware can be persistent and lead to various problems, such as lost data, stolen personal information, or getting locked out of your device. A fresh Chromebook OS install can help you eliminate all malware and viruses. |
| 🔧Factory reset your device | Whenever you're having issues with your Chromebook that weren't present when you first bought it, you can use factory reset to erase all settings and data. Chromebook Recovery Utility is very convenient for this. |
| 🔍Hardware changes | If you've replaced the hardware components of your Chromebook, you might be forced to install a brand-new OS to ensure compatibility. |
| ❎Bugged/corrupted updates | System updates can rarely fail or get bugged, leading to a corrupted system in an unstable state. Chromebook Recovery Utility can bring your device back to a functional state. |
How to Install Chromebook Recovery Utility
Before you can do anything, you must install the Chromebook Recovery Utility. Since this is a Chrome plugin, you need Google Chrome to install it. Here are the steps to follow:
- Launch your Chrome browser.
- Go to the Chrome Web Store's official Chromebook Recovery Utility page and click Add to Chrome.

- Click Add extension and wait until the plugin is installed.

- Go to your extension section and click the Chromebook Recovery Utility icon to start.

Chromebook Recovery Utility is under 1.75 MB, meaning you don't have to worry about disk space when installing. It supports 52 languages, so even if you don't know English, you can probably find your native language support.
Once you've installed Chromebook Recovery Utility, you must recover your data since reinstalling ChromeOS means you'll lose all the data on your drive.
Recover Your Files Before Using Chromebook Recovery Utility
If your Chromebook is unusable and you can't access it to copy your data because of corruption or file system errors, an alternative lets you recover all the files on your hard drive where ChromeOS is installed.
Wondershare Recoverit is a professional data recovery solution that lets you recover data from various hard drives and file systems. Before recovering data from your Chromebook, you must download and install the app on a different computer.
After installing, follow these steps:
- Open Wondershare Recoverit, click Hard Drives and Locations on the left menu bar, and select the drive where your ChromeOS is installed.

- The program will start scanning the drive automatically. You can check the progress in the bottom-left corner, pause, or stop the scan. All discovered files will be displayed in real-time; you can check them by selecting and clicking Preview.

- Check the discovered files on your Chromebook and click Recover when ready.

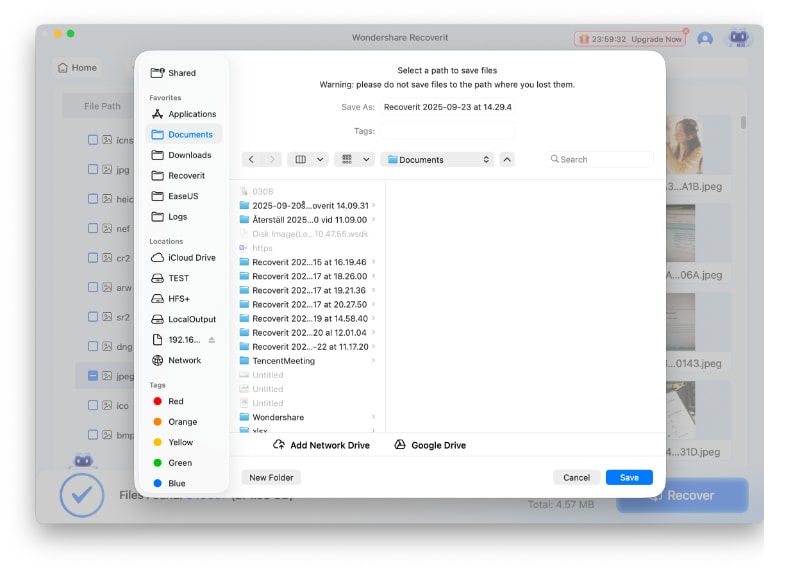
- Name the files in the "Save as" column and select the save location in the "Where" column. Click Save when ready.
How to Use Chromebook Recovery Utility
Before you can start recovering your device using Chromebook Recovery Utility, you will first have to ensure you have several things:
- A compatible Chromebook device: Make sure that the model of your Chromebook supports Chromebook Recovery Utility.
- Google Chrome browser: The Chromebook Recovery Utility is a plugin designed for Google Chrome. Make sure to install the browser if you don't have it.
- Stable internet connection: An internet connection is required to download your Chromebook model's extension and recovery image.
- SD card or USB drive: You will need one with enough storage capacity to create a working recovery media. All of the data on the SD card or the USB drive will be formatted in the process.
- Chromebook or computer: You can use a Chromebook, Mac, or a Windows device to create a recovery media with Chromebook Recovery Utility.
Here are the ways you can use Chromebook Recovery Utility:
Creating a Recovery Media Using Chromebook Recovery Utility
After downloading your Chromebook Recovery Utility and installing it to your Google Chrome browser, the next step is to create a bootable media for repairing your Chromebook. Here are the steps you must follow:
- Click on the Chromebook Recovery Utility extension icon.

- Click Get started.

- Enter the model of your Chromebook in the next window and click Continue.

- Insert a previously formatted SD card or USB flash drive into your computer and select it. Click Continue when ready.

- Click Create now in the next window.

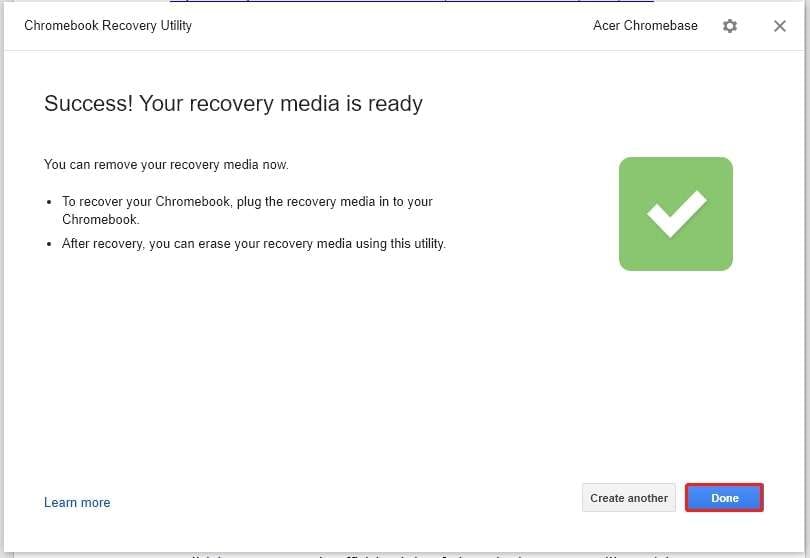
- Wait until the process is complete and click Done. Remove your storage media.
Use Chromebook Recovery Utility to Recover Your Chromebook
If your Chromebook displays errors, won't boot, or shows a black screen, you can use Chromebook Recovery Utility to resolve the problem. The recovery media you've created is the backup for your current OS and will restore your system to a fully functional state.
Here are the steps you should follow:
- Turn off your Chromebook by pressing and holding the power button for three seconds and unplug all the external devices or accessories.

- Plug your bootable media into your Chromebook (USB flash drive or SD card).

- Press Esc + Refresh + Power key and hold them until you enter the recovery mode.

- When you get to recovery mode, your Chromebook will display the "External disk with recovery image detected" message and prepare the recovery media.

- Your Chromebook will start the recovery operation automatically. Wait until the process is complete.

- Unplug your bootable media when you see the "Recovery is now complete" message.

- The Chromebook will reboot automatically. Follow the instructions, set up keyboard language and your pin, and sign into your Google account. Once you've done that, click Get Started, and you can use your Chromebook.

Conclusion
Chromebook Recovery Utility is a simple tool you can use to quickly reinstall and recover your ChromeOS. As you can see, the steps are straightforward, and most are automated to make it easier for the user. However, this isn't the only method for recovering ChromeOS, and Chromebook Recovery Utility doesn't support many Chromebook models.
Take the time to see your model and whether it's supported. It's a simple method for restoring Chromebook OS, but it doesn't always work. Good luck, and we hope this post helped you.
FAQ
-
How do I open Chromebook Recovery Utility?
1. Start Google Chrome.
2. Click on the Extensions icon and the Chromebook Recovery Utility icon.
-
How do I exit Chromebook Recovery Utility?
No matter what you're doing in Chromebook Recovery Utility, you can always click the "." icon in the upper right corner to exit. However, don't do this while you're creating a recovery media. You might damage your storage device. -
Is Chromebook Recovery Utility the same as ChromeOS Recovery Mode?
No, these two aren't the same, even though they can be used to recover your Chromebook. The Chromebook Recovery Utility is a Chrome extension created by Google, allowing users to create recovery media and recover their Chromebook.
On the other hand, the Chrome OS Recovery Mode is a built-in feature of the Chrome OS that allows users to recover their systems directly while booting up.
