
Oct 12, 2026 • Filed to: Solve Mac Problems • Proven solutions
⚡ Quick Answer: How to Format a Hard Drive on Mac?
Open Disk Utility (in Applications > Utilities), select the drive from the left panel, click Erase, choose a file system such as APFS or Mac OS Extended (Journaled), and click Erase again to confirm. Formatting permanently deletes all data on the drive, so back up your files first. If you already formatted without a backup, run Wondershare Recoverit for Mac to recover the erased files.
In all likelihood, you're more acquainted with formatting an external hard drive than your Mac's internal one, aren't you? That's often the norm because there's rarely ever a need to format your internal drive. But regardless of what type it is, errors can still restrict it from reading and writing data. This means you can't store files and neither can you copy or delete data from the drive. At times, formatting your drive could be the only logical solution to fixing it; other times, simple fixes could get it working again.
Part 1: How to Format External Hard Drive for Mac
The simple reason you might want to completely wipe your Mac's internal drive is that it has encountered one serious error or another. Apple has given you several options to choose from should you ever need to format or reformat your drive. No one needs to tell you formatting your Mac's drive entails reinstalling the macOS afterward, right? As long as you're aware of that, you're good to go.
Method 1: How to Format a New Hard Disk on Mac
- Boot into Recovery: Start your Mac and press
Option + Command + Rtogether. Let go of the keys once the Apple logo or spinning globe appears — the Utilities window will show up.
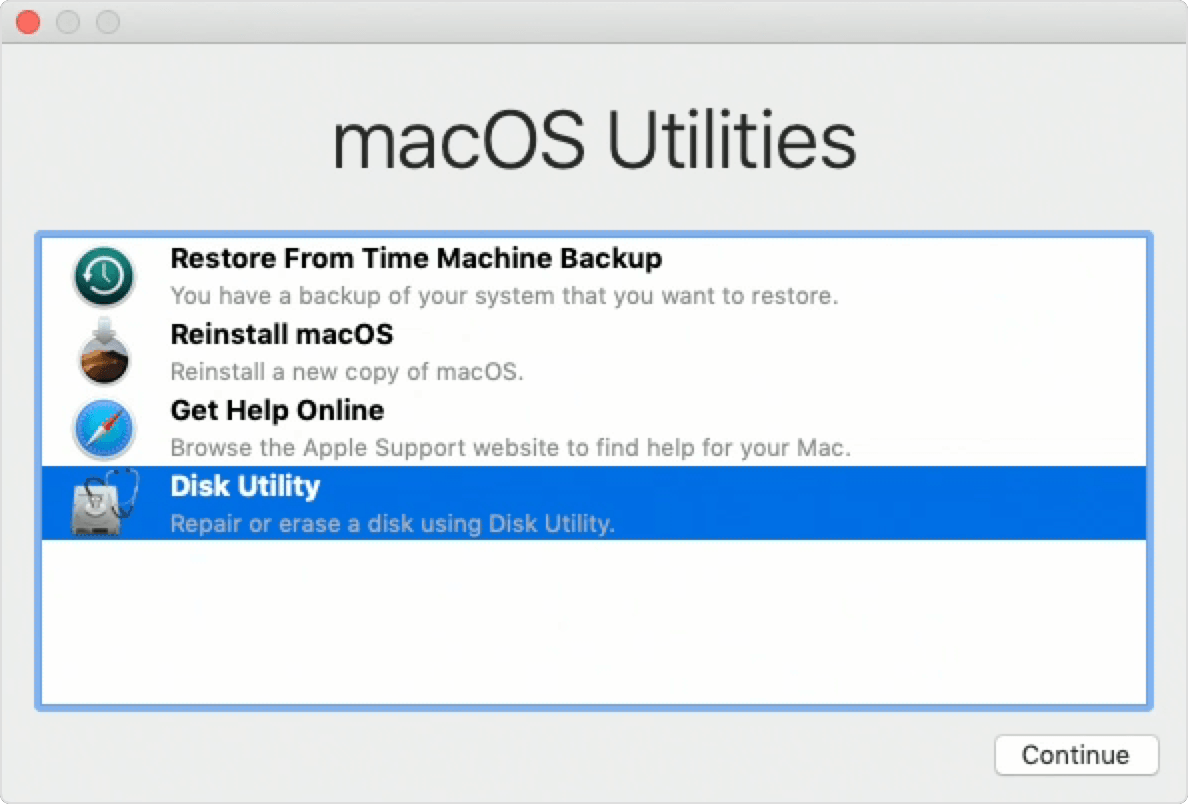
- Open Disk Utility: Choose Disk Utility from the Utilities window.
- Erase the disk: Select the new drive and click Erase. When prompted, choose macOS Extended (Journaled) or another file system based on your needs, and give the drive a name.
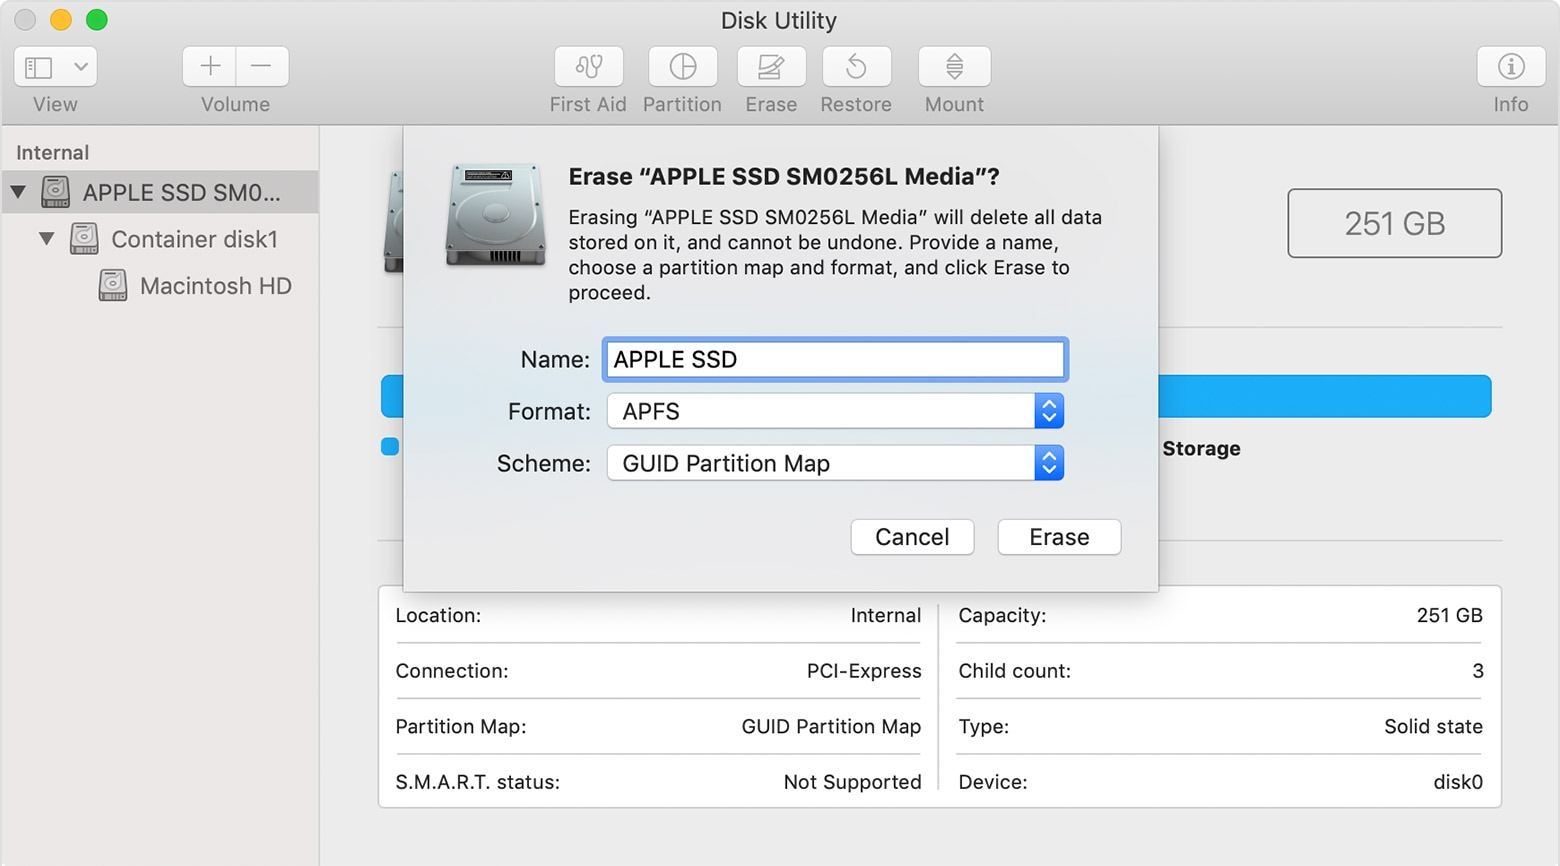
- Reinstall macOS: Go back to the utilities and select Install macOS, then restart your Mac when it's done.
Method 2: How to Reformat a Hard Drive on Mac
Reformatting resets your drive by replacing the old file system, which clears both your files and any errors on the disk.
- Open Disk Utility: Launch Disk Utility from Applications > Utilities.
- Select the drive: Look at the left panel of the Disk Utility window and select the drive to be reformatted.
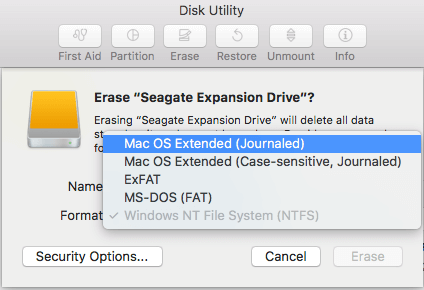
- Click Erase: Follow the prompts to choose a file system, such as Mac OS Extended (Journaled), then click Erase and let the disk be formatted.
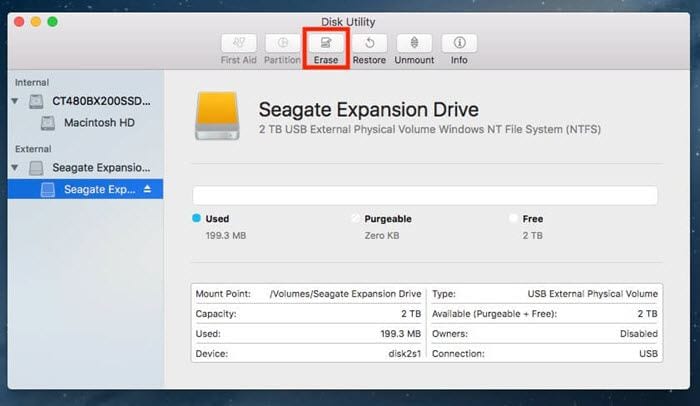
- Restart your Mac once the process finishes.
3. Video Tutorial on How To Format A Hard Drive

4. Important Tips Before Formatting a Drive on Mac
- Use Disk Utility first. It is the first tool you should use to format any HDD on your Mac — even a corrupted drive can often be fixed and then formatted with it.
- Back up your files before formatting. The importance of backing up cannot be emphasized enough. Backing up may be tedious, but losing years of data is far worse — don't be hasty.
- Ensure a stable power supply. Make sure your battery is fully charged or that you are near a power source. A sudden shutdown while the drive is being repaired or formatted will only create new errors.
When Should You Format a Disk on Mac?
- Giving away or selling your Mac: Formatting the drive protects your sensitive data from the next owner.
- Serious errors or viruses: A clean format wipes both viruses and system errors off the drive.
- Restoring factory settings: Returning your Mac to factory state requires formatting the disk.
- Changing the file system: Switching formats, for example from exFAT to APFS, requires erasing the disk first.
- Disk read errors: If macOS keeps saying the disk can't be read, it's time to format it.
Read More:
How To Format HDD/Disk/Hard Drive Using CMD?
How To Restore Mac From External Hard Drive
Full Format vs. Quick Format
Part 3: Different Formats of Mac Hard Drive
The file formats out there waiting to be used by you are few. Knowing the right one to choose depends on what you intend the drive to be primarily used for. Have a read below and determine which one best suits your needs.
🔍 Mac Hard Drive File System Comparison
| File System | Compatibility | Best Use Case |
| APFS (Apple File System) | macOS Sierra and later, SSD drives. | Default modern Mac drive format; advanced, reliable, and efficient. |
| Mac OS Extended (Journaled) | macOS only. | Older Macs and Time Machine backups; supports encrypted variants. |
| NTFS | Readable on Mac; full read/write on Windows. | Windows drives you only need to read on your Mac. |
| exFAT | macOS and Windows. | Cross-platform drives and files larger than 4GB. |
| MS-DOS FAT (FAT32) | Mac, Windows, and Linux. | Sharing drives between all three systems; limited to files under 4GB. |
- APFS (Apple File System)
This is the newest file system Apple incorporated into their Mac systems, so naturally, you can expect it to be more advanced, reliable, and efficient than prior versions. APFS only works on Sierra and if your Mac's drive isn't SSD, APFS won't work for you too.
- Mac OS Extended (Journaled)
This was Apple's default file system for their Mac systems before APFS entered the picture. There's another variant, Mac OS Extended (Journaled, Encrypted), which sees greater use by people who encrypt their drives and make passwords a necessity. Mac OS Extended (Case-sensitive, Journaled) is another variant that is case-sensitive to names of folders; folders named "CAR" and "Car" are not the same. The 4th type is Mac OS Extended (Case-sensitive, Journaled, Encrypted). It has all the distinctive features of its three brethren listed up there rolled into one.
- NTFS
This is Windows' very own default file system but it can still be read by your Mac; writing to it it's a different story, though.
- exFAT
exFAT is one of the more versatile file systems because it's compatible with both macOS and Windows. Either operating system can read drives formatted with exFAT, and it's capable of storing a file larger than 4GB.
- MS-DOS FAT (FAT32)
This file system is also readable by Mac, Windows, and Linux, so if you often share external hard drives between the 3 operating systems, you might want to go with this option. It's one flaw is you can't copy files larger than 4GB in size each.
Okay, those are the file systems, but how do you know which one of them your Mac is using?
1. Open up "Disk Utility" and select the volume or drive. Open up "System Configuration" and choose "Storage".
2. Choose the volume in "Finder", then select "File" and "Get info" from the menu bar. The next window will show you the Format of the disk.
Part 4: How to Fix Errors When Formatting Mac Hard Drive
Formatting your drive should be an affair that takes up, at most, minutes of your time. But of course, this isn't always the case, is it? Sometimes, your Mac just decides to make things a little harder for you. Don't sweat it. A few solutions have been rounded up and written out for you down below.
Problem 1. Unable To Format Hard Drive
Does your Mac show you errors similar to what's in the image below? Chances are you don't even know what causes them. Thankfully, fixing them is a breeze.

1. Open up "Utilities", then your "Applications" folder. Find "Disk Utility" from the list and launch it.
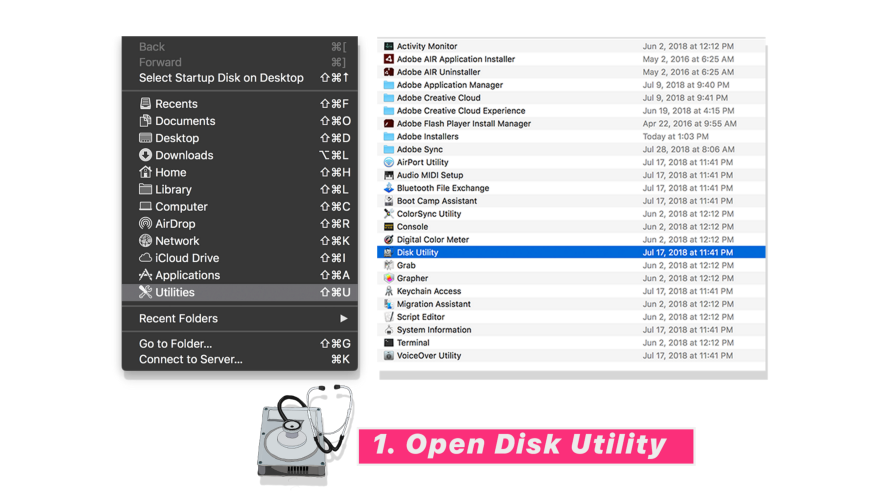
2. Click on "View" and choose "Show All Devices" in the dropdown menu. Next, you choose the "Top Volume" of the drive to be formatted.

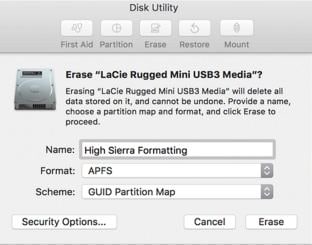
3. Click on "Erase", then give a name to the drive. When it comes to "Format", you can either choose APFS or Mac OS Extended.
4. Choose a "Scheme" (go with "GUID Partition Map"). Click on "Erase" and wait until you see the green checkmark. That means it's done.
Problem 2. Erase All Disk Data Without Backup
By now, everyone who handles large amounts of data should be diligent in making regular backups of their files, right? Nope, because there's always that one guy who only decides to do this when it's too late. Have you ever been in such a situation?
If you have, why not prepare yourself for a similar eventuality? Download and install Recoverit Mac Data Recovery to safeguard your files against accidental deletion and crashed drive; or if you simply forget to backup your data prior to formatting your drive. The steps below will show you how to do this.
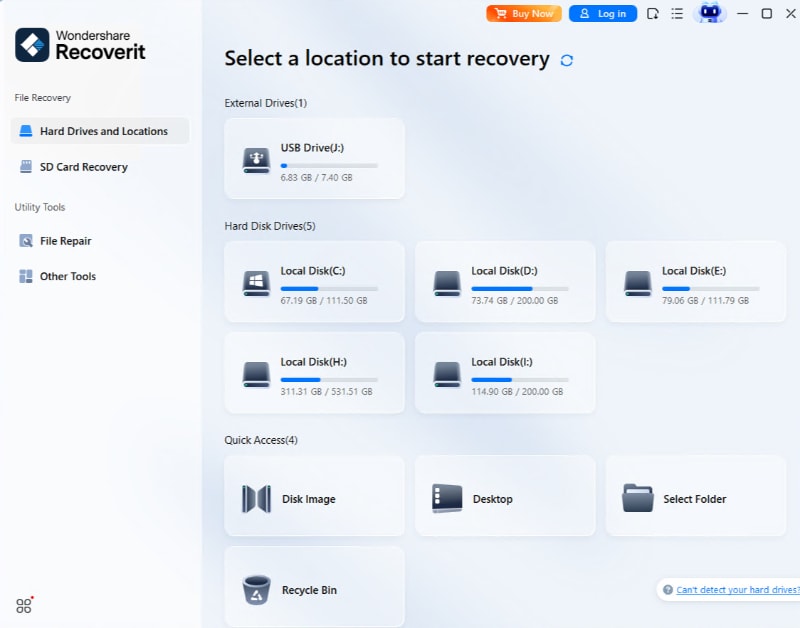
Step 1. Choose a Location
Launch Recoverit and select the hard disk to be scanned (the formatted one). It will be among the other drives displayed on the first window you see once the software opens up. Click "Start."
Step 2. Scan the Location
Use "File Type" and "File Path" to narrow your search and make it easier to recover particular files-as against everything you lost. The scan will end after a given time and show you a preview of your lost files.

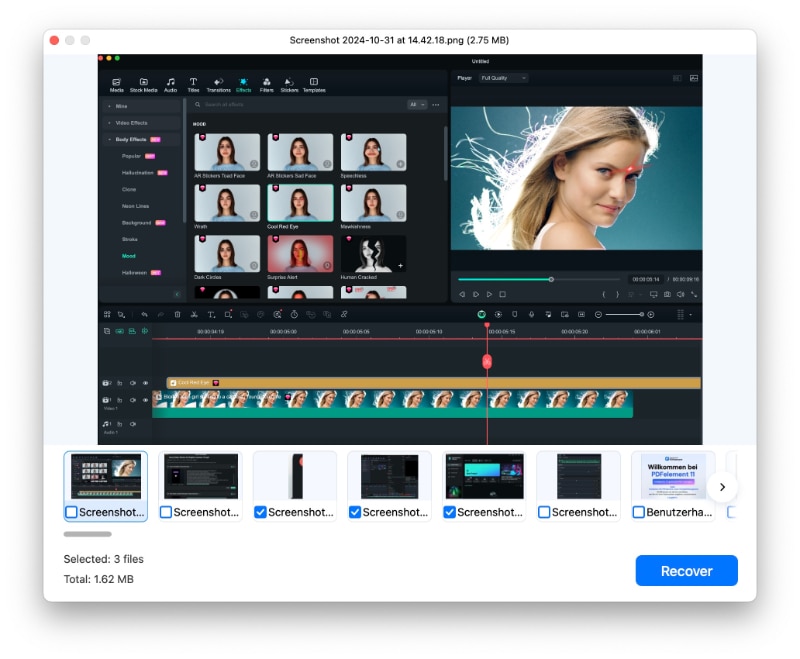
Step 3. Preview & Recover Formatted Data
You will see checkboxes to the left of the Recoverit window. Those are the files you came looking for. Select particular ones or all of them. Click the "Recover" ribbon and the files will be recovered. And don't forget to save everything you've recovered onto a new drive.
Don't bother yourself with the format of your Mac's disk or how much data you lost. Recoverit's tools and features mean it's perfectly capable of recovering data which was erased hours, weeks, months, or even years ago. Surprised? Yeah, it has that much power. Just download, install, and run it. It doesn't get any easier than that, does it?
Problem 3: Hard Drive Not Showing up
When your drive is not mounting on Mac, here are two solutions to help you.
1. Boot Mac into Recovery Mode
- To fix it, boot your Mac into "Recovery Mode" (already explained earlier).
- Choose "Disk Utility" from the "Utilities" menu, then choose the faulty drive and click on "First Aid". Click "Run" to verify and repair any errors.

2. Change Finder Settings
- It's possible your drive won't show up in Finder because your Mac is yet to be set up to display hard drives. Fix it by opening up "Finder" and going to "Preferences."
- Click on the "General" tab and choose "Hard disks." The drive will be visible now.

Closing Words
It's good to be cautious when it comes to formatting your Mac's drive but don't worry yourself by thinking it's something complicated and time-consuming. Any hard drive error you come across while using your Mac is something easily rectifiable. The only time you may need an extra set of hands to help you out is if the drive is failing due to hardware damage. And if the problem is that you've erased everything and plan on getting formatted drive data back, Recoverit is there to help out with that too. Either way, follow every step written here and you're good.
People Also Ask
-
How do I format my Mac's internal hard drive?
Restart your Mac and holdOption + Command + Rto boot into Recovery Mode, open Disk Utility, select the internal drive, click Erase, choose a file system such as APFS, then reinstall macOS afterward. -
What file format should I use to format an external hard drive for Mac?
Use APFS or Mac OS Extended (Journaled) for Mac-only drives. If you need to share files with Windows, choose exFAT — it supports files larger than 4GB and works on both systems. -
Why can't I format my hard drive on Mac?
In Disk Utility, click View > Show All Devices, select the top-level volume, then click Erase and choose GUID Partition Map as the scheme. This usually resolves formatting errors. -
Can I recover data after formatting a hard drive on Mac?
Yes. Stop using the drive immediately and run Wondershare Recoverit for Mac. It scans formatted drives and restores erased files — even data deleted months or years ago.
What's Wrong with Mac
- Recover Your Mac
- 5 best data recovery software for Mac
- Recover my trashed files.
- Recover deleted files on Mac.
- 3 ways to restore Mac photos.
- Recover SD card files on Mac.
- Recover files from external hard drive on Mac
- Fix Your Mac
- Fix grey screen at startup.
- Ethernet issues occur | Fixed.
- Mac won't shut down. Boot it.
- Solve flashing question mark.
- Fix slow WiFi after upgrade.
- Delete Your Mac
- Format your USB drive.
- Delete APFS partition.
- How to format APFS drive.
- What can be cleaned on Mac.
- Format external hard drive.
- Learn Mac Hacks


Sue Wayne
staff Editor