


 TL;DR:
To fix a Windows 11 screen saver that works in Preview but fails to auto-start, ensure your system's display-off and sleep timers are set to a duration longer than the screen saver's designated wait time.
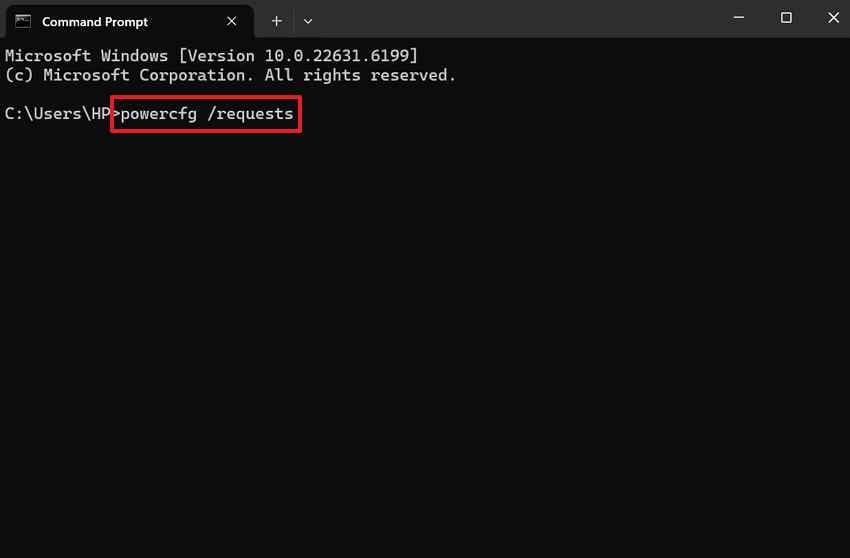
● Identify background applications or media preventing Windows from reaching an idle state by executing the `powercfg /requests` command in an Administrator Command Prompt.
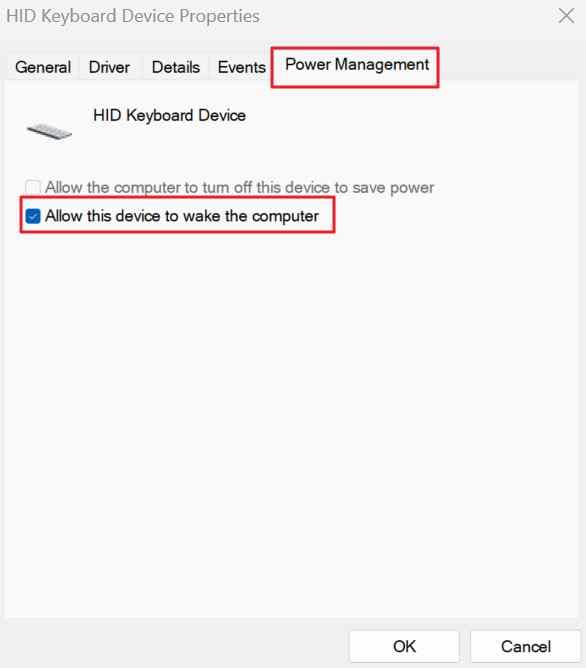
● Prevent peripheral input from constantly resetting the idle timer by unchecking "Allow this device to wake the computer" for your mice and keyboards under Device Manager.
● If your configurations continuously reset after a system reboot, check `gpedit.msc` to see if work or school administrators are overriding personal display settings via Group Policy restrictions.
Ask AI for a summary
 ChatGPT
 Perplexity
 Gemini
 Claude
 Grok
Grok
A screen saver may feel like a small Windows feature, but when the Windows 11 screen saver is not working, it can affect privacy, photo slideshows, idle display settings, and your daily workflow. In most cases, the issue comes from screen saver settings, power timers, connected devices, background apps, display drivers, or organization policies.
Quick Answer: If the Windows 11 screen saver is not working, first open Settings > Personalization > Lock Screen > Screen Saver, choose a screen saver, set a short Wait time, click Apply, and test Preview. Then make sure your display-off and sleep timers are longer than the screen saver wait time. If Preview works but the screen saver never starts automatically, check apps or devices keeping the PC awake with powercfg /requests, unplug extra input devices, update display/input drivers, and check work or school policies.
In this article
-
- 1. Check and Reapply Screensaver Settings
- 2. Adjust Display and Sleep Timers
- 3. Stop Input from Devices
- 4. Close Apps Keeping PC Awake
- 5. Check Blockers with Commands
- 6. Turn off Presentation/Awake Modes
- 7. Update Key Drivers
- 8. Repair System Files
- 9. Check Policy Settings
- 10. Edit Registry Only with Backup
- 11. Update or Roll Back Windows
- 12. Test With a New User
- 13. Do a Repair Install
Part 1. Screensaver, Sleep, Lock Screen, and Display Off: What Is the Difference?
Many users think the “Windows 11 screen saver not working” issue is a bug, but it is often caused by how screen saver, display-off, sleep, and lock screen settings interact.
Why Preview Works But Auto-Start Does Not
If Preview works but the screen saver never starts automatically, the screen saver file is usually not broken. Instead, Windows may not be reaching idle state, or another setting may happen first.
Common causes include:
- Display turns off before the screen saver starts.
- PC sleeps before the screen saver timer ends.
- A mouse, keyboard, controller, or Bluetooth device keeps sending input.
- A media app, game, browser tab, or meeting app keeps Windows awake.
- Work or school policy controls screen saver settings.
- A Windows update reset display or power settings.
Part 2. Quick Diagnosis: Why Your Windows 11 Screensaver Will Not Start
Most of the time, the screensaver not working issue is simple and can be found with basic checks:
- Preview Works, Auto Doesn’t: A Working Preview means the screensaver is fine, and the idle timer or power settings are usually wrong.
- Screen Goes Black Instead: If the screen just turns black or off, the display‑off timer is kicking in before the screensaver.
- PC Sleeps Before Saver: Once the PC enters sleep first, the screensaver never has a chance to appear.
- Timer Ends, But Nothing: Soon, if the screensaver timer finishes and nothing appears, Windows thinks there’s still activity.
- Settings Reset After Reboot: When the screensaver settings keep changing after restart, something is overwriting them.
- Devices keep waking PC: Any mouse, keyboard, controller, or Bluetooth device movement can wake the PC because it sees new input.
- Apps Keep PC Awake: Videos, games, and some media apps tell Windows to “stay awake” while they run.
- Stopped After Update: The screensaver stopped right after a Windows update; the update may have changed power or display settings.
- Managed by Work or School: On work or school PCs, admins can control or disable screensavers, as their policies may override anything you set.
Part 3. How to Fix the Screensaver Not Working on Windows 11
The solutions below start with regular settings checks and move towards more advanced repairs for the screensaver not working in Windows 11:
1. Check and Reapply Screensaver Settings
Learn how to reapply Screensaver settings because they might get disabled or changed without you noticing:
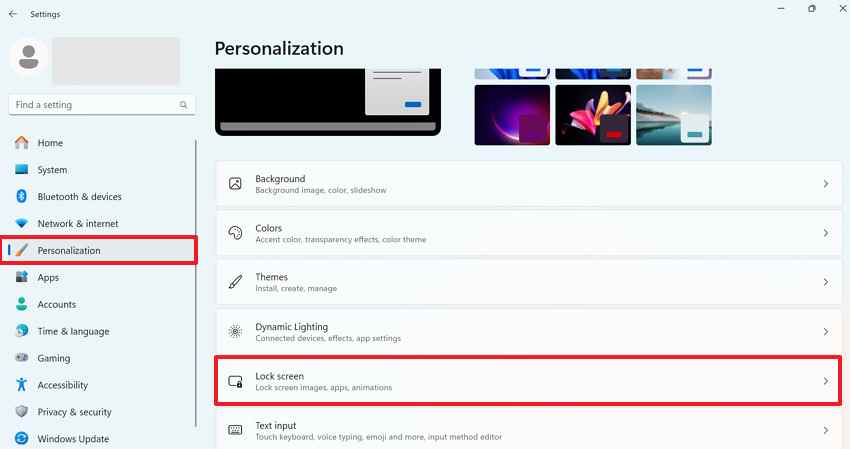
Step 1. In Windows Settings, access “Personalization > Lock Screen > Click “Screensaver” option.”
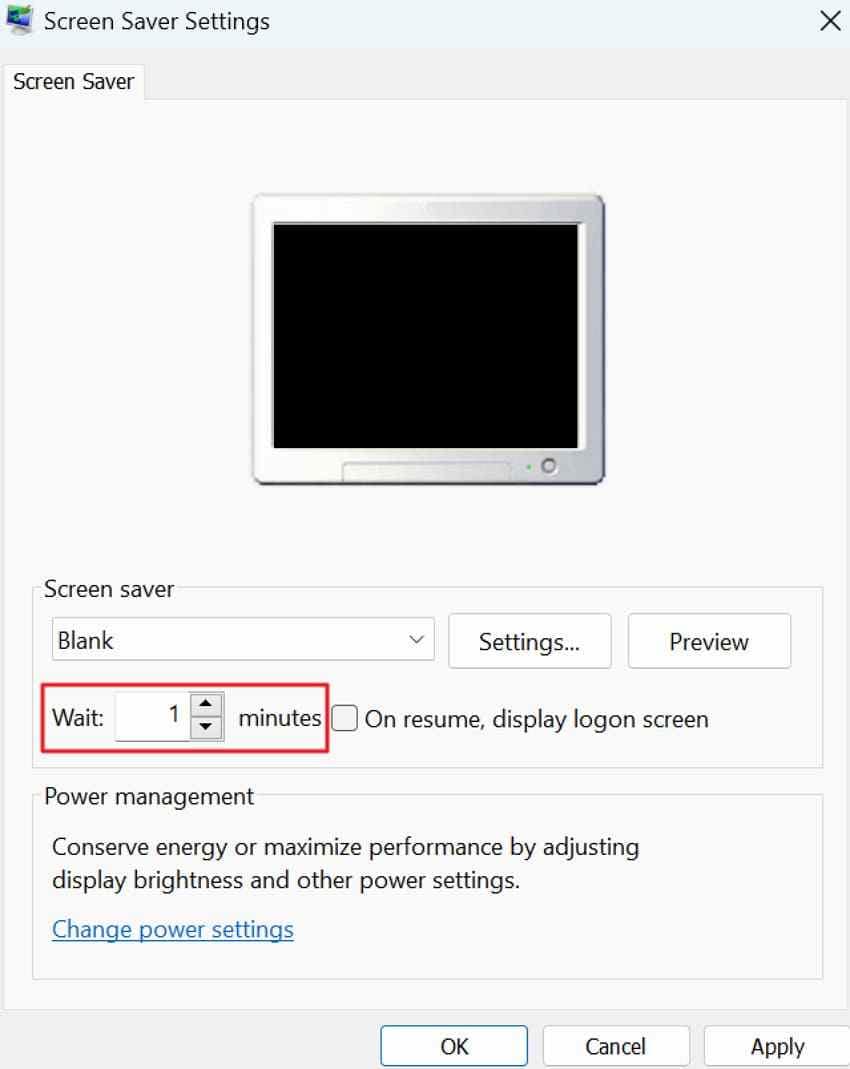
Step 2. Check or reapply “Wait” time > Press “Apply” > Tap “OK.”
2. Adjust Display and Sleep Timers
Once the display turns off or the PC sleeps first, the screensaver never gets a chance to start. Follow the guidelines to set Display and Sleep Timers and don't override the screensaver:
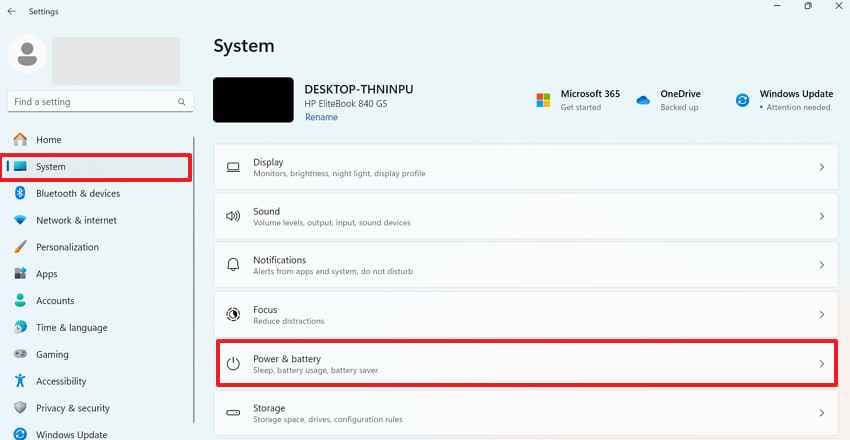
Step 1. Open Settings, click “System > Power & Battery > Screen and Sleep.”
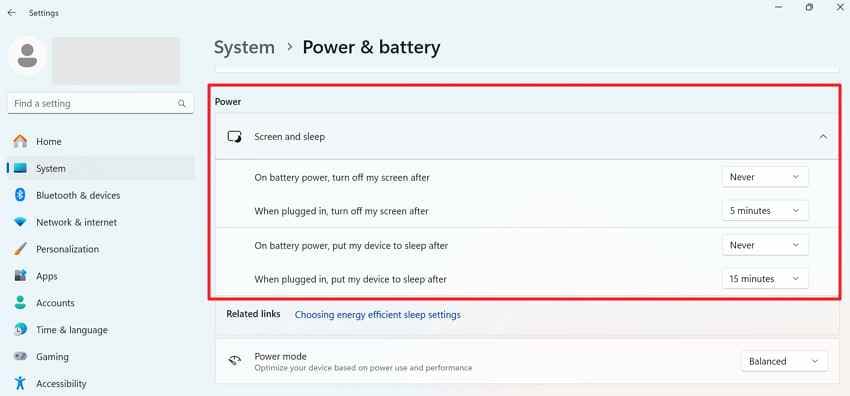
Step 2. From Screen and Sleep, set “Sleep” and “Turn off Screen" times longer than the screensaver.
3. Stop Input from Devices
Unplug extra mice, keyboards, and USB hubs, or follow this tutorial to stop input from such devices:
Step 1. Open Device Manager > Expand Mouse/Keyboard > Access “Properties” option.
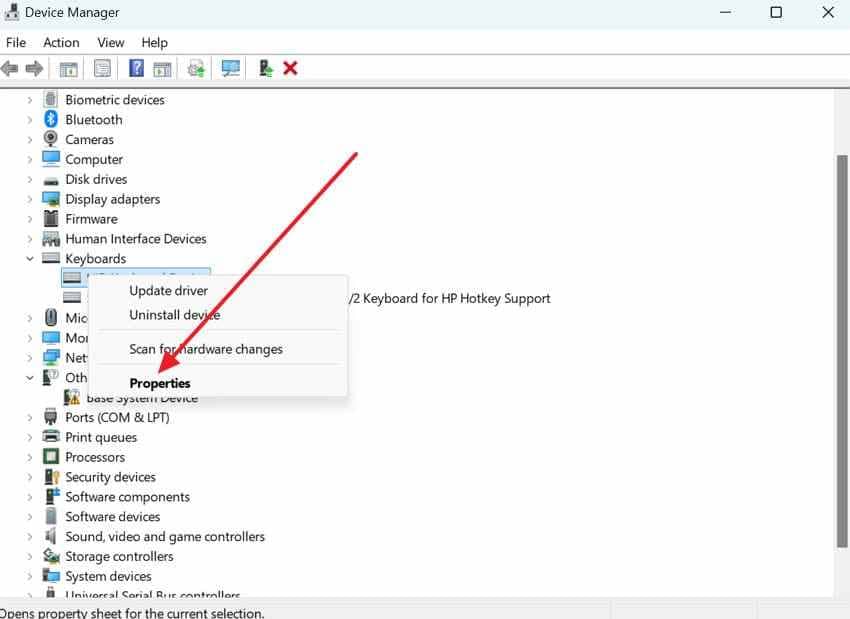
Step 2. Access “Power Management” > Untick “Allow this Device to Wake the Computer” > OK.
4. Close Apps Keeping PC Awake
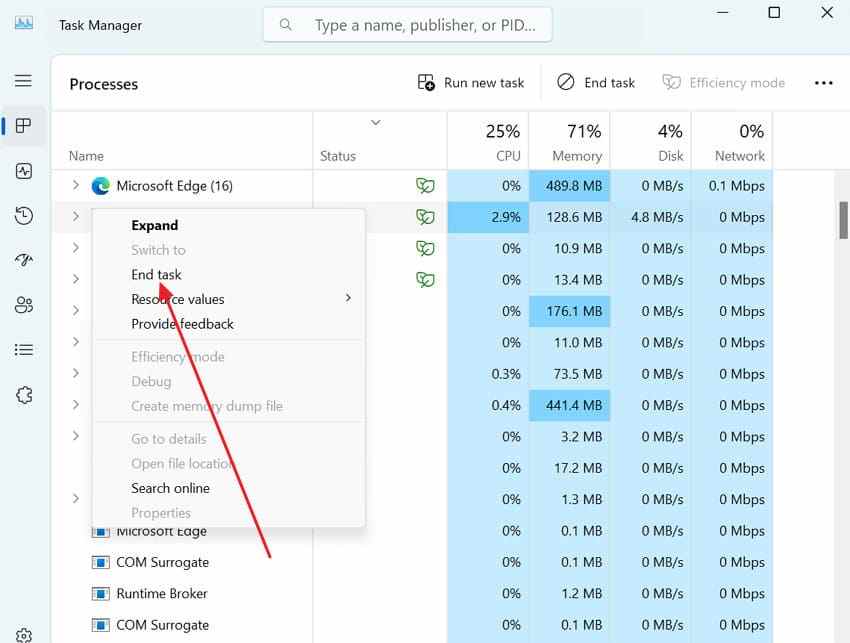
For the screensaver not working, close all apps that prevent Windows from entering idle mode, as guided:
Instructions. Task Manager > Right-click unwanted apps > Press “End Task” > Wait for screensaver.
5. Check Blockers with Commands
Windows can identify apps or devices that are blocking idle mode, and to check them, follow the guidelines:
Instructions. Enter Command Prompt (Admin) > Run “powercfg /requests” > Review results > Close listed process.
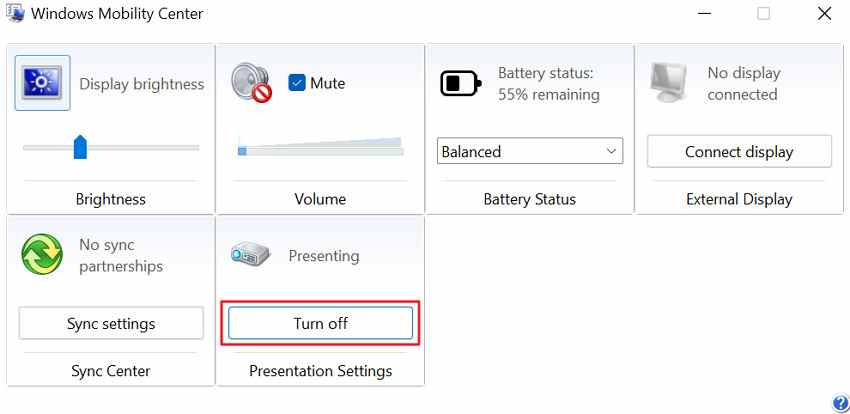
6. Turn off Presentation/Awake Modes
Presentation tools and awake utilities can stop the screensaver from running, so turn them off following the tutorial:
Instructions: Press “Windows + X” > Select “Mobility Center” > Press “Turn Off” for Presenting mode if on.
7. Update Key Drivers
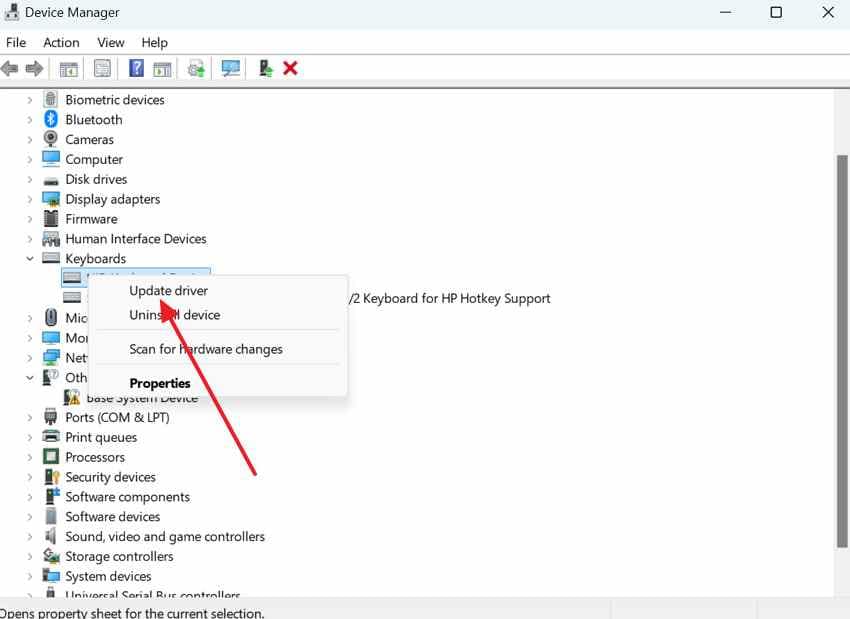
To overcome the screensaver not working on Windows 11, read the manual to update all main key drivers, if they’re outdated:
Step 1. From Device Manager > Expand “Keyboard/Mouse/Display Adapters” > Right-click driver > Tap “Update Driver.”
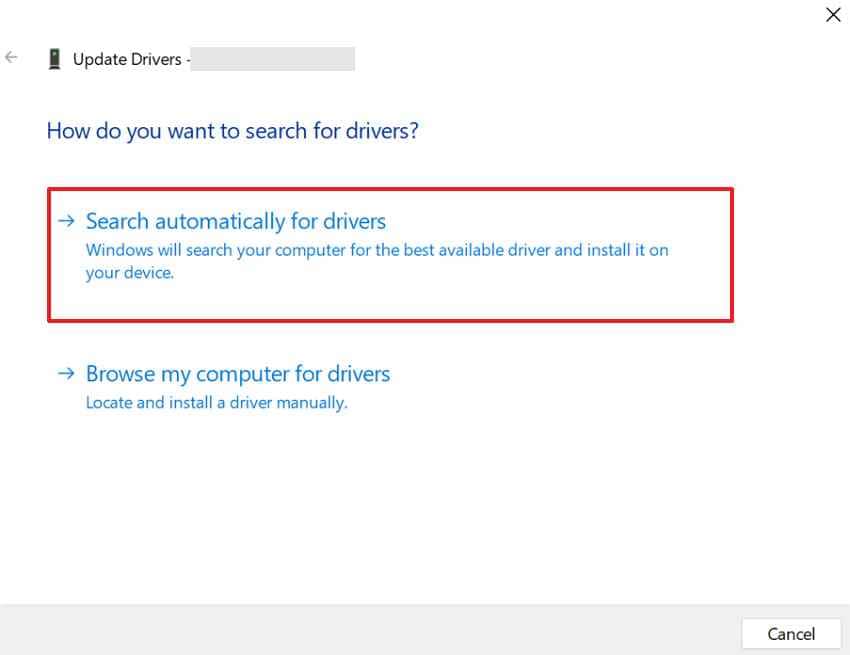
Step 2. Click “Search Automatically for Drivers” > Windows search and update the selected drivers.
8. Repair System Files
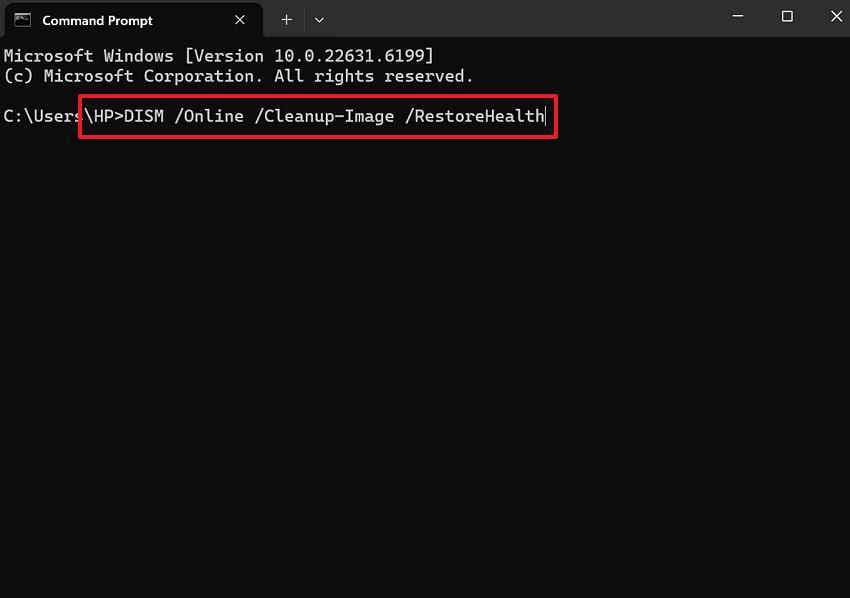
While corrupted system files may restrict the screensaver feature from working, go through the guidelines to repair them:
Instructions. Command Prompt (Admin) > Run “DISM /Online /Cleanup-Image /RestoreHealth” > Press Enter > After it finishes > Execute “sfc /scannow” > Restart PC.
9. Check Policy Settings
Group Policy can disable or control screensaver behavior; thus, to check them, follow the manual as demonstrated:
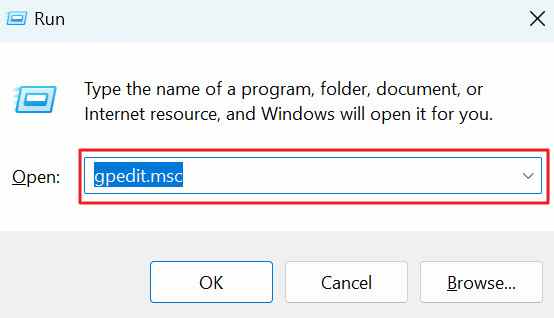
Step 1. Press “Windows + R” > Type “gpedit.msc” > Press the “Enter” key.
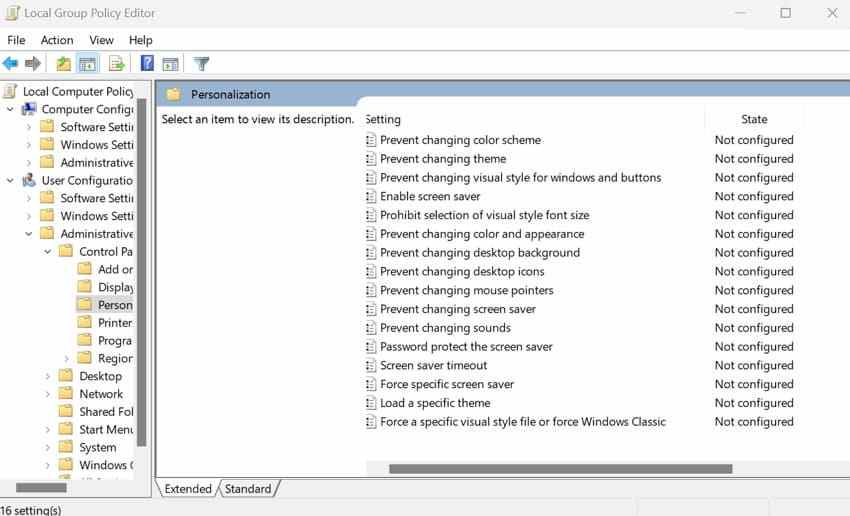
Step 2. Go to “User Configuration > Administrative Templates > Control Panel > Personalization > Review screensaver-related policies.”
10. Edit Registry Only with Backup
This screensaver is not working issue can happen due to incorrect registry values, so follow the tutorial to get sorted:
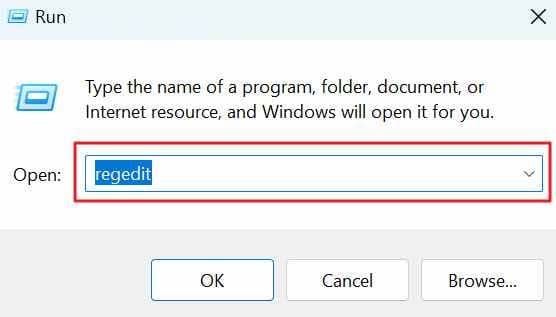
Step 1. Hold “Windows + R” > Write “regedit” > Then hit Enter.
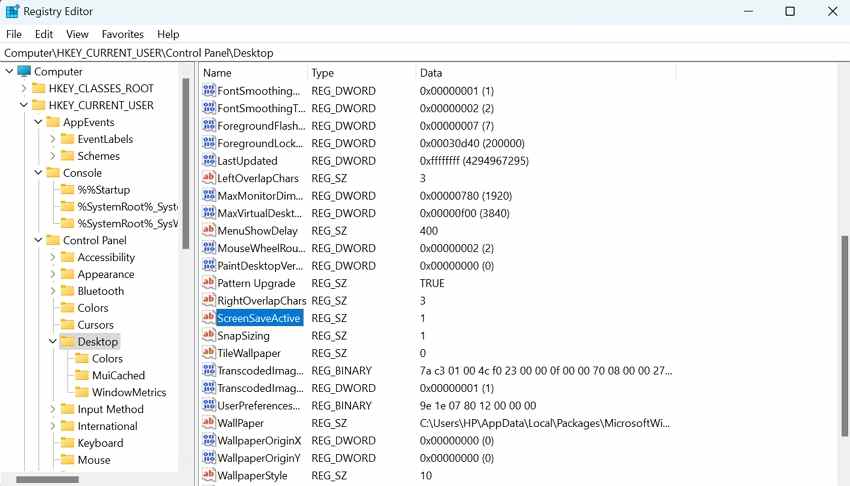
Step 2. Open “HKEY_CURRENT_USER\Control Panel\Desktop” > Verify the screen saver registry values and edit them if required.
11. Update or Roll Back Windows
A recent update may have caused the issue, while a newer update may fix it, as shown below:
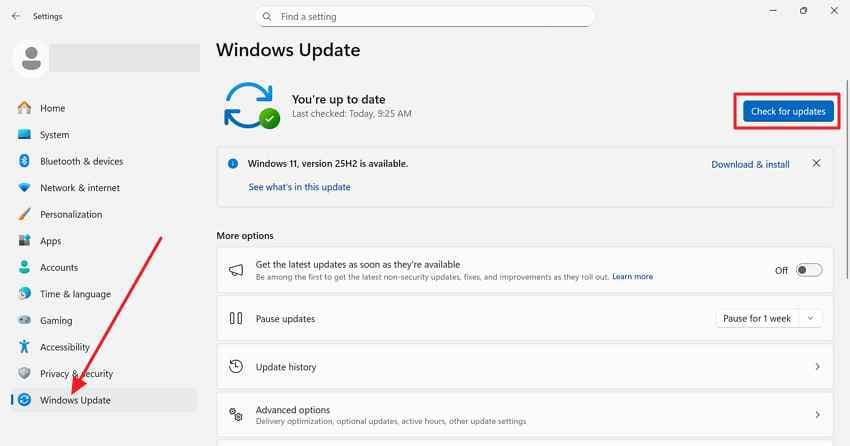
Instructions. Access Windows Settings, click “Windows Update > Check for Updates” > Install available updates.
12. Test With a New User
A corrupted user profile can cause the screensaver not working in Windows 11 issue, needing a new account for testing:
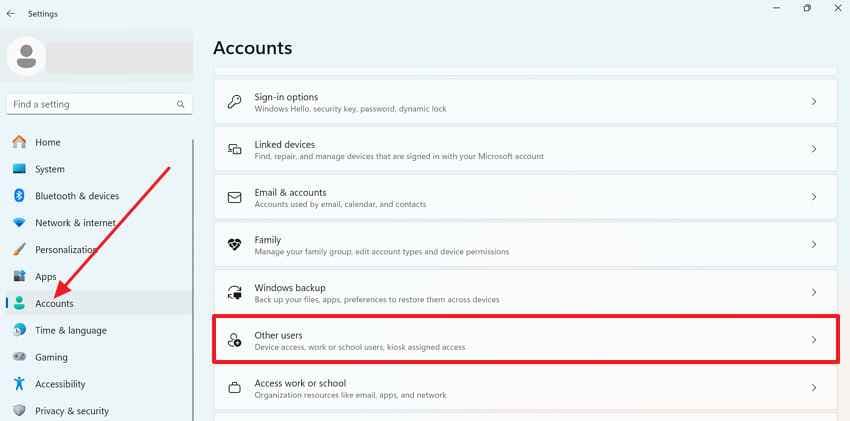
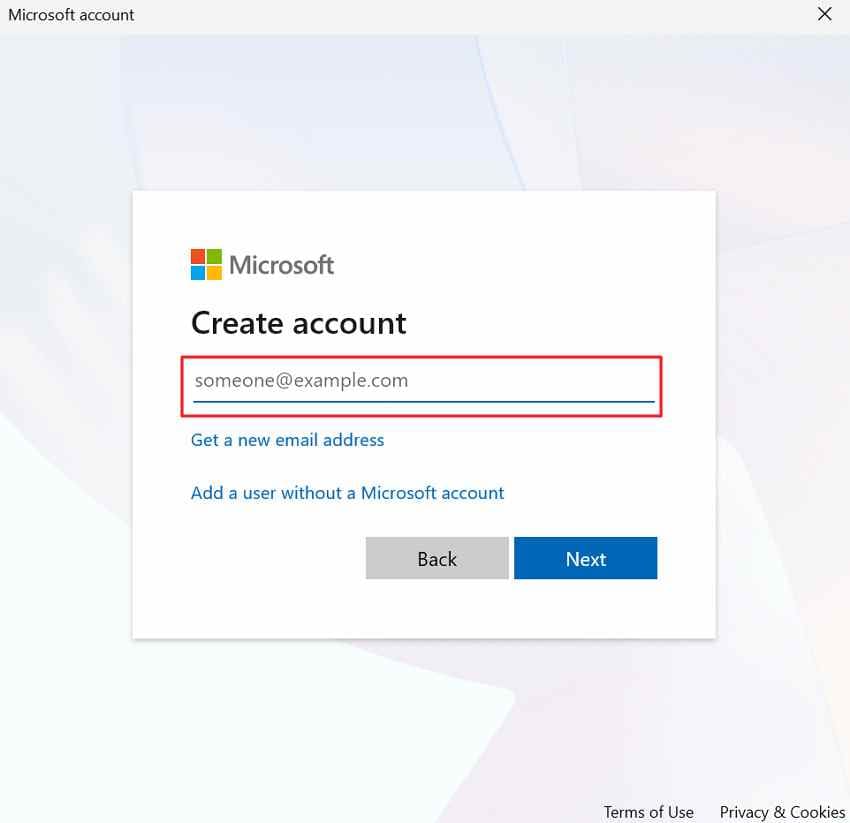
Step 1. From Windows settings, open “Accounts > Other Users > Add Account > I Don't Have This Person's Sign-In Information.”
Step 2. Create a new account for your computer by following the on-screen instructions.
13. Do a Repair Install
If you think nothing works, a repair install can fix Windows 11, keeping your personal files and apps, as shown:
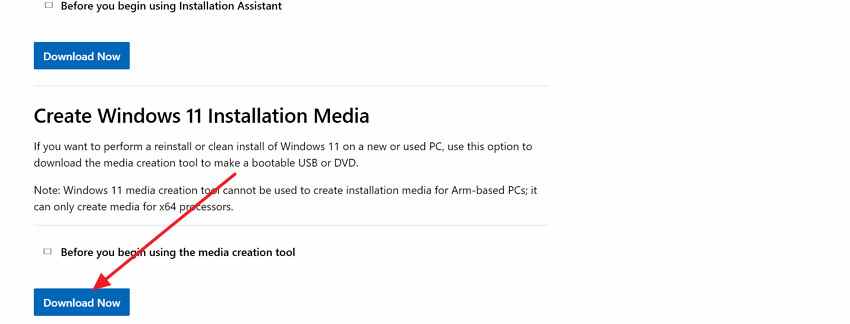
Instructions. Visit the official “Microsoft Download Windows 11” page > Download the “Windows 11 Installation Media” or “Windows 11 Disk Image (ISO)” > Run setup.exe > Select “Keep personal files and apps” > Follow the on-screen instructions to complete the repair install.
Part 4. Before Advanced Windows Repairs: Protect Important Files First
Most basic screen saver fixes do not affect personal files. However, advanced actions such as Registry edits, system repairs, repair installs, reset attempts, or failed Windows troubleshooting can carry more risk.
Data Safety Note: Recoverit is not a screen saver repair tool. It does not fix Windows screen saver settings, power timers, or drivers. It is a Windows data recovery tool that can help if important files are accidentally deleted, lost, or become inaccessible during advanced troubleshooting.
Use Recoverit Data Recovery for Windows if:
- Files are deleted during Windows repair attempts.
- Documents, photos, videos, or project files become inaccessible.
- A drive, USB, SD card, or external storage device loses files.
- A Windows crash, failed update, or system repair causes data loss.
How to Recover Lost Files During Windows 11 Repairs
If your files are accidentally deleted or become inaccessible while repairing Windows 11, follow these steps to recover them with Recoverit.
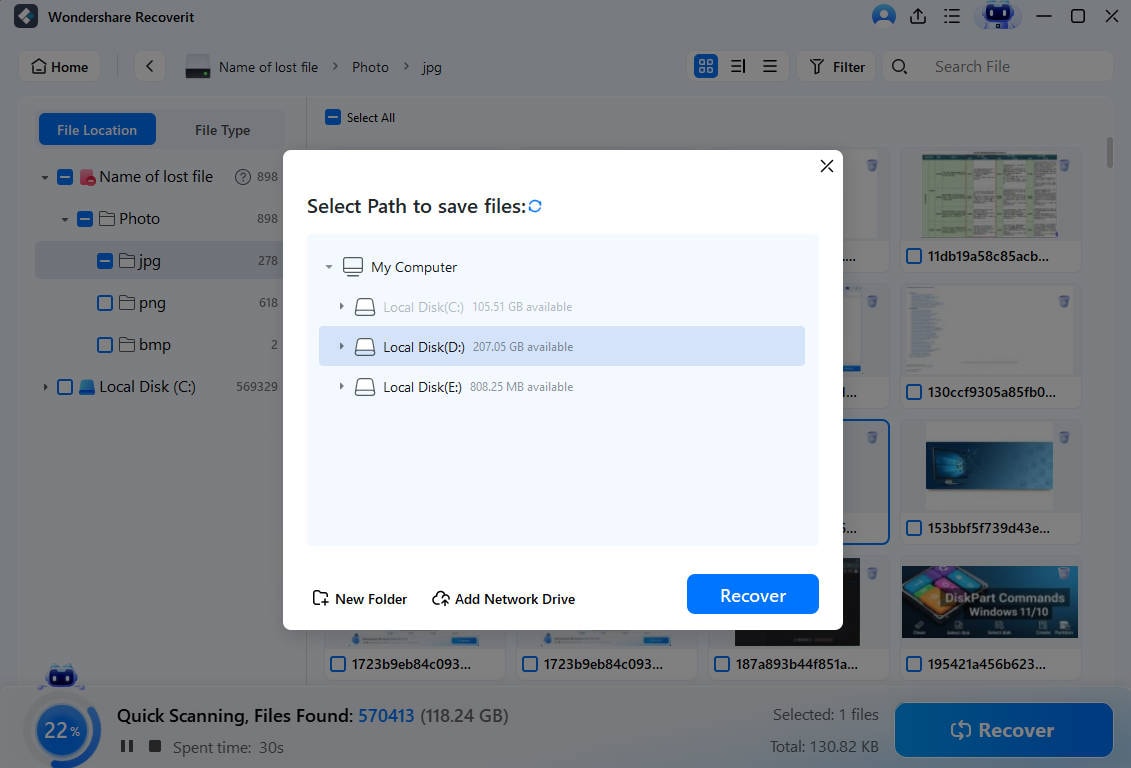
Step 1. Select a Location on Windows 11
Install Recoverit > Access “Hard Drives and Locations” > Choose location > Click “Start.”

Step 2. Begin the Quick Recovery Scan
The program starts the quick scan automatically > Locate the required recovered files.

Step 3. Confirm and Recover Your Files
Preview and confirm the files you lost and press the “Recover” button.
Part 5. How to Set Up and Maintain a Screensaver on Windows 11 Properly
After fixing the screensaver not working on Windows 11 issue, it's important to configure and maintain your screensaver properly.
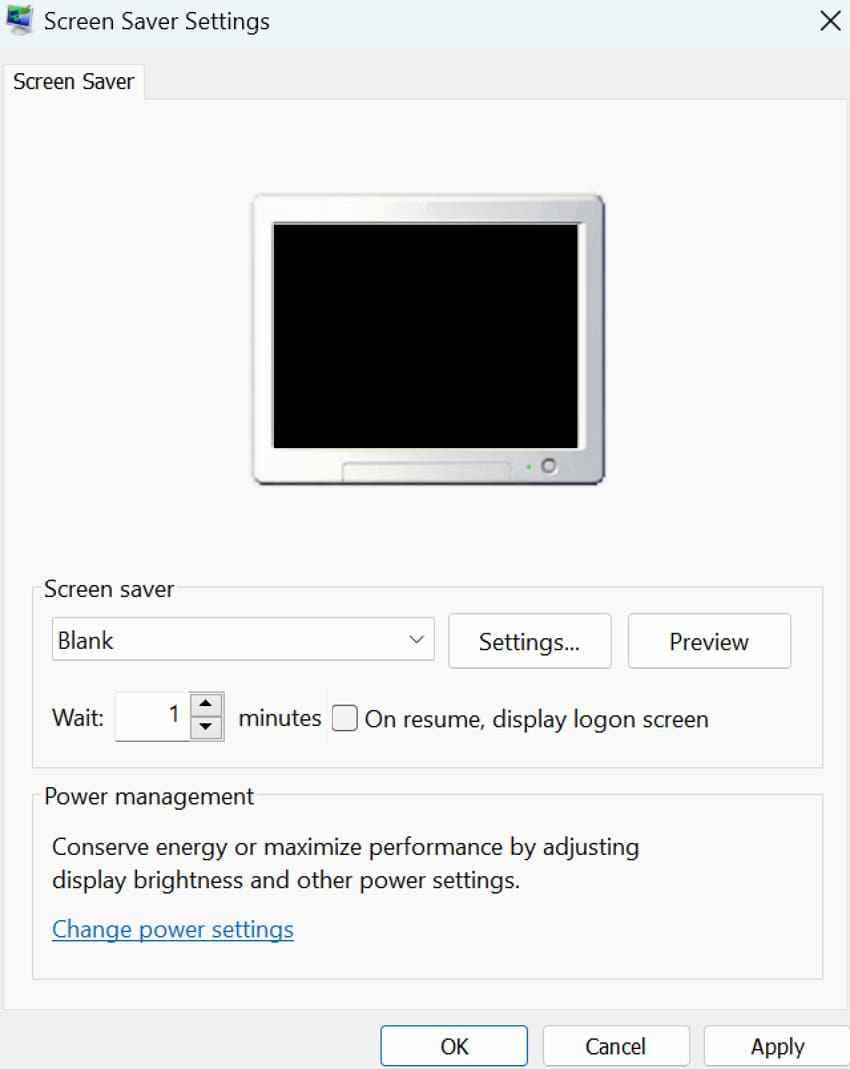
- Open Screensaver Settings: Windows key > Type “screen saver” > Select “Change Screen Saver” > Access screen saver settings window.
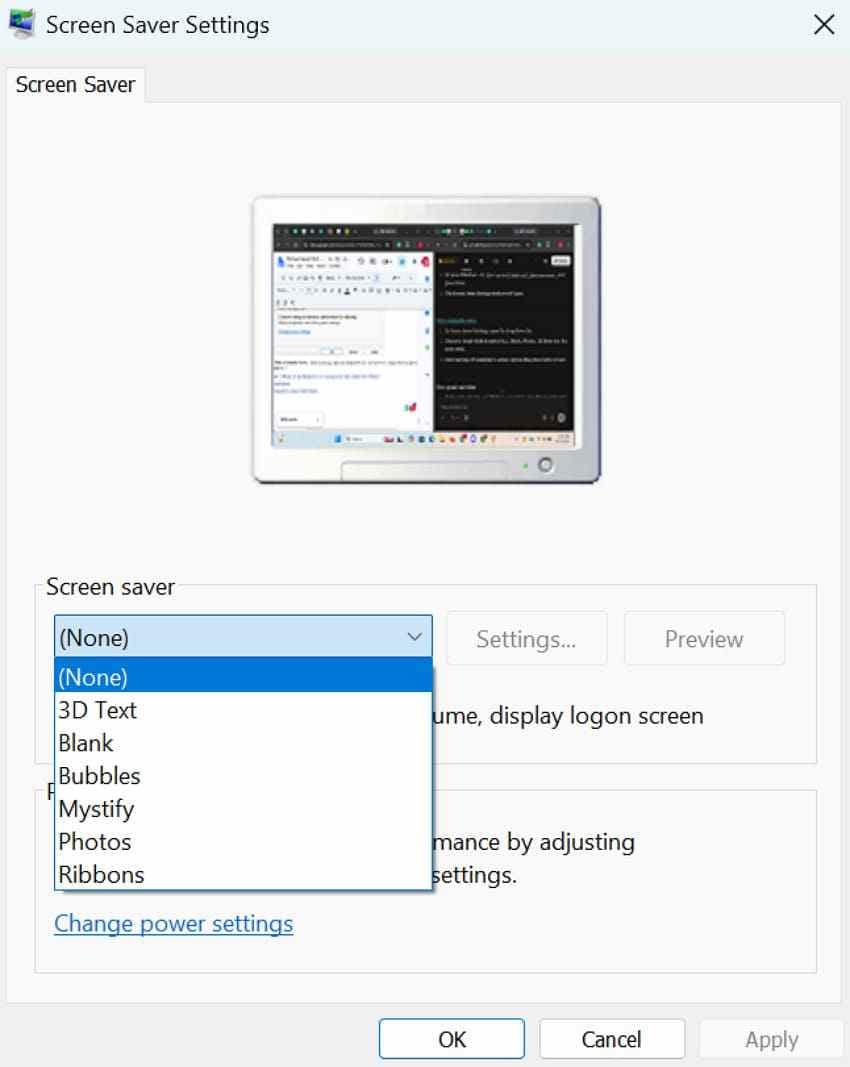
2. Pick a Suitable Saver: After accessing, open the drop-down list and choose a simple built-in option such as Blank, Bubbles, Mystify, Ribbons, or Photos.
3. Set a Good Wait Time: Within the same window, set “Wait” to a practical value and adjust later if needed.
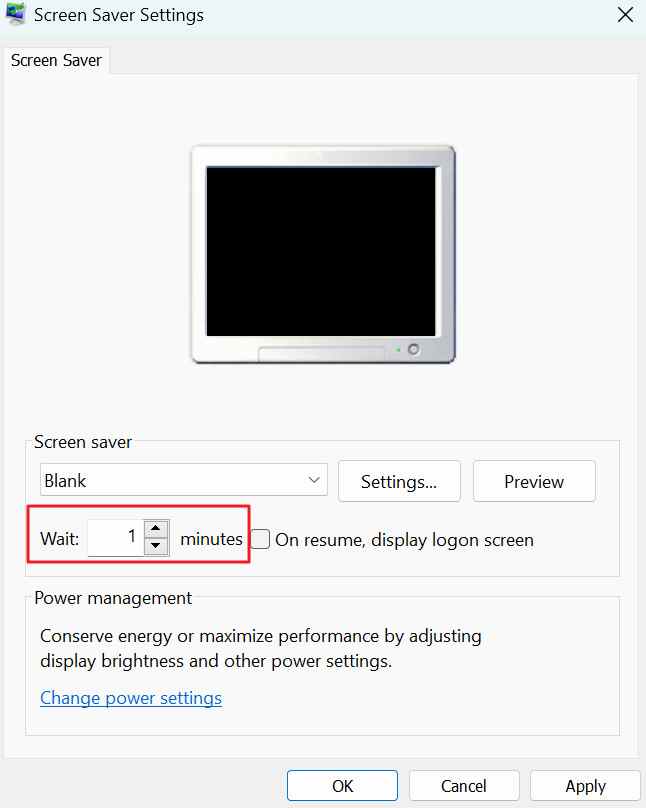
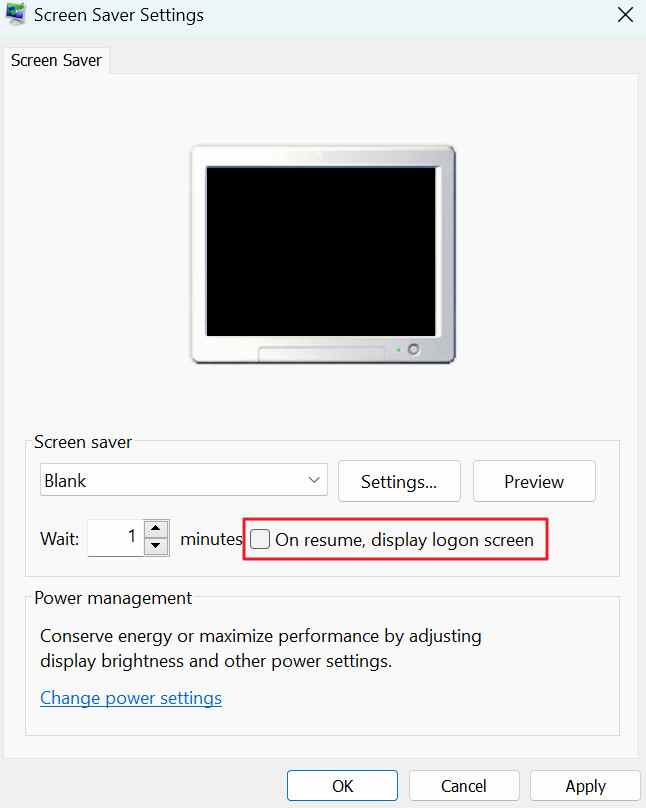
4. Turn on Logon Screen for Privacy: Simply, tick “On Resume, Display Logon Screen,” then apply changes so others can’t access your desktop.
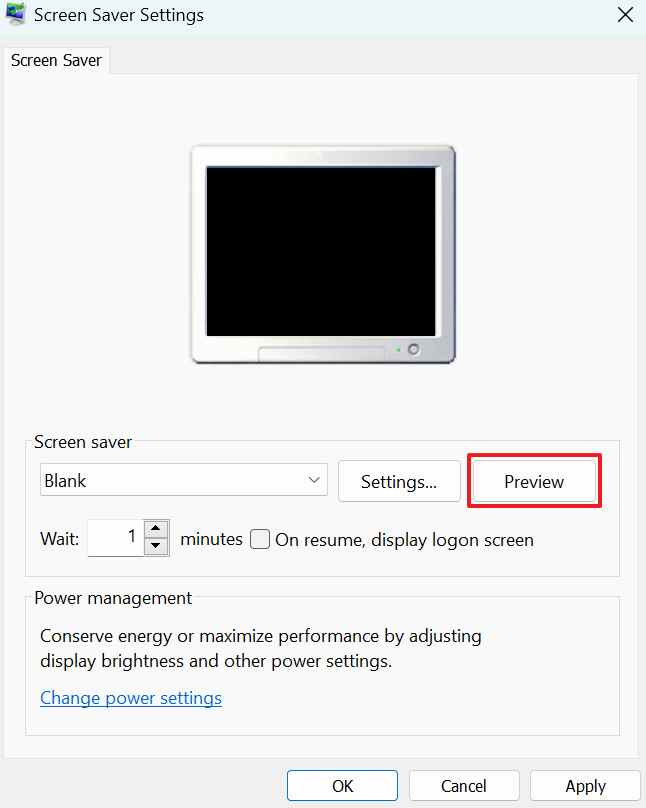
5. Test Preview and Auto Start: In Screen Saver settings, click “Preview,” then move the mouse or press a key to exit it.
6. Check Settings After Updates: After major Windows updates, reopen the Screensaver settings and confirm previously made changes.
7. Keep Windows and Drivers Updated: Regular updates might help prevent compatibility issues that may affect screensavers and power management.
Part 6. What If the Windows 11 Screensaver Still Does Not Work?
After all, if the Windows 11 screen saver not working issue persists, explore what is still possible in this situation:
1. Test the Screensaver in a Clean Boot
A Clean Boot often navigates Windows to start with only essential services and drivers. In this context, it could help determine whether a background program is preventing the screensaver from running:
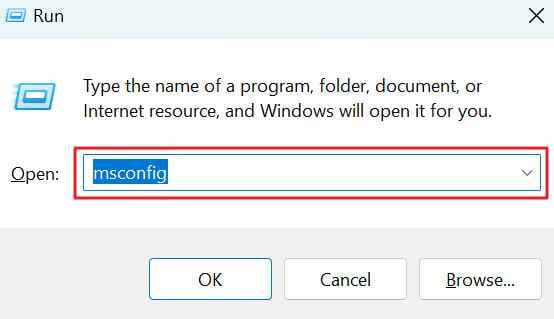
Step 1. Press “Windows + R” keys > Type “msconfig” > Press “Enter.”
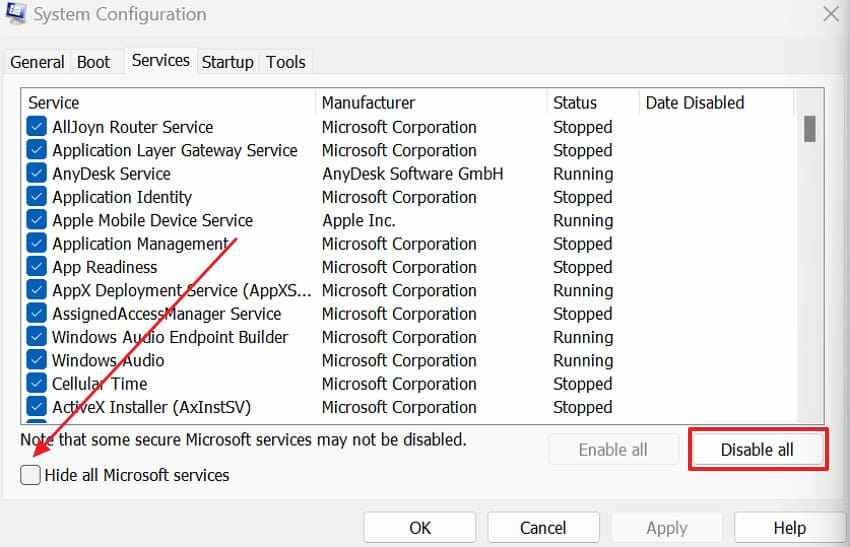
Step 2. On the Services tab,> Tick "Hide All Microsoft Services” > Click the "Disable All” option.
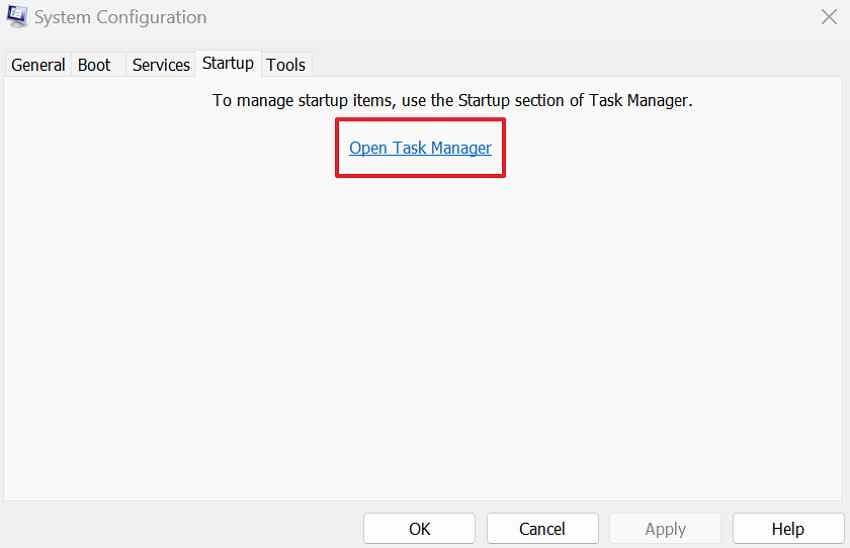
Step 3. Enter Startup tab > Press “Open Task Manager" > Disable all startup items > Restart and test the screensaver.
2. Check Work or School Policy Restrictions
When a work, school, or organization-managed computer is in use, the screen saver settings are controlled by the administration. Thus, you can check whether the screensaver problem is related to administrative controls through the instructions below:
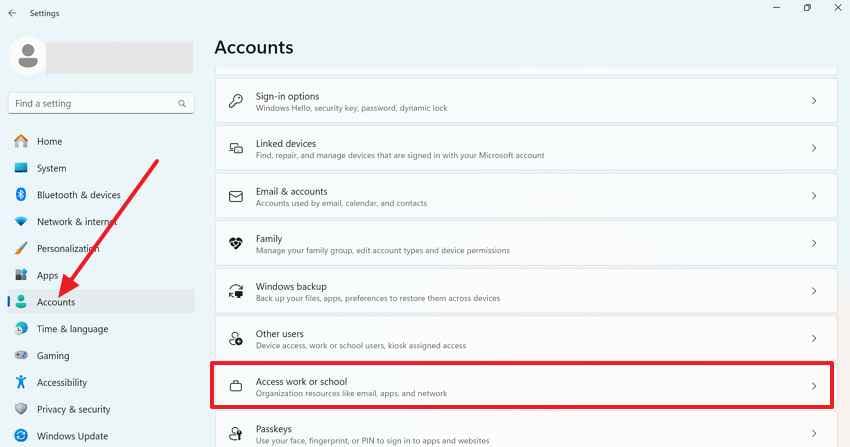
Instructions. Access “Settings > Accounts > Access Work or School” and verify the device is organization-managed. Then, open “gpedit.msc” and navigate to “User Configuration > Administrative Templates > Control Panel > Personalization” to review screen saver policies (Windows Pro/Enterprise only).
3. Decide on Repair Install
Ask yourself how important the screensaver is compared to the time and risk of a repair install. If other features are also broken, a repair install is suggested; if only the screensaver is affected, you might accept a workaround.
4. Use Other Options Instead
For those who use screensavers for privacy and power settings, Windows 11's display sleep and lock screen features can provide a similar experience. These features are often more reliable and can help reduce power consumption while protecting your data from unauthorized access.
5. Review Recent Changes
Think about what changed just before the problem, including Windows updates, driver updates, or new apps. Remove or disable any new apps that might keep the PC awake for a constant screensaver not working issue.
Conclusion
Lastly, it's clear that the "Windows 11 screen saver not working” issue is caused by simple settings, power options, or background apps. Most of the time, you can fix it by checking your settings or following the fixes outlined in this guide. However, remember to recover your essential files with Recoverit before applying deep fixes such as system repairs or registry changes.
Frequently Asked Questions
-
Q1. Why does my screen go black instead of showing the screensaver?
This happens because your display turn-off time is shorter than your screensaver wait time. For this, set the screensaver to start first, and the screen/sleep timers to longer times. -
Q2. Why do my screensaver settings reset after every restart?
It might happen when another program, a cleanup tool, or a policy overwrites your settings. Thus, turn off such tools or ask your IT admin if this is managed by your organization. -
Q3. Do I really need a screensaver on modern monitors?
For modern LCD and LED monitors, burn-in is very rare during normal everyday use. This means you actually don't need a traditional screensaver like older CRT monitors did. Your Display, Sleep Mode, and the Lock Screen are enough to save power and privacy.


