
![[Solved]Dell Laptop Needs the BitLocker Recovery Key](https://images.wondershare.com/recoverit/article/how-to-find-recovery-key-for-dell-laptop-1.jpg)

 TL;DR:
To unlock a Dell laptop stuck on the BitLocker recovery screen, you must retrieve your 48-digit recovery key from your connected Microsoft Account (account.microsoft.com) or Azure Active Directory, because Dell does not store or have access to user encryption credentials.
● If the prompt appeared suddenly after a SupportAssist or BIOS update, especially on 2025 or 2026 XPS and Latitude models, press F2 on startup to enter BIOS and verify that UEFI is the primary boot option, Secure Boot is on, and TPM 2.0 Security is enabled with TPM PPI Bypass disabled.
● If you possess a bootable Windows installation drive, you can navigate to the Advanced Options Command Prompt and execute the command manage-bde -protectors H: -get (replacing H with your encrypted drive letter) to attempt retrieving the key directly from the system.
● When the 48-digit key is permanently lost and unavailable on any USB or cloud account, the only remaining method to bypass the lockout is formatting the drive via the diskpart utility, which completely erases all files unless subsequently salvaged by data recovery software like Wondershare Recoverit.
Ask AI for a summary
 ChatGPT
 Perplexity
 Gemini
 Claude
 Grok
Grok
The problem you’re describing happens all the time to Dell users. Don’t worry, all your files are still there, and you will be able to access them. But first, we must try to find the BitLocker recovery key for your Dell laptop – or the way to bypass it and recover the encrypted data.
What Is a BitLocker Recovery Key on Dell?
BitLocker is Microsoft’s native encryption system built into every Windows OS since Vista. It uses advanced encryption protocols to protect your hard drive, so it can’t be easily bypassed. To unlock a BitLocker encryption, you need a password or recovery key.
Can Dell help you with this? Absolutely no. Your BitLocker credentials are between you and BitLocker. Dell doesn’t have your BitLocker recovery key and can’t provide you with one.
📊 BitLocker Key Search Matrix: Where is mine?
| Setup Scenario | Likely Key Location | Action Required |
| New Dell (Personal) | Microsoft Account (Cloud) | Log into account.microsoft.com. |
| Old Dell / Pro User | USB Flash Drive | Search for a .txt file named "BitLocker Recovery Key." |
| Office/Work Laptop | Azure AD / IT Admin | Access via portal.azure.com or helpdesk. |
| DIY Encryption | Physical Printout | Search your files for a paper with the 48-digit code. |
| Custom Windows Install | Active Directory | Check with your Domain Administrator. |
How BitLocker Encryption Can Be Started Automatically
Your Dell laptop wasn’t encrypted with BitLocker when you bought it, but the encryption may have been automatically enabled the moment you first activated Windows OS. If this was the case with your Dell, the recovery key was automatically saved to your Microsoft Account.
BitLocker is automatically enabled in all devices using Windows 8.1 and above – as long as you use a Microsoft Account. That includes all computers that Dell currently ships. So it’s common to see a great number of users have the problem with Windows 10, the most used operating system in the world.
Another reason for seeing BitLocker’s recovery screen could be that you’ve updated the BIOS on your Dell. Updates and similar changes to the computer can trigger BitLocker to prompt a recovery key, such as disabling Secure Boot, disabling TPM, or performing a push-button reset.
How to Bypass BitLocker Recovery Key on Dell Laptop
There are several ways to deal with a Dell laptop when it is asking for a BitLocker recovery key that you don’t remember saving. Of course, finding your Dell laptop recovery key is always the best solution. If that isn’t possible, there are other things you can try. Let’s go step by step.
Method 1: Disable BitLocker Encryption (If You Can Access Windows)
If BitLocker denies access to a hard drive on the computer you still have access to, you can simply turn it off from the Control Panel. That doesn’t apply to users who cannot log into Windows OS because they get blocked with BitLocker’s recovery screen after they turn on their PC.
- Go to Start and search for Control Panel. Click on the app to open it.
- When you enter the Control Panel app, choose System and Security.

- Select BitLocker Drive Encryption.

- Click on Turn off BitLocker and then Decrypt the Drive to unlock it.

And that’s it. BitLocker encryption will be disabled after you restart the computer, and you will again have access to your hard drive and all the files you’ve stored there.
Method 2: Find the BitLocker Recovery Key
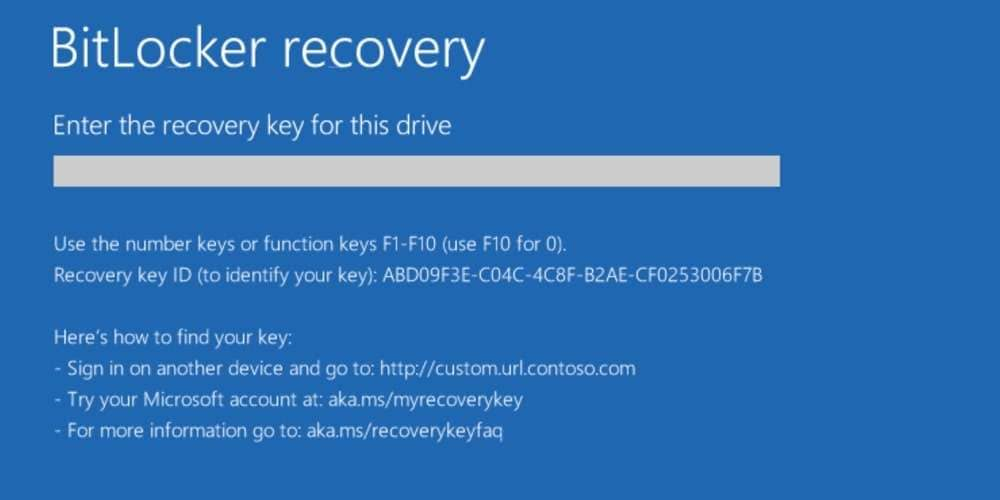
If you get greeted by BitLocker’s blue screen every time you start your PC, it’s best to look for your recovery key. Remember, if you’re using a computer that belonged or belongs to somebody else, you should contact that person and ask for their BitLocker credentials.
If you’ve bought your Dell laptop in a store and installed the Windows OS using your Microsoft Account, the BitLocker recovery key is in your possession. You just need to locate it.
There are four possible places your BitLocker recovery key could be saved:
- Your Microsoft Account.
- A TXT. file on a USB drive.
- On a physical printout.
- The Azure AD Account.
If you don’t know where to start, we’ll help you look. Now, we will introduce steps for recovering your Dell BitLocker recovery key from each of these four possible locations.
How to Find BitLocker Recovery Key on Your Microsoft Account
As mentioned before, Windows automatically enables BitLocker encryption on newer devices with Windows OS 8.1 and above. In this case, the recovery key is automatically saved on your Microsoft Account. It’s the easiest way to retrieve your key, so let’s try that first.
- Go to Microsoft Online and sign in using your Microsoft Account password.

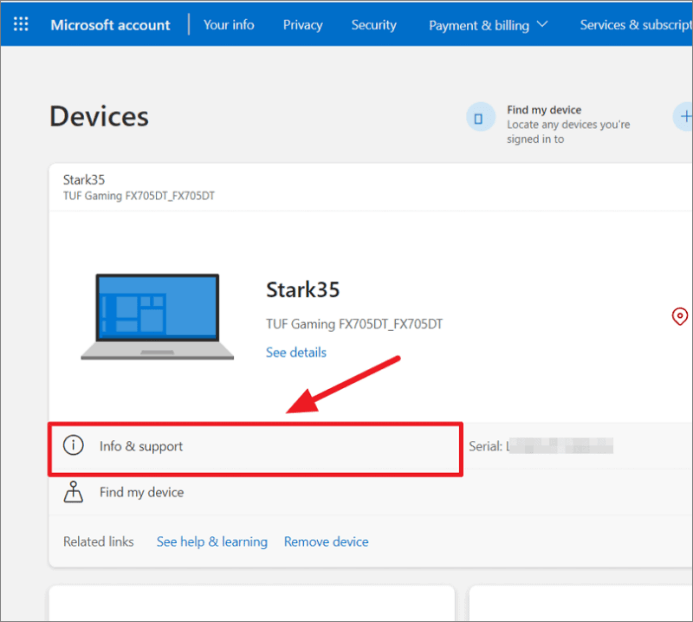
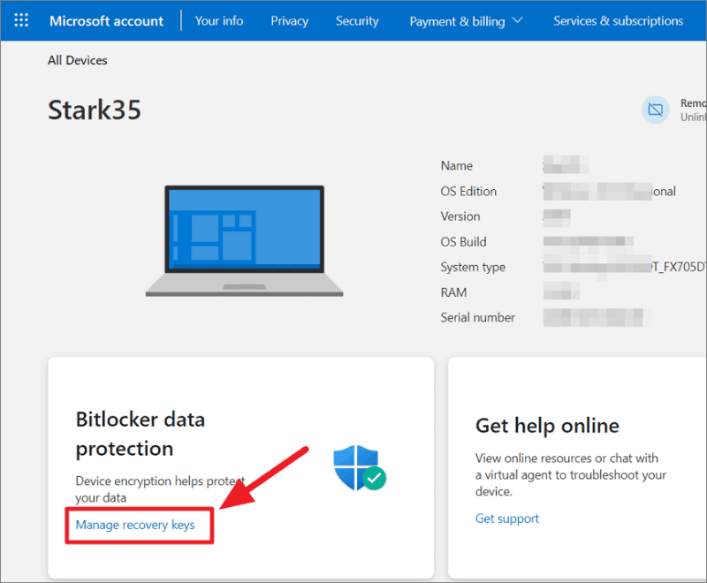
- Find your Dell computer on the Devices page and click on Info & Support.
- Navigate to BitLocker Data Protection and click on Manage Recovery Keys.
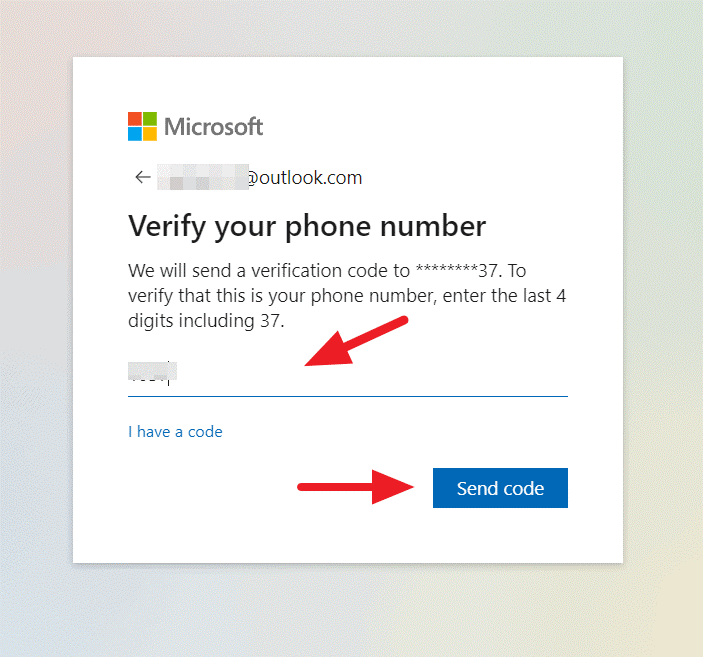
- Complete the authentication process. First, you’ll need to verify your phone number and then enter the OTP (one-time password) code that Microsoft will send you as a text message.
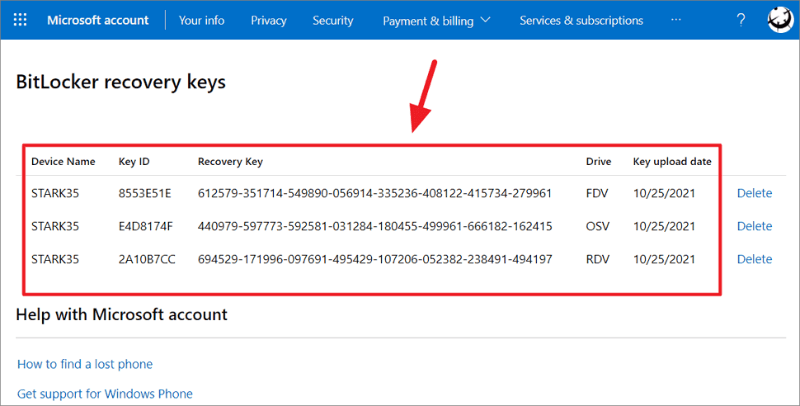
- When you pass the verification process, a list of recovery keys for different devices on this account will appear. Find your Dell recovery key based on your device ID.
How to Find BitLocker Recovery Key Saved on a USB Drive
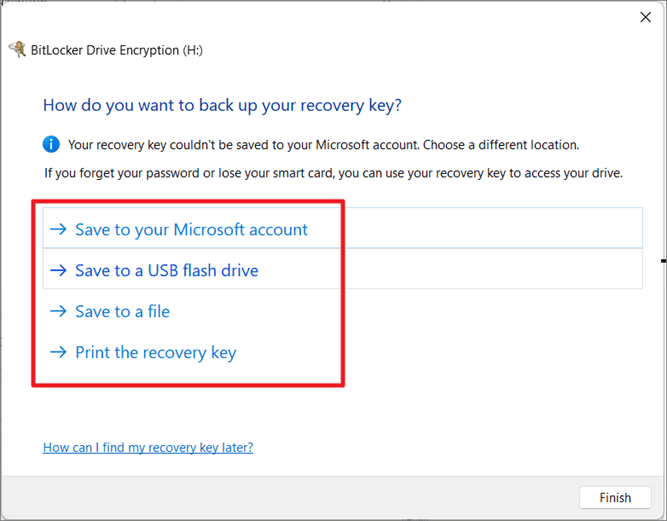
If there’s a possibility that you’ve enabled BitLocker encryption on your Dell yourself, but that was too long ago to remember the specifics, let us refresh your memory. After you’ve set up BitLocker, Microsoft has provided the following options for storing your recovery key:
If you’ve searched for your key on your Microsoft Account and it’s not there, it could be on a USB flash drive you use for backup or as a temporary storage device. Look it up.
Many users get stuck on this step after finding their designated USB drive because there’s nothing on it. They can remember saving the recovery key on the USB, but now the key is lost, which calls for data recovery. A reliable data recovery software like Wondershare Recoverit can help you here.
- Manages over 500 data loss situations, such as deletion, formatting, and disk corruption.
- The user-friendly interface allows you to recover data in just a few clicks.

- Download Wondershare Recoverit on a working PC and plug in the USB drive.
- Look under Hard Drives and Locations > External Devices and select the USB.

- Monitor the scanning process on the screen. Recoverable files will show up.

- When Wondershare Recoverit finds your recovery key, click on the file to preview it.
- After ensuring that’s what you’ve been looking for, click the Recover button.
- Choose a safe location for saving your BitLocker recovery key and click Recover.
Now that you have the necessary credentials, go back to your Dell and enter the recovery key when prompted by BitLocker. Your PC will start as usual, and you’ll get to your files.
How to Find BitLocker Recovery Key on a Physical Printout
Many users find it easier to keep passwords on printouts even though data security experts advise against saving your credentials in a physical form. If you can relate, there’s a chance you’ve printed out your key on a paper document and stored it somewhere safe.
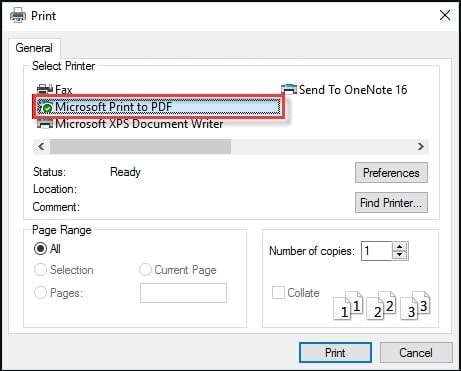
There’s another possibility here. While you were printing the recovery key, you might have chosen the Microsoft Print to PDF option and turned your BitLocker recovery key into a PDF document first. In this case, the PDF file with the recovery key might still be on your computer.
If you can log into Windows, you can use Wondershare Recoverit to scan your PC and dig up the PDF using the same process as before. Only this time, you need to scan a local disk.
How to Find BitLocker Recovery Key in the Azure Account
This method will be helpful only if your Dell computer is company-owned and you’ve brought it home from work. If so, you’ll have to contact a designated IT specialist on your team because only the system administrator can access your company’s Azure Active Directory.
You’re the designated IT guy? If you have system administrator-level access to Azure AD but you don’t know how to do this, follow these steps to find the lost BitLocker recovery key:
- Sign in to your Microsoft Azure Account as a system administrator.
- Navigate to the Azure Active Directory and select Devices on the left.
- In the sidebar on the right, click on All Devices and find your device.

- Click on your device. The recovery key is at the bottom of the Properties page.

- If you don’t know the device name, you can search the Azure AD for the BitLocker Key ID displayed on the blue recovery screen. You need to go back to Devices to do this. Click on BitLocker Keys in the sidebar on the right and enter your key ID.

Method 3: Retrieve the Key Using the Command Prompt
One of the ways to retrieve a lost or misplaced BitLocker recovery key is from the Command Prompt. However, this method requires you to log into Windows or have a bootable drive or disk with full Windows installation files. You need this to boot your PC around the locked drive.
- First, you need to change the BIOS boot sequence on your computer. Start the PC and press F2 several times to access the BIOS startup utility. Go to the Boot tab and use the instructions on the right to change the boot order. The bootable drive needs to be first on the list.

- Exiting BIOS will restart your computer. Make sure the bootable drive is in for the next startup. The Windows installation mode will be activated, and you’ll have to enter the language and other preferences and click Next to continue.

- On the next step, click on Repair your computer.

- On the Choose an option page, select Troubleshoot.

- Select Advanced options and click on Command Prompt.

- When you’re in the Command Prompt, run the following command and hit Enter:
manage-bde -status.This command will give you an overview of the BitLocker status for all your drives, and you’ll be able to see the letter of the encrypted drive. - The next command you need to type in and hit Enter is:
manage-bde -protectors H: -get. The letterHin the command line is a placeholder for the letter of your encrypted drive. So when you enter the command, replace theHwith the letter of the hard drive you need to unlock.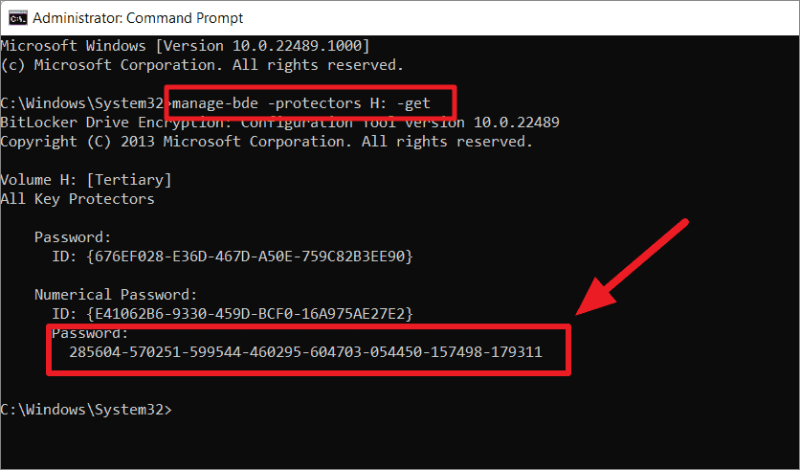
Method 4: Change Bios Settings
If previous methods didn’t help and you still can’t find your BitLocker recovery key, don’t panic. There are a couple of options left. The next step is to modify the BIOS settings on your Dell computer and hope that changing the boot order and enabling TPM and Secure Boot will help.
- Start your computer and keep pressing F2 until you enter BIOS.
- Like before, go to the Boot Sequence and change the order of bootable devices using the instructions provided on the right. This time, UEFI needs to be in the first place.
- Now go to the Security tab and select and enable TPM 2.0 Security (Firmware TPM).
- Next, enable the Secure Boot option. It’s just below Firmware TPM.

- Exit BIOS and wait for your computer to restart and boot to Windows.
Many 2025 and 2026 Dell BIOS updates (specifically for XPS and Latitude series) may inadvertently toggle TPM 2.0 to "Hidden" or "Off." If BitLocker appeared suddenly after a SupportAssist update, ensure the TPM PPI Bypass is disabled in BIOS, as this often triggers the recovery screen by signaling a "Security State Change."
Method 5: Format the Drive and Reinstall Windows
Changing the BIOS settings didn’t work? Unfortunately, that was our last resort. If you can’t bypass the BitLocker recovery screen and boot into Windows because your recovery key is definitely lost and everything else has failed, the only remaining option is to reformat the drive.
- Run the Command Prompt using a bootable drive or disk, like in Method 3.
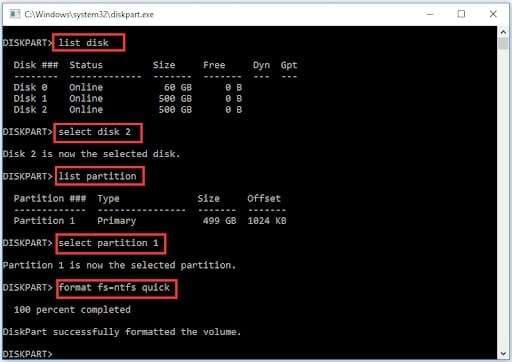
- Once in the Command Prompt, type in the following string of commands and press Enter after each one:
diskpart

list disk

select disk * (replace * with the disk number that contains the BitLocker encrypted drive)

list partition

select partition * (replace * with the partition number of your encrypted drive)

format fs=ntfs quick
Please note that doing this will completely erase your encrypted drive, deleting all your important files in the process. If you can’t back them up because you can’t access the drive without the recovery key, use Wondershare Recoverit to recover files from the formatted disk.
Recovery Success After Formatting
If you are forced to format your Dell laptop to bypass the BitLocker screen, your files are not necessarily gone forever.
| Feature | Recoverit Benefit for Formatted Drives |
| High-Level Scans | Bypasses the new file system to find "signatures" of your old photos/docs. |
| Formatted Disk Recovery | Specifically optimized for NTFS/FAT32 drives that have been "Quick Formatted." |
| Deep Sector Analysis | Locates data that wasn't overwritten by the new Windows installation. |
| Preview Feature | Allows you to verify your documents before committing to full recovery. |
🏁 Final Summary: Dell BitLocker Resolution Checklist
- Verify the Key ID: Ensure the "Recovery Key ID" on your screen matches the one in your Microsoft Account.
- Try "ESC" for Options: Sometimes pressing ESC during the blue screen allows you to skip a drive if you have multiple partitions.
- Check for Print-to-PDF: If you saved the key as a PDF on a USB drive, use Recoverit to find deleted documents on that USB.
- BIOS Safety: Always try resetting BIOS to "Load Optimized Defaults" before resorting to a wipe.
- Post-Format Recovery: If you reinstalled Windows, run Recoverit immediately to prevent new data from overwriting your old files.
Conclusion
If you’re still wondering how to bypass the BitLocker recovery key on your Dell laptop, the truth is there’s only so much you can do. BitLocker wouldn’t be a very good encryption system if there were an easy way to go around it. Finding the forgotten key is usually the best shot you have.
Unfortunately, these types of scenarios may result in data loss. If you end up losing your files, don’t despair. Usually, there’s a way to get your data back with Wondershare Recoverit.
FAQ
-
Should I use BitLocker encryption on my Dell laptop?
If you keep sensitive data on your PC or simply want to protect your privacy, the answer is yes – you should definitely use BitLocker encryption on your Dell laptop. To prevent BitLocker lockouts, store your recovery key in a safe location and remember to regularly back up your data. -
How to manually enable BitLocker on my Dell computer?
Follow these steps to enable BitLocker on your Dell PC:1. Go to Start and search for Manage BitLocker; 2. In the BitLocker Management section, click Turn on BitLocker; 3. Choose one of three options for saving your Dell recovery key; 4. Choose how much of your drive you want to encrypt and click Next; 5. Choose which encryption mode to use and click Next; 6. If you are ready to encrypt the drive, click on Continue and restart the PC.
Before you proceed with BitLocker encryption, make sure your recovery key is saved to a safe location. You should know that this process can take a while if your drive is full. There’s a chance you won’t be able to use your PC in a few hours. -
What is the safest way to save my Dell BitLocker recovery key?
You can save your Dell BitLocker recovery key to your Microsoft Account, as a .txt file, or you can print it out. Depending on your user habits, all three ways can be equally safe or insecure. In general, keeping a physical printout of your recovery key is widely considered a bad practice since paper documents can be easily lost, misplaced, damaged, or stolen. A similar can be said about .txt files. However, digital files are easier to restore if they get lost. For most users, the safest way to keep a BitLocker recovery key is on their Microsoft Account.


