If you're a proud owner of an Acer laptop, you're probably familiar with common problems with Acer computers, including file corruption and data loss. D2D recovery or disc-to-disc recovery is a reliable Acer recovery method that can help you recover your Acer computer, including all your data stored on the device.
Today, we'll delve deeper into D2D Acer recovery, including what you should do before and the best D2D recovery methods on Acer. Let's scroll down.
In this article
D2D Acer Recovery Meaning & Reasons
So, what is D2D Acer Recovery? D2D Acer recovery means disk-to-disk recovery of the Acer operating system. It allows you to repair and recover your Acer OS with a recovery disc or partition (also known as D2D recovery).
You have several D2D recovery disc options to choose from:
- Acer recovery CD;
- Acer recovery DVD;
- Acer recovery USB.
Typically, you receive one of these recovery discs when you first get your Acer machine. You can also create a recovery disc using Acer eRecovery Management. If you can't create a disc for Acer recovery, visit the Acer support center and download your Acer recovery disk from the official source.
The biggest reason for D2D Recovery is ensuring the proper function of the Acer eRecovery Management (ARM) utility. If the D2D recovery option is disabled in the computer's BIOS, the utility may not work, or you may experience problems with Acer Recovery Management.
There are three common problems of Acer eRecovery Management:
- 🐌ARM gets stuck – if ARM freezes during the Acer recovery disk-creating process, you may be facing file or disk corruption.
- 🚨ARM stops working – if the D2D recovery option is disabled in BIOS, your Acer computer won't be able to load ARM.
- 👀Forgotten ARM password – if you can't remember your ARM password, reboot your Acer computer to change the password.
Enabling D2D recovery in your computer's BIOS can fix all these issues, including Acer file corruption and data loss.
Things to Do Before Making a D2D Recovery on Acer
Backup Your Files
If you have an Acer laptop with Windows 10, you can easily back up all your laptop data before attempting D2D Acer recovery. Download Acer Recovery Management for Windows 10 system, install and launch it.
Have a USB sized 16 GB or larger ready. Connect the USB to your device and follow the steps below to back up your Acer files in Windows 10.
- Open Acer Care Center and click the Backup tab;
- In the Create Factory Default Backup section, select Get Started;

- Tick the Back up system files to the recovery drive box and click Next;

- Select the USB drive and click Next;

- Click Create to back up your Acer files, then click Finish to complete the process.

Enable D2D Recovery in BIOS
The next step is to access BIOS on your computer and enable the D2D recovery option.
Here's how:
- Restart (boot) your computer;
- When it starts booting, press the F2 key to access BIOS;
- Use the arrow keys to navigate to the Main tab;
- In the Main section, look for the D2D Recovery option (it should be right under the F12 Boot Menu);
- Check its status (Enabled or Disabled);
- If the option is disabled, select it, hit Enter, then select Enabled;

- Press F10 to save your changes and exit BIOS;
- When the Acer logo appears, press Alt and hit F10 again.
These steps should enable D2D Recovery on your Acer computer. You're now ready to perform D2D data recovery on your Acer device. Below are the best D2D Acer recovery methods you should try.
Two Methods for Making a D2D Recovery on Acer
Here are the top two methods for D2D Acer Recovery.
Do Acer D2D System Recovery Using Recovery Partition
Acer Recovery partition (D2D recovery partition) is a special built-in partition with every Acer device. It's typically hidden by default. It facilitates system recovery by restoring it to its default state.
Whether you're experiencing Acer system issues due to software-related problems or a virus/malware infection, the recovery partition can help restore your system to normal.
Here's how to use the recovery partition for D2D Acer recovery.
- Restart your computer;
- While it's rebooting, hit Alt and then keep pressing F10 until you see the "Windows is loading files" screen;
- When your Acer boots with the D2D recovery partition, navigate to the Select Restore Type tab;
- Select Completely Restore system to Factory Defaults;

- Enter your password to confirm, select the restore destination, and hit Yes to initiate the recovery process;
- Click Yes to complete the process;
- Follow the onscreen instructions to customize your settings.
Perform Acer D2D System Recovery with Reset Your PC
The Reset Your PC option is another way to conduct D2D Acer Recovery on your device. You'll need a recovery disc for this method to work. Have the disc with you and follow the steps below.
- Turn off your computer;
- Power on your device and allow it to start booting;
- Press Alt+F10 when you see the first logo;

- Select your language and navigate to Choose an option > Troubleshoot;

- Select Reset this PC ;

- In the Reset this PC window, select Remove everything;

- Select Just remove my files and click Reset.


Bonus: Easier Way to Make Acer Recovery
If you find the aforementioned methods complicated, we have a simpler solution. You can use an alternative Acer recovery method to get back your files and ensure their safety. You only need a reliable and user-friendly data recovery tool like Wondershare Recoverit.
It's a professional file, data recovery, and backup software for Windows users. It can recover over 1000 file types from over 2000 storage devices across over 500 data loss scenarios. No matter what caused data loss on your Acer computer, Recoverit can restore your files with a 98% success rate using its patented data recovery techniques.
Whether you're dealing with file corruption, file system errors, or virus attacks, you can give Wondershare Recoverit a nice try before starting the acer d2d recovery. This user-friendly recovery tool can repair the damaged files and bring back your data.
Download and install the app on your computer, then follow these steps to make Acer recovery.
- Launch the app on your Windows-operated Acer computer;
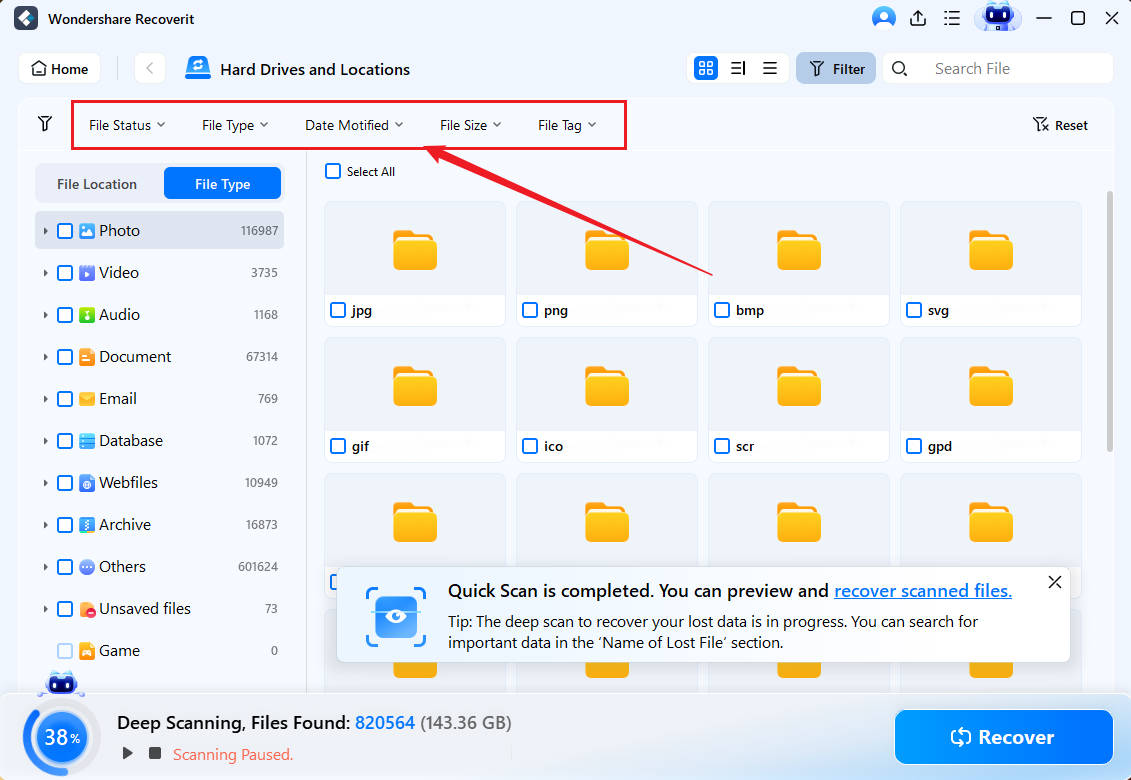
- Navigate the main File Recover menu to Hard Drives and Locations;
- Select a drive to start recovery;

- Click Start to initiate the scanning process;

- Use search filters to locate your Acer files during the scanning;

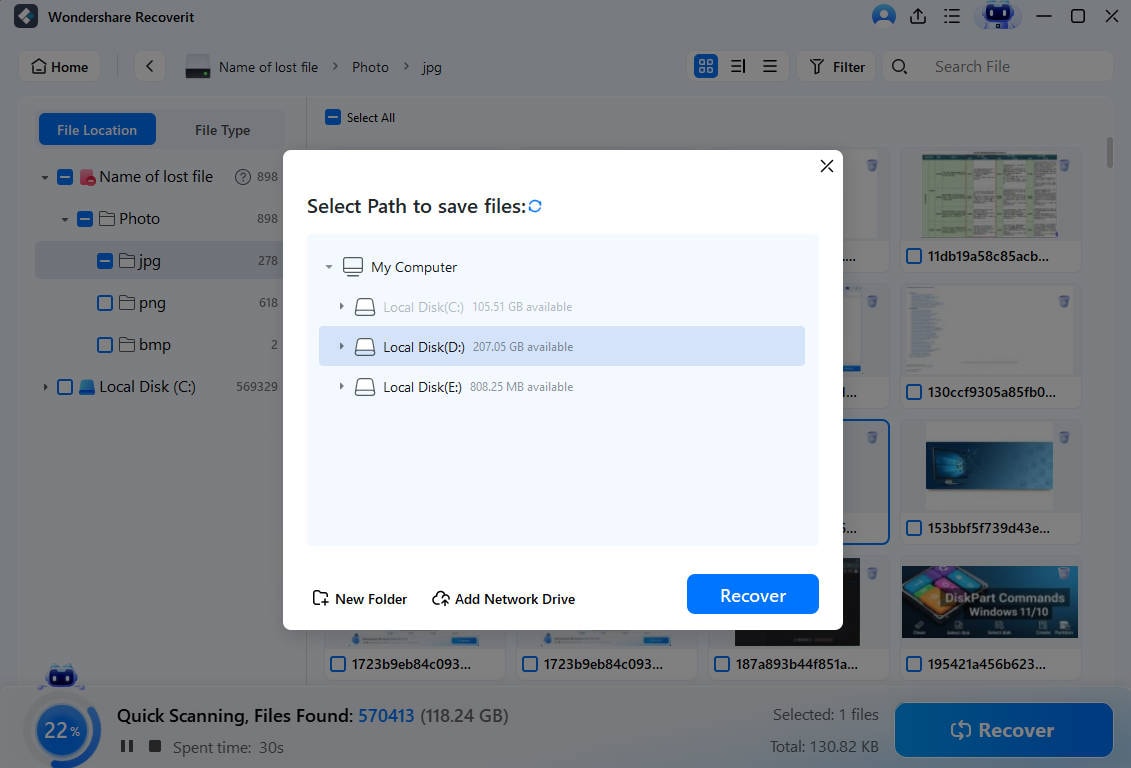
- Click Preview to check the recoverable files before recovery;

- Click Recover to get your files back, then click Save to save the recovered data on your Acer computer.

Conclusion
We've shed some light on D2D Acer Recovery and its benefits and gave you the best recovery methods for the data on your Acer computer. In addition, we also mentioned the best alternative data recovery method to help you recover your precious files in case nothing else works.
In most situations, the two D2D Acer Recovery methods should help get your files back. If they don't work for you, install Wondershare Recoverit to increase your chance of recovering your data and restoring your Acer system.
FAQ
Is D2D recovery safe?
Yes, D2D recovery is a perfectly safe data recovery practice.What are the benefits of D2D recovery on Acer?
D2D recovery on Acer lets you repair file corruption, fix system errors, restore lost partitions, avoid data loss, and mitigate virus/ malware infections.What is the F key for Acer recovery?
Pressing the Alt+F10 keys allows you to boot into the Acer recovery environment and restore your device without the need to login access or your Windows passwords.


 ChatGPT
 Perplexity
 Google AI Mode
 Grok
Grok


