Sometimes, people started initializing their disks, only to figure out later that their data is missing. Due to these scenarios, you may have the question: does initializing a disk erase data? If so, you're in the right place.
We'll answer this troublesome question and teach you how to perform a flawless initialization for the best experience and data preservation.
In this article
What Is Disk Initialization?
Disk initialization is usually performed on new disks and components. This process implies preparing the disk for running Windows and storing your valuable data on it. However, your disk may sometimes experience issues, and you may need to initialize it even after using it for some time.
Initialization will also prepare your disk for formatting, another process that may affect your data experience. If you're curious about what happens with your data in the process, check out the section below for more information.
Does Initializing a Disk Erase Data?
The disk initialization process involves writing or rewriting the Master Boot Record, which partitions your disk and prepares it for further use. However, this process only focuses on the MBR section, so it shouldn't affect your data alone.
However, the process that will affect your data is formatting the drive after the initialization process to make it suitable for your device. Formatting will wipe away everything stored on the disk, so you may lose your essential files.

How to Initialize a Disk Without Losing Data
Here's a step-by-step guide on how to initialize a disk without losing your valuable
Stage 1: Recover Data From the Uninitialized Disk
As mentioned above, you must format the disk to make it compatible with your device and start storing your favorite memories. The best thing you can do is recover your data from the uninitialized disk before you move to the initialization process.
Wondershare Recoverit is among the most potent solutions for all recovery experiences. This tool has been on the market for more than 20 years and currently has over 35 patented technologies and recovery mechanisms, proving its reliability and trustworthiness.
Moreover, it can deal with all data loss scenarios and extract any file type from your disk, so you won't have to worry about leaving data behind. It also has among the best success rates on the market (98%), so you can rely on it during recovery.
The best part is that the app provides advanced safety mechanisms, protecting your sensitive data and protecting it from potential threats.
To retrieve your valuables, go to the official Wondershare Recoverit website, download the tool to your desktop device, and follow the steps below.
- Open the app and click the Hard Drives and Locations option from the main menu.
- Next, select the hard drive you want to initialize.

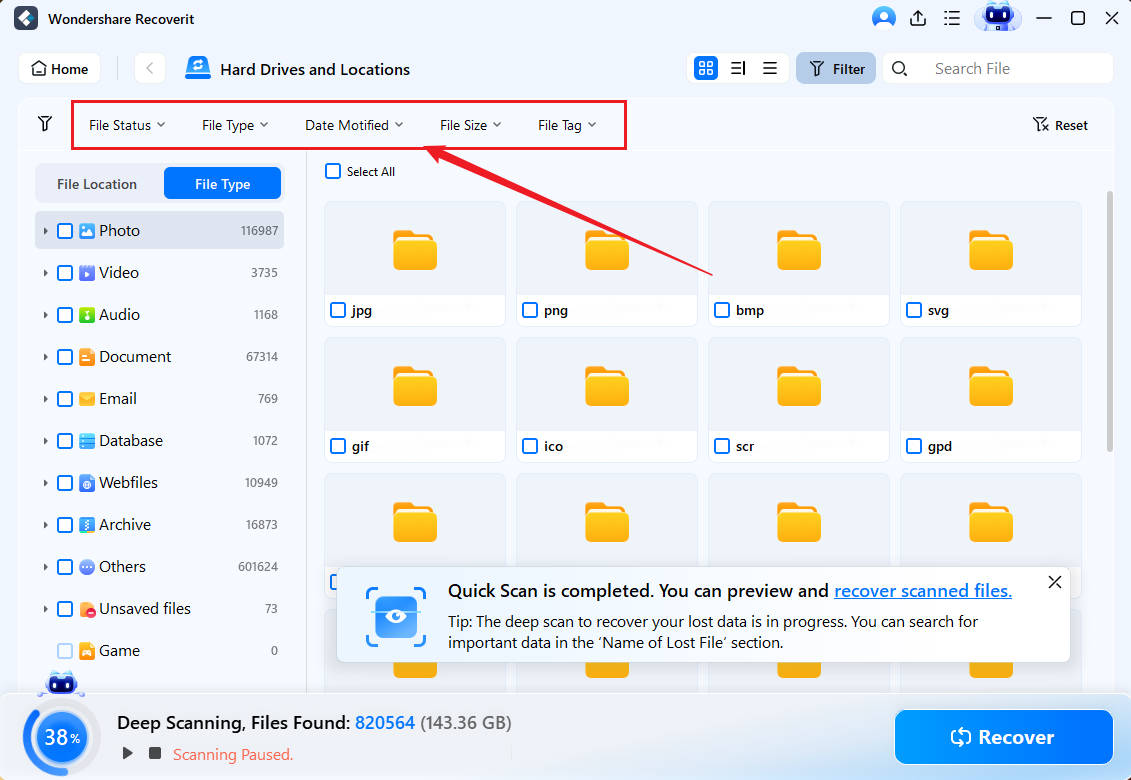
- As soon as you select the location, the program starts scanning. In the next window, you can enable a deep scan, view the progress, or pause the process.

- Filter your files by type, size, and name if needed.

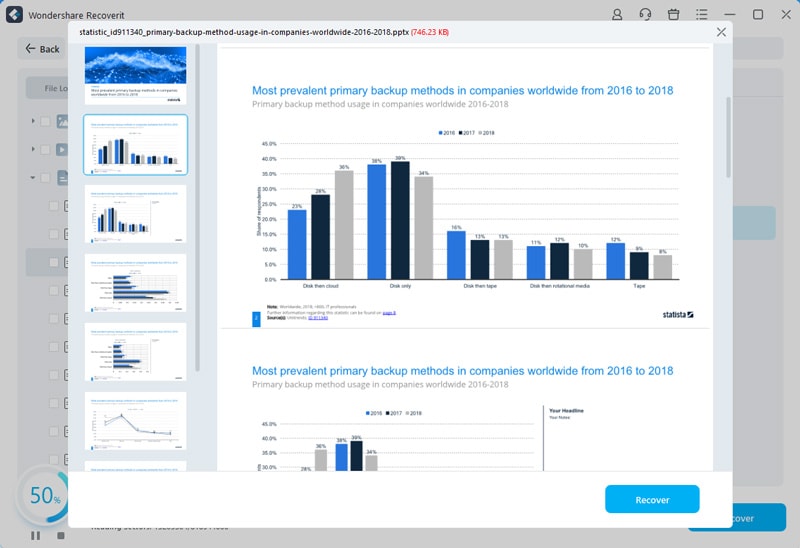
- Once the scanning process is complete, preview the files and select the ones to save. Click the Recover button.

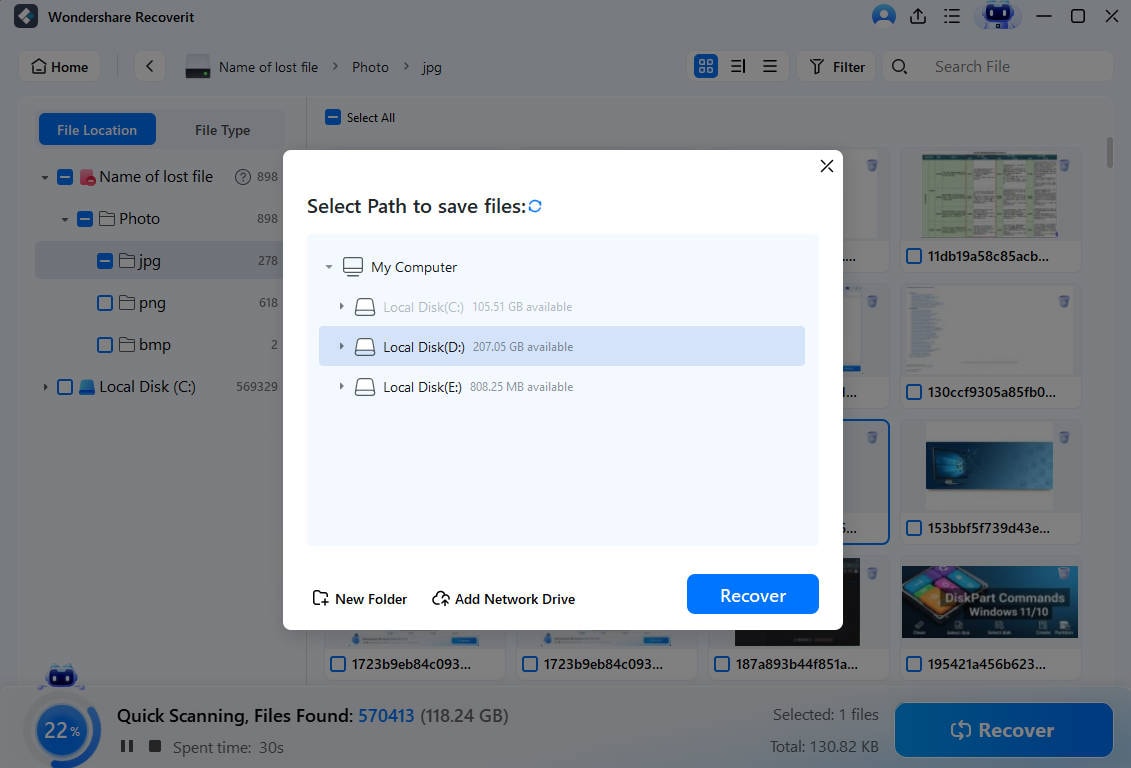
- Choose where to save the files.

And just like that, you've prepared your hard disk for initialization while preserving your valuable files.
Stage 2: Initialize the Disk Using Disk Management & PowerShell
You can try two different methods to initialize your disk. Check out the step-by-step guides below to choose your ideal option and start the experience.
Disk Management
Using Disk Management for disk initialization is straightforward. The user interface is easy to navigate, so you won't have issues on the journey. Here's a step-by-step guide on how to initialize a disk using Disk Management:
- Right-click on the Start button and select Disk Management from the menu.

- Next, right-click on the disk you want to initialize.
- Select Initialize Disk from the drop-down menu.

Once you complete these steps, the program will start initializing the disk, and you can jump into the formatting experience.
PowerShell
PowerShell is a built-in command-line tool for Windows devices, and there's nothing you can't do if you know the proper commands. However, we don't advise using this solution without previous experience since it lacks a graphical user interface and may initially seem confusing.
Here's everything you need to do to initialize a disk using PowerShell:
- Search for PowerShell and select Run as Administrator.

- Next, type the get disk command and press Enter.
- Then, remember the number of the disk you want to initialize.
- Type
initialize-disk x(replace x with your disk number) and press Enter.
Stage 3: Format the Initialized Disk
The last step in the initialization process is to format the disk and prepare it for further use. You can use the Disk Management program we mentioned earlier to reach your goals. Check out this guide to learn how to do it:
- Right-click on the Start button and select Disk Management from the available options.
- Right-click the Unallocated space on your disk and select New Simple Volume from the drop-down menu.

- Click Next in the wizard.
- Set the volume size and click Next.

- Tick the Assign the Following Drive Letter, select the letter, and click Next.
- Tick the Format this volume with the following settings box, and set up the file system and other preferences. Click Next to continue.

- Click Finish after the formatting process.
This process will take a few minutes. You can use your disk normally after completing these steps.
Conclusion
Seeing that something's wrong with your disk can be overwhelming, especially if you need to initialize the disk. The initialization won't affect your data, but the formatting process afterward will wipe away everything on the drive.
We've prepared a detailed step-by-step guide on initializing your disk without losing data. The guide requires you to have a recovery software solution like Wondershare Recoverit by your side to make the process successful.
FAQ
Can I initialize a disk without losing data?
The most reliable method is to recover your valuables before the initialization process. You can use reliable solutions like Wondershare Recoverit to meet your goals and preserve your precious memories.What happens when I initialize a disk?
The initialization process will deal with the Master Boot Record, meaning it won't impact your data. However, you must format the disk afterward to be able to use it, which is when issues occur. For the best experience, we advise using a recovery software solution to protect your valuables.Does reactivating the disk destroy data?
In most cases, the reactivation process shouldn't affect your data. However, people often encounter issues on the journey, so we advise you to have a recovery solution like Wondershare Recoverit at hand in case things go sideways.Do I need to format my disk after initialization?
Yes, formatting is essential since it'll make your disk readable and recognizable. You'll be able to store your memories after initialization, so you must format the disk. If you have data stored on it, we advise you to use Wondershare Recoverit before formatting to save your data.

![[Solved] Does Initializing a Disk Erase Data?](https://images.wondershare.com/recoverit/article/does-initializing-a-disk-erase-data-1.jpg)


