Is your computer crashing during or after the update? You're not alone. Many Windows 11 users are seeing the Blue Screen of Death (BSoD) and similar issues with their devices after running the latest KB5035853 update for Windows 11 23H2 and 22H2 back in March.
Why is this Windows update crashing computers? This guide lists the possible reasons for you. The important thing is, we have a solution. Here's why we think this might be happening, how to deal with the Windows 10/11 crash after the update, and what to do if you lose important data.
In this article
Reasons Why Windows 10/11 Is Crashing Your Computer
Why did your Windows 10/11 crash after the update? We've researched this issue extensively and talked with some users who've shared their experiences online. Based on their testimonies, we have several ideas on what might have gone wrong after this update:
- 🧩Not enough free space on your hard drive;
- 👾The Windows boot partition is corrupted;
- 😭Software conflicts with the previous version;
- 🔌Incomplete installation due to power failure;
- ❗The latest Windows 10/11 update is bug-ridden.
Do any of these reasons sound like a scenario for your case? If yes, you'll be able to fix your PC quickly. If your answer is no, don't panic. Your problem is still solvable. We just have to find the best way to deal with it. Keep reading for the best update fixes.
How to Deal with Windows Update Crashes
Do you have your crashed Windows computer in front of you? Then, let's start. Below, you'll find tried and tested methods for undoing computer crashes after a Windows update. We'll stay with you every step of the way with instructions, screenshots, and explanations.
| Insufficient disk space | Run the Windows Memory Diagnostic tool |
| Software conflicts | Update Microsoft Store apps
Update network drivers Turn off Driver Signature Enforcement Turn off Fast Startup Run DISM and SFC |
| Power failure | Turn off Link State Power Management |
| Faulty update | Rollback the latest Windows update
Reset/reinstall Windows 10/11 |
| Corrupted boot partition | Recover data from unbootable Windows 10/11 |
Update Microsoft Store Apps
Running an update to stop a new Windows update from crashing your PC seems counterintuitive, but hear us out. One of the most common reasons for this problem is software conflict, which happens when two programs can't run simultaneously on the same computer.
If your updated Windows 10/11 crashes after you run a particular app on your computer, that's likely the problem. You can easily fix this by updating your Microsoft Store apps.
- Go to Start and search for Microsoft Store. Click on Open to launch the app.

- Click on the Library icon. It's located in the Microsoft Store's left sidebar.

- Go to Updates and Downloads and hit Update All to update all apps simultaneously.

If you know which app is causing your PC to crash, you can update it individually or uninstall it if updating doesn't help. If this is a third-party app that you can't find in the Microsoft Store, run the problematic app and search for available updates under Help or Settings.
Update Network Drivers
If a latest Windows 10/11 update keeps crashing your computer during the installation process, not after the update has been completed, we suggest you check your network drivers. An OS update requires a stable internet connection, so you need your drivers to be in top shape.
Follow these steps to update network drivers on your Windows:
- Go to Start and search for Device Manager. Click on Open to run the app.

- Scroll down and double-click on Network adapters to reveal your drivers.

- Right-click on each network driver and click on the Update driver option.

- When asked, choose the Search automatically for drivers option.

To get rid of internet connectivity problems, you can also try resetting your WiFi network from Settings > Network & internet > Wi-Fi > Manage known networks. Windows 11 also has a built-in troubleshooter for this. Go to Settings > System > Troubleshoot > Other troubleshooters, click Run next to Internet Connections, and pick Troubleshoot my connection to the Internet.
Run the Windows Memory Diagnostic Tool
In addition to a stable internet connection, OS updates require a certain amount of free memory to store temporary files and perform the installation. The installation could fail if RAM is heavily utilized or faulty, causing a Windows 11/Windows 10 crash after the update.
You can use the Memory Diagnostic Tool to troubleshoot your RAM:
- Go to Start and search for a Memory Diagnostic Tool. Click Run as administrator.

- Choose one of two options: Restart now and check for problems, or Check for problems the next time I start my computer.

- The computer will automatically restart, after which you will see a blue screen with the memory testing process log. The process takes about 20 minutes to half an hour.

- When the Memory Diagnostic Tool is done troubleshooting, the Windows should start as it normally does. If there are any problems with the RAM that require your attention, you will see a pop-up window with test results.
Turn off Driver Signature Enforcement
Both Windows 10 and Windows 11 have a security feature called Driver Signature Enforcement. That prevents your computer from running drivers that are not certified by Windows. Enabled by default, the Driver Signature Enforcement can malfunction due to a faulty update.
You should disable the Driver Signature feature until you figure things out:
- Driver Signature Enforcement must be disabled from Recovery Mode. To launch Recovery Mode, go to Start and click the Power button. Next, click on Restart while holding the Shift key on your keyboard.

- When your computer launches the Recovery Mode, choose Troubleshoot.

- Next, select Advanced Options.

- From Advanced Options, choose Startup Settings.

- Click the Restart button in the bottom right corner.

- Press 7 to select Disable Driver Signature Enforcement.

Don't forget that Driver Signature Enforcement is a security feature enabled by default for a good reason. After you successfully install the update and ensure your Windows is working without hiccups, restart your computer to turn the feature back on.
Turn off Fast Startup
Most people don't know this, but Windows computers never really shut down after you turn them off. The so-called Fast Startup feature, which is in charge of starting Windows as quickly as possible, sends your computer to hibernation mode instead of deep sleep.
Because Fast Startup doesn't refresh kernels (the programs at the core of your computer's operating system), it could clash with a new Windows update - especially if the update is kernel-related. To rule out this possibility, you should turn off Fast Startup. Here's how:
- Go to Start and search for Control Panel. Click on Open to launch the app.
- In the Control Panel, choose Hardware and Sound and select Power Options.

- Click on Choose what the power buttons do in the sidebar on the left.

- Find the Turn on fast startup option and uncheck the box next to it.

The next time you turn off your computer using the Power button, it will go into a complete shutdown mode. After that, you should be able to install the update without trouble.
Turn off Link State Power Management
Link State Power Management is a power-saving feature on your computer that allows you to adjust performance based on user habits. So, for example, if you typically keep your computer plugged in, it's better to disable it because it only slows down its performance.
You should keep this feature on if you rely on your laptop battery a lot. In this case, Link State Power Management ensures optimum performance while preserving your battery life. The only problem is - it also blocks Windows updates for efficiency reasons.
It's easy to enable and disable this option. Just follow the steps below:
- Go to Start and look for Control Panel. Click Open to run it.

- Choose Power Options and select Change Plan Settings.

- Next, click on Change advanced power settings.

- Scroll down until you find PCI Express, and double-click to expand it.
- Double-click on Link State Power Management to expand it and adjust settings.

Depending on how you use your laptop the most - plugged in or charging only when necessary - you can turn both or only one of the options off and set Moderate or Maximum power settings for the other power mode. Or you can switch both to Maximum after the update.
Run DISM and SFC
When the latest Windows keeps crashing after an update, one of the usual suspects for this is system file corruption. While this sounds scary to an average user (even though it could lead to more serious problems), a corrupt file system can be fixed with Windows utilities.
There are two tools you can use for this: SCF and DISM. Follow these steps:
- Right-click on Start and choose Windows Terminal (Admin).
- When you see the Command Prompt window, type in this command and press Enter:
sfc /scannow.
- It will take a while. Wait until you see one of these messages: Windows Resource Protection did not find any integrity violations or Windows Resource Protection found corrupt files but was unable to fix some of them.

- If you receive the latter message, restart your computer and run the command in Safe Mode. If that doesn't work either, try the DISM tool.
- Once again, open the Command Prompt, but this time, run the following command:
DISM /Online /Cleanup-Image /RestoreHealth.
If neither of these commands proves successful, it's time to go deeper. At this point, non-technical and inexperienced users might be better off with professional assistance.
Rollback the Latest Windows Update
If the latest Windows 11 or Windows 10 update keeps crashing your computer no matter what you try, you should uninstall it until you work out the reason. This is usually a simple process:
- Open Settings by pressing the Windows and . keys together.
- Go to System in the left sidebar and choose Recovery.
- Under Recovery Options, find the Previous version of Windows option and click Go back.

 Warning: Rolling back Windows 11 will delete all apps and programs you installed after the update. If you have important stuff that you can't afford to lose, back them up first.
Reset/Reinstall Your Windows 10/11
Despite buggy updates, Windows is a sophisticated operating system that lets you fix a wide range of issues locally. One of the best features of this version is a new reinstall option that allows you to download and run the same version of Windows without losing files.
This option is called Fix problems using Windows Update. Follow along:
- Go to Start and open Settings.
- Click on System on the left sidebar and select Recovery.
- Find the Fix problems using Windows Update option and click Reinstall now.

- Check the box next to Automatically restart my PC 15 minutes after installation and hit OK.

There's an alternative way to reinstall a problematic Windows 10/11 update, but it involves losing your apps and settings (while preserving other files). You will find this option in System > Recovery, as well. It's simply called Reset this PC. After you click on it, you'll be asked to choose between keeping your files (but wiping out apps and settings) and removing everything.
Bonus: How to Recover Data When Your Windows 10/11 Update Crashes
Update crashes are a terrible nuisance, but they are nothing compared to losing important files from your PC. Could a system crash triggered by a buggy Windows 10/11 update cause data loss? Absolutely! And in more ways than one! Sudden crashes can damage the operating system, leading to file system corruption and other problems. That's why regular backups are essential.
If you lose files in the aftermath of an update failure or forget to perform a backup before you roll back or reset the latest update, don't despair. We have just the right solution for that. Wondershare Recoverit is a powerful tool for data recovery in this situation.
- Manages over 500 data loss situations, such as windows crash after update, deletion, formatting, and disk corruption.
- The user-friendly interface allows you to recover data in just a few clicks.

You can recover lost pictures, videos, documents, and more in a few steps:
- Download Wondershare Recoverit Windows from the official website.
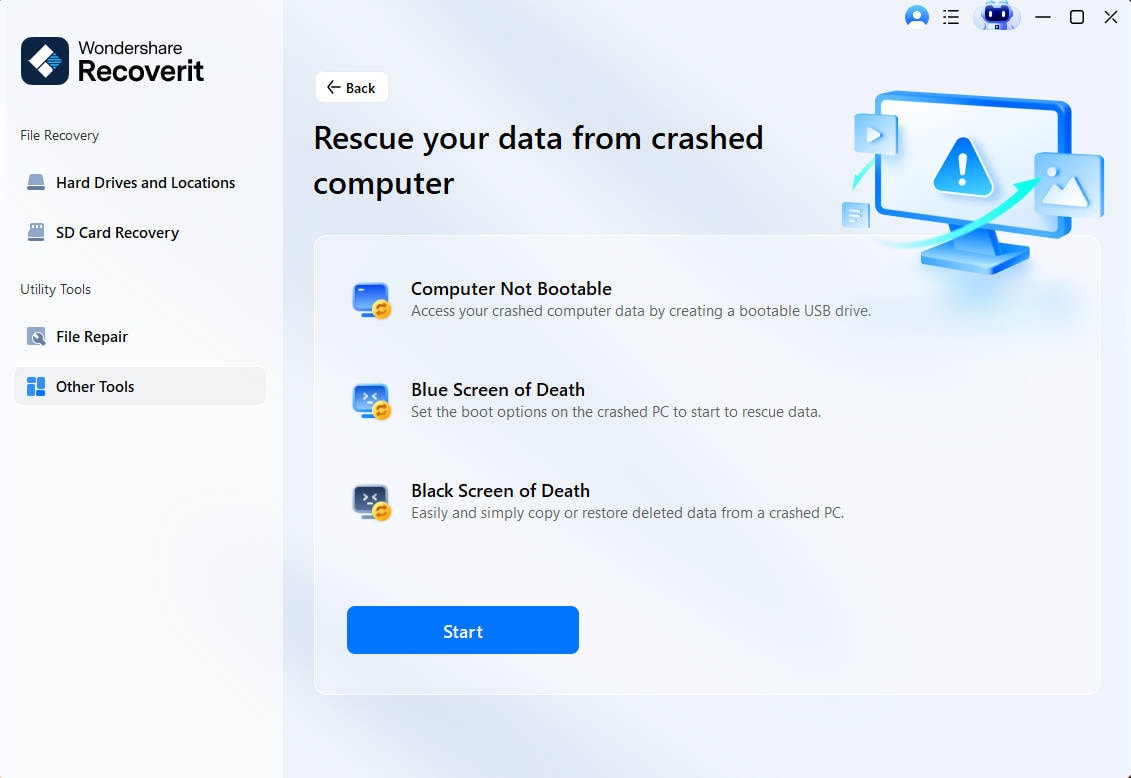
- Install and launch Recoverit. Select System Crashed Computer from the sidebar on the left and click the Start button to initiate the process.

- Prepare another working computer and an empty USB drive because you will need to create a bootable media. Connect the USB to the computer before you continue.
- Select the drive to create a bootable media and click the Create button.

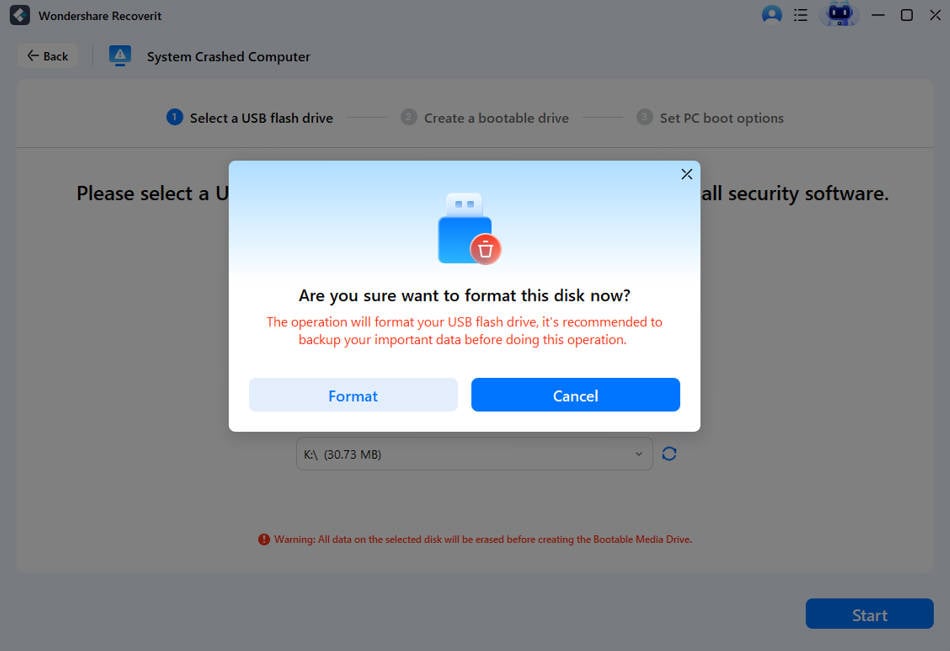
- Recoverit will first format your USB to ensure it's empty. If you have something on it, this is a good time to back it up. When you're ready to continue, click Format.

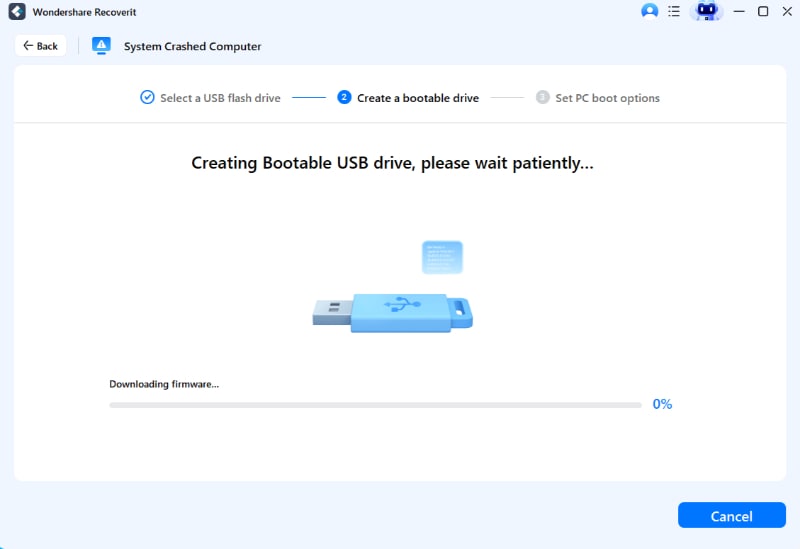
- At this step, Recoverit will turn your USB into a bootable drive. This is an automatic process, so you don't have to do anything but wait patiently.

- When this process is done, connect the USB to your crashed computer and adjust the BIOS to boot from the USB drive.
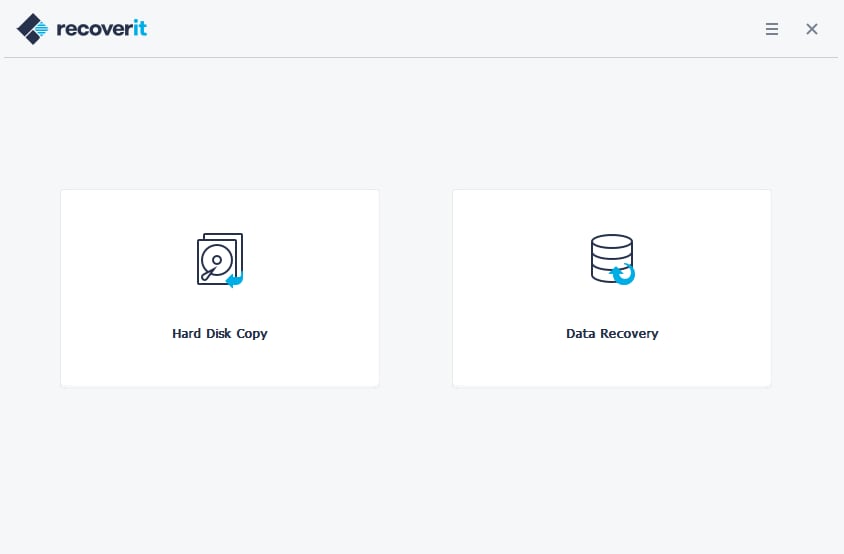
- After your computer boots from the USB bootable drive, select Data Recovery and choose a disk for Recoverit to scan. The scanning results will be in shortly, depending on the volume of data you have stored on the disk.

- To recover data from the disk, choose a location to save recovered files and click the Recover button.
Recoverit can bring back more than 1000 types and formats of data and files, so don't worry if you have obscure file formats on your PC. No matter what the real reason behind the update failure is, it will use its powerful scanning tech to dig up and recover your data safely.
Conclusion
When your Windows keeps crashing after an update, there are several things you can try before you decide to call a professional. In many cases, the update gets shut down by an existing app, program, or setting. Try to identify what triggers the crash and update or disable it.
Sometimes, the Windows update closes immediately without any obvious reason. In this case, you can try updating network drivers, running the Windows Memory Diagnostic Tool, or executing SFC and DISM commands to rule out connectivity, memory, or file system issues.
Finally, you can roll back, reinstall, or reset Windows if nothing else works. That might lead to some data loss, so watch out! If you don't back up your files in time, Wondershare Recoverit can help you retrieve lost files. See? Take a deep breath. There's a solution for everything!
Try Wondershare Recoverit to Get Vital Data Back When Your Windows 10/11 Update Crashes

FAQ
Can Windows updates cause problems?
Yes and no. Windows updates are notorious for causing various problems, such as system crashes or file loss. However, you should keep in mind that this rarely happens because the update is buggy. Much more often, a failed update is the consequence of a pre-existing issue, like file system corruption, a faulty app, or a setting that's fighting against the new update.Is Windows 11 23H2 causing crashes?
There have been a dozen cases of Windows 11 users reporting system crashes due to a 23H2 and 22H2 cumulative update, mainly on Reddit. These users reportedly had issues such as the Blue Screen of Death, stuttering, and poor performance.Why is my PC suddenly crashing a lot?
Some frequent reasons that might explain sudden crashes on your PC are overheating, hardware and software incompatibility, system bugs, software corruptions, and more.


 ChatGPT
 Perplexity
 Google AI Mode
 Grok
Grok


